
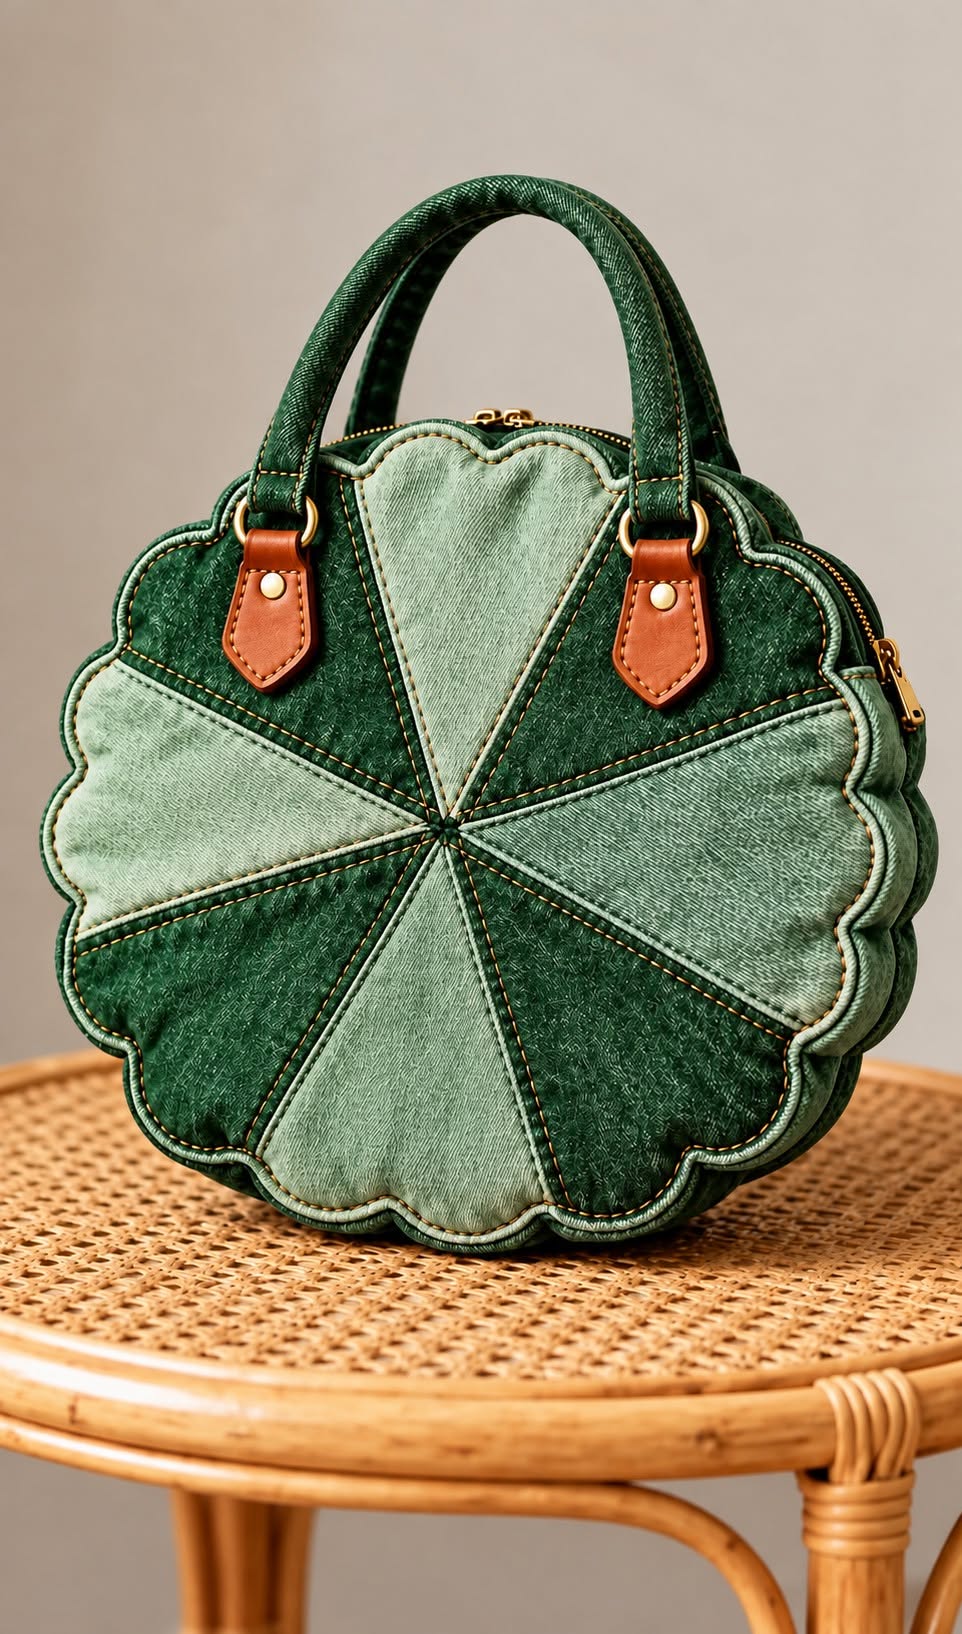
The Denim Bag with Scalloped Edge Pattern is a beautiful sewing project that combines the casual character of denim with the softness of a rounded, flower-inspired silhouette. The bag shown in the reference image stands out because the front is divided into alternating light and dark denim sections, creating a dimensional pinwheel effect that immediately draws the eye. Its curved outer edge gives the project a handcrafted personality, while the sturdy handles and hardware add a polished finish that makes the bag look suitable for everyday use. This type of design is especially appealing for sewists who enjoy turning practical materials into something creative, useful, and visually distinctive.
One of the best features of the Denim Bag with Scalloped Edge Pattern is its versatility. You can make it with new denim yardage, recycled jeans, leftover fabric pieces, or a combination of different blue tones. Using contrasting shades gives each segment of the front panel more definition and helps reproduce the dimensional appearance seen in the inspiration photo. Although the finished bag looks elaborate, the construction can be broken into manageable stages: preparing the pattern, assembling the decorative front, creating the rounded outer shape, stabilizing the body, adding the zipper and handles, attaching the lining, and completing the final topstitching.
This tutorial explains a practical way to recreate the overall style of the photographed bag rather than claiming exact measurements from the image alone. A finished size of approximately 32 to 36 cm wide and about 30 to 34 cm high works well for this shape, but the pattern can easily be enlarged or reduced. The most important elements of the Denim Bag with Scalloped Edge Pattern are the segmented front panel, scalloped perimeter, strong interfacing, neat topstitching, secure handle attachments, and a clean interior. Taking time with each of these details will help you achieve a professional-looking bag that remains functional as well as decorative.
Preparing the Fabric and Creating the Denim Panel
Begin by choosing several shades of denim fabric. For a look similar to the reference project, combine medium blue, dark indigo, and light washed denim. Two or three contrasting shades are enough to make the segmented design visible. If you are recycling old jeans, select areas without excessive wear, permanent creases, or weak fibers. Wash and dry all recycled denim before cutting so the fabric is clean and has already completed most of its natural shrinkage.
DISCOVER MORE FREE PATTERNS HERE!
Create a paper template for the body of the Denim Bag with Scalloped Edge Pattern. Draw a rounded bag shape approximately 34 cm wide and 32 cm high, then divide the circumference into several broad scallops. The scallops should be smooth rather than extremely deep because gentle curves are easier to sew, clip, turn, and topstitch. Add approximately 1 cm of seam allowance around the pattern unless you prefer to add the allowance after drawing the final shape.
Next, create the decorative front panel. The image suggests a radial arrangement in which wedge-shaped fabric sections converge near the center. You can reproduce this effect by drawing six or eight wedges radiating from a central point. Cut alternating wedges from light and dark denim, remembering to add seam allowances wherever two pieces will be joined. Accurate cutting matters because even small differences can shift the center of the design.
Sew the denim wedges together in pairs using a consistent seam allowance. Press each seam carefully before joining the larger sections. Denim can become bulky where several seams meet, so grading or carefully trimming the seam allowances near the center can improve the final appearance. Press the seams in alternating directions whenever possible to distribute thickness and prevent one bulky ridge from forming.
Once all wedges are assembled, place the paper body template over the completed patchwork panel and cut the scalloped front shape. This method is usually easier than cutting each wedge with its portion of the scalloped edge already included. The finished front should show clean radial lines extending toward the outer curves. If desired, sew a line of contrasting topstitching approximately 2 to 3 mm from each wedge seam to emphasize the patchwork construction.
Prepare the back panel in either solid denim or another patchwork arrangement. The back can be simpler than the front if you want the decorative radial pattern to remain the focal point. Cut matching pieces of stabilizer and lining for both sides of the bag. A medium-to-firm fusible interfacing or bag stabilizer will help the Denim Bag with Scalloped Edge Pattern maintain its sculpted form instead of collapsing when placed on a surface.
Building the Scalloped Shape and Structured Body
The scalloped edge is one of the defining features of this project. Unlike a standard rectangular handbag, the outer seam follows a sequence of rounded curves. This creates a floral or petal-like silhouette. To make the curves symmetrical, fold your paper pattern vertically while drawing one side, then transfer the shape to the opposite side. Balanced scallops make the finished bag look much more refined.
Fuse or baste the stabilizer to the wrong side of the exterior denim panels according to the type of interfacing you are using. Avoid excessively high heat on stretch denim or synthetic stabilizers because they can distort. When working with recycled denim, test the interfacing on a leftover scrap first. Good stabilization is important because the curved perimeter will otherwise be more likely to ripple or lose its definition.
A practical construction method is to use a gusset around the outside edge. Cut a strip of denim approximately 7 to 9 cm wide and long enough to follow most of the bag perimeter. The final width depends on how deep you want the bag to be. A wider gusset creates more interior capacity, while a narrow gusset produces a flatter, more decorative handbag.
Mark the center points and quarter points on both the scalloped panels and the gusset. Pin or clip the gusset gradually around the curved perimeter, matching these reference marks. Fabric clips are particularly useful with several layers of denim because ordinary pins can become difficult to push through thick seams. Sew slowly and stop with the needle down whenever you need to reposition the fabric around a curve.
Clip into the seam allowance along inward curves and trim excess bulk around outward curves without cutting through the stitching. This allows the seam allowance to spread or compress naturally when the bag is turned. Gentle clipping is essential for the Denim Bag with Scalloped Edge Pattern because poorly released seam allowances can cause puckering around the scalloped perimeter.
After turning or completing the appropriate exterior assembly stage, carefully shape each rounded section with your fingers. Press with steam when the denim allows it, using a pressing cloth if necessary. Add visible topstitching around the outer contour if you want the scalloped shape to appear more pronounced. A slightly heavier topstitching thread can enhance the traditional denim aesthetic while also making the construction lines look intentional.
Adding the Zipper, Handles, Hardware, and Lining
A secure top closure makes the Denim Bag with Scalloped Edge Pattern much more practical. A zipper approximately 28 to 35 cm long should work for many bags in this size range, although the exact length should be determined by your finished opening. Choose a zipper with teeth strong enough for handbag use. Metal-look hardware complements denim particularly well, but nylon coil zippers are often easier for beginners to sew.
Prepare two zipper panels or zipper gusset strips from denim and matching lining pieces. Attach the zipper between the exterior fabric and lining so the raw edges remain concealed. Topstitch beside the zipper tape to keep the fabric from rolling toward the teeth. Test the zipper several times before permanently attaching the upper section to the bag because correcting a zipper problem becomes much harder after the lining is installed.
The handles shown in the inspiration image are short handbag-style handles positioned near the upper portion of the bag. You can make fabric handles by folding reinforced denim strips around strong webbing or interfacing. A finished handle width of approximately 2.5 to 3 cm provides a substantial appearance. Reinforce the attachment ends because handles experience significant stress during everyday use.
Hardware can elevate the overall finish. D-rings, rectangular rings, rivets, decorative tabs, and metal connectors can all be incorporated into the design. If you use rivets, place additional interfacing or a small reinforcement patch behind the hardware. Never rely on decorative hardware alone to support the bag; the underlying fabric tabs should also be securely stitched into the structure.
For the lining, choose a tightly woven cotton or lightweight canvas. Cut lining pieces using the same basic shape as the exterior, adjusting slightly if necessary to account for bulky seams. Interior pockets are optional but useful. A simple slip pocket can be made from a rectangle of fabric folded in half, topstitched along the upper edge, and sewn to the lining before the lining sections are assembled.
Join the lining in the same general form as the exterior but leave a turning opening if your construction method requires one. Insert the lining into the Denim Bag with Scalloped Edge Pattern, match the top edges, and stitch carefully around the opening. After turning the bag through the opening, close it with a narrow machine stitch or invisible hand stitching. Press the lining downward so it sits neatly without showing above the zipper.
Final Topstitching, Finishing Details, and Sewing Tips
Topstitching plays an important visual role in a Denim Bag with Scalloped Edge Pattern. It defines the patchwork sections, reinforces construction seams, and gives the bag the familiar appearance associated with quality denim garments. Use a denim needle, slightly longer stitch length, and suitable topstitching thread. Test the tension on several layers of scrap fabric before sewing the actual bag.
When sewing over intersections where several denim seams meet, the presser foot can tilt dramatically. A hump jumper, folded scrap of fabric, or leveling tool can help keep the presser foot horizontal. Sew these bulky areas slowly and avoid pulling the fabric through the machine. Pulling may bend the needle, distort the seam, or cause skipped stitches.
You can personalize the Denim Bag with Scalloped Edge Pattern by changing the number of wedges or adding decorative quilting. Straight-line quilting along the center of each wedge creates subtle texture without competing with the radial design. You could also combine plain denim with printed cotton inserts, although strong contrast should be used thoughtfully so the scalloped silhouette remains the main visual feature.
For a more vintage look, mix naturally faded denim sections. For a cleaner modern version, use evenly colored new denim in two carefully selected tones. The term denim bag pattern refers not only to the external outline but also to the placement of seams, panels, handles, closure, lining, and structural components. Understanding these relationships makes it easier to adapt the project to your own preferred dimensions.
Before considering the bag finished, examine every stress point. Check the handle tabs, zipper ends, gusset seams, and any hardware attachments. Reinforce areas that appear weak with an additional line of stitching. Remove loose threads and gently press the exterior from the wrong side whenever possible. These small finishing steps can dramatically improve the appearance and durability of a handmade bag.
Finally, place a light filling such as folded fabric or tissue inside the bag for several hours to help establish its shape. The stabilizer and structured seams should hold the scalloped contours naturally afterward. Your completed Denim Bag with Scalloped Edge Pattern should combine the relaxed charm of denim patchwork with the polished construction of a structured handbag, resulting in a project that is both decorative and genuinely useful.
Frequently Asked Questions About the Denim Bag with Scalloped Edge Pattern
What kind of denim is best for this bag? Medium-weight denim is generally the easiest option because it provides structure without becoming excessively difficult to sew. Very heavy jeans denim can work, but multiple overlapping seams may become challenging for a domestic sewing machine. Light and medium washed denim are especially useful for creating the contrasting wedges seen in the Denim Bag with Scalloped Edge Pattern.
Can I make this bag from old jeans? Yes. Recycling jeans is an excellent way to create natural color variation. Legs usually provide the largest uninterrupted areas of usable fabric. Avoid damaged sections around knees, pockets, or hems unless you intentionally want a distressed appearance.
Do I need interfacing for a denim handbag? In most cases, yes. Although denim already has body, the rounded scalloped silhouette benefits from additional support. Medium or firm bag stabilizer helps the bag maintain its shape and prevents the front panel from becoming floppy.
How do I sew smooth scalloped curves? Use a shorter stitch length around tight curves, sew slowly, and keep the fabric flat rather than forcing it around the presser foot. After stitching, clip inward curves and trim outward seam allowances carefully. Proper clipping allows the curved edge to relax when turned.
What sewing machine needle should I use for denim? A denim or jeans needle is usually the most appropriate choice. Select the needle size according to the number and thickness of fabric layers. Always begin with a new needle because thick fabrics place more stress on the needle point.
Can a beginner make the Denim Bag with Scalloped Edge Pattern? A patient beginner with basic sewing experience can attempt it, although the project is more demanding than a simple tote bag. Practicing curved seams and zipper installation on scrap fabric first can make the main project considerably easier.
How can I make the center of the patchwork look neat? Accuracy starts during cutting. Keep all wedge seam allowances equal and stitch consistently. Press each seam before joining the next section. When several wedges meet, trim excess seam allowance carefully to reduce bulk while preserving enough fabric for a strong seam.
What size should I make the bag? Approximately 34 cm wide by 32 cm high is a useful starting size for a medium handbag inspired by the reference image. However, you can resize the pattern as long as all related pieces, including the lining, gusset, zipper area, and stabilizer, are adjusted proportionally.
Can I add a shoulder strap? Yes. Add reinforced side tabs with D-rings before assembling the final exterior. A removable shoulder strap can then be clipped to those rings. Reinforcing the tabs with additional stabilizer is important because a shoulder strap transfers significant weight to those points.
How should I clean a finished denim bag? Spot cleaning is often preferable for structured handmade bags because machine washing can affect interfacing, hardware, lining, and shape. If the materials you selected are washable, test all fabrics and stabilizers before construction and follow their care requirements.
Why does my scalloped edge look wavy after sewing? The most common causes are insufficient clipping, stretched fabric, uneven seam allowances, or inadequate stabilization. Carefully reshaping the curves with gentle pressing can improve minor waviness. More severe distortion may require reopening and correcting the affected section.
Can I change the colors while keeping the same pattern? Absolutely. The construction concept can be adapted to black denim, gray denim, colored twill, canvas, or combinations of denim and cotton. The alternating radial panels are what create the visual movement, so contrasting shades are usually more effective than fabrics that are nearly identical.
The Denim Bag with Scalloped Edge Pattern is a rewarding sewing project because it combines several useful techniques in one design: patchwork assembly, curved sewing, stabilizing, gusset construction, zipper installation, lining, handle reinforcement, hardware application, and decorative topstitching. By building the bag gradually and keeping the seams accurate, you can recreate the main characteristics of the inspiration photo while still adapting the dimensions and details to your own sewing style.
The key to a successful result is preparation. Choose compatible denim weights, create a symmetrical pattern, reinforce the structure, carefully assemble the radial front panel, and take extra time around the scalloped curves. Proper pressing and topstitching will help transform the individual pieces into a cohesive, polished handbag.
EASILY FIND THE FREE PDF FOR THIS PATTERN HERE!
Most importantly, this pattern offers plenty of room for creativity. Different denim washes, recycled jeans, contrasting stitching, custom handles, interior pockets, or a removable shoulder strap can make every version unique. If you make your own Denim Bag with Scalloped Edge Pattern, leave your sincere opinion about the project and share any suggestions or creative variations you would add. Your ideas may inspire even more ways to personalize this distinctive denim bag.