
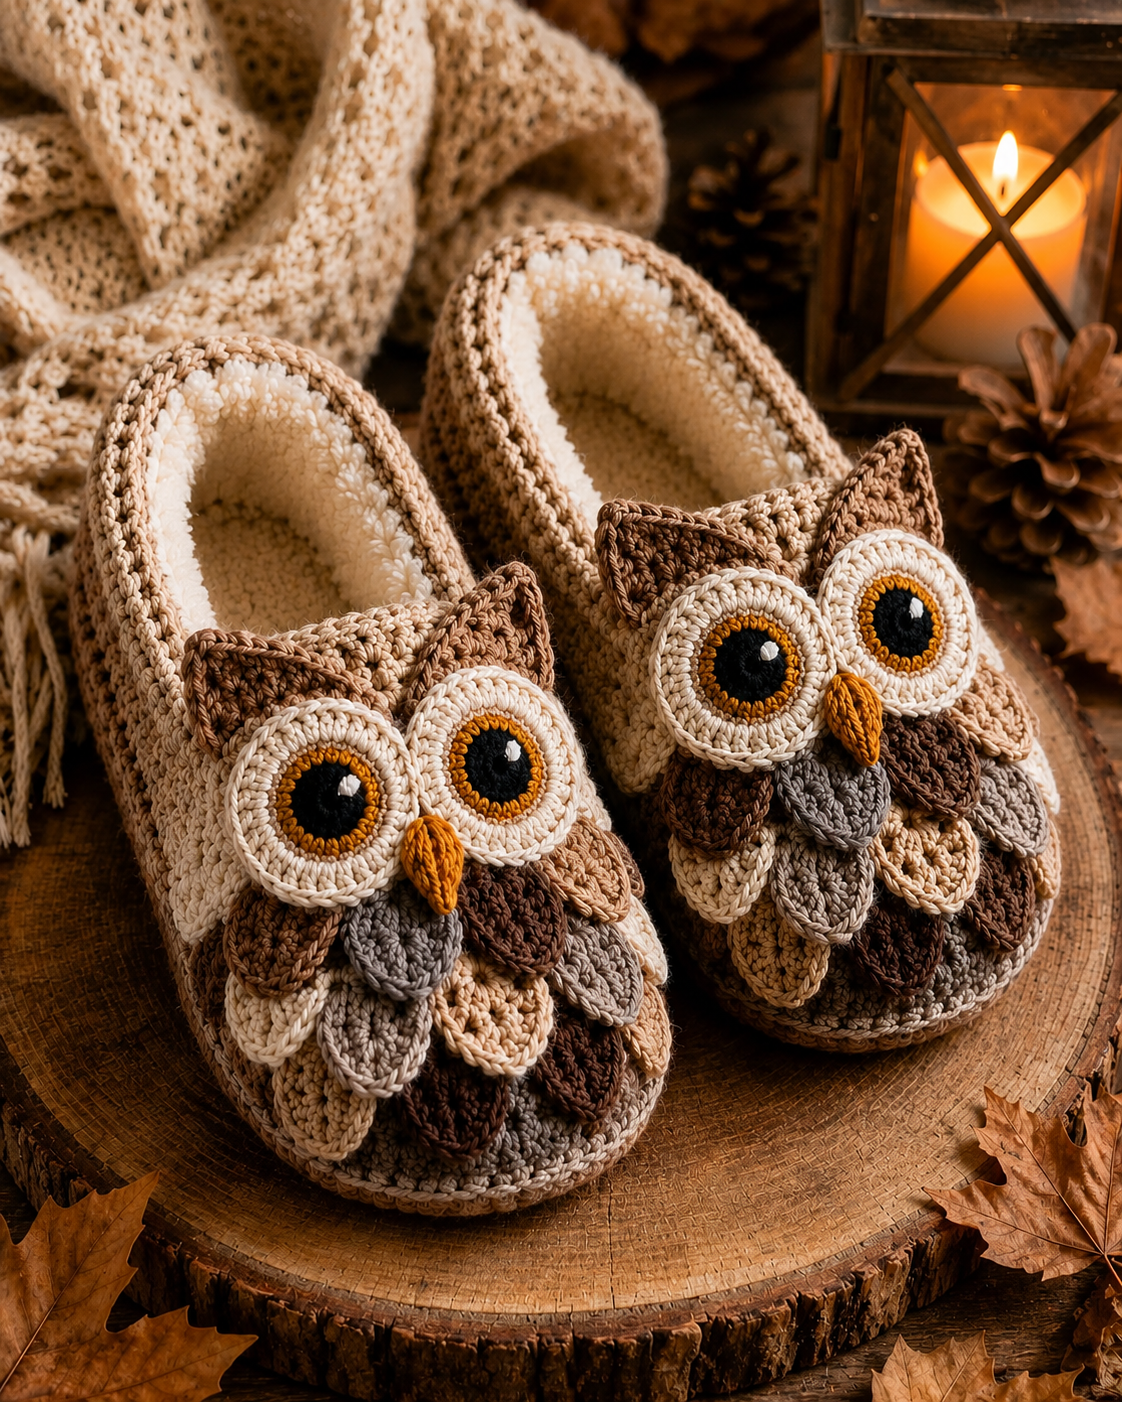
The Crochet Owl Slippers Pattern is a cozy and creative crochet project that combines practical indoor footwear with the charming appearance of a woodland owl. Inspired by the warm neutral colors and layered crochet details visible in the reference image, these slippers feature a rounded foot, a comfortable opening, dimensional feather motifs, large owl eyes, pointed ears, and a small textured beak. The design works especially well in shades of cream, beige, taupe, brown, gray, mustard, and black, although the palette can easily be customized. Because the construction uses familiar crochet techniques arranged in logical sections, the project can be approached by an adventurous beginner while still offering enough detail to interest more experienced crocheters.
Making a successful Crochet Owl Slippers Pattern begins with understanding that a slipper is different from a decorative amigurumi piece. The base needs enough structure to hold its shape, but it must also remain soft and flexible around the foot. For that reason, a medium-weight yarn with good stitch definition is an excellent choice. The decorative owl pieces can be made separately and sewn onto the finished slipper, allowing you to control their position and symmetry. This construction method also makes it easier to adjust the size of the slipper without changing every decorative element. Before beginning, crochet a small gauge sample and measure the intended wearer’s foot from heel to longest toe so that your finished slippers are comfortable rather than overly tight.
This tutorial presents an original method for recreating the general look of the pictured slippers rather than claiming to reproduce a commercial designer’s exact instructions. You will learn the crochet stitch keys, how to build the sole, how to raise the sides, how to shape the toe and heel, and how to create the owl’s eyes, ears, beak, and overlapping feathers. Throughout the Crochet Owl Slippers Pattern, count your stitches carefully and compare both slippers after every major section. A difference of only one or two stitches can become noticeable when the decorative owl faces are attached, so consistency matters. The finished result should feel handmade, cozy, dimensional, and comfortable enough for relaxing indoors during cooler seasons.
Materials, Crochet Stitch Keys, Gauge, and Sizing
For one adult pair of Crochet Owl Slippers, prepare approximately 250–350 g of medium-weight yarn, depending on foot size and yarn thickness. Use cream or beige for the main slipper, then smaller quantities of brown, taupe, gray, mustard, black, and ivory for the owl details. A 4.0 mm to 5.0 mm crochet hook is a useful starting range, but choose the hook that creates a firm yet flexible fabric with your selected yarn. You will also need a yarn needle, scissors, stitch markers, and a measuring tape. Optional non-slip fabric paint can be applied carefully to the bottom after completion if the slippers will be worn on smooth indoor floors.
The principal crochet stitch keys used in this pattern are simple. ch = chain, sl st = slip stitch, sc = single crochet, hdc = half double crochet, dc = double crochet, inc = increase, and dec = decrease. When you see inc, work two stitches into the same stitch. When you see dec, work two stitches together to reduce the stitch count. BLO means back loop only, while FLO means front loop only. The notation st/sts means stitch or stitches, rnd means round, and rep means repeat. Understanding these abbreviations before starting will make every following section much easier to follow.
For a basic adult medium slipper, aim for a finished sole of approximately 24–25 cm from heel to toe. A smaller adult size may measure around 22–23 cm, while a larger version may need 26–28 cm. These numbers are guidelines rather than rigid rules because yarn thickness, hook size, crochet tension, and foot shape all influence the finished dimensions. A useful rule is to make the crochet sole approximately 0.5 to 1 cm shorter than the wearer’s actual foot because the crochet fabric normally stretches slightly during use.
Gauge is particularly important in a Crochet Owl Slippers Pattern. A suitable starting gauge with medium-weight yarn might be approximately 16 sc x 18 rows = 10 x 10 cm, but achieving an exact numerical gauge is less important than producing a dense fabric that does not feel stiff. If your stitches are very loose and large gaps appear between them, switch to a smaller hook. If your work feels rigid and difficult to bend, move up half a hook size. Both slippers should be created with the same hook and approximately the same tension.
For color placement, use an ivory, oatmeal, or light beige yarn as the dominant shade. The owl feathers can alternate between cream, warm brown, dark brown, mushroom gray, and taupe, creating the layered woodland appearance seen in the inspiration image. Mustard or golden brown works beautifully for the iris ring and beak. Black yarn creates the pupil, while a tiny amount of white can provide a highlight. Keeping the color palette relatively limited helps the many textures and dimensional motifs remain visually balanced.
Before starting the soles, make several removable stitch markers available. You will use them to identify the center toe, center heel, and side positions. Marking these reference points is one of the easiest ways to maintain symmetry throughout the Crochet Owl Slippers Pattern. If you are making a pair, another helpful technique is to crochet both soles before beginning either upper. You can then place them side by side and immediately notice any difference in length, width, or shaping.
Crocheting the Sole and Building the Slipper Body
Begin the sole with a foundation chain long enough to run from approximately the base of the toes to the center of the heel. For an adult medium size, start with ch 25–28, depending on your yarn and gauge. Work 2 sc in the second ch from hook, then 1 sc in each chain across. Place 5 sc into the final chain to create the rounded toe end. Instead of turning, continue working along the opposite side of the foundation chain. Work 1 sc in each remaining loop and place 3 sc in the beginning chain area. Join with a sl st or work continuously in a spiral.
For Round 2, place increases around the curved toe and heel sections while keeping the sides relatively straight. A practical sequence is to work an increase in each of the first two rounded stitches, continue evenly along the side, increase across several stitches at the toe, work evenly down the opposite side, then increase across the heel. The exact number of increases may vary according to your starting chain. The goal is an elongated oval rather than a perfect circle. Keep the work flat on a table while crocheting; if the sole begins forming a bowl, add more increases.
Continue the sole for approximately 4–6 rounds, gradually spreading your increases around the toe and heel. Stop increasing when the sole reaches the width needed for the wearer. For an adult medium slipper, the widest part near the ball of the foot might measure approximately 9–10 cm. The heel can remain slightly narrower. At this stage, place the sole against the wearer’s foot or compare it with a well-fitting indoor shoe. The crochet should reach almost to the outer edges without extending far beyond them.
Once the sole is finished, create a defined edge by working one complete round of sc in BLO without increasing. Crocheting through the back loop creates a subtle horizontal ridge and encourages the next stitches to rise vertically rather than continue expanding outward. This is an important transition in the Crochet Owl Slippers Pattern because it changes the construction from a flat sole into a three-dimensional slipper. After this ridge round, work another one or two rounds of regular sc or hdc evenly around.
To create the front of the slipper, mark approximately the center 18–24 stitches around the toe. In the next round, work normally around the heel and sides but begin making sc2tog or hdc2tog decreases across the marked toe section. Spread the decreases evenly rather than placing them all in one spot. Repeat the shaping for several rounds. With each new round, the upper portion will curve gradually over the toes. Try the slipper on frequently while shaping so the opening remains large enough for the foot to enter comfortably.
Continue decreasing until the toe feels secure without becoming tight. Work the heel and side stitches without decreases unless additional shaping is needed. Finish with one or two rounds of sc around the opening, possibly using a slightly smaller hook for a snugger edge. A final round of reverse single crochet can create a decorative corded appearance, although a simple sc edge is equally suitable. Fasten off and weave the ends into the inner surface. Repeat the entire construction for the second slipper, checking frequently that both pieces remain equal in length and height.
Creating the Owl Eyes, Ears, Beak, and Layered Crochet Feathers
The oversized eyes are the focal point of this Crochet Owl Slippers Pattern. Begin each eye with black yarn. Make a magic ring, ch 1, and work 6 sc into the ring. For the next round, work 2 sc in every stitch for 12 stitches. Change to mustard or golden brown and increase evenly around the circle. Then switch to ivory or cream and continue working one or two additional rounds while maintaining a flat circular shape. Depending on your yarn, the finished eye can measure approximately 5–6.5 cm across.
For a more dimensional eye, crochet the final ivory round using hdc or a combination of sc and hdc. Finish with an optional round of sl st around the outer edge to make the circle look crisp. Create four identical eyes, two for each slipper. Use a small strand of white yarn to embroider a tiny highlight near the upper part of each black pupil. The highlight should remain subtle; a small white stitch is enough to make the owl face appear lively without requiring plastic safety eyes or other hard components.
For each ear, ch approximately 7–9, depending on the desired size. Starting in the second chain from the hook, work sc, hdc, dc, dc, hdc, and sc, adjusting the sequence to your chain length. The result should form a tapered triangular piece. Another method is to crochet a small triangle in rows, beginning with 2–3 stitches and increasing at both edges until the base is wide enough. Make four ears. Leave long yarn tails because the tails can be used later to sew each ear securely to the upper slipper.
The beak can be crocheted as a narrow leaf-shaped motif. With mustard yarn, ch 6. Beginning in the second chain, work sl st, sc, hdc, sc, sl st. Continue around the underside of the foundation chain if you want a thicker, more three-dimensional beak. Another option is to crochet three short rows that decrease toward a point. Fold the piece slightly lengthwise before sewing so it rises gently from the owl face. You will need two beaks, one for each slipper.
The layered feathers create most of the visual texture. For one feather, ch 6. Beginning in the second chain from hook, work sc, hdc, dc, hdc, sc. Rotate the chain and repeat a similar sequence along the opposite side, finishing with a sl st. This forms a small oval or leaf-shaped feather approximately 3–4 cm long. For longer feathers, begin with ch 8 and use sc, hdc, dc, dc, hdc, sc along the chain. Mix several lengths for a more natural layered appearance.
Make approximately 16–24 feathers per slipper, depending on their size and the area you want to cover. Crochet them in cream, beige, gray, taupe, medium brown, and dark brown. Arrange the first row near the lower toe so the pointed ends face downward. Place the second row slightly higher and overlap it across the first row like roof shingles. Continue upward until the feathers reach the lower edges of the owl eyes. This overlapping technique creates depth while also hiding most of the attachment stitches beneath the following row.
Assembling, Finishing, Fitting, and Caring for Your Owl Slippers
Before sewing anything permanently, arrange every component on the finished slipper. Position the two eyes near the top of the toe so their edges nearly touch in the center. Place the ears behind or slightly above the eyes. Set the beak between the lower inner edges of the two eyes. Arrange the feathers below them in overlapping rows. Photographing or simply observing the layout carefully before sewing can help you reproduce the same placement on the second Crochet Owl Slippers Pattern.
Attach the lowest feather row first. Thread the long yarn tail onto a yarn needle and sew around only the upper portion of each feather, leaving the lower point slightly free. This attachment method allows the feather tips to lift away from the slipper and creates the three-dimensional appearance seen in richly textured crochet animal designs. Continue with the next row, allowing each feather to overlap the attachment area of the row beneath it. Alternate colors naturally rather than arranging identical colors into rigid columns.
Next, sew the ears firmly to the slipper. Their lower portions can sit partially beneath the eyes so the joining stitches remain hidden. Attach each eye around its outer cream edge, taking care not to pull the yarn so tightly that the circles become distorted. Position both pupils consistently; slightly inward-facing pupils can create a charming expressive appearance. Finally, sew the mustard beak between the eyes and allow its pointed end to extend over the upper feather row.
Try on both slippers before weaving in the final assembly tails. Walk carefully indoors for a few minutes and observe whether the heel stays in place. If the opening feels too loose, join matching yarn and work an additional round of sc around the opening, decreasing a few stitches near the heel. If it is slightly tight, blocking may provide enough relaxation. Avoid making large corrections until both slippers have been worn briefly because crochet fabric generally softens and stretches slightly with use.
To finish the Crochet Owl Slippers Pattern, weave every loose yarn tail through several stitches on the inside and trim carefully. Light steam blocking may help the owl motifs settle into position, but avoid placing a hot iron directly on acrylic yarn. For wool or natural fibers, use the blocking method recommended for that yarn. If desired, small dots or thin lines of non-slip fabric paint can be placed on the sole. Allow them to dry completely according to the product instructions before wearing the slippers.
For cleaning, hand washing is usually the gentlest approach, particularly because the owl design contains multiple raised pieces. Use cool or lukewarm water and a mild detergent appropriate for your yarn. Press excess water out gently without twisting the slippers, reshape the eyes, feathers, and toe, then allow them to dry flat. Proper care helps the dimensional details of your Crochet Owl Slippers Pattern remain defined and keeps the slippers comfortable for repeated seasonal use.
Frequently Asked Questions About the Crochet Owl Slippers Pattern
Can a beginner make the Crochet Owl Slippers Pattern?
Yes. A confident beginner who understands chain, single crochet, half double crochet, double crochet, increases, decreases, and slip stitches can attempt this project. The sole and slipper shaping require careful counting, but none of the techniques are unusually advanced. Making the decorative pieces separately also allows beginners to practice the small motifs before attaching them.
How do I make the slippers larger or smaller?
Adjust the foundation chain and the number of sole rounds. For a longer foot, add chains to the beginning foundation. For a wider foot, add one or more increase rounds before beginning the BLO transition round. Always measure the physical sole rather than relying exclusively on stitch counts because yarn thickness and crochet tension can change the final dimensions substantially.
What yarn is best for crochet slippers?
A medium-weight yarn that is soft, durable, and easy to wash is practical. Acrylic blends are convenient because they are often washable, while wool blends can provide extra warmth. Cotton produces excellent stitch definition but may feel heavier. Whatever fiber you choose, use a yarn that allows you to create a firm fabric without making the slipper excessively stiff.
How many owl feathers should I crochet?
Approximately 16–24 feathers per slipper works well for a richly layered adult design. Larger feathers require fewer motifs, while small feathers require more. You do not need an identical number for every size. Arrange the pieces temporarily and continue adding them until the toe is covered evenly without creating excessive bulk.
Can I use different colors for the Crochet Owl Slippers Pattern?
Absolutely. Neutral shades create a rustic woodland appearance, but the same design can be made with blues, pinks, greens, purples, or brighter combinations. Keeping the pupil black and using contrasting colors around the eyes can help preserve the recognizable owl expression even when the overall palette changes.
Why does my crochet sole curl?
Curling usually indicates that there are not enough increases around the toe or heel, or that your tension is unusually tight. Add increases gradually around the curved sections until the sole lies flat. If it begins becoming wavy instead, you may have too many increases.
How can I stop the slippers from stretching too much?
Use a slightly smaller hook to create denser stitches, select yarn with good recovery, and make the finished slipper slightly smaller than the actual foot. Adding a firm sc edging around the opening can also reduce stretching. Avoid an excessively loose gauge because the fabric may grow considerably after repeated wear.
Are crochet slippers slippery on hard floors?
Crochet yarn soles can slide on certain polished surfaces. If necessary, add an appropriate non-slip treatment to the underside. Whatever method you choose should remain flexible, securely attached, and completely dry before the slippers are worn.
Can the eyes and feathers be crocheted directly onto the slippers?
They can, but creating them separately gives you much greater control over placement. Separate motifs also make it easier to create the dimensional, layered effect characteristic of this Crochet Owl Slippers Pattern. They can be arranged and adjusted several times before you make any permanent stitches.
How do I keep both owl faces symmetrical?
Mark the center of each slipper before assembly. Attach the beak near that center line, then position the eyes at equal distances from it. Count stitches between the outer eye edges and the slipper sides whenever possible. Assemble both slippers at the same time rather than finishing one completely before starting the second.
Can I make this pattern for children?
Yes, but the foundation chain, sole width, and decorative motif sizes should be reduced proportionally. For young children, securely sew every decorative piece in place and avoid unnecessary loose or detachable components. The slipper should fit comfortably without creating excessive material around the toe.
What does BLO mean in the pattern?
BLO means Back Loop Only. Instead of inserting the hook beneath both loops at the top of a stitch, insert it only beneath the loop farthest from you. In this project, working through the back loop creates the turning ridge between the flat sole and the vertical sides of the slipper.
What does sc2tog mean?
sc2tog means single crochet two together. Insert the hook into the first stitch, yarn over and pull up a loop. Insert the hook into the next stitch, yarn over and pull up another loop. Yarn over again and pull through all loops on the hook. Two stitches become one, producing a decrease that is useful for shaping the toe.
Conclusion
The Crochet Owl Slippers Pattern brings together several enjoyable crochet techniques in one practical project. You began with an oval sole, learned how increases shape the toe and heel, used BLO crochet to turn the flat base upward, and applied controlled decreases to create a comfortable slipper upper. Understanding the crochet stitch keys makes the entire construction easier because simple combinations of ch, sc, hdc, dc, inc, dec, and sl st provide almost everything required for the project.
The decorative stage transforms an ordinary crochet slipper into the recognizable owl design. Circular eyes created in black, mustard, and cream establish the character of the face, while pointed ears and a small mustard beak complete the upper features. The individually crocheted feather motifs add the strongest dimensional effect, especially when cream, brown, beige, taupe, and gray shades are mixed and the feathers are sewn in overlapping rows.
Most importantly, remember that handmade footwear should be adjusted to the person who will wear it. Measure frequently, compare the two slippers throughout the process, and modify the number of foundation chains, sole rounds, or toe decreases whenever necessary. Crochet patterns become far more useful when you understand why each shaping technique is used rather than simply following numbers without considering the finished dimensions.
EASILY FIND THE FREE PDF FOR THIS PATTERN HERE!
With careful assembly and secure finishing, this Crochet Owl Slippers Pattern can become a warm, distinctive handmade project for cooler days, thoughtful handmade gifts, or simply an enjoyable way to practice dimensional crochet. The combination of practical construction and decorative crochet makes the pattern especially satisfying because every separate motif contributes to the finished character. If you make your own version, leave your sincere opinion about the pattern and share any suggestions you have for different colors, yarn combinations, feather arrangements, or sizing adjustments. Your ideas can inspire new variations of these cozy crochet owl slippers and help other crochet enthusiasts approach the project with even more creativity.