
“Mushroom House” Fabric Panel Pattern
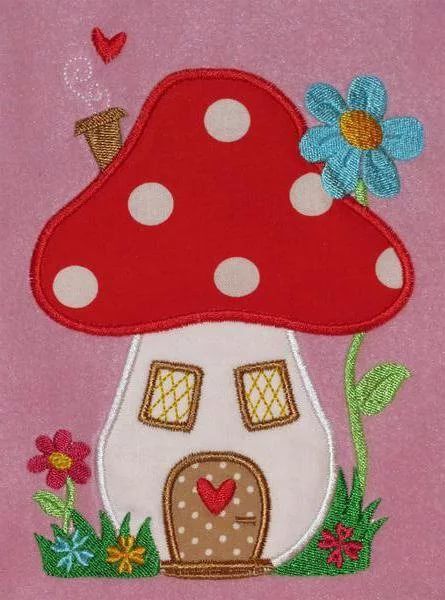
The “Mushroom House” Fabric Panel Pattern is a charming sewing and appliqué project that transforms simple pieces of fabric into a whimsical decorative scene. Inspired by the image, the design features a large red mushroom cap with white spots, a soft cream-colored house body, a rounded door, two small windows, colorful flowers, grass, leaves, and playful heart details. The combination creates a warm storybook appearance that works beautifully as a fabric wall panel, nursery decoration, craft-room accent, or centerpiece for a handmade quilt project. One of the greatest advantages of this pattern is that most shapes are uncomplicated and can be adapted to different sizes without changing the character of the design. Beginners can practice basic appliqué skills, while experienced sewists can add embroidery and decorative stitching for extra texture. The finished panel has plenty of personality without requiring highly complicated construction.
When creating the “Mushroom House” Fabric Panel Pattern, the most important idea is to work in layers. Instead of trying to sew the entire picture at once, you build the design gradually, beginning with the background and larger shapes before moving toward smaller decorative elements. This technique helps maintain accurate proportions and prevents tiny pieces from becoming hidden beneath larger appliqués. The red mushroom roof immediately becomes the focal point, while the neutral mushroom stem or house body gives the eye a comfortable place to rest. Bright blue, green, yellow, and pink details add contrast around the central house and make the composition feel lively. Decorative stitching around the appliqué shapes also strengthens the edges while giving the finished project its recognizable handmade appearance.
This project is also an excellent introduction to fabric appliqué, a sewing method in which smaller pieces of fabric are positioned and attached to a larger background fabric to create pictures, motifs, or decorative patterns. In the mushroom house design, appliqué can be used for the roof, house, windows, door, flowers, grass, hearts, leaves, and other details. Fusible web can simplify the process by temporarily securing each shape before stitching, although traditional needle-turn appliqué can also be used by more experienced makers. For a polished result, fabrics should be pressed before cutting, shapes should be arranged carefully before permanent attachment, and stitching should remain consistent around curved edges. Following these basic principles makes the “Mushroom House” Fabric Panel Pattern enjoyable, organized, and achievable for sewists at many different skill levels.
Materials, Fabrics, and Preparation for the Mushroom House Panel
Begin by selecting a sturdy background fabric for your fabric panel pattern. A medium-weight cotton is an excellent choice because it is easy to press, cut, and stitch. To reproduce the general appearance of the reference design, choose a soft pink or dusty-rose background that provides strong contrast against the red mushroom roof and the lighter body of the house. Cut the background several centimeters larger than your intended finished dimensions so there is room for trimming and finishing later.
DISCOVER MORE FREE PATTERNS HERE!
For the mushroom roof, select a vibrant red cotton fabric. You will also need white or cream fabric for the circular spots. The main body of the mushroom house can be made from ivory, light beige, or warm white fabric. Using slightly different neutral tones for the house and spots can prevent the design from appearing too flat while still preserving the recognizable color palette of the “Mushroom House” Fabric Panel Pattern.
Gather smaller scraps for the decorative elements. Green fabrics can be used for stems, leaves, and grass; turquoise or light blue works beautifully for the large flower beside the mushroom cap; brown fabric can form the door and window outlines; and pink, red, orange, or yellow scraps can create the smaller flowers. Scrap-friendly projects like this are a practical way to use leftover quilting cottons from previous sewing projects.
For the appliqué process, prepare lightweight fusible web, fabric scissors, a fine-tip fabric marking tool, an iron, and coordinating sewing thread. Fusible web provides temporary stability and is especially helpful when working with circles, leaves, and narrow stems. Follow the instructions supplied with your chosen fusible product because heat settings can vary between manufacturers.
You may also want a piece of lightweight tear-away or cut-away stabilizer behind the background fabric. Stabilizer is particularly useful if you plan to use dense decorative stitches or machine embroidery. It helps reduce puckering and keeps the pink background smooth while you sew around the edges of the mushroom and its decorative elements.
Before cutting anything permanently, sketch the complete mushroom house appliqué pattern on paper. Divide the illustration into individual components: mushroom cap, spots, house body, windows, door, flower petals, flower centers, stems, leaves, grass, and hearts. Numbering the pieces can make assembly considerably easier, especially when several small shapes need to overlap.
Cutting and Building the Main Mushroom House Appliqué
Start with the largest component: the cream mushroom-house body. Draw a gently tapered form that is narrower near the roof and slightly wider toward the bottom. Keep the lower edge almost flat so the house appears grounded. Trace the reversed shape onto the paper side of your fusible web, cut loosely around it, and fuse it to the wrong side of your chosen cream fabric.
Next, prepare the distinctive red mushroom cap. The shape should extend wider than the house body and feature soft, rounded curves rather than sharp corners. The reference project has a playful, asymmetrical silhouette, which is useful because your handmade version does not have to be mathematically perfect. Slight variations actually reinforce the cozy handcrafted character of the “Mushroom House” Fabric Panel Pattern.
Cut several white circles in different sizes for the mushroom spots. Varying their placement creates visual interest and keeps the roof from looking overly formal. Arrange them across the red cap while leaving enough space around the outer edges for stitching. Secure the circles with fusible web before attaching the entire roof section to the background.
Place the cream house body near the center of the background and position the red mushroom cap so that it overlaps the upper edge of the house slightly. Before ironing, check that the roof is level and that enough background remains visible around every side. Once you are satisfied with the composition, carefully fuse the main shapes according to the fusible web instructions.
The rounded brown door should sit near the bottom center of the house. Create a simple arch with a flat base, then add a smaller red heart near the upper portion of the door if you want to closely capture the personality of the original project. Tiny cream or white dots can be added with fabric paint, embroidery, small appliqué circles, or decorative stitching.
Complete the main house structure by making two small rectangular windows. Position one on each side above the door, but allow slight differences in angle to maintain the playful storybook appearance. Brown or golden fabric can form the window frames, while pale yellow fabric creates the impression of warm interior light. Decorative diagonal stitching inside the windows can imitate small panes and add another attractive layer of detail.
Adding Flowers, Grass, Leaves, and Decorative Stitching
Once the central mushroom house is assembled, begin creating the large flower near the upper right side of the mushroom cap. Cut approximately five rounded petals from turquoise or blue fabric and arrange them around a golden-yellow center. Slightly overlapping the petals produces a fuller flower and reduces small spaces between the individual pieces.
Add a narrow green stem that travels from the flower toward the lower area of the fabric appliqué panel. Because narrow fabric stems can be difficult to handle, consider using bias-cut fabric strips or a narrow satin stitch instead of a traditional appliqué shape. Add one or two green leaves along the stem to connect the upper flower visually with the grass below.
At the lower edge of the panel, build a simple grassy area from several shades of green. Individual pointed grass pieces can be cut separately or combined into irregular clusters. Using more than one green creates depth and makes the scene feel more organic. You can also layer a darker green behind a lighter green to give the impression of foliage growing in front of the mushroom house.
Create several small flowers inside the grass. Red, yellow, blue, pink, and orange work especially well with the dominant red roof. These flowers do not need complicated patterns; five simple petals with a contrasting center are enough. Because these are small elements, they are also an excellent place to use tiny fabric scraps that might otherwise be discarded.
Now begin stitching around every appliqué shape. A satin stitch creates a bold embroidered edge similar to the finish visible in the inspiration image. A narrow zigzag stitch provides another reliable option, while a blanket stitch gives the project a more traditional folk-art look. Whatever method you choose, practice on scrap fabric first so you can adjust stitch width and tension before sewing the actual panel.
Finish the decorative composition by adding heart motifs and tiny embroidered accents. A small red heart above the roof and another heart on the door help reinforce the friendly, whimsical theme of the “Mushroom House” Fabric Panel Pattern. Additional details such as tiny swirls, French knots, embroidered flower centers, or small stitched highlights can be included, but avoid overcrowding the background. Leaving some open space allows the central mushroom house to remain the strongest visual element.
Finishing, Quilting, and Displaying the Fabric Panel
After all appliqué pieces have been secured, press the project carefully from the back whenever possible. Place a pressing cloth between the iron and delicate decorative stitching to protect the threads. At this stage, inspect the entire panel and trim any loose thread ends. Also check that narrow stems, petals, and leaves are fully attached.
If you want the “Mushroom House” Fabric Panel Pattern to have a soft quilted appearance, layer the finished appliqué top with thin batting and backing fabric. Smooth each layer carefully and secure them with quilting pins or temporary basting spray. A thin batting is usually sufficient because excessive loft can distort the detailed appliqué.
Quilt the background with simple lines, gentle curves, or free-motion stitching. Another attractive option is echo quilting, where stitches follow the outer contours of the mushroom house at gradually increasing distances. This technique emphasizes the main silhouette while adding texture without competing with the decorative appliqué.
You can quilt inside some of the larger areas as well. For example, gentle lines can be added to the red mushroom cap, and minimal stitching can secure the cream house body. However, heavy quilting is not necessary. The colorful fabrics and embroidered edges already provide plenty of visual detail, so understated quilting usually produces a balanced result.
When quilting is complete, square the panel by trimming the outer edges carefully. Add a fabric binding around all four sides for a traditional quilted finish. A coordinating pink, red, green, or neutral binding can work beautifully. Another possibility is to attach a wider fabric border before binding, which can make the mushroom house fabric panel appear larger and more suitable for wall display.
Finally, decide how you would like to use the completed piece. It can become a small wall hanging, a decorative pillow front, the center block of a larger quilt, a nursery decoration, or part of a seasonal handmade display. If you plan to hang it, sew a fabric sleeve to the back before finishing. The result is a colorful handmade project that combines appliqué sewing, decorative stitching, quilting, and creative fabric selection in one approachable design.
FAQ About the “Mushroom House” Fabric Panel Pattern
Is the “Mushroom House” Fabric Panel Pattern suitable for beginners?
Yes. The project is beginner-friendly when fusible appliqué is used. Most components are simple shapes, including circles, petals, leaves, rectangles, and rounded pieces. Beginners may want to practice satin or zigzag stitching on scraps before sewing around the final appliqués.
What is the best fabric for making this mushroom house panel?
Quilting cotton is one of the easiest materials to use because it presses well, cuts cleanly, and is available in many colors. Cotton or cotton-blend fabrics can be used for both the background and the individual fabric appliqué elements.
Do I need fusible web?
Fusible web is not absolutely required, but it makes construction much easier. It holds the appliqué pieces in place while you sew their edges and is especially useful for small flowers, leaves, mushroom spots, and hearts.
What stitch should I use around the appliqué pieces?
A narrow satin stitch, zigzag stitch, or blanket stitch can all work well. Satin stitching creates a polished embroidered appearance, while blanket stitching produces a more traditional handmade look.
Can I sew the pattern by hand instead of using a sewing machine?
Yes. Hand appliqué can be used instead of machine appliqué. Needle-turn appliqué provides a softer traditional finish, while hand blanket stitching can create visible decorative edges around each fabric piece.
How can I resize the mushroom house pattern?
Because the design is composed mainly of individual appliqué shapes, it can be enlarged or reduced proportionally. Keep the relationship between the mushroom roof, body, windows, door, flowers, and surrounding greenery consistent so the finished picture remains balanced.
Should I add seam allowance to appliqué pieces?
For raw-edge fusible appliqué, a traditional seam allowance usually is not necessary because the edges are secured with decorative stitching. For needle-turn appliqué, however, you should add a small allowance around each shape so the raw edge can be turned underneath.
How can I prevent the background fabric from puckering?
Use stabilizer behind the background, reduce excessive stitch tension, and avoid pulling the fabric while sewing. Pressing the fabric before assembly also helps. When using dense satin stitching, stabilizer becomes particularly important.
Can I turn this panel into a quilt block?
Absolutely. The completed “Mushroom House” Fabric Panel Pattern can function as the center block of a larger quilt. Add coordinating fabric borders or additional patchwork blocks around the panel until the project reaches your desired dimensions.
What other colors can I use for the mushroom house?
The traditional red-and-white mushroom combination is instantly recognizable, but the design can easily be personalized. A blue, orange, pink, burgundy, or even patchwork mushroom cap can create an entirely different style. The background can also be changed to cream, pale blue, sage green, or another shade that contrasts with the appliqué.
How do I make the small flowers easier to sew?
Enlarge them slightly if necessary and simplify the petal shapes. Very small appliqués can be challenging to stitch cleanly, so there is nothing wrong with making the flowers larger. You can also replace tiny fabric flowers with simple embroidery.
Can leftover fabric scraps be used for this project?
Yes. This is an excellent scrap fabric project because many of the decorative components require only small amounts of material. Flowers, leaves, hearts, windows, mushroom spots, and grass can all be created from leftovers.
Conclusion
The “Mushroom House” Fabric Panel Pattern is a creative way to combine simple sewing techniques with colorful storytelling. Beginning with a plain background fabric, you can gradually build the project using a cream mushroom-house body, a bright red spotted roof, rounded windows, a welcoming door, flowers, leaves, stems, grass, and playful heart details. Working from the largest shapes toward the smallest decorations makes the assembly process easier and helps maintain a balanced composition.
Throughout the project, you also have an opportunity to practice important skills such as fabric appliqué, fusible appliqué, satin stitching, decorative machine stitching, fabric layering, quilting, and binding. None of these elements need to be overly complicated. Careful cutting, pressing, positioning, and patient stitching are more important than sophisticated equipment.
EASILY FIND THE FREE PDF FOR THIS PATTERN HERE!
Best of all, the design can be personalized in countless ways. Change the colors, enlarge the flowers, create different window styles, add embroidered details, use printed fabrics, or surround the finished mushroom house with patchwork borders. Whether you transform it into a wall hanging, pillow front, quilt block, or decorative fabric panel, the same basic construction process can be adapted to your own creative vision. If you make your own version of the “Mushroom House” Fabric Panel Pattern, leave your sincere opinion about the project and share your suggestions. Your ideas about colors, fabrics, stitches, borders, and decorative details can inspire new variations and make this whimsical mushroom house even more personal.