
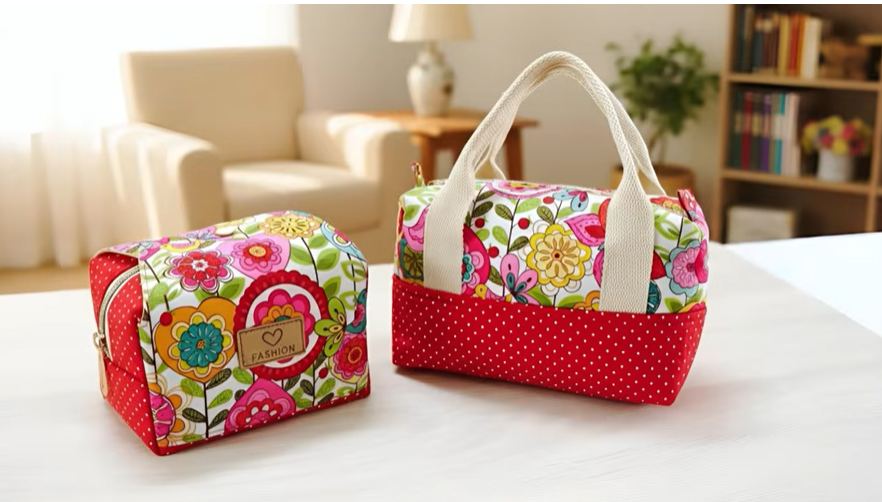
The Zippered toiletry bag Pattern is a practical sewing project that combines everyday usefulness with the creative freedom of handmade fabric design. Inspired by the colorful bags shown in the reference image, this project features a structured rectangular shape, a secure zipper closure, contrasting fabrics, and optional handles for a larger travel-bag variation. It is suitable for storing cosmetics, toiletries, sewing notions, craft supplies, small accessories, or travel essentials. Because the construction uses mostly straight seams and manageable fabric pieces, the pattern can also be a satisfying project for confident beginners who want to practice working with zippers, lining, interfacing, and boxed corners.
One of the most attractive features of a handmade zippered toiletry bag is the ability to personalize every detail. Floral cotton can create a cheerful vintage appearance, while polka-dot fabric adds playful contrast along the base or side panels. A neutral lining keeps the interior clean and easy to see, and a coordinating zipper ties the whole design together. The larger bag shown in the inspiration image also demonstrates how simple fabric handles can transform the same basic construction into a compact travel organizer. By understanding the structure rather than copying only the appearance, you can adapt this Zippered toiletry bag Pattern to different sizes, colors, and purposes.
Another advantage of this sewing project is that it teaches several useful techniques that can later be applied to handbags, cosmetic pouches, lunch bags, organizers, and other accessories. You will learn how to stabilize cotton fabric, install a zipper between exterior fabric and lining, create dimensional corners, manage seam allowances, and achieve a neat finished interior. The following tutorial explains the entire process from choosing materials to completing the final topstitching, helping you create a durable and attractive fabric toiletry bag with a polished handmade finish.
Materials and Fabric Preparation for the Zippered Toiletry Bag Pattern
Begin by selecting a medium-weight quilting cotton or craft cotton for the exterior of the bag. A floral print similar to the one in the inspiration image works beautifully because the colorful motif becomes the focal point of the finished project. You can use one fabric throughout the exterior or combine a printed upper section with a contrasting lower section, such as red polka-dot cotton. Mixing fabrics is an excellent way to give the bag a professional boutique-style appearance.
DISCOVER MORE FREE PATTERNS HERE!
For the lining, choose a tightly woven cotton fabric in a coordinating or neutral shade. Light-colored lining is often practical because it makes small items easier to find inside the bag. If you plan to use the pouch for cosmetics or toiletries, you may also choose laminated cotton or another wipe-clean fabric, provided your sewing machine can handle the material comfortably. The important point is to keep the lining smooth and flexible enough to turn through the opening during construction.
You will also need fusible interfacing or lightweight fusible fleece. Interfacing gives the bag structure so that it does not collapse when placed on a table. For a soft cosmetic pouch, medium fusible interfacing is usually enough. For a larger travel toiletry bag, fusible fleece can create a more padded and substantial appearance. Apply the stabilizer to the wrong side of each exterior fabric piece following the manufacturer’s general temperature recommendations for the material you are using.
A zipper should be slightly longer than the final opening of your bag. For a medium toiletry pouch, a zipper measuring approximately 25 to 30 cm works well. A longer zipper is often easier to install because the zipper pull can be moved away from the sewing area. After construction, any excess zipper tape can be trimmed carefully before the side seams are completed.
For a medium-size version, cut two exterior rectangles measuring approximately 28 cm x 20 cm, two lining rectangles of the same size, and matching pieces of interfacing. If you want the contrasting base seen in the photo, divide each exterior rectangle horizontally and sew a printed upper piece to a contrasting lower piece before applying the interfacing. Press the seam toward the darker fabric and add a line of topstitching approximately 3 mm from the seam for a clean finish.
Before sewing, mark the center of the top edge, bottom edge, and side edges of every main panel. These small reference marks help keep the exterior and lining aligned later. Accurate preparation is especially important with a Zippered toiletry bag Pattern because even a small difference between panels can make the zipper or side seams appear uneven. Taking a few extra minutes during cutting usually saves much more time during assembly.
How to Install the Zipper and Sew the Main Bag
Place one exterior panel right side up on your work surface. Position the zipper along the upper edge with the zipper teeth facing the right side of the exterior fabric. The zipper pull should face downward toward the fabric. Align the zipper tape carefully with the raw edge of the fabric, then secure it with sewing clips or pins placed away from the zipper teeth.
Next, position one lining panel over the zipper with its right side facing the exterior panel. The zipper will now be sandwiched between the exterior fabric and the lining. Sew along the upper edge using a zipper foot, keeping the stitching close to the zipper teeth without sewing directly into them. Move the zipper pull when necessary so it does not interfere with the presser foot.
Open the exterior fabric and lining away from the zipper and press them gently. Topstitch along the fabric edge beside the zipper. This extra line of stitching helps prevent the lining from becoming caught in the zipper during everyday use. It also creates a crisp professional edge that makes a handmade toiletry pouch look more carefully finished.
Repeat the same process on the opposite side of the zipper. Place the remaining exterior panel right side against the free side of the zipper, followed by the remaining lining panel. Check that both exterior fabrics are facing the correct direction before sewing. Stitch the zipper seam and then topstitch just as you did on the first side.
At this stage, open the zipper approximately halfway. This step is extremely important because the bag will later be sewn closed around its outer edges. If the zipper remains completely closed, turning the project right side out becomes much more difficult. Keeping the zipper partially open creates the opening you need during the final construction stages.
Now bring the two exterior panels together with right sides facing each other and place the two lining panels together in the same way. The zipper should sit between the two sections. Carefully match the zipper seams at both ends. Clip around the edges, making sure the exterior pieces align evenly and the lining remains smooth without wrinkles.
Creating Boxed Corners, Structure, and Optional Handles
To give your Zippered toiletry bag Pattern the three-dimensional shape visible in the inspiration image, you need to create boxed corners. Before sewing the main perimeter, mark a square approximately 4 cm x 4 cm in each lower corner of both the exterior and lining pieces. A larger square creates a deeper bag, while a smaller square produces a flatter pouch.
Sew around the perimeter of the exterior section and lining section using a seam allowance of approximately 1 cm. Leave an opening of about 8 to 10 cm along the bottom edge of the lining. This opening is required for turning the entire project right side out later. Reinforce the stitching at both ends of the opening so the seam does not pull apart during turning.
Cut away the previously marked corner squares. At each corner, separate the layers and bring the side seam together with the bottom seam. The two seam lines should meet exactly in the center. Flatten the corner into a straight line, clip it securely, and sew across the opening. Repeat this process for every exterior and lining corner.
Boxed corners are what transform two flat rectangles into a functional travel toiletry bag. The depth created by this technique provides enough internal space for bottles, brushes, cosmetics, toiletries, or craft supplies. For a larger version, increasing the corner depth to approximately 5 or 6 cm can create a more spacious base.
If you would like to reproduce the handled bag shown in the reference image, prepare two strips of strong cotton webbing or reinforced fabric approximately 30 to 35 cm long. Position the handles symmetrically on the exterior panels before installing the zipper. Keep each handle approximately 8 to 10 cm from the nearest side edge, depending on the size of your bag.
Baste the handle ends securely to the upper portion of the exterior fabric, making sure the handles are not twisted. For additional strength, stitch across each handle end several times. A larger zippered toiletry bag with handles can be useful for travel because it is easier to carry between a bedroom, bathroom, suitcase, or dressing area while keeping personal items organized.
Finishing the Bag, FAQ, and Care Tips
Once the perimeter and boxed corners are sewn, turn the project right side out through the opening left in the lining. Work slowly around the zipper ends and corners so the fabric is not stretched unnecessarily. A blunt turning tool can help shape the corners, but avoid using anything sharp that could puncture the fabric or damage the stitches.
After turning, pull the lining completely outside the bag so you can close the opening neatly. Fold the raw edges inward by approximately 1 cm and press them flat. Sew the opening closed with a narrow machine stitch close to the folded edge. If you prefer an almost invisible finish, you can hand-sew the opening using a ladder stitch.
Push the lining back inside the bag and smooth it carefully into each corner. Press the exterior using an appropriate temperature for your fabric and interfacing. Avoid pressing directly over synthetic zipper teeth at high heat. Shape the base with your hands until the bag stands evenly, then check that the zipper opens and closes smoothly.
For a polished result, inspect all visible seams and trim any loose threads. The contrasting lower fabric should appear straight across both sides of the bag, and the zipper should remain centered. If you added handles, confirm that they are secure before placing heavier toiletries inside. These small finishing details make a major difference in the overall quality of a handmade fabric zipper pouch.
The completed Zippered toiletry bag Pattern can be adapted in many ways. You can add interior slip pockets for small cosmetics, an elastic holder for brushes, a waterproof lining, decorative labels, quilting, embroidery, or appliqué. The same basic construction can also be resized into a pencil case, makeup pouch, sewing organizer, travel medicine pouch, or larger bathroom bag.
To keep the bag looking attractive, follow the care requirements of the fabrics and stabilizers you selected. Cotton versions can often be gently cleaned by hand, while laminated or coated linings may simply require wiping with a damp cloth. Allow the bag to dry completely before storing it closed, particularly if it has been used around water or bathroom products.
FAQ: Frequently Asked Questions About the Zippered Toiletry Bag Pattern
Is the Zippered toiletry bag Pattern suitable for beginners?
Yes. This project is suitable for beginners who are comfortable sewing straight seams and are ready to practice inserting a zipper. The most important steps are accurate cutting, careful zipper alignment, and remembering to leave the zipper partially open before completing the outer seams.
What is the best fabric for a zippered toiletry bag?
Quilting cotton is one of the easiest materials to use because it is stable, widely available, and simple to sew. Canvas can provide additional durability, while laminated cotton may be useful for a moisture-resistant interior. Lightweight fabrics usually benefit from interfacing.
Should I use interfacing in a toiletry bag?
Interfacing is strongly recommended when you want a structured shape. Medium-weight fusible interfacing creates light support, while fusible fleece produces a softer padded bag. The choice depends on whether you want a flexible pouch or a more substantial travel organizer.
How long should the zipper be?
The zipper should be at least as long as the top opening of your bag. Using a zipper slightly longer than necessary can actually make installation easier. The excess tape can usually be trimmed after the zipper has been securely sewn into the project.
How do I stop the lining from getting caught in the zipper?
Topstitching along both sides of the zipper is very helpful. After attaching the zipper, press the exterior and lining fabrics away from the teeth and stitch approximately 2 to 3 mm from the folded fabric edge. This keeps the lining flat and away from the zipper mechanism.
What are boxed corners?
Boxed corners are created by removing or marking squares at the lower corners, matching the side seam with the bottom seam, and sewing across the resulting opening. This technique creates depth and allows the bag to stand instead of remaining completely flat.
Can I make the bag larger?
Yes. Increase the width and height of all exterior and lining panels by the same amount. You may also increase the boxed corner measurement to create additional depth. Remember to choose a zipper long enough for the new top opening.
Can I add pockets to the lining?
Absolutely. Interior pockets should normally be attached to the lining panels before the zipper and main bag are assembled. A simple rectangular slip pocket is useful for smaller products that might otherwise become lost inside the main compartment.
Can I make the bag washable?
Yes, provided all materials are washable. Cotton fabric, polyester thread, and suitable interfacing are good choices for a washable version. Always consider the care requirements of the zipper, stabilizer, decorative elements, and lining before washing the completed bag.
Why does my zipper look uneven after sewing?
Uneven zipper placement usually happens when the two fabric sides were not aligned equally during installation. Marking the centers of the zipper and fabric panels before sewing can help. Topstitching both sides with the same seam distance also improves symmetry.
How can I make the toiletry bag stand upright?
Use a stabilizer such as medium-weight interfacing or fusible fleece and create sufficiently deep boxed corners. A contrasting base made from canvas or another slightly heavier material can provide additional support while also becoming a decorative feature.
Can the Zippered toiletry bag Pattern be used for other projects?
Yes. Once you understand the construction method, the same design can become a makeup bag, sewing notions pouch, craft organizer, pencil case, travel accessory bag, or small storage case. Adjusting the dimensions and fabrics makes the pattern extremely versatile.
Conclusion
The Zippered toiletry bag Pattern is a useful sewing project that teaches several techniques within one attractive design. Throughout this tutorial, you learned how to select exterior and lining fabrics, apply interfacing, prepare contrasting panels, install a zipper, sew the main structure, create boxed corners, add optional handles, close the lining, and finish the bag neatly.
The colorful design shown in the inspiration image demonstrates how effectively floral fabric and contrasting polka-dot cotton can work together. However, the real advantage of making your own zippered toiletry bag is customization. You can choose fabrics that match your personal style, adjust the dimensions for different purposes, add pockets, reinforce the structure, or create matching bags in several sizes.
With careful cutting, consistent seam allowances, patient zipper installation, and accurate corner construction, this Zippered toiletry bag Pattern can produce a polished handmade accessory that is both decorative and practical. Once you have completed one version, experimenting with different fabrics, sizes, handles, and interior features becomes much easier. I would love to know your sincere opinion about this Zippered toiletry bag Pattern. What colors or fabric combinations would you choose for your own version? Leave your honest feedback and suggestions, especially if there is another sewing detail or variation you would like to see included in a future project.