
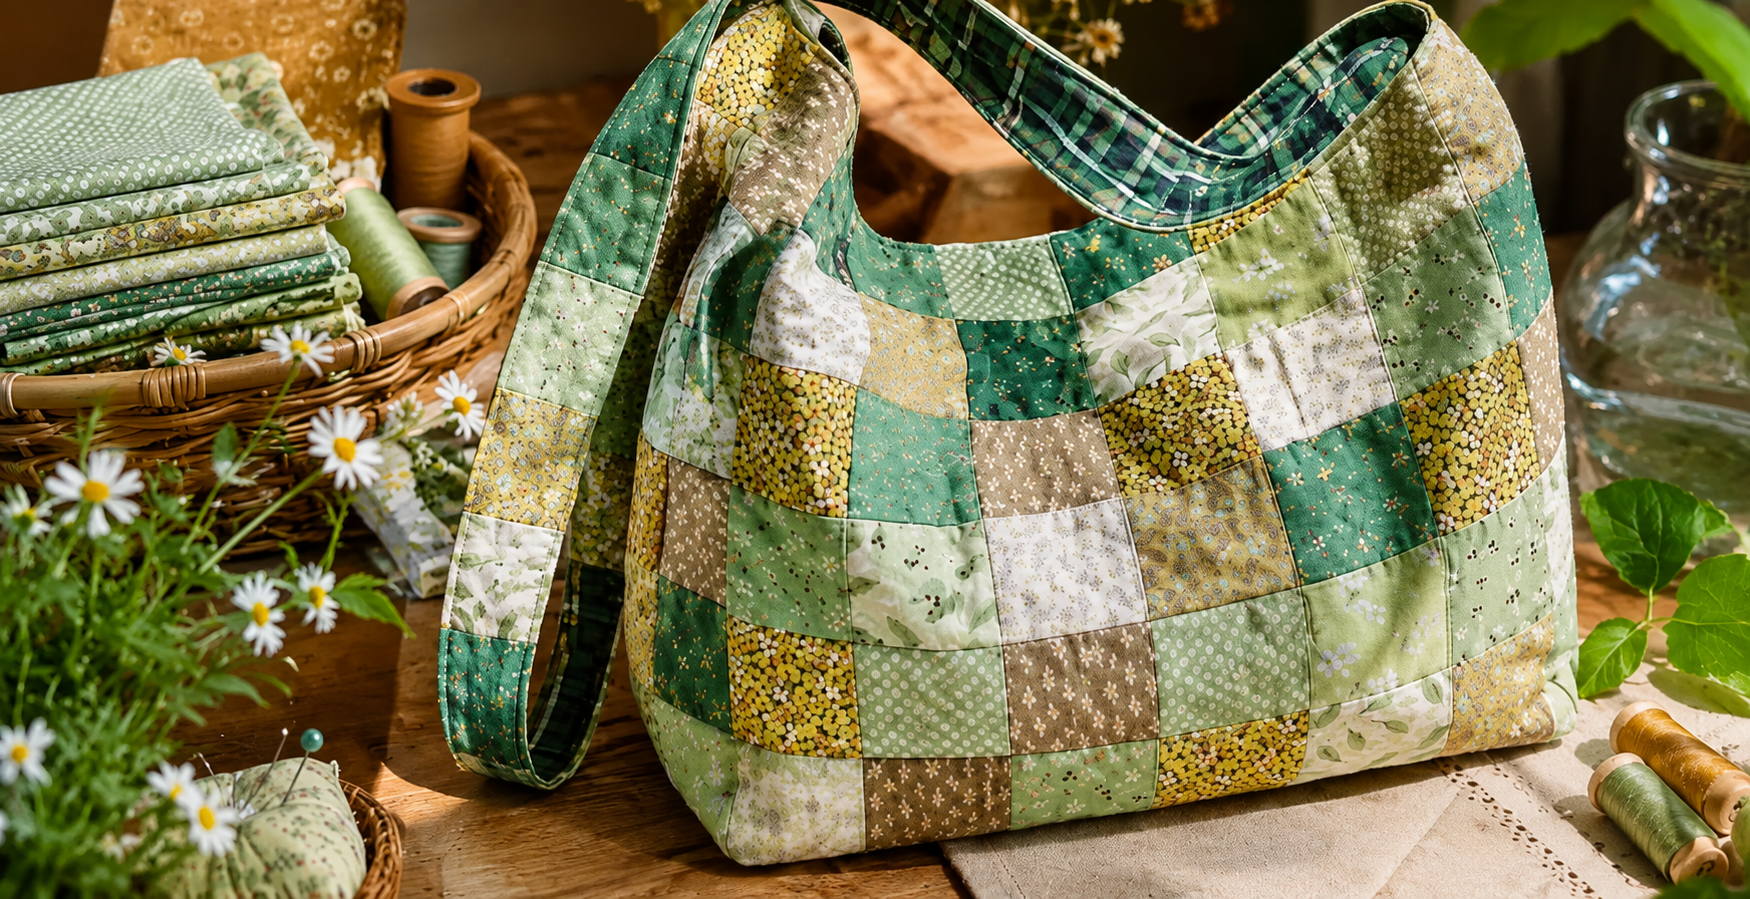
The Square Patchwork Bag Pattern is a charming sewing project that combines traditional patchwork with the practicality of a roomy handmade shoulder bag. Inspired by the bag shown in the reference image, this design uses a harmonious arrangement of small fabric squares in shades of green, cream, beige, mustard yellow, and soft botanical prints. The result is a relaxed, slightly rustic bag that looks beautiful while remaining useful for everyday life. One of the most appealing features of this project is that it can be created with fabric scraps, coordinated quilting cottons, or leftover pieces from previous sewing projects. Because the construction relies on simple geometric shapes, the Square Patchwork Bag Pattern can also be an approachable project for sewists who want to develop their patchwork skills without beginning with a large quilt.
Another important characteristic of the Square Patchwork Bag Pattern is its versatility. The square units can be arranged randomly for a scrappy appearance or carefully organized by color to create a more controlled design. In the pictured inspiration, different shades of green patchwork fabric, cream floral prints, neutral beige squares, and mustard accents produce a soft countryside palette. A darker green plaid fabric is used around the opening and along the shoulder strap, helping frame the lighter patchwork body. This contrast gives the bag a finished appearance while also making the handle visually stronger. Although the finished size can be adjusted according to personal preference, the same basic construction method can be used for a small purse, medium shoulder bag, or larger everyday tote.
Making a handmade patchwork bag is also a good opportunity to practice several essential sewing techniques in one project. You will learn how to cut consistent squares, maintain an accurate seam allowance, press patchwork seams, add interfacing or batting, construct a lining, shape a bag body, and attach a comfortable shoulder strap. The term Square Patchwork Bag Pattern describes both the visual design and the construction method: small fabric squares are joined into larger panels before those panels are transformed into a three-dimensional bag. Taking time to cut accurately and press carefully makes a noticeable difference in the finished result. With thoughtful preparation, even simple squares can become a polished accessory with plenty of handmade personality.
Choosing Fabrics and Preparing the Square Patchwork Pieces
The first step in creating the Square Patchwork Bag Pattern is choosing a coordinated fabric collection. For a look similar to the reference project, combine several shades of sage, forest, olive, and mint green with cream, tan, beige, and muted mustard yellow. Tiny floral patterns, dots, leaves, delicate botanical motifs, and small geometric prints work especially well because the individual squares are relatively small. Try to include both light and dark fabrics so the finished patchwork has enough contrast without appearing too busy.
DISCOVER MORE FREE PATTERNS HERE!
For a medium-sized shoulder bag, squares measuring approximately 7 x 7 cm before sewing are a practical starting point. If you prefer a chunkier patchwork appearance, increase them to approximately 8 or 9 cm. Remember that every square becomes smaller after the seam allowances are sewn. The important thing is consistency: all squares should have exactly the same dimensions. A rotary cutter, quilting ruler, and cutting mat can make this process easier, although careful cutting with fabric scissors is also possible.
Before cutting, press all fabrics so they lie completely flat. Wrinkles can change the measurements and cause neighboring squares to misalign later. If you are working with scraps, check that each piece is large enough to remain stable after trimming. Lightweight quilting cotton is particularly suitable for this project because it is easy to sew, presses cleanly, and produces crisp patchwork seams. Very stretchy or slippery fabrics may require extra stabilization and can make the assembly process more challenging.
Lay the cut squares on a table before sewing anything together. This is one of the most enjoyable stages because you can experiment with color placement until the composition feels balanced. Avoid placing too many identical prints directly beside one another. Instead, alternate light and dark values and distribute mustard or stronger green accents throughout the design. This simple planning technique creates visual movement and makes the patchwork bag appear intentionally designed rather than randomly assembled.
Once the layout is established, organize the squares into horizontal rows. Sew each pair using a consistent seam allowance of approximately 0.7 cm. Continue adding squares until every row is complete. After sewing, press the seam allowances carefully. Many quilters prefer pressing alternating rows in opposite directions because the seams can nest together when the rows are joined. This helps the corners of the squares meet more accurately and creates the recognizable grid that defines a square patchwork pattern.
Finally, join the completed rows together to form the main exterior panels. Depending on your desired bag dimensions, you may need approximately six to eight squares across and five to seven rows high. You can create two separate rectangular panels for the front and back or construct one longer patchwork section that wraps around the bottom. The exact arrangement can be customized, which is part of the appeal of the Square Patchwork Bag Pattern. Once assembled, press the entire patchwork panel from both sides without stretching the fabric.
Adding Batting, Quilting, and Shaping the Bag Body
After the patchwork panels are finished, the next step is adding structure. A bag made only from quilting cotton may feel too soft, so placing fusible interfacing, fleece, or thin quilt batting behind the patchwork provides additional strength. Lightweight batting creates the soft quilted appearance visible in the inspiration image, while firmer interfacing produces a bag that stands more upright. Some sewists combine both materials, using lightweight batting for texture and interfacing for reinforcement.
Cut the batting slightly larger than each patchwork panel. Position the exterior fabric over it and smooth away wrinkles. If you are using fusible material, follow its recommended pressing method carefully. For traditional batting, temporary basting stitches or safety pins can keep the layers from shifting during quilting. At this point, you can add a backing fabric beneath the batting if desired, although the final lining will eventually cover the interior construction.
Quilting the patchwork adds both decoration and durability. One of the easiest options is stitch-in-the-ditch quilting, where the sewing line follows the seams between the squares. This technique emphasizes the patchwork grid while keeping the design clean. Another option is to sew approximately 2 or 3 mm away from each seam for a slightly more visible quilted effect. Work slowly, especially where multiple seam allowances intersect, because those areas can become thicker.
Once quilting is complete, trim the panels so that their edges are even. For the relaxed shape shown in the image, gently curve the upper corners instead of leaving the body completely rectangular. You can create a paper template by folding a piece of paper in half, drawing one side of the desired curve, and cutting it out. Using a symmetrical template ensures that both sides of the bag match. Do not remove too much fabric because you still need sufficient width for the shoulder opening.
Next, place the exterior panels with their right sides together. Sew around the side edges and bottom, leaving the top completely open. Reinforce the beginning and end of every seam with backstitching. For additional capacity, you can create a boxed or gently rounded bottom. To make a boxed base, flatten each lower corner so the side seam aligns with the bottom seam, mark a short line across the corner, stitch along it, and trim away the excess fabric.
Turn the exterior right side out temporarily and inspect the shape. The Square Patchwork Bag Pattern should have a soft, comfortable silhouette rather than looking overly rigid. Check that the patchwork rows remain reasonably aligned and that no seams have opened during construction. Small imperfections are normal in handmade patchwork, but loose seams should be repaired before proceeding. Once you are satisfied with the shape, turn the exterior wrong side out again so it is ready to receive the lining.
Sewing the Lining, Opening, and Comfortable Shoulder Strap
A well-made bag lining protects the patchwork seams and makes the finished accessory more practical. Choose a durable cotton fabric that complements the exterior colors. Solid cream, sage green, small botanical prints, or subtle checks can all work beautifully. Cut the lining using the completed exterior as a guide, adding the same curved corners and general silhouette. Avoid making the lining significantly larger than the exterior because excess fabric can bunch inside the finished bag.
Place the two lining pieces right sides together and sew the sides and bottom. Leave an opening of approximately 10 to 12 cm along the bottom seam. This opening will later allow the entire bag to be turned right side out. If your exterior has boxed corners, repeat exactly the same corner construction on the lining. Accurate matching between the lining and exterior helps the inside sit smoothly without pulling or sagging.
Before attaching the lining, consider adding an interior pocket. Cut a rectangle of fabric, fold the top edge twice, and topstitch it to create a clean finish. Fold the remaining raw edges toward the wrong side, press them, and sew the pocket onto one lining panel. A patch pocket is useful for keeping small objects organized and requires very little additional sewing. You can divide a larger pocket with a vertical row of stitching to create two compartments.
The shoulder strap is an important feature of the Square Patchwork Bag Pattern. To echo the reference image, use a darker green plaid or coordinating fabric that contrasts gently with the patchwork body. A finished strap width of approximately 4 to 5 cm is comfortable for most shoulder bags. Cut a long fabric strip, reinforce it with interfacing, fold the long edges inward, then fold the strip in half and press. Topstitch close to both long edges for a professional finish.
Attach each end of the strap securely near the upper sides of the exterior bag. Because the handle will carry the weight of everything inside, reinforce the attachment points with multiple rows of stitching. A rectangular stitching pattern with an additional diagonal cross can provide extra strength. Before permanently securing the strap, pin it in position and test the approximate length against your shoulder. A longer strap creates a relaxed shoulder or crossbody style, while a shorter strap keeps the bag closer beneath the arm.
With the exterior still wrong side out and the lining right side out, place the lining inside the exterior so their right sides face each other. Align the upper edges carefully and pin or clip around the opening. Stitch around the complete top edge, keeping the strap ends safely positioned between the layers. After sewing, gently pull the entire bag through the opening left in the lining. Close that opening with a neat machine stitch or invisible hand stitch, then push the lining into the bag and press the upper edge.
Finishing Details and Creating a Professional Patchwork Bag
Once the lining is inside, topstitch around the upper opening approximately 3 to 5 mm from the edge. This small finishing detail prevents the lining from rolling outward and gives the Square Patchwork Bag Pattern a cleaner appearance. Use a slightly longer stitch length for visible topstitching and sew slowly around curved areas. If your machine struggles with thicker sections near the strap attachments, turn the handwheel manually for the first few stitches.
You may also add a closure depending on how you plan to use the bag. A magnetic snap is discreet and convenient, while a fabric loop and button can enhance the handmade aesthetic. Another simple option is a zipper installed within a narrow facing, although this requires more advanced sewing. If you prefer the soft open-top appearance shown in the inspiration, the bag can also be left without a closure.
Give the entire project a final press using a temperature appropriate for your fabrics and interfacing. Avoid flattening thick batting excessively, because part of the charm of the project comes from its soft quilted texture. Shape the bottom and corners with your hands while the fabric is still slightly warm from pressing. This helps the handmade patchwork bag settle into its intended form.
Check all stress points before using the bag. The strap attachments, lower corners, and side seams should be securely stitched because these areas experience the greatest pressure. If you plan to carry heavier objects, consider adding extra reinforcement behind the handle attachment areas before completing the lining. A small piece of sturdy interfacing hidden inside the seam can significantly improve durability without changing the exterior appearance.
One of the best things about this Square Patchwork Bag Pattern is how easily it can be personalized. Instead of green and mustard fabrics, you could create a version using blues and creams for a coastal feel, reds and neutrals for a country-inspired design, or bright multicolored scraps for a cheerful modern look. The same construction can also be adapted to seasonal fabrics. Keeping the square size consistent allows you to change the color palette without changing the overall sewing method.
After finishing, trim loose threads and inspect the patchwork carefully. The finished bag should feel soft but supported, with smooth lining, secure handles, and evenly arranged squares. What began as a collection of individual fabric pieces has now become a useful accessory with texture, character, and visual depth. That transformation is exactly what makes the Square Patchwork Bag Pattern such a satisfying project for both practical sewing and creative patchwork.
Frequently Asked Questions About the Square Patchwork Bag Pattern
What fabric is best for a Square Patchwork Bag Pattern?
Medium-light quilting cotton is one of the easiest options because it cuts accurately, presses well, and is available in many coordinating prints. Cotton canvas may be used for selected areas requiring extra strength, but very heavy fabrics can make intersecting patchwork seams difficult to sew.
How large should the patchwork squares be?
Squares of approximately 7 x 7 cm before sewing work well for a medium bag, but the dimensions are flexible. Larger squares produce a bolder design with fewer seams, while smaller squares create more detailed patchwork. Whatever size you choose, accurate and consistent cutting is more important than the exact measurement.
Do I need batting for a patchwork bag?
Batting is not absolutely required, but it helps produce the soft quilted appearance associated with this design. Thin cotton or polyester batting adds body without making the bag excessively bulky. For a firmer result, use bag interfacing or combine lightweight interfacing with thin batting.
Can beginners make this patchwork bag?
Yes. The basic construction uses straight seams, simple quilting, a lining, and a strap. Beginners may find it helpful to work slowly when matching square intersections and assembling the curved upper edge. Practicing the patchwork panel first can make the final bag construction much easier.
How do I make the corners of the squares line up correctly?
Cut every square accurately and use the same seam allowance throughout the project. Press alternate rows in opposite directions so neighboring seams nest together when pinned. Place a pin directly through important intersections before stitching the rows together. These habits greatly improve patchwork alignment.
Can I make the bag from fabric scraps?
Absolutely. A scrap fabric bag is one of the best uses for leftover quilting cotton. Try sorting scraps into a limited color family so the finished result remains visually balanced. The green, cream, beige, and mustard palette used in this style demonstrates how many prints can work together when their colors are coordinated.
How can I make the shoulder strap stronger?
Reinforce the strap with woven interfacing, fusible fleece, or another layer of sturdy fabric. Secure both strap ends with several rows of stitching and reinforce the bag fabric where the strap is attached. This is particularly important if the finished bag will regularly carry heavier items.
Should the patchwork be quilted before assembling the bag?
Yes, quilting the flat exterior panels before constructing the bag is generally easier. It stabilizes the patchwork and batting while everything is still flat and accessible. Once the quilting is completed, the panels can be trimmed and assembled into their final three-dimensional shape.
Can I add a zipper to this Square Patchwork Bag Pattern?
Yes. A recessed zipper can be added between the lining and upper opening for a polished finish. Beginners may prefer a magnetic closure or button loop because those options involve fewer construction steps. The choice depends on the desired appearance and how securely you want the bag to close.
How can I change the finished size of the bag?
Increase or reduce either the size of each patchwork square or the number of squares in each row. For example, adding another column increases width, while adding another row increases height. Remember to adjust the lining, batting, and strap proportions accordingly so all components remain balanced.
Conclusion
The Square Patchwork Bag Pattern demonstrates how straightforward pieces of fabric can be transformed into a distinctive and practical handmade accessory. The process begins with selecting coordinated fabrics and cutting accurate squares, followed by joining those squares into balanced patchwork panels. Adding batting and quilting gives the fabric structure and texture, while careful shaping turns the flat panels into the rounded, roomy bag form inspired by the reference image.
From there, adding a fitted cotton lining, optional interior pockets, reinforced shoulder strap, topstitching, and a suitable closure completes the construction. Each stage introduces useful sewing skills that can be carried into future quilting and bag-making projects. The pattern can also be adapted easily by changing square sizes, fabrics, colors, quilting designs, pockets, handles, or the final dimensions.
Most importantly, the Square Patchwork Bag Pattern gives fabric scraps and favorite prints an opportunity to become something both decorative and functional. Whether you choose the calming green, cream, beige, and mustard palette shown in this project or create an entirely different color combination, the fundamental technique remains accessible and highly customizable. If you make your own version, leave your sincere opinion about this project and share your suggestions. It is always interesting to know which colors, fabrics, strap styles, pockets, or finishing details you would choose for your own Square Patchwork Bag Pattern.