
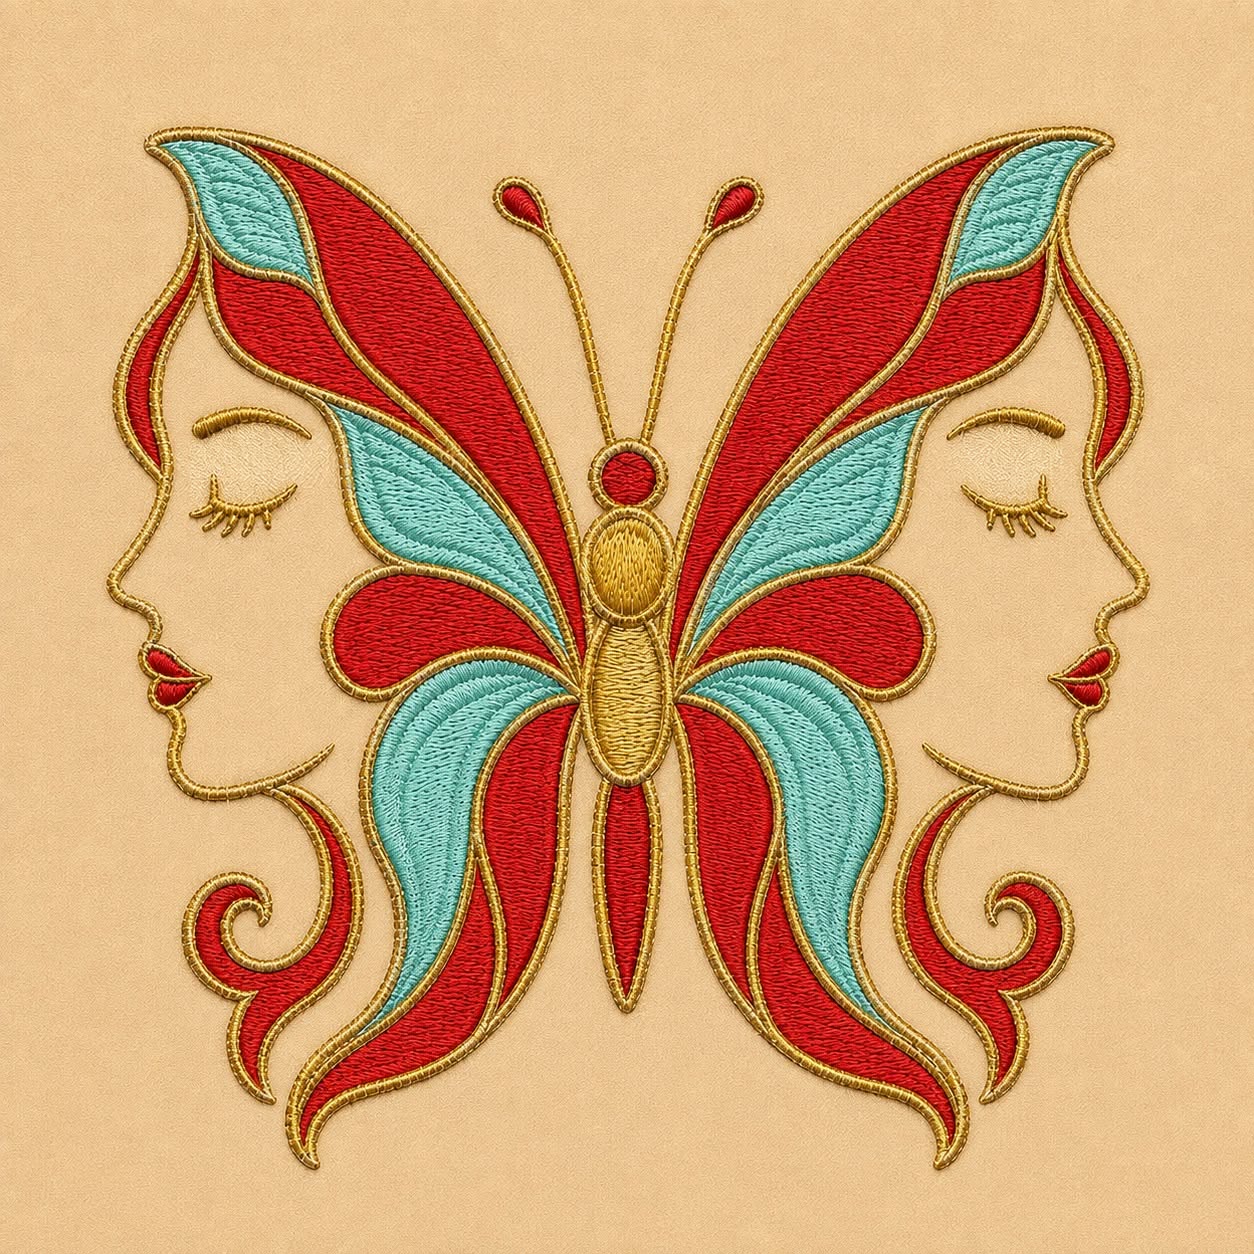
Double Sided Quilted Butterfly Appliqué Pattern is a creative sewing project that combines symmetrical butterfly wings, elegant feminine profiles, decorative quilting, and colorful fabric appliqué in one striking design. Inspired by the image, this project features two mirrored faces that form the outer silhouette of a butterfly, while the central body and layered wings connect both sides. Deep blue, turquoise, cream, and black create a sophisticated contrast, but the pattern can easily be adapted to match different fabrics, home décor styles, clothing projects, or personal color preferences. Whether you want to decorate a quilt block, wall hanging, cushion cover, tote bag, or fabric panel, this design offers an artistic way to practice precision sewing while producing a unique handmade result.
The term Double Sided Quilted Butterfly Appliqué Pattern describes a balanced appliqué composition that presents visual details on both sides of a central axis. “Double sided” refers to the mirrored arrangement of the faces, curls, and wings. “Quilted” means that the appliqué can be attached to a layered fabric surface containing a top, batting, and backing, creating texture and stability. A “butterfly appliqué” is a decorative motif made by placing shaped fabric pieces over a background and stitching around their edges. Finally, the word “pattern” refers to the collection of templates used to cut and position every section accurately. Understanding these elements before beginning will help you complete the design with cleaner lines and a more professional finish.
Although the finished image looks detailed, the project becomes manageable when it is separated into small sections. The central butterfly body can be assembled first, followed by the main wings, inner wing accents, faces, eyelashes, lips, antennae, and decorative curls. Each piece can be traced separately and placed according to a central guideline. The most important part of this project is symmetry, so careful measuring and patient positioning are more valuable than sewing quickly. Beginners may choose larger fabric shapes and simple satin stitching, while experienced makers can add free-motion quilting, embroidered facial details, thread painting, trapunto, or additional decorative lines. The following guide explains the complete process from material selection to final quilting.
Materials, Fabrics, and Tools for the Butterfly Appliqué
Begin by choosing a firm background fabric that will support the many appliqué pieces without becoming distorted. A neutral cotton or cotton-linen blend is ideal because it allows the blue butterfly and black outlines to remain clearly visible. Cream, ivory, pale gray, or soft beige will create a look similar to the inspiration image. Cut the background several centimeters larger than the desired finished block so you have enough space for trimming and squaring after the appliqué and quilting are complete.
DISCOVER MORE FREE PATTERNS HERE!
For the wings, select at least two coordinated fabrics with noticeable contrast. Dark royal blue can be used for the main wing sections, while turquoise or aqua fabric can form the smaller leaf-shaped accents and lower wing panels. Solids are excellent for creating a clean embroidered appearance, but subtle tonal prints can add depth without making the design look crowded. Prewash the fabrics when necessary, press them flat, and avoid materials that fray excessively unless you intend to use a raw-edge technique.
You will also need small pieces of cream or skin-tone fabric for the two facial profiles. Choose a shade that remains distinct from the background so the outlines of the forehead, nose, lips, chin, and neck are easy to recognize. If the face fabric is very similar to the base, add a dark stitched outline around the profile. The lips can be made from tiny dark blue appliqué pieces, fabric paint, or dense satin stitching, depending on the tools available.
An appliqué adhesive is helpful for keeping the pieces secure before sewing. Fusible web is a popular choice for a Double Sided Quilted Butterfly Appliqué Pattern because it prevents the numerous curved shapes from shifting. Select a lightweight product that will not make the finished block excessively stiff. Freezer paper, template plastic, tracing paper, or cardstock may also be used to prepare reusable templates. Always follow the manufacturer’s instructions when pressing fusible materials.
Essential sewing tools include sharp fabric scissors, small embroidery scissors, a fine fabric marker, an iron, an ironing surface, pins, and a sewing machine. A machine with an adjustable zigzag stitch is enough for this project. An open-toe appliqué foot provides better visibility around curves, while a free-motion quilting foot is useful for adding decorative texture later. Keep a seam ripper nearby because correcting a short section immediately is easier than working around an uneven outline.
Choose thread colors that coordinate with each fabric area. Dark blue and turquoise threads help the stitches blend into the butterfly wings, while black thread creates the bold outlines seen in the inspiration. Cream thread can be used for subtle quilting in the faces or background. Machine embroidery thread produces a smooth, polished surface, while cotton thread gives the design a softer handmade character. Test the stitch width, tension, and density on a fabric scrap before working on the main block.
Preparing and Arranging the Double Sided Design
Create the pattern by dividing the image into individual shapes. You will need templates for the central body, head, upper and lower body sections, antennae, large upper wings, lower wings, inner wing accents, side wing extensions, two facial profiles, lips, and lower decorative curls. The facial profiles should mirror each other, and every wing section on the left should have a matching reversed section on the right. Label each template clearly to avoid confusion during assembly.
Draw a vertical guideline through the center of the background fabric using a removable fabric marker. Add a horizontal line across the approximate center of the butterfly body. These two guidelines will keep the composition balanced. The centerline is especially important because even a small placement difference can make one side appear larger than the other. Fold the background fabric gently in half to verify that the center has been marked correctly, but avoid pressing a permanent crease.
Trace each pattern piece onto the paper side of the fusible web. When a shape has a specific direction, remember that the final fused piece will be reversed. For the right and left sides, trace one original template and one mirrored version. Leave a small amount of space between the traced shapes, cut them apart roughly, and fuse them to the wrong side of the selected fabrics. Do not cut directly on the final line until the adhesive has cooled.
Carefully cut every fabric shape using small, smooth movements. Curved wing sections should have clean edges without sharp accidental corners. Keep the left and right pieces in separate labeled groups. A small tray, envelope, or resealable bag can prevent tiny pieces such as lips, eyes, and antenna tips from being lost. Place all completed pieces on the background before removing any remaining paper backing so you can evaluate the composition.
Begin arranging the design from the center outward. Position the butterfly body directly over the vertical guideline, followed by the largest wing sections. Add the turquoise inner details, lower wing pieces, and horizontal side shapes. Next, position the facial profiles so their inner edges visually connect with the wings. Make sure both noses, lips, chins, and neck curves sit at the same height. Finish the arrangement with the curled lower decorations and the antennae.
Step back and observe the entire Double Sided Quilted Butterfly Appliqué Pattern before fusing. Check the space around the motif and make sure the design is not too close to the edges of the background. Measure matching points on both sides, including the tips of the upper wings, the eyes, the lips, and the ends of the lower curls. When the arrangement looks balanced, remove the backing papers and fuse the pieces gradually, beginning with the lower layers and finishing with the smallest details.
Sewing, Quilting, and Finishing the Butterfly Block
Stitch the appliqué pieces in layers rather than trying to sew around the entire design at once. Begin with the shapes that are partially covered by other pieces, such as inner wing panels or the lower portions of the central body. A narrow zigzag stitch, blanket stitch, or satin stitch can be used around the edges. Satin stitching creates the bold embroidered look of the reference image, while blanket stitching gives the project a softer traditional appliqué appearance.
When sewing curved edges, reduce the machine speed and stop frequently with the needle down. Lift the presser foot slightly and pivot the fabric by a small amount before continuing. This technique produces smoother outlines around the faces, curls, and wing tips. Avoid turning too sharply because sudden pivots can create visible points in places that should be rounded. Practice several inside and outside curves on a scrap before beginning the profiles.
Use black thread to define the two faces. Stitch carefully along the forehead, nose, lips, chin, jaw, and neck. The eyes can be drawn first with a removable marker and then covered with a narrow satin stitch or a reinforced straight stitch. Add short curved eyelashes extending downward from each closed eye. Because the design is mirrored, compare both faces often so their expressions remain consistent and peaceful.
The antennae can be created with a narrow satin stitch, a triple straight stitch, couching, or hand embroidery. Begin at the butterfly’s head and work upward in a gentle curve. Add a small teardrop-shaped appliqué or dense stitched oval at each tip. Keep the antennae approximately equal in length, but do not worry about microscopic differences. Slight variations are natural in handmade work and can give the butterfly more character.
Once the appliqué stitching is complete, prepare the quilt sandwich. Place the backing fabric right side down, add a thin layer of batting, and position the appliquéd top right side up. Baste the layers with pins, temporary spray, or long hand stitches. Quilt around the outer silhouette of the butterfly and faces first. This outlining technique stabilizes the design and helps the central motif stand slightly above the background.
Add additional quilting according to the intended use of the block. Echo quilting can follow the outer shape of the butterfly, while free-motion swirls can complement the decorative curls. Closely spaced background quilting will make the appliqué appear more raised. For a cushion, tote bag, or wall hanging, trim the block square after quilting and finish it with borders, binding, or assembly seams. Press gently from the wrong side to preserve the dimensional texture.
Frequently Asked Questions About Butterfly Appliqué
What is a Double Sided Quilted Butterfly Appliqué Pattern?
A Double Sided Quilted Butterfly Appliqué Pattern is a symmetrical fabric design built around a central butterfly body. Matching or mirrored shapes appear on both sides, creating visual balance. In this project, the wings blend with two feminine facial profiles, making the motif both decorative and artistic. The finished appliqué can be added to quilts, bags, cushions, garments, banners, or framed textile art.
Is this project suitable for beginners?
The design is detailed, but a motivated beginner can complete it by working slowly. It is helpful to practice basic fusible appliqué and curved machine stitching first. Beginners may simplify the smallest wing accents, replace satin stitching with a wider blanket stitch, or enlarge the complete pattern. Larger pieces are easier to cut, position, and sew than very small shapes.
Which appliqué method works best for this pattern?
Fusible raw-edge appliqué is the easiest method for achieving precise mirrored pieces. The adhesive holds the curved shapes securely while they are stitched. Turned-edge appliqué can also be used, although it requires more preparation and may be challenging around the narrow curls, lips, and wing tips. Machine embroidery is another option when a properly digitized file and compatible equipment are available.
How can I make both sides perfectly symmetrical?
Create only one half of the main paper pattern first and then trace a reversed copy for the opposite side. Mark a centerline on the background fabric and measure the distance from matching points to that line. You can also place tracing paper over the arrangement and compare the silhouettes. Do not fuse the shapes until all major points, including wing tips, eyes, lips, and curls, are aligned.
What fabrics should I avoid?
Very stretchy, slippery, thick, or loosely woven fabrics can make precision appliqué more difficult. Lightweight quilting cotton is the safest choice because it presses well and maintains its shape. If you want to use satin, velvet, denim, or another specialty fabric, stabilize it before cutting and test the adhesive temperature. Some synthetic fabrics may be damaged by high heat.
Can I change the blue and turquoise color palette?
Yes. The color combination can be completely customized. Purple and pink can create a romantic version, while orange and yellow can produce a warm monarch-inspired butterfly. Green and gold can give the design a nature-themed appearance. For strong definition, maintain contrast between adjacent pieces and use a dark outline thread that remains visible over every selected fabric.
Do I need an embroidery machine?
An embroidery machine is not required. A standard sewing machine with straight and zigzag stitches can complete the entire project. Satin stitching is created by using a short stitch length and an appropriate zigzag width. Decorative details can also be added by hand with embroidery floss. The most important requirements are good visibility, controlled stitching, and careful preparation.
How do I prevent puckering around dense satin stitches?
Use a stabilizer behind the background fabric before sewing dense outlines. A lightweight tear-away or cut-away stabilizer can support the fabric and reduce distortion. Test the thread tension and avoid making the satin stitch unnecessarily dense. Allow the machine to feed the fabric naturally instead of pulling it. Press the finished work gently from the back using a pressing cloth.
Can this design be used on clothing?
Yes, but the size, weight, and placement should be considered. A smaller version may work well on the back of a denim jacket, the front of a fabric vest, or a decorative pocket. Use flexible stabilizer and avoid creating overly stiff areas. Washable fabrics, colorfast threads, and secure edge stitching are essential when the finished item will be laundered regularly.
What size should the finished butterfly be?
The ideal size depends on the project. A butterfly measuring approximately 25 to 35 centimeters wide provides enough room for detailed faces, eyelashes, and layered wing sections. A larger wall hanging may use a motif measuring 40 centimeters or more. When reducing the pattern, check that the lips, antennae, and narrow curls remain large enough to cut and stitch accurately.
How should I wash the finished appliqué?
Use gentle washing methods, especially when the design contains dense stitching or multiple small pieces. Wash in cool water with mild detergent and avoid harsh bleach. Air drying is preferable for wall hangings and decorative blocks. For cushions, bags, or garments, follow the care requirements of the most delicate fabric used in the project. Always test fabrics for color bleeding before assembly.
Can I add extra quilting inside the wings?
Additional quilting can make the butterfly more dimensional. Sew curved lines that follow the direction of each wing, add feather-like motifs, or quilt small echo shapes inside the colored panels. Use matching thread for subtle texture or contrasting thread for a more graphic effect. Avoid excessive stitching over tiny appliqué sections because it may flatten the layered appearance.
Conclusion
The Double Sided Quilted Butterfly Appliqué Pattern combines symmetry, fabric appliqué, decorative stitching, and quilting in a memorable textile project. Throughout this guide, you learned how to choose suitable fabrics, prepare mirrored templates, mark the center of the background, arrange each section, fuse the pieces, stitch smooth outlines, create the facial details, add antennae, and quilt the completed block. By building the design from the central body outward, you can control the alignment and preserve the graceful balance that makes this butterfly so distinctive.
EASILY FIND THE PDF FOR THIS PATTERN HERE!
This project can be adapted to many styles and skill levels. You may follow the elegant blue and turquoise palette from the inspiration or create an entirely new combination using your favorite colors. The finished motif can become the center of a quilt, cushion, tote bag, wall hanging, jacket panel, or personalized handmade gift. Take your time with the mirrored placement, test your stitches before sewing, and enjoy each stage of the creative process. Please leave your honest opinion about this butterfly appliqué pattern and share any suggestions, color ideas, or project variations you would like to see.