
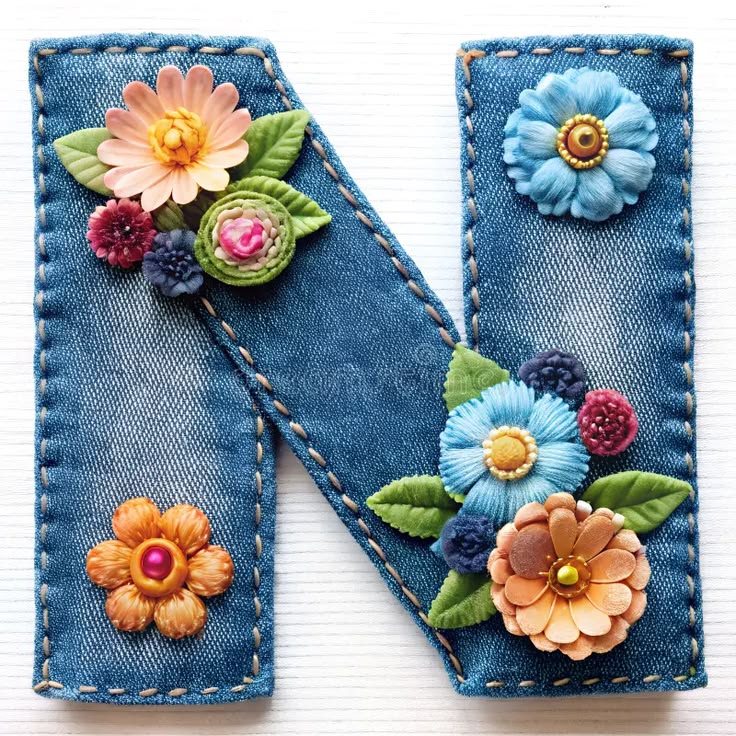
Tutorial for a floral letter “N” on denim Pattern is a creative sewing project that transforms a simple fabric letter into a charming decorative piece filled with texture, color, and personality. The design shown in the reference image combines the casual appearance of blue denim with delicate handmade flowers, green leaves, decorative centers, and visible stitching around the edges. This contrast between rustic fabric and elegant floral details makes the letter suitable for many decorative purposes. It can become part of a personalized wall hanging, nursery decoration, bedroom ornament, craft-room sign, fabric banner, or handmade gift. Although the finished project looks detailed, it can be completed by following a clear sequence of cutting, layering, stitching, and decorating. This guide explains every important stage so that beginners and experienced crafters can confidently reproduce the idea.
The central feature of this project is the padded denim letter pattern, which provides a strong and durable base for the floral arrangement. Denim is especially useful because it keeps its shape, supports heavier decorations, and creates an attractive background for pastel and vibrant colors. The exposed running stitches around the letter add a handmade finish while also helping to secure the fabric layers. Flowers can be created from felt, fabric scraps, ribbon, artificial petals, embroidery thread, or a combination of materials. Small beads, buttons, fabric-covered circles, and decorative findings can be used to form the flower centers. Because each floral element is made separately, the design can easily be customized without changing the construction of the letter.
A successful floral letter “N” on denim depends on careful preparation rather than complicated sewing techniques. The letter should be large enough to display the flowers clearly, and its diagonal section must remain wide enough to prevent the shape from becoming fragile. A small seam allowance helps create clean edges, while lightweight padding gives the project a pleasant three-dimensional appearance. Before attaching anything permanently, all flowers and leaves should be arranged on the denim to test their balance. Larger flowers usually work best near the upper-left and lower-right areas, while smaller details can fill empty spaces. By taking time to plan the composition, you can create a polished decorative letter that remains visually balanced from every angle.
Materials and Tools for the Denim Floral Letter
Begin by choosing a medium-weight piece of blue denim for the front of the letter. You may use new denim fabric or repurpose a clean section from an old pair of jeans. Avoid areas with thick seams, pockets, belt loops, or excessive stretching because they can make cutting and stitching difficult. A medium-blue shade provides a classic appearance and allows light-colored flowers to stand out clearly. Dark denim can create a more dramatic result, while faded denim gives the project a softer vintage style. Wash and press reused material before cutting so that it lies flat and does not shrink later.
DISCOVER MORE FREE PATTERNS HERE!
For the back layer, select another piece of denim, cotton fabric, felt, or sturdy interfacing. Using denim on both sides makes the letter firm and consistent, while felt can simplify construction because it does not fray easily. You will also need a thin layer of batting, craft fleece, or soft foam to place between the front and back pieces. This internal layer gives the fabric letter “N” a padded appearance without making it too bulky. Choose padding that can be cut easily with fabric scissors. Very thick stuffing should be avoided because it may distort the narrow corners of the letter.
Prepare basic sewing supplies such as sharp fabric scissors, paper scissors, pins, sewing clips, a fabric marker, a ruler, a hand-sewing needle, and strong thread. A sewing machine is optional because the entire project can be completed by hand. For the visible border stitching, embroidery floss, pearl cotton, or thick sewing thread works particularly well. Beige, cream, light brown, or golden thread creates a warm contrast against the denim. You may also use thread that matches the flowers for a more colorful result. Make sure the needle has an eye large enough for the chosen decorative thread.
The flowers may be constructed from felt, cotton fabric, satin scraps, ribbon, lace, artificial petals, or molded fabric pieces. The reference style includes flowers in peach, orange, pale blue, burgundy, pink, green, and dark blue. You do not need to reproduce every color exactly, but selecting a coordinated palette will make the final decoration more harmonious. Gather materials in at least three flower sizes so that the composition has variety. Large flowers create focal points, medium flowers support them, and tiny blossoms fill narrow spaces. Using leftover materials from previous sewing projects is an economical way to personalize the design.
Green felt, cotton, velvet, or textured fabric can be used to create the leaves. Choose two or three shades of green to prevent the foliage from looking flat. The leaves can be plain, pleated, lightly padded, or marked with stitched veins. You will also need flower-center decorations such as buttons, beads, pearls, cabochons, fabric circles, or small coils of ribbon. Select lightweight items whenever possible so that the finished letter remains easy to hang. Heavy metal decorations may pull the denim forward or cause the fabric to sag over time.
Finally, choose the method you will use to attach the decorations. Hand stitching provides the strongest and most traditional result, especially for a project that may be handled frequently. Fabric glue can help hold small petals or leaves in position, but it should be applied sparingly. Hot glue offers a quick option, although it may create hard areas or visible lumps beneath delicate flowers. A combination of temporary fabric glue and secure hand stitches is often the most reliable solution. Always test adhesive on a denim scrap to confirm that it does not leave dark marks.
Creating and Sewing the Letter “N” Pattern
Draw or print a large block-style letter “N” on paper. A finished height of approximately 25 to 35 centimeters works well for a decorative wall piece, although the size can be adjusted to suit your intended use. Keep both vertical sections wide and make the diagonal band approximately the same width. Avoid narrow corners because they can become difficult to turn, pad, and decorate. Check that the letter looks balanced before cutting the paper pattern. Remember that the floral elements will cover some of the denim, so the base should be large enough to remain visible.
Place the paper letter “N” sewing pattern on the wrong side of the front denim piece and trace around it using tailor’s chalk or a removable fabric marker. Add a seam allowance of approximately 6 to 10 millimeters around the entire shape. Mark the original outline as the stitching guide and the outer line as the cutting guide. Transfer the same shape to the backing fabric and padding. When working with denim that has a noticeable grain or faded direction, keep the pattern upright on both fabric pieces. This prevents the front and back from appearing visually mismatched.
Cut the front denim, backing, and padding carefully. Use small, controlled cuts around the inner corners and diagonal edges of the letter. Do not cut directly into the stitching line when clipping corners. If your denim frays easily, apply a narrow line of fray-prevention liquid near the cut edges or finish them with a zigzag stitch. Another option is to use pinking shears, although these may be difficult to control in tight areas. Place all three pieces together afterward to confirm that their shapes align correctly.
Create a fabric sandwich with the backing piece facing downward, the padding in the center, and the front denim facing upward. Smooth each layer so there are no folds or bubbles. Pin or clip around the perimeter, paying special attention to the top corners, lower corners, and the diagonal bar. If you prefer a cleaner padded finish, place the front and back fabrics right sides together, stitch around them, leave a turning gap, and insert the padding after turning. However, the visible raw-edge method shown in the reference style is easier and creates an attractive rustic look.
Sew around the entire denim letter decoration using a running stitch. Keep the stitches approximately 5 to 8 millimeters long and position them evenly from the edge. Pull the thread firmly enough to secure the layers, but do not tighten it so much that the denim wrinkles. At every corner, make one shorter stitch to help the thread follow the shape neatly. When a thread length ends, secure it on the back with a strong knot. Continue until every outer and inner edge of the letter is stitched.
Inspect the completed base before adding the flowers. Trim any uneven fabric edges and remove loose denim threads that extend too far beyond the stitching. Gentle fraying is acceptable because it contributes to the handmade appearance, but excessive threads may hide the shape of the letter. Press the piece carefully from the back using a pressing cloth, especially when synthetic padding is used. Do not place a very hot iron directly on foam, felt, or decorative thread. The base should now be flat, padded, secure, and ready for embellishment.
Making and Arranging the Fabric Flowers
Start with the largest flower for the upper-left area of the letter. Cut several rounded petals from peach, blush, or pale pink fabric, making each petal slightly wider at the outer end. Fold or gather the base of each petal and stitch the petals together in a circular arrangement. Add a smaller second layer if you want a fuller flower. Cover the center with a gathered yellow fabric circle, a button, or a small cluster of beads. This large blossom will become one of the main focal points of the floral denim craft.
Create another large flower for the lower-right portion using peach, tan, orange, or soft coral fabric. For a layered appearance, cut petals in two or three graduated sizes. Arrange the largest petals at the back and the smallest petals toward the center. Slightly overlap them so the denim does not show between the layers. Secure the center with a contrasting bead, button, or fabric-covered circle. This flower should complement the upper blossom without looking completely identical.
Make two or three medium flowers using pale blue fabric, ribbon, or narrow strips of textured material. A simple gathered flower can be produced by sewing a running stitch along one edge of a fabric strip, pulling the thread, and joining the ends to form a circle. Another option is to fold individual petals and stitch them around a central button. Use gold, yellow, or brown centers to create contrast against the blue petals. Place one blue flower near the top of the right vertical section and another near the lower diagonal area. Repeating a color in separate locations helps visually connect the design.
Prepare several small flowers in burgundy, pink, dark blue, orange, or green. Small yo-yo flowers are easy to make by cutting fabric circles, sewing around their edges, and pulling the thread to gather them. Tiny rolled flowers can be created from narrow fabric or felt strips. You may also stack two small flower shapes and add a bead in the center. These miniature decorations are useful for filling spaces beside the larger blossoms. Avoid making every small flower identical, as slight differences add handcrafted character.
Cut pairs of leaves in different lengths and shapes. Some leaves can be narrow and pointed, while others can be rounded or slightly curved. To create dimension, fold each leaf lengthwise and make a small stitch at the base. Embroider a central vein with matching or contrasting thread, or add several diagonal stitches to suggest natural leaf texture. Arrange leaves beneath and between the flowers so that they frame each group. The foliage should support the flowers without covering too much of the denim background.
Before sewing, place every flower and leaf on the letter and photograph the arrangement for reference. Build one floral cluster near the upper-left corner, a smaller single flower near the top-right, and a larger cluster near the lower-right and central diagonal sections. Leave some open denim visible so that the letter remains easy to recognize. Begin attaching the leaves first, followed by the largest flowers, medium flowers, and smallest details. Sew through the flower centers and several hidden points beneath the petals. Once everything is secure, gently reshape the petals with your fingers.
Finishing, Displaying, and Personalizing the Project
After attaching all floral elements, examine the letter from a short distance. The top-left and lower-right arrangements should feel connected without making one area appear excessively heavy. Add one or two small leaves or flowers only when an empty space looks unintentional. It is better to preserve some clear denim than to cover the entire surface. Check that the diagonal bar of the “N” remains visible because it defines the letter’s shape. A balanced composition makes the Tutorial for a floral letter “N” on denim Pattern look professional and easy to understand.
Secure any loose petals, beads, or flower centers with extra stitches. Turn the project over and inspect the back for long threads or weak knots. Tie off each thread independently so that one loose knot cannot release several decorations. A small fabric patch can be stitched over the back of heavily embellished areas to hide knots and provide additional support. Do not apply glue across the entire back because this may make the letter stiff and difficult to repair. Neat finishing improves both durability and presentation.
To hang the letter, sew a small fabric loop, ribbon loop, or metal ring to the upper back. Position the hanger near the center of balance rather than automatically placing it in the exact middle. Because the flower arrangement may make one side heavier, test the letter on a temporary hook before sewing the loop permanently. Two small loops can provide greater stability for a larger piece. The letter can also be attached directly to a fabric banner, canvas panel, embroidery hoop, or wooden plaque. Choose a display method that supports the weight safely.
The design can be personalized with different color themes. Soft pink, cream, sage, and light blue are suitable for nursery décor, while burgundy, mustard, forest green, and dark denim create a rustic autumn appearance. Bright rainbow flowers can make the project playful and cheerful. For an elegant version, use ivory fabric flowers, pearl centers, gold thread, and dark indigo denim. The letter may also be decorated according to a holiday, season, or room color scheme. Consistent colors will help even highly varied flowers look like part of one collection.
You can use the same method to create other letters, names, or initials. When producing several letters for a word, trace them at the same height and use matching border stitches. Repeat two or three flower colors throughout the complete set to create visual continuity. Some letters may have large floral clusters, while narrower letters should use smaller blossoms. Avoid forcing oversized flowers onto small shapes because the letters may become difficult to identify. This adaptable denim floral letter pattern works well for personalized handmade gifts.
To keep the finished decoration clean, remove dust with a soft brush or a hair dryer on a cool, low setting. Avoid machine washing because beads, glue, padding, and dimensional flowers may be damaged. Small marks can be treated carefully with a damp cloth and mild soap. Store the letter flat or in a box when it is not displayed. Do not place heavy objects over the flowers because they may lose their shape. With gentle care, the project can remain attractive for many years.
Frequently Asked Questions
What is the best denim for making a floral letter “N”?
Medium-weight, non-stretch denim is usually the easiest material to cut and sew. It provides enough structure to support flowers without becoming difficult to handle. Very heavy denim may be challenging for hand stitching, while thin stretch denim may lose its shape.
Do I need a sewing machine for this project?
No. The letter can be assembled completely by hand using a running stitch around the edges. A sewing machine may speed up the construction, but hand stitching creates the visible decorative finish that gives the project its special character.
How large should the letter “N” be?
A height between 25 and 35 centimeters is practical for wall décor. Smaller letters are possible, but the flowers and leaves will need to be reduced accordingly. Larger letters can hold more decoration but may require thicker backing for support.
Can I use real dried flowers instead of fabric flowers?
Fabric flowers are more durable and flexible than dried flowers. Real dried flowers can break, fade, or release small pieces over time. For a long-lasting textile project, felt, ribbon, cotton, and artificial fabric petals are safer options.
What can I use instead of batting?
Craft felt, fleece, thin foam, or several layers of cotton fabric can replace batting. The purpose of this layer is to give the letter gentle padding and stability. Choose a material that is lightweight and easy to stitch.
How do I stop denim from fraying?
Keep the decorative stitches close enough to the edge to hold the fabric layers securely. You can also use fray-prevention liquid, a narrow zigzag stitch, or pinking shears. A small amount of natural fraying can be left visible for a rustic handmade finish.
Should the flowers be sewn or glued?
Sewing is the most secure method, particularly for beads, buttons, and large flowers. Fabric glue can temporarily hold small pieces in place while you stitch them. When glue is used as the only attachment method, choose a product designed specifically for textiles.
How can I make the flower arrangement look balanced?
Begin with the largest flowers and distribute them across different parts of the letter. Add medium flowers, leaves, and tiny blossoms around them. Leave visible areas of denim and check the arrangement from a distance before sewing.
Can this floral letter be used in a child’s room?
Yes, but small beads, buttons, and loose decorations should be attached extremely securely. The finished piece should be displayed out of reach and used only as decoration. For a safer version, replace small removable items with embroidered or fabric-covered centers.
Can I create the project with another fabric?
Yes. Canvas, corduroy, felt, linen, and upholstery fabric can be used instead of denim. However, the material must be strong enough to support the dimensional flowers and maintain the shape of the letter.
Conclusion
This Tutorial for a floral letter “N” on denim Pattern explained how to prepare a strong letter template, cut the denim layers, add lightweight padding, sew decorative running stitches, create fabric flowers, shape textured leaves, and arrange every detail in a balanced composition. The project combines simple sewing techniques with creative embellishment, making it suitable for anyone who enjoys personalized fabric crafts.
EASILY FIND THE PDF FOR THIS PATTERN HERE!
By changing the colors, materials, flower sizes, and display method, you can create a completely unique letter while preserving the same construction process. The finished decoration can be displayed alone, included in a name banner, attached to a wall panel, or given as a thoughtful handmade gift. Please leave your sincere opinion about this tutorial and share any suggestions that could make the project even more useful, beautiful, or enjoyable for other crafters.