
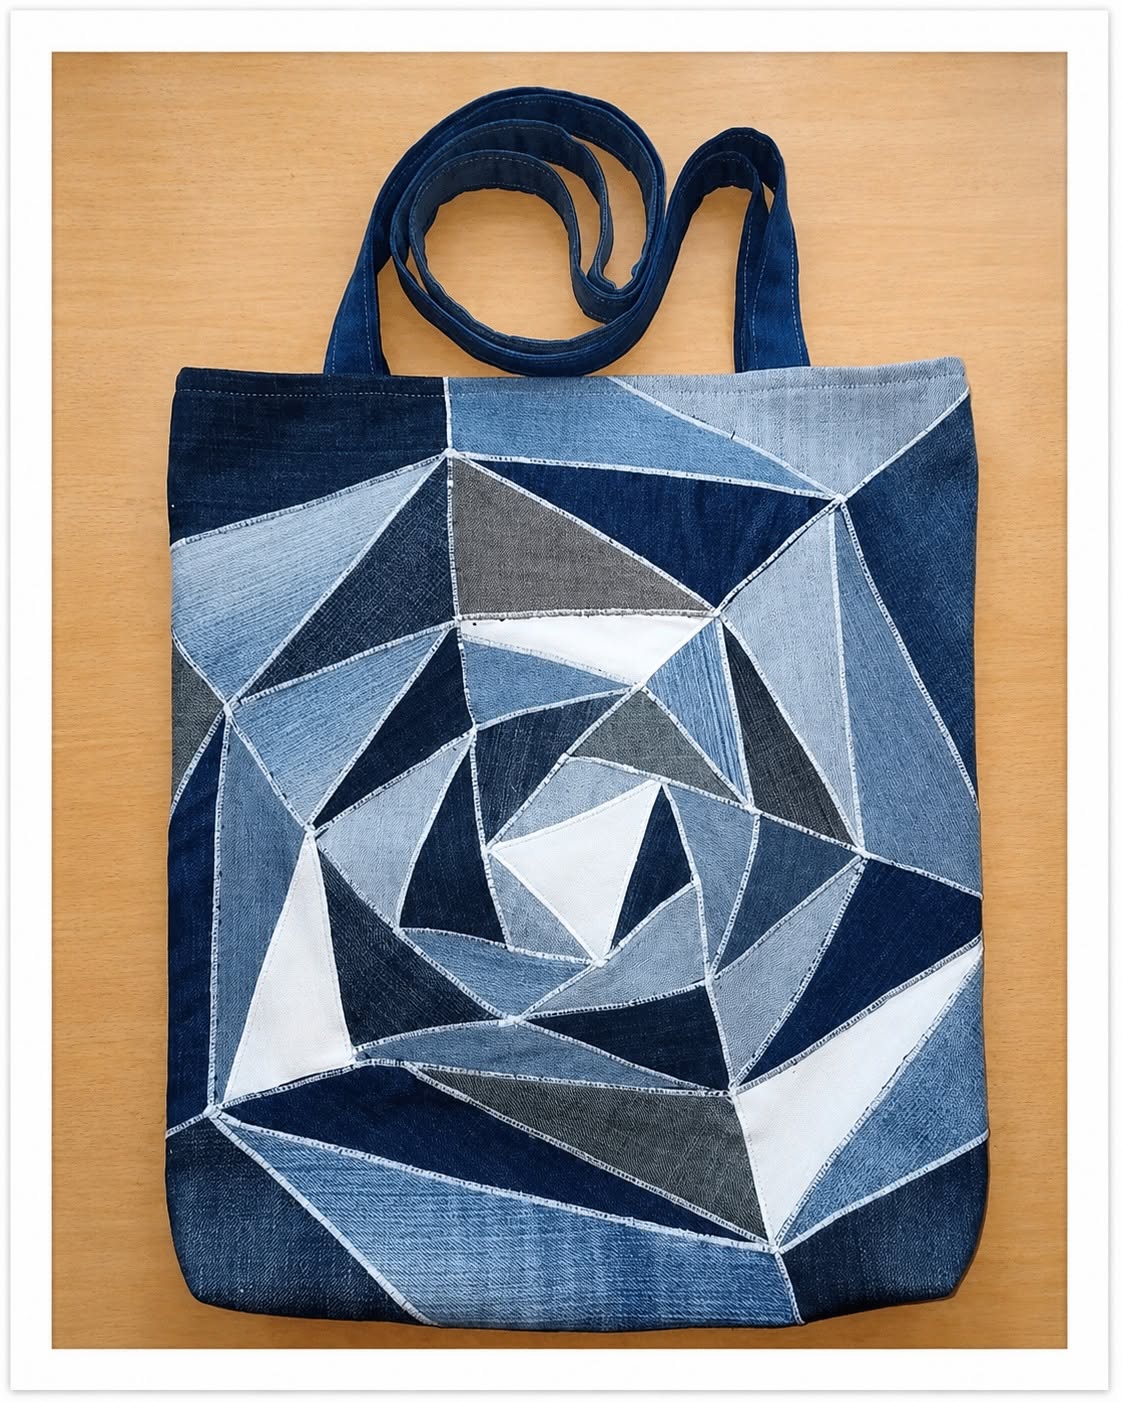
Denim Patchwork Tote Bag Fabric Pattern is a creative sewing project that transforms denim scraps into a strong, practical, and visually striking handmade bag. Inspired by the tote shown in the photo, this design combines different shades of blue, gray, and white denim to form an abstract geometric spiral across the front panel. The irregular shapes create movement and depth, while the visible seam lines emphasize the handcrafted patchwork style. This project is an excellent way to reuse old jeans, leftover upholstery fabric, or small denim pieces that might otherwise be discarded. It also allows you to create a unique accessory because no two arrangements of fabric pieces will ever look exactly the same.
The term Denim Patchwork Tote Bag Fabric Pattern refers to both the design plan and the construction method used to make this type of bag. “Denim” identifies the main material, which is appreciated for its resistance and durability. “Patchwork” describes the technique of joining smaller pieces of fabric to create a larger decorative surface. “Tote bag” refers to the simple, roomy bag shape with two handles, while “fabric pattern” represents the measurements, templates, cutting instructions, and assembly order required to complete the project. When these elements are combined, the result is a reusable bag that is functional, artistic, and suitable for everyday use.
Although the finished geometric design may appear complicated, it can be constructed gradually by working from the center toward the outer edges. The secret is to organize the denim pieces before sewing, maintain accurate seam allowances, press every seam carefully, and trim the panel regularly as it grows. Beginners can simplify the composition by using larger shapes, while experienced sewists can add narrower pieces and more detailed angles. The following tutorial explains the complete process, including material selection, pattern planning, patchwork assembly, bag construction, lining, handles, finishing, and care.
Materials, Measurements, and Denim Preparation
Begin by collecting several shades of denim to reproduce the dimensional effect visible in the inspiration photo. Dark indigo, medium blue, faded blue, charcoal, pale gray, and white fabrics create a balanced palette. Old jeans are ideal, provided that the fabric is still strong and does not contain excessively stretched or damaged areas. Avoid using thick waistbands, bulky pockets, metal rivets, or heavily worn knee sections in the main patchwork panel.
DISCOVER MORE FREE PATTERNS HERE!
For a medium-sized tote, plan a finished bag measuring approximately 15 inches wide by 17 inches high, or about 38 by 43 centimeters. Add a ½-inch seam allowance around all outer edges. You will need two exterior rectangles measuring approximately 16 by 18 inches, two lining rectangles of the same size, and two handle strips measuring around 4 by 28 inches. These measurements may be adjusted according to the desired bag size.
The essential supplies for this Denim Patchwork Tote Bag Fabric Pattern include denim scraps, cotton lining fabric, medium-weight fusible interfacing, coordinating thread, a universal or denim sewing-machine needle, fabric scissors, a rotary cutter, a cutting mat, a quilting ruler, pins or sewing clips, an iron, and a marking pencil. A walking foot can be useful because it helps feed multiple fabric layers evenly, but it is not essential.
Wash and dry all reclaimed denim before cutting it. Prewashing removes dirt, softens the fabric, and reduces the possibility of future shrinkage. Open the jeans by cutting along the inner-leg and outer-leg seams so the fabric can lie flat. Press each section with steam, being careful not to stretch it. Flat, wrinkle-free pieces are much easier to mark and cut accurately.
Sort the prepared scraps by color and weight. Place dark, medium, and light pieces into separate groups so that you can quickly compare them while building the design. Try to use fabrics with similar thicknesses in the main panel. When one piece is noticeably thinner, apply lightweight fusible interfacing to its wrong side. This step helps prevent weak or uneven areas in the finished patchwork.
Before sewing, cut a foundation rectangle from muslin, lightweight canvas, or nonwoven stabilizer. Make it slightly larger than the intended front panel, approximately 17 by 19 inches. The foundation supports the irregular pieces and keeps the geometric design stable. Mark the center of the rectangle and draw a few angled guide lines radiating outward. These guides do not need to be perfectly symmetrical because the charm of this project comes from its abstract appearance.
Creating the Geometric Denim Patchwork Panel
Start the geometric spiral with a small central polygon. A triangle, diamond, or irregular five-sided shape works well. Place it near the center of the foundation with the right side facing upward. Select a contrasting denim strip and position it along one edge of the central piece, right sides together. Stitch through both layers and the foundation using a consistent ¼-inch seam allowance.
Fold the newly attached strip away from the center and press the seam flat. Trim the strip so that its outer edges create another clean angle. Add a second strip along the next side of the central shape, again placing the fabrics right sides together. Sew, fold, press, and trim. Continue working around the center so the shapes gradually form a rotating geometric pattern.
Alternate light and dark shades to make the spiral visible. A dark section placed beside a very similar dark section may disappear visually, while strong contrast defines each angular shape. Use white or pale gray sparingly as highlight colors. In the photographed project, the light pieces attract attention and help guide the eye toward the center of the composition.
As the patchwork area becomes larger, use wider and longer denim strips. The pieces do not have to follow a precise mathematical sequence, but every new strip should completely cover the raw edge beneath it. Check the direction of each angle before sewing. Slight changes in direction create the broken-glass appearance that makes this Denim Patchwork Tote Bag Fabric Pattern so distinctive.
Press after attaching every piece. This may seem time-consuming, but careful pressing keeps the panel smooth and prevents unwanted folds. Press the seam first in its closed position to set the stitches, then open the strip and press it away from the center. Use moderate heat and steam suitable for denim. Do not drag the iron across the panel because this can distort the angled seams.
Continue adding pieces until the entire foundation is covered. Some sections near the corners may require broad triangles or trapezoids. Once no foundation fabric remains visible, place the panel on a cutting mat and square it to the required exterior measurement. Trim slowly, confirming that the design is centered and that every edge is straight. Staystitch around the perimeter approximately ⅛ inch from the edge to secure loose seams.
Assembling the Tote Bag, Lining, and Handles
After completing the decorative front, prepare the back panel. It can be made from one solid denim rectangle or from a simpler arrangement of large denim pieces. A solid back keeps attention on the geometric front and makes assembly easier. Apply medium-weight fusible interfacing to the wrong side of both exterior panels. Follow the manufacturer’s temperature instructions and allow the pieces to cool completely before moving them.
To create the handles, fold each 4-by-28-inch strip in half lengthwise with the wrong sides together and press a center crease. Open the strip, fold both long raw edges toward the crease, and press again. Fold the strip in half along the original crease so the raw edges are enclosed. Topstitch close to both long edges. For extra strength, sew an additional row of stitching through the center.
Mark the handle placement on the upper edge of each exterior panel. Position each handle end approximately 4 inches from the nearest side edge, making sure the handle is not twisted. Baste the ends within the seam allowance, with the handle loop pointing downward over the right side of the panel. Reinforce each attachment area with a second line of stitching because handles receive significant pressure during use.
Place the front and back exterior panels right sides together. Clip the side and bottom edges, keeping the top open. Sew around the three clipped sides using a ½-inch seam allowance. Reinforce the lower corners with backstitching. To give the tote more depth, create boxed corners by flattening each lower corner so that the side seam aligns with the bottom seam. Mark a line about 2 inches from the point, stitch across it, and trim away the excess.
Prepare the lining in the same way, but leave a 5-inch opening along the bottom edge for turning. Optional interior pockets can be added before joining the lining panels. Cut a fabric rectangle, fold it in half, stitch around the edges, turn it right side out, and topstitch it to one lining piece. Divide the pocket into sections with vertical stitching to organize a phone, keys, pens, or small sewing tools.
Keep the exterior bag right side out and turn the lining wrong side out. Insert the exterior bag inside the lining so their right sides face each other. Match the side seams and upper raw edges, then clip around the entire opening. Stitch around the top with a ½-inch seam allowance. Pull the bag through the opening left in the lining, close the opening with a narrow machine stitch, and push the lining neatly inside the tote.
Finishing Details, FAQ, and Project Care
Press the upper edge of the bag carefully so the lining remains slightly inside and does not roll toward the exterior. Topstitch around the opening approximately ⅛ inch from the edge. Add a second row of topstitching about ¼ inch below the first for a professional finish. Sew slowly over the handle areas because these sections contain several layers of denim.
Inspect the finished tote and trim any visible thread ends. Check that the handles are equal in length, the boxed corners are balanced, and the lining lies flat. When necessary, reinforce the handle bases by stitching a small rectangle with a diagonal cross inside it. This common bag-making method distributes pressure and improves the durability of the denim tote bag.
Decorative options can personalize the project without distracting from the geometric composition. Consider using contrasting topstitching, embroidered initials, a magnetic snap, a zipper closure, or a handmade fabric label. Small denim pockets removed from old jeans may also be attached to the back panel. Keep embellishments lightweight so they do not distort the bag or make it uncomfortable to carry.
To care for the tote, spot-clean minor marks with mild soap and cool water. When a full wash is necessary, place the bag inside a laundry bag and use a gentle cycle. Air-drying is preferable because high dryer temperatures may weaken interfacing or cause uneven shrinkage. Press the tote with a protective cloth after drying to restore its shape.
One advantage of this project is its flexibility. The same construction method can produce a small lunch tote, a large market bag, a laptop carrier, or a craft-supply organizer. Simply change the panel measurements, reinforce the structure appropriately, and adjust the handle length. The abstract patchwork can also be made with canvas, corduroy, linen, or sturdy cotton remnants.
The Denim Patchwork Tote Bag Fabric Pattern supports mindful sewing by encouraging the reuse of available materials. Instead of requiring perfectly matched new fabric, it celebrates fading, variation, and the history visible in reclaimed denim. Every seam becomes part of the design, and every color difference contributes to the final visual texture.
Frequently Asked Questions
Is this denim patchwork tote suitable for beginners?
Yes. A patient beginner can complete the project by working one section at a time. The irregular design is forgiving because the pieces do not need to match a traditional quilt block. However, it is helpful to practice sewing straight seams and pressing fabric before beginning the final panel.
What type of denim is best for a patchwork tote bag?
Medium-weight denim is usually the easiest option. Very heavy denim can create bulky seams, while extremely stretchy denim may distort the geometric shapes. When using stretch denim, stabilize it with lightweight fusible interfacing before cutting and sewing.
Can I make the pattern entirely from old jeans?
Yes. Reclaimed jeans provide multiple shades and textures that are ideal for this patchwork tote bag. Avoid weakened areas, and remove zippers, rivets, thick seams, and damaged fabric. Wash all jeans before using them so that the finished pieces have already undergone normal shrinkage.
How do I prevent the geometric panel from becoming uneven?
Use a foundation fabric, maintain a consistent seam allowance, and press each piece immediately after sewing. Trim the panel regularly as it grows, but do not cut it to its final measurement until the foundation is completely covered. These steps help control stretching and distortion.
Does the bag need interfacing?
Interfacing is strongly recommended. It provides body, supports the patchwork seams, and helps the tote retain its shape. Medium-weight fusible interfacing is suitable for most projects. For a firmer bag, add fusible fleece or sew-in foam, but reduce bulk within the seam allowances.
What seam allowance should I use?
Use a ¼-inch seam allowance when constructing the patchwork design and a ½-inch seam allowance when assembling the exterior and lining. Consistency is more important than the exact width. Marking the needle plate or using a seam guide can help maintain accurate stitching.
Can I add a zipper to the top of the tote?
Yes. A recessed zipper panel can be inserted between the lining and the exterior. This modification requires two zipper tabs and two fabric strips slightly shorter than the bag opening. Beginners may prefer a magnetic snap, which is easier to install and still provides a convenient closure.
How can I make the handles more comfortable?
Increase the finished width of the handles, add interfacing, or insert cotton webbing inside the folded strips. Longer handles allow the tote to be carried over the shoulder, while shorter handles are suitable for carrying by hand. Always reinforce the points where the handles connect to the bag.
Why is a denim needle recommended?
A denim needle has a strong shaft designed to pass through dense woven fabric and multiple layers. It reduces skipped stitches, thread breakage, and needle bending. Select the needle size according to the fabric thickness and replace it when it becomes dull.
How can I make the patchwork spiral look balanced?
Begin with a small central shape and rotate the direction of the added pieces as you move outward. Alternate light, medium, and dark denim rather than grouping similar shades together. Step back occasionally and view the panel from a distance to evaluate the overall color distribution.
Can the raw patchwork seams be left visible?
They can be left visible for a distressed style, but enclosed seams are more durable and easier to maintain. The construction method described in this tutorial hides the raw edges under each new piece. This produces a cleaner panel and minimizes fraying during regular use.
What can I do with very small denim scraps?
Small scraps can be used near the center of the spiral, where the geometric shapes are naturally smaller. They can also be joined into strips before being added to the panel. Save even narrow pieces for zipper tabs, labels, key straps, or decorative details.
Conclusion
Creating a Denim Patchwork Tote Bag Fabric Pattern is an enjoyable way to combine practical bag-making skills with expressive patchwork. This tutorial covered how to choose and prepare reclaimed denim, organize contrasting shades, build an abstract geometric spiral, stabilize the completed panel, make reinforced handles, assemble the exterior, add a lining, form boxed corners, and finish the upper edge neatly.
EASILY FIND THE PDF FOR THIS PATTERN HERE!
The completed tote is durable enough for daily errands, books, craft materials, or casual outings, yet its geometric surface gives it the character of a handmade textile artwork. Use the instructions as a reliable foundation while allowing the placement of each denim piece to develop naturally. Please leave your sincere opinion about this project and share suggestions for colors, features, or other fabric patterns that could be explored in future tutorials.