
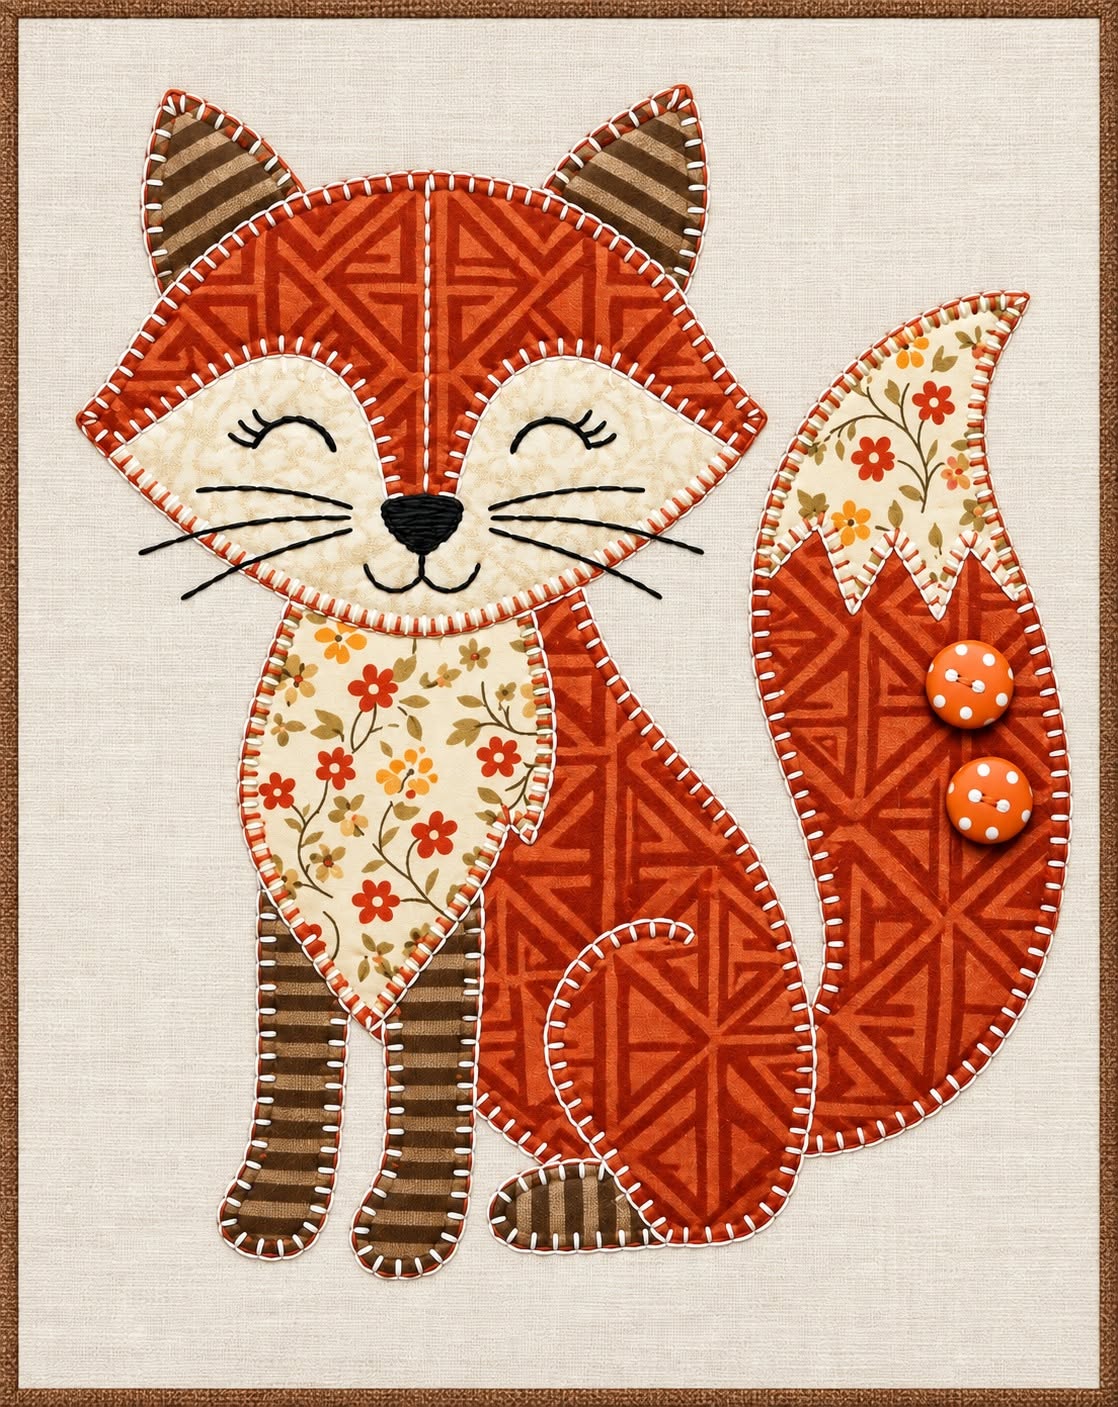
Cute Little Fox Appliqué for a Quilt Pattern is a charming sewing project that combines the warmth of traditional quilting with the playful personality of woodland-inspired appliqué. The fox in this design is built from several coordinated fabric pieces, including warm rust tones, cream floral prints, and darker striped accents. Small embroidered details give the face expression, while decorative stitching around the fabric pieces creates the handcrafted finish that makes appliqué projects so appealing. This pattern can become the centerpiece of a quilt block, wall hanging, pillow cover, nursery decoration, tote bag, or other handmade fabric project. Because the design is assembled in separate sections, it is also an approachable way to practice fabric appliqué, curved shapes, layering, embroidery, and decorative stitching.
One of the most attractive features of the Cute Little Fox Appliqué for a Quilt Pattern is the opportunity to combine different prints without making the finished piece look overly complicated. The photographed inspiration uses a predominantly burnt-orange fox body with geometric fabric, a lighter floral fabric on the chest and parts of the face and tail, and striped brown fabric for the ears, legs, and small foot detail. This creates contrast while keeping the entire fox visually coordinated. You do not have to find identical fabrics to achieve a similar result. In fact, choosing fabrics from your own collection can make the project more personal. Focus instead on color balance, print scale, contrast, and fabric texture, selecting materials that allow each appliqué section to remain clearly visible against the background.
The project is especially useful for quilters who want to explore raw-edge appliqué or a similar decorative appliqué technique. Each fox component can be traced, cut, positioned, temporarily secured, and then stitched to the background. The visible stitches become part of the design rather than something that needs to disappear completely. For a neat result, it is important to work slowly around the curved areas of the face, body, chest, legs, and tail. The tiny details can be completed after the larger pieces are secured. Although the finished fox appears detailed, the construction becomes much easier when the project is divided into manageable stages. The following tutorial explains how to recreate the overall look from beginning to end.
Materials and Preparation for the Cute Little Fox Appliqué
Begin by selecting a stable quilting cotton for the background. A cream, ivory, soft beige, or very pale neutral fabric works particularly well because it provides contrast against the warm colors of the fox. Cut your background several centimeters larger than the final block size you need. Keeping extra fabric around the edges is helpful because appliqué and embroidery can occasionally cause slight distortion. Once all stitching is complete, the block can be squared and trimmed accurately.
DISCOVER MORE FREE PATTERNS HERE!
For the fox itself, prepare several coordinating cotton fabrics. A rust, terracotta, burnt orange, or cinnamon print can form the head, body, and main tail section. Choose a cream floral or small-scale print for the muzzle, chest, and tail tip. A brown striped or geometric fabric works beautifully for the inner ears, legs, and foot. These variations are important because fabric contrast helps define the different parts of the animal without relying exclusively on outlines.
You will also need basic sewing and quilting supplies, including fabric scissors, small detail scissors, pins, an iron, sewing thread, embroidery floss, a hand-sewing needle, and a marking tool suitable for fabric. Fusible web can be extremely useful if you prefer fusible appliqué, as it holds small shapes in position while they are stitched. Always follow the specific temperature and application instructions supplied with your fusible product because different brands can behave differently.
Before cutting expensive fabric, create paper templates for the main components. Break the fox into recognizable sections: head, two ears, two face patches, muzzle, nose area, chest, body, front legs, rear leg or foot, tail, and tail tip. Notice that some sections overlap others. The chest, for example, sits over part of the body, while the lighter face pieces sit on top of the head. Planning these overlaps is one of the keys to creating a convincing fox appliqué pattern.
When preparing your templates, remember that fusible appliqué patterns often need to be traced in reverse because the fusible web is applied to the wrong side of the fabric. This matters particularly with asymmetrical components such as the curved tail. If you are using a different appliqué technique, determine whether reversal is necessary before cutting. Mark each template clearly so that similar pieces do not become confused during assembly.
Finally, press all fabrics before tracing or cutting. Flat fabric makes it much easier to produce clean shapes. Avoid stretching the pieces while pressing, particularly around bias edges and narrow sections. Arrange the prepared fabrics beside the background and preview the color combination before beginning. This small planning step can prevent you from discovering later that two neighboring prints do not provide enough contrast.
Cutting, Layering, and Building the Fox Appliqué
Start construction with the largest silhouette pieces. Trace the fox body, head, and tail onto your fusible web or template material. Cut roughly around each traced shape first rather than immediately cutting directly on the final line. Fuse each section to the wrong side of its selected fabric according to the manufacturer’s instructions. After the pieces cool, carefully cut along the actual traced outlines using sharp scissors.
Next, prepare the smaller pieces for the face. The photographed design has two large cream-colored cheek or face patches that create the characteristic pointed fox appearance. These sections curve around the eyes and narrow toward the sides of the head. Add a separate lighter muzzle section below them if your pattern construction uses one. The combination of rust-colored forehead fabric and cream facial fabric produces the recognizable woodland fox appliqué expression.
Cut the chest or belly piece from your lighter printed fabric. A small floral print is particularly effective because it introduces visual detail without competing with the geometric orange body. Shape the upper portion so that it fits naturally beneath the head and allow the lower section to taper toward the legs. Place it temporarily over the body to check the proportions before securing anything permanently.
Prepare the ears and legs using the darker contrasting fabric. The ears should have triangular shapes that extend above the head, while the two front legs can be long and slightly rounded at the bottom. The inspiration image uses horizontal stripes in these areas, which provides a pleasant contrast with the geometric patterns elsewhere. When working with striped fabric, pay attention to fabric direction because the orientation of the stripes becomes an intentional design feature.
The tail is one of the most distinctive parts of the Cute Little Fox Appliqué for a Quilt Pattern. Cut a generously curved tail that sweeps upward alongside the fox’s body. Add a lighter tail-tip section near the upper end. The tip can have a slightly irregular or pointed lower edge to suggest natural fur. Before fusing the pieces, arrange the entire fox on the background so that the tail does not extend beyond the usable area of your quilt block.
Once you are satisfied with the arrangement, secure the layers in logical order. Generally, pieces that visually sit behind other components should be attached first. Depending on your pattern, this may include the tail, ears, body, legs, and head before adding the chest, face sections, muzzle, and tail tip. Use the iron carefully if working with fusible web. Press rather than sliding the iron back and forth, since excessive movement can shift small appliqué pieces.
Stitching the Appliqué and Adding the Fox Face
After all fabric components are secured, begin stitching around their edges. A blanket stitch is an excellent choice because it gives the project a traditional handmade appearance and helps secure raw fabric edges. You can complete this stitch by hand or use a compatible decorative stitch on your sewing machine. Choose thread that either coordinates with each fabric or provides deliberate contrast, depending on the visual effect you prefer.
Work slowly around tight curves and narrow points. On a sewing machine, stop with the needle down when you need to pivot the fabric. Small adjustments are generally smoother than attempting to sew an entire curve continuously. Around the ears, muzzle, feet, and pointed tail section, shorten the stitch length if necessary to maintain control. Consistent stitching helps give the quilt appliqué fox a polished appearance.
The face gives the project most of its personality. Mark the eyes lightly before embroidering them. The inspiration uses closed, curved eyes with small eyelashes, creating a peaceful and friendly expression. Backstitch or stem stitch can work well for these lines. Use dark embroidery floss and keep the stitches small enough to preserve the gentle curves. Avoid pulling the floss too tightly because excessive tension may gather the background fabric.
Create the nose using a small piece of dark fabric or dense embroidery. A rounded triangular nose works particularly well for this style of fox. Position it where the cream face sections meet, then embroider a short line downward toward the mouth. Add two small curved mouth lines to create the subtle smile. These uncomplicated details demonstrate how embroidery for appliqué can transform basic fabric shapes into an expressive character.
Whiskers can then be stitched on both sides of the muzzle. Use long, controlled stitches and keep the arrangement reasonably balanced without making both sides perfectly identical. Slight variations can contribute to the handmade character. If long embroidery stitches concern you because the finished item will be frequently washed, use several shorter stitches to form each whisker rather than one very long exposed thread.
Inspect the entire fox after completing the facial embroidery. Reinforce any appliqué edge that appears loose, trim stray threads, and gently press the finished block from the reverse side using appropriate heat protection. If decorative buttons are desired, they can be added as accents, similar to the small round embellishments visible on the tail area of the inspiration. For items intended for babies or very young children, however, avoid loose or detachable embellishments and use stitched fabric details instead.
Finishing, Quilting, FAQ, and Creative Variations
Once the Cute Little Fox Appliqué for a Quilt Pattern is completely stitched, square the background block to the dimensions required by your project. Use a quilting ruler to make sure the fox remains properly centered and that sufficient seam allowance surrounds the design. Do not trim too close to the ears or tail. Leaving visual breathing room around the appliqué makes the completed block feel more balanced.
If the fox will become part of a quilt, join it with surrounding blocks using your preferred quilt construction method. You can coordinate the neighboring fabrics with the orange, cream, brown, and floral colors found within the appliqué. Alternatively, surrounding the detailed fox with simpler solid or low-volume blocks allows the character to remain the primary focal point. Both approaches can work beautifully.
After assembling the quilt top, create the usual quilt sandwich with backing, batting, and the completed top. Quilting around the outline of the fox can emphasize its silhouette. Additional quilting in the background can provide texture while making the appliqué stand forward visually. Keep dense quilting away from delicate embroidery unless that effect is intentionally part of your design.
This fox quilt pattern can also be adapted beyond a full quilt. A single block can become the front of a cushion, a decorative wall hanging, a fabric storage basket panel, or a tote bag pocket. When making an item that receives frequent handling, secure every appliqué edge carefully and consider using stronger machine stitching. Decorative projects that will remain primarily on display can accommodate more delicate hand embroidery.
Color changes provide another simple way to personalize the project. Traditional woodland colors such as rust, brown, cream, and ochre produce an autumn-inspired fox, while pastel fabrics can create a softer nursery aesthetic. Scraps from previous quilts can produce a colorful patchwork interpretation. Regardless of palette, maintaining enough contrast between the fox body, face, chest, tail, and background is more important than following one exact color combination.
The final stage is simply to examine the craftsmanship and make small corrections. Remove temporary markings according to the marking tool’s instructions, press carefully, check the seams, and secure any remaining thread ends. Handmade appliqué does not have to look mechanically perfect. Small differences in blanket stitches, embroidery curves, and fabric placement can become part of its charm while still producing a neat, durable, and attractive finished piece.
FAQ About the Cute Little Fox Appliqué for a Quilt Pattern
What is the best fabric for a fox appliqué quilt?
Quilting cotton is one of the easiest materials to use because it is stable, widely available, easy to cut, and compatible with many appliqué methods. For this particular design, combining rust-colored quilting cotton, cream prints, floral fabric, and darker brown accents creates strong visual definition.
Can beginners make the Cute Little Fox Appliqué for a Quilt Pattern?
Yes. Beginners can approach the project by treating each component as a separate step. Start with the larger body, head, and tail shapes before moving to smaller facial details. Practicing the chosen appliqué stitch on scrap fabric beforehand can make the final sewing considerably easier.
Should I use fusible web for this fox appliqué?
Fusible web is optional, but it can make positioning easier, especially for small or curved pieces. It temporarily or permanently stabilizes the shapes, depending on the product, so they are less likely to move while you stitch around the edges.
What stitch should I use around the appliqué pieces?
Blanket stitch is a popular option for this type of decorative design. A narrow zigzag or satin-style appliqué stitch can also be used depending on the desired finish. Hand stitching creates a traditional appearance, while machine stitching is often faster and can provide additional durability.
How can I prevent the background from puckering?
Begin with a well-pressed background and avoid pulling the thread excessively during embroidery. Stabilizer may be useful behind areas with substantial decorative stitching. When machine sewing, allow the feed dogs to move the fabric naturally instead of pulling it from behind.
How do I make the fox face look friendly?
Placement is especially important. Gently curved closed eyes, short eyelashes, a small dark nose, a subtle curved mouth, and fine whiskers create the relaxed expression seen in this style of cute fox appliqué. Mark these elements lightly before stitching so you can evaluate their positions.
Can I make the fox larger or smaller?
Yes. The templates can be resized as a complete set. All pieces should be scaled by the same percentage so that the proportions remain consistent. Remember that extremely small versions can make narrow appliqué pieces and facial embroidery more difficult to sew accurately.
Do I need to use exactly the same fabric prints shown in the inspiration?
No. The important principle is contrast. Use one dominant fabric for the body, lighter fabric for the face and chest, and contrasting accents for areas such as the ears and legs. Coordinating scraps can make an excellent scrap fabric appliqué project.
Can this pattern be used for a baby quilt?
A fabric fox can work wonderfully as a decorative element on a baby quilt, but construction choices should prioritize secure stitching. Avoid buttons, beads, or other detachable decorative components on items intended for babies or small children. Embroidered or appliquéd fabric circles can replace dimensional embellishments.
How should I wash a finished appliqué quilt?
Washing requirements depend on the fabrics, threads, batting, fusible products, and embellishments used. Prewashing fabrics may help when shrinkage or color bleeding is a concern. After completion, follow care recommendations appropriate for the most delicate material included in your quilt.
Conclusion
The Cute Little Fox Appliqué for a Quilt Pattern turns a collection of relatively simple fabric shapes into an expressive woodland character. The process begins with choosing coordinated quilting cottons and preparing templates, followed by cutting the head, body, face, chest, ears, legs, and curved tail. Careful layering establishes the fox’s recognizable silhouette before decorative stitching brings all of those individual pieces together.
Throughout this tutorial, we explored the essential techniques behind fabric appliqué, including template preparation, fusible appliqué, fabric placement, blanket stitching, embroidery, layering, and final quilting. The most intricate-looking areas, particularly the face and tail, become much more manageable when they are divided into individual shapes and completed one stage at a time.
The project also leaves plenty of room for creativity. You can reproduce the warm autumn palette of the inspiration or transform the design with pastel fabrics, scraps, modern geometric prints, florals, or your own favorite quilting collection. Whether the finished fox becomes part of a quilt, cushion, wall hanging, or another sewing project, the combination of contrasting fabrics and expressive embroidery can make every version unique.
EASILY FIND THE FREE PDF FOR THIS PATTERN HERE!
Most importantly, take your time with the small details and enjoy the process of watching the character emerge from individual pieces of fabric. Cute Little Fox Appliqué for a Quilt Pattern is as much about creative fabric selection and decorative stitching as it is about following a pattern. If you make your own version, leave your sincere opinion and suggestions about the project. Sharing which fabrics, colors, stitches, or finishing ideas worked best for you can inspire even more creative variations of this adorable little fox.