
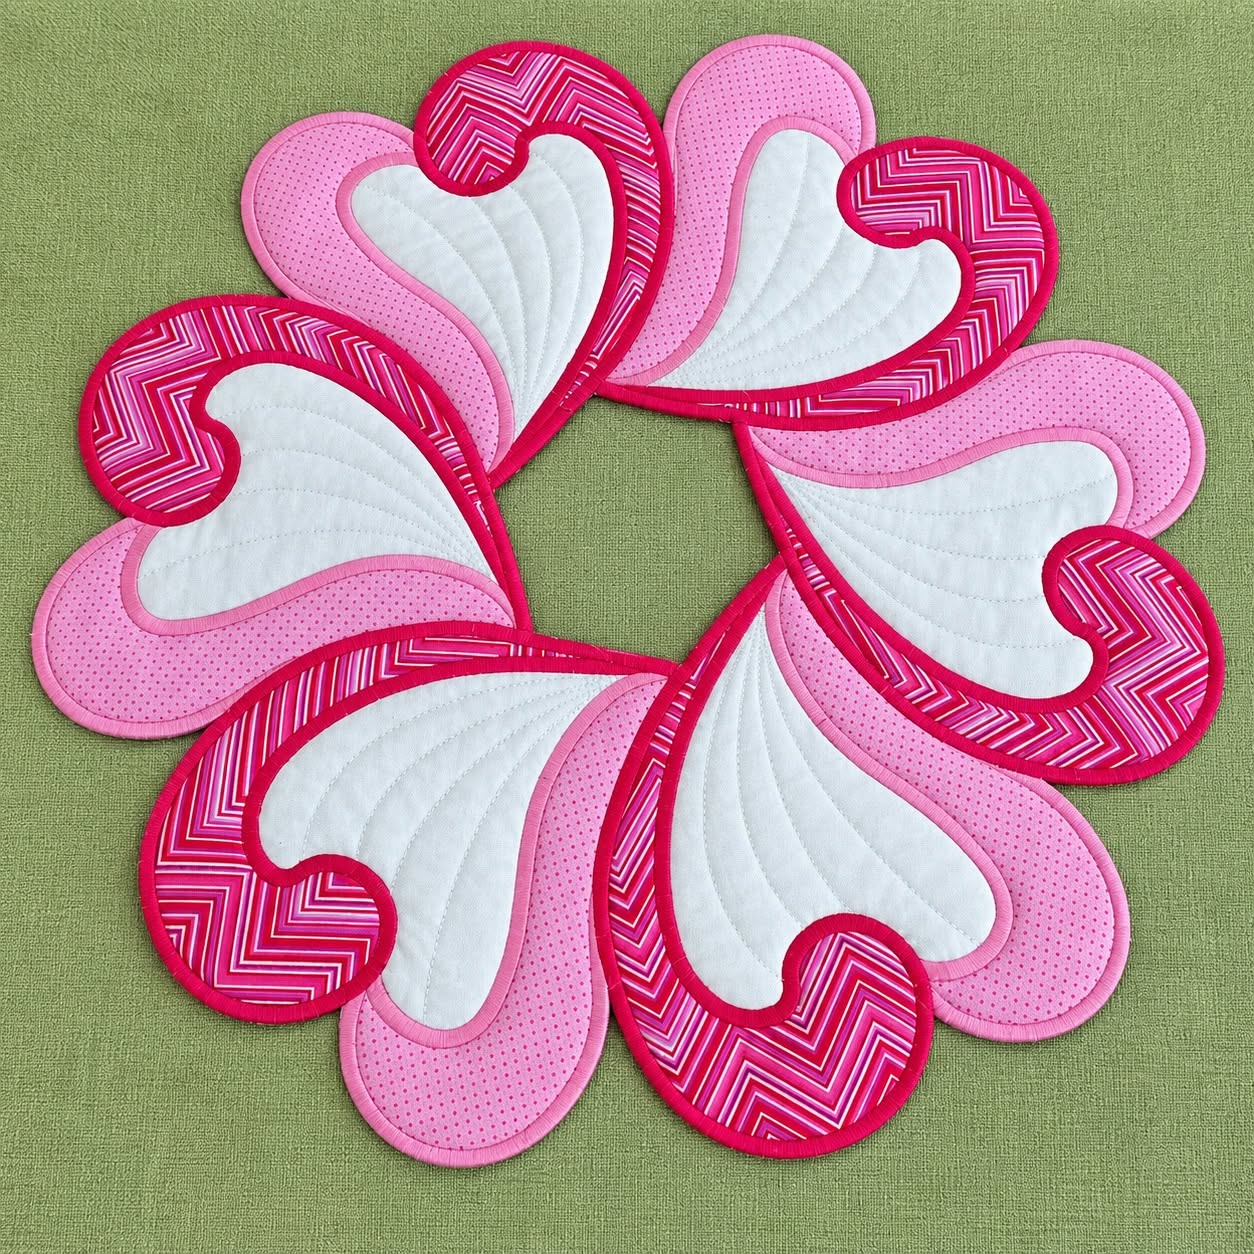
The Heart patterned placemat Pattern is a charming sewing and quilting project that turns a familiar heart shape into a decorative piece with movement, texture, and personality. Inspired by the project shown in the photo, the design combines curved heart sections, contrasting fabrics, visible quilting, and neatly finished edges. Several finished pieces can be arranged together to form a beautiful circular centerpiece, while a single heart-shaped piece can also work as a small placemat, table accent, mug mat, or decorative quilted accessory. The combination of pink, white, and vibrant patterned fabric gives the project a cheerful appearance, but the same construction method can easily be adapted to other colors and prints.
One of the most attractive details of this Heart patterned placemat Pattern is the layered visual effect. Instead of looking like a simple flat heart, the project uses contrasting sections that curve around one another. A light central area provides space for decorative quilting, while pink and patterned sections create definition around the outside. Binding or a narrow finished edge emphasizes the unusual silhouette. Although those curves require a little patience, they also make this project an excellent way to practice accurate sewing, clipping curves, topstitching, quilting, and working with shaped fabric pieces.
This tutorial explains a practical way to recreate the overall look of the photographed project rather than claiming to reproduce an unseen commercial template. Because an exact scale cannot be determined from a photograph alone, you can choose the finished size that works best for your table and create a paper template accordingly. For a useful starting point, try a heart unit approximately 25–30 cm wide and 28–33 cm long. The most important part is maintaining the distinctive sweeping shape and making every unit from the same template. Once you understand the construction process, the Heart patterned placemat Pattern becomes highly customizable and can be made from quilting cotton, scraps, seasonal prints, or fabrics selected specifically for your dining-room décor.
Materials and Preparation for the Heart Patterned Placemat Pattern
Begin by gathering quilting cotton, lightweight batting, backing fabric, coordinating thread, paper for templates, fabric scissors or a rotary cutter, pins or sewing clips, a sewing machine, an iron, and an ironing surface. For a look similar to the photograph, select three coordinating fabrics: a light fabric for the large inner heart section, a soft pink fabric for one curved section, and a stronger pink or red geometric print for the contrasting section. A narrow coordinating binding or carefully turned edge will complete the design.
DISCOVER MORE FREE PATTERNS HERE!
The fabric selection has an important effect on the finished appearance. Quilting cotton is especially convenient because it is stable, easy to press, and available in countless prints. Try combining one relatively quiet fabric with one small-scale print and one stronger accent print. This contrast allows the curved construction to remain visible from across the table. If every fabric has an equally busy pattern, some of the distinctive heart-shaped geometry may disappear visually.
Next, create your heart template on paper. Start with a generously rounded heart shape rather than a narrow traditional Valentine heart. One upper lobe can be extended into a sweeping curved section to imitate the swirling appearance seen in the reference project. Draw the major color sections inside the shape, remembering that each section must eventually fit together cleanly. Keep the curves smooth because abrupt corners are harder to sew and turn accurately.
Add a seam allowance around pieces that will be joined with traditional seams. A seam allowance of approximately 0.7–1 cm is comfortable for many sewing projects, although experienced quilters may prefer their usual quilting allowance. Clearly label every paper piece before cutting it apart. Write information such as “center,” “pink section,” “printed section,” and grain direction directly on the templates. This simple step prevents confusion when several similarly curved pieces are lying on your worktable.
Prewash your fabrics if that is part of your normal quilting routine, especially when combining strongly colored cotton with white fabric. After drying, press everything thoroughly. Accurate pressing matters with curved patchwork because wrinkles can alter the shape enough to make matching curved edges unnecessarily difficult. Place the templates on the fabric and trace them carefully before cutting. Avoid stretching fabric along bias edges while handling the pieces.
Before beginning the final project, consider making one test heart from inexpensive cotton scraps. The test version allows you to check the proportions, curves, seam allowances, batting thickness, and final dimensions. You can also place several paper or test units in a circle to see whether they create the arrangement you want. Adjusting a paper template is much easier than discovering a sizing problem after cutting your favorite quilting fabrics.
Cutting, Piecing, and Building the Curved Heart Shape
Cut all of the fabric sections required for one Heart patterned placemat Pattern unit first. Use that first unit as your sample before batch-cutting additional hearts. If you want a coordinated circular arrangement like the photograph, prepare several identical sets only after confirming that the first one works correctly. Cutting the pieces with consistent orientation is important because accidentally flipping an asymmetrical curved template can change the direction of the entire design.
When sewing two curved fabric pieces, mark the midpoint of each curve. Match those midpoint marks first, then match the beginning and end of the seam. Add pins or clips between these reference points. Do not try to force the fabric into position all at once. Instead, distribute the curve gradually. Quilting cotton can usually be eased gently into place, particularly when the curve is broad and the fabric pieces have been cut accurately.
Sew the curved seam slowly while keeping the raw edges aligned. A shorter stitch length can provide additional control around tighter areas. Stop periodically with the needle down, lift the presser foot if necessary, and reposition the fabric before continuing. The objective is a smooth curved seam without pleats. Accuracy matters more than speed here, so take your time and avoid pulling the fabric from behind the machine.
After stitching, carefully clip or notch the seam allowance where necessary so the curve can relax. Never cut through the stitching line. Press the seam according to the construction method you have chosen, using gentle pressure rather than aggressively stretching the curved fabric. Continue joining the remaining colored sections until the complete heart-shaped top is assembled. At this stage, the contrasting pieces should create the flowing, interlocking appearance that gives the design its character.
Place the completed top over a piece of lightweight batting and backing fabric. Cut the batting and backing slightly larger than the top so you have room for quilting and final trimming. Smooth all three layers carefully. You can secure the quilt sandwich with pins, temporary basting methods appropriate for your materials, or hand basting. The layers should remain flat without puckers before you begin quilting.
Check the overall silhouette before moving forward. Both rounded lobes and the lower point should look intentional, and the extended curved portion should flow naturally into the rest of the heart. If you are making multiple pieces, place the first finished top beside the remaining cut pieces and confirm their orientation. Consistency is especially important when the hearts will eventually be displayed together as a circular quilted table arrangement.
Quilting and Finishing the Heart Shaped Placemat
The central light-colored area offers an ideal place for decorative quilting. In the photographed inspiration, curved stitched lines reinforce the flowing shape of the heart. You can achieve a similar effect by drawing several gentle guide lines that follow the outer contour. Start near one side and gradually echo the shape inward. A removable fabric marker can help maintain consistent spacing, but always test marking tools on scrap fabric first.
Begin quilting near the center and work outward when practical. Keep the fabric sandwich supported so its weight does not pull against the needle. Echo quilting is particularly suitable for this project because it emphasizes the curves without requiring complicated free-motion designs. Each line can follow the previous one at an even distance, creating a clean series of concentric curves across the light center.
Straight-stitch quilting with a walking foot is a comfortable option for many sewists. If you are experienced with free-motion quilting, you can add more personalized details, but elaborate stitching is not necessary. The color-blocked heart already provides plenty of visual interest. Coordinating thread creates a subtle finish, while contrasting thread can make the quilting itself an important decorative element.
Once the quilting is complete, inspect both sides for puckers, loose threads, or skipped stitches. Trim the excess batting and backing carefully, following the exact outline of the quilted top. Take special care around the inward curves and pointed areas. Clean trimming makes the next finishing stage much easier and gives your heart-shaped placemat a professional-looking silhouette.
The outer edge can be finished with bias binding, which is useful for pronounced curves because it stretches more easily around rounded areas than straight-grain binding. Use a narrow binding that complements the dominant fabrics. Attach it slowly around the perimeter, easing it around curves rather than stretching it excessively. Clip or manipulate inward curves carefully so the binding lies flat without folds or puckering.
After securing the binding, give the project a final gentle press. If you plan to make several matching hearts, use the completed unit as a visual reference for quilting-line spacing and edge finishing. Small handmade variations are natural, but consistent dimensions will make the group arrangement more balanced. Your finished Heart patterned placemat Pattern should now have a softly padded structure, defined color sections, visible quilting, and a crisp curved outline.
Arranging, Customizing, and Caring for the Finished Project
One heart can be used independently, but arranging several pieces together creates the dramatic effect shown in the inspiration photo. Position the pointed or curved portions toward the center and rotate each unit around an imaginary circle. Experiment before deciding on the final placement. Depending on the exact template proportions, the pieces may create an open center that resembles a flower, wreath, or swirling heart table centerpiece.
For a romantic version, combine blush pink, burgundy, cream, and red. A spring interpretation could use floral prints, pastel green, lavender, and soft yellow. For autumn, consider rust, gold, brown, and cream. The Heart patterned placemat Pattern is also well suited to scrap quilting because its individual sections are relatively compact. Using coordinated remnants can produce a lively patchwork effect without requiring large pieces of fabric.
You can also change the quilting design. Instead of echoing curves, try closely spaced parallel lines, gentle waves, crosshatching, or simple outline quilting around each colored section. Beginners should select a design they can sew comfortably and consistently. The purpose of quilting stitches is both decorative and functional: they hold the top, batting, and backing together and prevent the layers from shifting during regular use and laundering.
If you intend to use the pieces regularly at the dining table, choose washable fabrics and batting. Cotton materials are often convenient for everyday table projects, but always follow the care recommendations for the specific materials you purchased. Wash handmade quilted items gently and reshape them while damp when necessary. Avoid excessive heat if your chosen batting or decorative fabrics are sensitive to high temperatures.
Storage also helps preserve the shape. Rather than tightly folding the hearts through heavily quilted areas, store them flat whenever possible. If space is limited, stack the individual pieces and place them in a clean, dry location. Keeping the curved binding flat prevents it from developing unwanted creases, particularly around the distinctive sweeping upper sections.
Most importantly, use the first finished piece to refine your own version of the pattern. You may decide that you prefer a wider center, a longer curved accent, a smaller overall placemat, or more quilting lines. Handmade sewing is naturally adaptable. Once your master template has the proportions you like, save it in a labeled envelope so you can reproduce the Heart patterned placemat Pattern for future color schemes, seasonal table settings, or handmade gifts.
FAQ About the Heart Patterned Placemat Pattern
Is the Heart patterned placemat Pattern suitable for beginners?
Yes, although it is most comfortable for someone who already understands basic machine sewing. The main challenge is sewing and finishing the curved sections. A beginner can absolutely attempt the project by practicing the curves on scrap fabric first and working slowly.
What fabric works best for a heart patterned placemat?
100% quilting cotton is a practical choice because it cuts cleanly, presses well, and is relatively easy to control. Using fabrics of similar weight also helps the sections behave consistently during piecing and quilting.
What batting should I use?
A thin or lightweight batting generally works well for table projects because it adds definition without making the finished piece unnecessarily bulky. Always select a batting compatible with the intended use and follow its manufacturer’s care and quilting-distance instructions.
How large should each heart be?
The photograph does not provide a reliable physical scale, so there is no exact measurement that can be extracted from it. A practical starting size is approximately 25–30 cm wide by 28–33 cm long, but you can enlarge or reduce the template according to your table and intended purpose.
Why are my curved seams puckering?
Puckering often happens when the fabric is stretched, the curved edges are not distributed evenly, or the seam allowance cannot relax after stitching. Match key points first, sew slowly, and carefully clip or notch the seam allowance where appropriate.
Do I need a special sewing machine?
No. A standard household sewing machine capable of a reliable straight stitch can complete this project. A walking foot can make quilting the layered sandwich easier, but it is not essential if your machine feeds the layers evenly.
Can I make the project without the patterned pink fabric?
Absolutely. The geometric fabric in the inspiration image creates strong contrast, but you can substitute florals, polka dots, stripes, solids, gingham, or other quilting prints. Maintaining contrast between adjacent sections is more important than copying the exact fabric.
Can I use fabric scraps?
Yes. This is an excellent scrap fabric project, particularly when the scraps are large enough to accommodate the curved template sections. Coordinate the colors before cutting so the completed hearts look intentional when arranged together.
How do I make all the hearts the same size?
Create one durable master template and use it for every unit. Keep the seam allowance consistent, mark matching points on curves, and compare each completed top with the master before quilting. Consistent cutting and seam widths are the keys to producing matching pieces.
How many hearts do I need for the circular arrangement?
That depends on the proportions and angle of your custom template. The reference photo shows multiple units forming a circular composition, but you should test your own template by arranging paper copies before cutting fabric. This allows you to determine how many units produce the spacing and center opening you prefer.
Can the Heart patterned placemat Pattern be made reversible?
Yes. Choose an attractive backing fabric and keep the quilting neat on both sides. A carefully applied binding can give both surfaces a finished appearance, allowing you to display the backing whenever you want a simpler table setting.
Should I wash the placemat before using it?
That depends on whether your fabrics and batting were prewashed and on the look you prefer. Washing a cotton quilted piece can create a slightly softer, more textured appearance. Always base laundering decisions on the care requirements of every material used in the project.
How can I prevent the placemat from becoming too bulky?
Use lightweight batting, avoid unnecessarily wide seam allowances, grade bulky seams when appropriate, and select fabrics of similar weight. A narrow, carefully applied bias binding also helps maintain a refined edge.
Can I enlarge this design into a table topper?
Yes. The template can be scaled up to create larger decorative pieces. When enlarging it significantly, remember that larger areas may require additional quilting to keep the layers stable. Check the recommended maximum quilting distance for your chosen batting.
Conclusion
The Heart patterned placemat Pattern combines traditional sewing skills with an unusual, flowing heart design that can transform simple quilting cotton into a striking table accessory. The project begins with a carefully developed template, continues through accurate fabric cutting and curved piecing, and gains structure from batting, backing, and decorative quilting. Finishing the perimeter with neat binding highlights the silhouette and gives the piece a polished appearance.
The most important techniques covered in this tutorial are template preparation, curved piecing, careful pressing, building a quilt sandwich, echo quilting, accurate trimming, and curved-edge finishing. Making a test version before cutting an entire coordinated set is especially helpful because the exact dimensions of the photographed inspiration cannot be reliably determined from the image alone.
EASILY FIND THE FREE PDF FOR THIS PATTERN HERE!
Once you have completed your first heart, the possibilities expand quickly. Change the prints, experiment with seasonal colors, alter the quilting lines, or make several matching pieces to create the circular arrangement. The same Heart patterned placemat Pattern can look romantic, modern, rustic, playful, or traditional simply by changing the fabrics. If you make your own version, leave your sincere opinion about the project and share your suggestions. Which colors, fabrics, quilting details, or design variations would you use for your heart placemats? Your creative ideas can inspire even more ways to personalize this beautiful sewing project.