
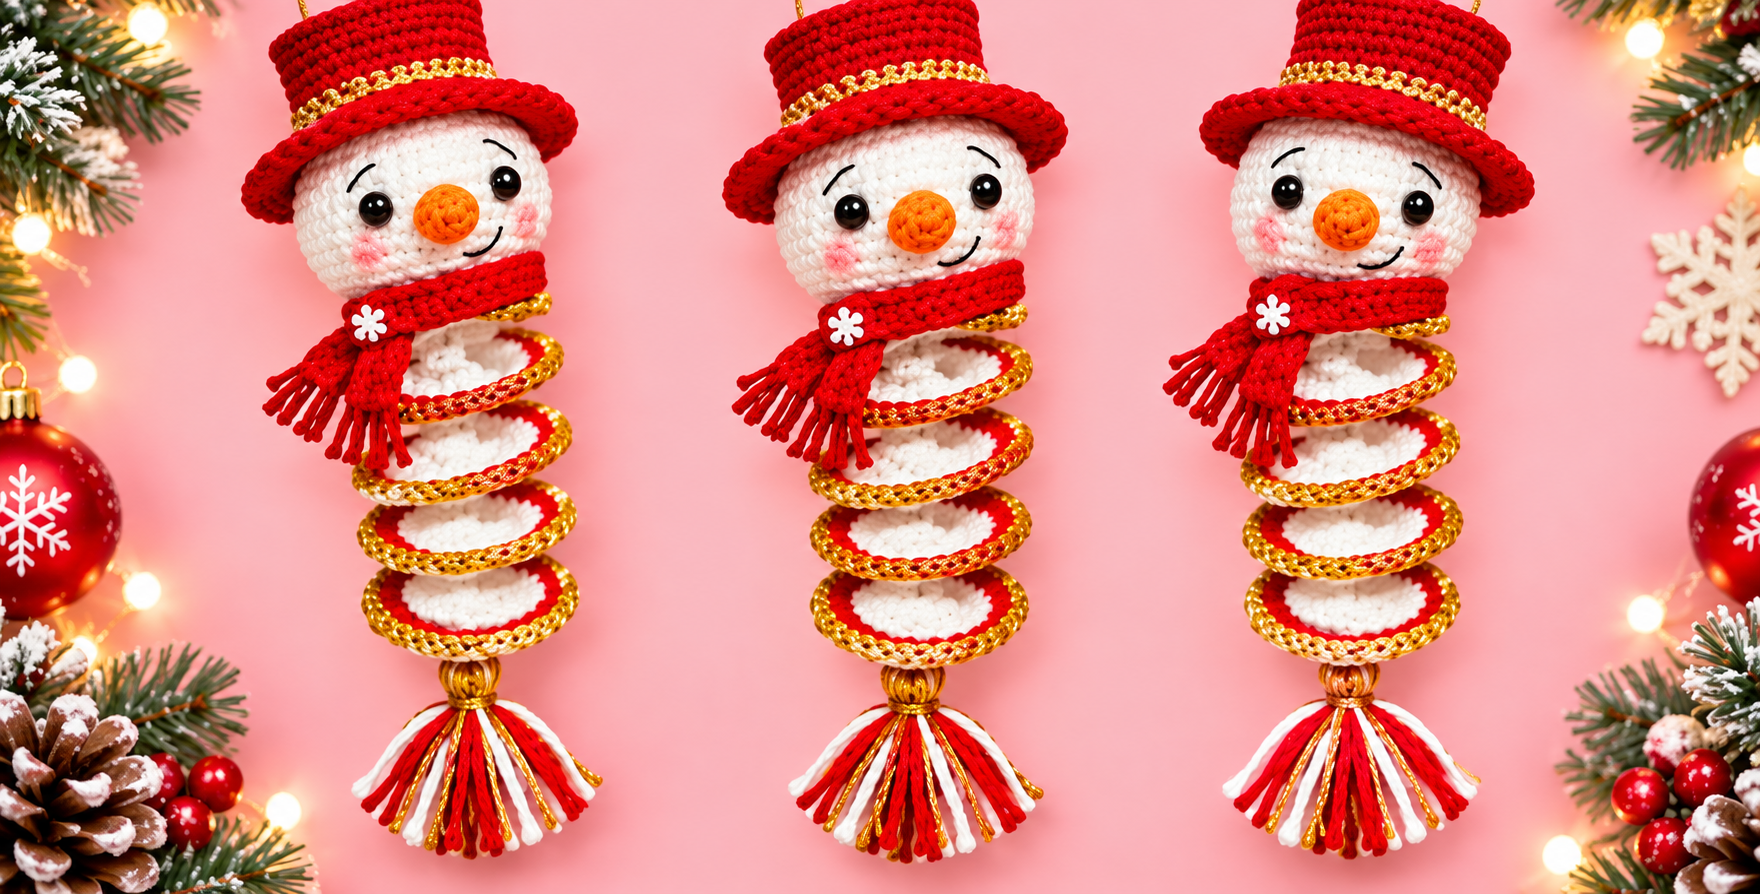
The Spiral snowman for Christmas Pattern is a cheerful crochet project that combines the charm of a traditional snowman with a playful spiral body that looks beautiful among Christmas decorations. Instead of creating a large stuffed figure, this pattern focuses on a lightweight hanging ornament made with basic crochet techniques, contrasting colors, and festive details. The spiral construction gives the snowman movement and makes the finished piece especially attractive when displayed on a Christmas tree, door, wall, mantel, or holiday garland. Red, white, orange, and touches of gold create a classic seasonal palette, but the colors can easily be personalized. This project is also a lovely way to use small amounts of leftover yarn from other crochet projects. Best of all, the crochet snowman ornament can be adapted in size without changing the overall character of the design.
Making a Spiral snowman for Christmas Pattern is also an enjoyable opportunity to practice several useful crochet skills in one manageable project. You will work with a magic ring, single crochet, increases, slip stitches, chains, decorative edging, simple shaping, and basic assembly. The snowman’s head provides practice with working in continuous rounds, while the spiral body introduces a different construction technique that naturally creates its curled shape. Small accessories such as the hat, scarf, carrot nose, and tassel allow you to experiment with color and texture without requiring large quantities of material. Beginners with knowledge of basic stitches should be able to follow the instructions slowly, while experienced crocheters can easily customize the pattern. Because handmade tension varies from person to person, the measurements in this tutorial should be considered practical targets rather than rigid requirements.
The finished Christmas crochet snowman described here is approximately 25 to 30 cm long, including the hat and tassel, although your final measurement will depend on yarn thickness, hook size, tension, and the number of spiral rounds you choose to make. For a balanced ornament, aim for a head approximately 7 to 8 cm in diameter and a spiral body approximately 12 to 15 cm long before adding the tassel. Use soft white yarn for the head and body, bright red yarn for the hat and scarf, orange for the nose, and gold or metallic-effect yarn for decorative accents. You can embroider the facial features for a softer ornament or use securely attached craft eyes when appropriate. With careful finishing and consistent stitches, the Spiral snowman for Christmas Pattern becomes a polished handmade decoration that can return to your holiday collection year after year.
Materials, Crochet Abbreviations, and Preparation
For this Spiral snowman for Christmas Pattern, gather white, red, orange, black, and optional gold yarn in compatible weights. A medium cotton or acrylic yarn works particularly well because it provides enough structure while keeping the stitches clearly visible. You will also need an appropriately sized crochet hook, such as 3.0 to 3.5 mm, a yarn needle, scissors, stitch markers, and a small amount of polyester filling. Optional supplies include small decorative buttons, metallic thread, and a hanging cord. Choose yarns with similar thicknesses so that the finished components remain proportional.
DISCOVER MORE FREE PATTERNS HERE!
Before beginning, become familiar with the main crochet abbreviations used throughout the instructions. MR means magic ring, ch means chain, sl st means slip stitch, sc means single crochet, hdc means half double crochet, dc means double crochet, inc means increase, and dec means decrease. An increase generally means working two stitches into the same stitch, while a decrease combines two stitches to reduce the stitch count. These simple techniques form nearly every part of the snowman.
Begin with the snowman’s head using white yarn. Create a MR and work 6 sc into the ring. On the following round, work 2 sc into each stitch, giving you 12 stitches. Continue increasing evenly: work [1 sc, inc] around for the next round, followed by [2 sc, inc], and then [3 sc, inc] if additional width is required. Continue until the circle reaches approximately 7 to 8 cm across, remembering that your exact number of rounds may differ depending on yarn and tension.
Once the head reaches the desired width, crochet several rounds without increasing. Work 1 sc in each stitch around until the piece begins forming a shallow bowl and then a rounded head. Add the facial details before the opening becomes too small to work comfortably. Position the eyes evenly, embroider a gentle smile with black yarn, and add small rosy cheek details using pink yarn if desired. Keep the expression simple because a few carefully placed stitches often create the sweetest result.
For the carrot nose, use orange yarn and create a very small cone. Begin with a MR and 4 sc, then crochet short rounds while adding occasional increases until the nose reaches approximately 2 to 2.5 cm long. Fasten off, leaving a tail for sewing. Attach the nose securely in the center of the face and shape it gently with your fingers. If the ornament will be handled frequently, embroidered eyes can be a practical alternative to separate plastic components.
Finish the head by gradually decreasing in the reverse order of your earlier increases. Add small amounts of filling as the opening becomes narrower, distributing it evenly so the head remains rounded rather than overstuffed. Continue decreasing until only a small opening remains, add the final amount of stuffing, and close the opening with your yarn needle. Weave the tail through the remaining stitches, pull gently, secure it, and hide the yarn end inside the head. You now have the foundation for your crochet Christmas snowman.
How to Crochet the Spiral Snowman Body Step by Step
The signature feature of the Spiral snowman for Christmas Pattern is its curled body. One convenient method is to begin with a foundation chain measuring approximately 25 to 30 cm. The exact length determines how large the completed spiral becomes, so you can shorten the chain for small tree ornaments or make it longer for a more dramatic hanging decoration. Use white yarn for the foundation because this will become the main snow-covered portion of the body. Keep the chain relaxed rather than pulling it tightly.
Starting in the appropriate chain from the hook, work multiple stitches into each foundation chain to force the strip to curl naturally. For example, you can work 3 dc into each chain across. As more stitches are packed into the foundation, the crochet fabric will begin twisting into a corkscrew shape. Do not try to flatten it. The curling effect is exactly what creates the recognizable crochet spiral snowman body. After completing the row, gently arrange the loops with your fingers so they form a smooth vertical spiral.
To create a fuller spiral, you may use 4 dc in selected chains or add another decorative round around the outside edge. The important point is consistency. Too few stitches can leave the strip almost straight, while too many can produce an extremely tight curl. For a snowman ornament approximately 25 to 30 cm long, a finished spiral section around 12 to 15 cm usually creates pleasing proportions beneath a 7 to 8 cm head. Always measure after allowing the crochet fabric to relax.
Add a red edging to introduce the traditional Christmas color combination. Join red yarn along the outer edge and work sl st or sc evenly around the spiral. If you prefer a more decorative finish, alternate red and gold accents. A fine metallic-effect yarn can be held together with your main yarn or worked separately along selected edges. This little touch helps define each coil and gives the Christmas crochet decoration a festive appearance without changing the basic construction.
Arrange the spiral beneath the head before sewing anything permanently. Hold the ornament vertically and check whether the body hangs evenly. The upper section should sit close to the head, while the remaining coils should gradually descend with visible spaces between them. Use a yarn needle and white yarn to secure the top of the spiral firmly to the bottom of the head. Several discreet stitches are better than one loose attachment because they help prevent the head from twisting when the ornament hangs.
Finally, shape each coil by hand. Crochet spirals sometimes become compressed while being handled, but they can usually be rearranged easily. Rotate each section slightly until the red or gold edging is visible and the white center remains prominent. Avoid stretching the foundation chain aggressively because that can distort the stitches. At this stage, your Spiral snowman for Christmas Pattern should already have its distinctive silhouette, with a round smiling head sitting above a playful corkscrew-style body.
Crochet the Hat, Scarf, Tassel, and Finishing Details
A bright red hat immediately transforms the basic snowman into a festive Christmas character. Begin the crochet snowman hat with a magic ring and increase in rounds until the top reaches approximately 5 to 6 cm in diameter. Then work several rounds without increases to create the tall crown. Depending on your yarn and preferred proportions, the crown can measure approximately 5 to 7 cm high. Finish with a wider brim by adding increases around the lower edge so that the hat flares outward slightly.
Gold trim can make the hat look especially festive. Join gold yarn around the crown and work a simple line of sl st or surface crochet. Another option is to embroider a narrow decorative band after the hat is finished. Place the hat on the head before attaching it and tilt it slightly if you prefer a playful appearance. Sew around several points of the brim using red yarn so that the hat remains securely positioned while still looking naturally placed rather than tightly flattened against the head.
For the scarf, chain until the piece measures approximately 18 to 22 cm, depending on the size of your snowman. Starting in the second chain from the hook, work sc across, turn, ch 1, and work another row of sc. Two or three rows generally create a narrow scarf suitable for an ornament. Fasten off and add short fringe pieces to each end. Wrap the scarf around the lower part of the head and secure it with a few discreet stitches so it cannot slide away from its intended position.
You can decorate the scarf with a tiny crocheted flower or snowflake-inspired accent. For a simple flower, make a small magic ring and repeat [ch 2, 2 dc, ch 2, sl st] several times into the ring to create miniature petals. Keep this embellishment small enough that it does not overpower the face. Sew it onto one side of the scarf using matching yarn. This optional feature gives the handmade Christmas snowman ornament an additional handcrafted detail and can be customized in white, gold, green, or another seasonal color.
At the bottom of the spiral, add a tassel using red, white, and gold yarn. Cut several strands approximately 15 to 18 cm long, align them, fold them in half, and secure the center. Wrap another piece of yarn around the bundle approximately 1 to 1.5 cm below the folded end and tie it firmly. Trim the ends so they hang evenly. Once attached, the visible tassel will usually measure approximately 6 to 8 cm, depending on how much you trim.
Complete your Spiral snowman for Christmas Pattern with a hanging loop. Crochet a chain approximately 12 to 15 cm long, or use a sturdy matching cord, and attach both ends securely behind the top of the hat or head. Weave in every remaining yarn tail and inspect the ornament from all sides. Straighten the scarf, adjust the spiral loops, fluff the tassel, and make sure decorative components are firmly attached. These finishing touches can make the difference between a simple crochet project and a beautifully presented Christmas crochet ornament.
Spiral Snowman for Christmas Pattern FAQ
Is the Spiral snowman for Christmas Pattern suitable for beginners? Yes, it can be a very approachable project for crocheters who already understand basic stitches. The main techniques are the magic ring, chain, single crochet, double crochet, increases, decreases, and slip stitches. The head requires basic amigurumi-style shaping, while the spiral is produced by placing several stitches into each foundation chain. Beginners may want to use stitch markers and count every round carefully. Taking time during assembly is also helpful because positioning the small pieces neatly contributes greatly to the finished appearance.
Why is my crochet spiral not curling properly? A crochet spiral forms because several stitches are worked into each stitch or chain of the previous section. If your strip remains relatively straight, there may not be enough stitches packed into the foundation. Working 3 dc into each chain is a useful starting point, although yarn thickness and individual tension can affect the result. If the spiral becomes too dense, reduce the number of stitches. Experimenting with a short sample first is an easy way to determine the best formula for your chosen yarn.
What yarn works best for a crochet snowman Christmas ornament? Cotton and acrylic are both practical options for the Spiral snowman for Christmas Pattern. Cotton provides excellent stitch definition and tends to hold decorative shapes well, while acrylic can create a softer and lighter ornament. A smooth yarn is usually easier to work with than highly textured novelty yarn, especially when creating small facial components. Whichever fiber you choose, try to keep the white, red, and orange yarns reasonably similar in weight so all the pieces remain proportional.
Can I make the Spiral snowman for Christmas Pattern larger or smaller? Absolutely. To make a smaller ornament, use thinner yarn, a smaller crochet hook, fewer head-increase rounds, and a shorter foundation chain for the spiral. For a larger decoration, use thicker yarn or increase the number of rounds and extend the spiral foundation. Remember that enlarging only one component can change the proportions. Ideally, adjust the head, spiral, hat, scarf, nose, tassel, and hanging loop together so the finished crochet snowman decoration remains visually balanced.
How can I make the snowman look more professional? Consistent tension, careful assembly, and neat finishing are the most important factors. Count the head stitches accurately so the shape remains symmetrical, distribute stuffing evenly, and position the facial features before permanently securing them. Hide yarn tails inside the crochet work and keep attachment stitches as discreet as possible. Small details such as a straight gold hat band, evenly trimmed scarf fringe, a balanced tassel, and smoothly arranged spiral loops can significantly improve the final presentation of your handmade Christmas crochet project.
Can I personalize this Christmas crochet pattern? Yes, and personalization is one of the most enjoyable parts of the project. You can replace the traditional red scarf with green, burgundy, pastel blue, or another favorite holiday color. Gold trim can become silver, the hat can be shortened, and small embroidered snowflakes or buttons can be added. You can also create several snowmen with different expressions and accessories while using the same basic Spiral snowman for Christmas Pattern. This makes it possible to create a coordinated collection while giving every finished ornament its own personality.
Conclusion
The Spiral snowman for Christmas Pattern combines several enjoyable crochet techniques in one festive handmade project. You learned how to crochet and shape a rounded snowman head, create a carrot-style nose, form the distinctive corkscrew body, add contrasting edging, and assemble the main components securely. The tutorial also covered how to crochet a tall Christmas hat, make a simple scarf, add a miniature decorative flower, create a colorful tassel, and finish the ornament with a practical hanging loop.
One of the best features of this crochet Christmas pattern is how easily it can be customized. Changing the yarn colors, spiral length, hat style, decorative trim, or facial expression can produce an entirely different snowman without requiring a completely new construction method. Once you understand how the spiral forms, you can also experiment with different stitch combinations to achieve tighter or softer curls while keeping the recognizable snowman design.
Remember that handmade crochet does not need to look mechanically identical from one project to another. Small variations in stitch tension and shaping give each handmade snowman ornament its individual character. Focus on secure stitches, balanced proportions, careful finishing, and a color combination that makes you happy. If your first spiral is tighter or looser than expected, simply adjust the number of stitches or foundation-chain length on the next version.
Whether displayed on a Christmas tree, incorporated into a festive garland, or used as a seasonal handmade decoration, this Spiral snowman for Christmas Pattern offers a creative way to celebrate the holiday season with crochet. It is compact enough to complete without a large amount of yarn while still providing plenty of opportunities for decorative details and personal touches.
After finishing your snowman, take a moment to check the hat, scarf, spiral, tassel, and hanging loop one final time. Arrange the coils evenly and gently shape the head and accessories. These small adjustments help showcase the texture of the crochet stitches and bring together all the techniques covered throughout this Christmas snowman crochet tutorial. I hope this Spiral snowman for Christmas Pattern inspires a fun addition to your holiday crochet collection. If you make your own version, leave your sincere opinion about the pattern and share your suggestions for colors, accessories, or improvements you would like to try. Your creative ideas can inspire even more variations of this charming spiral snowman for Christmas.