
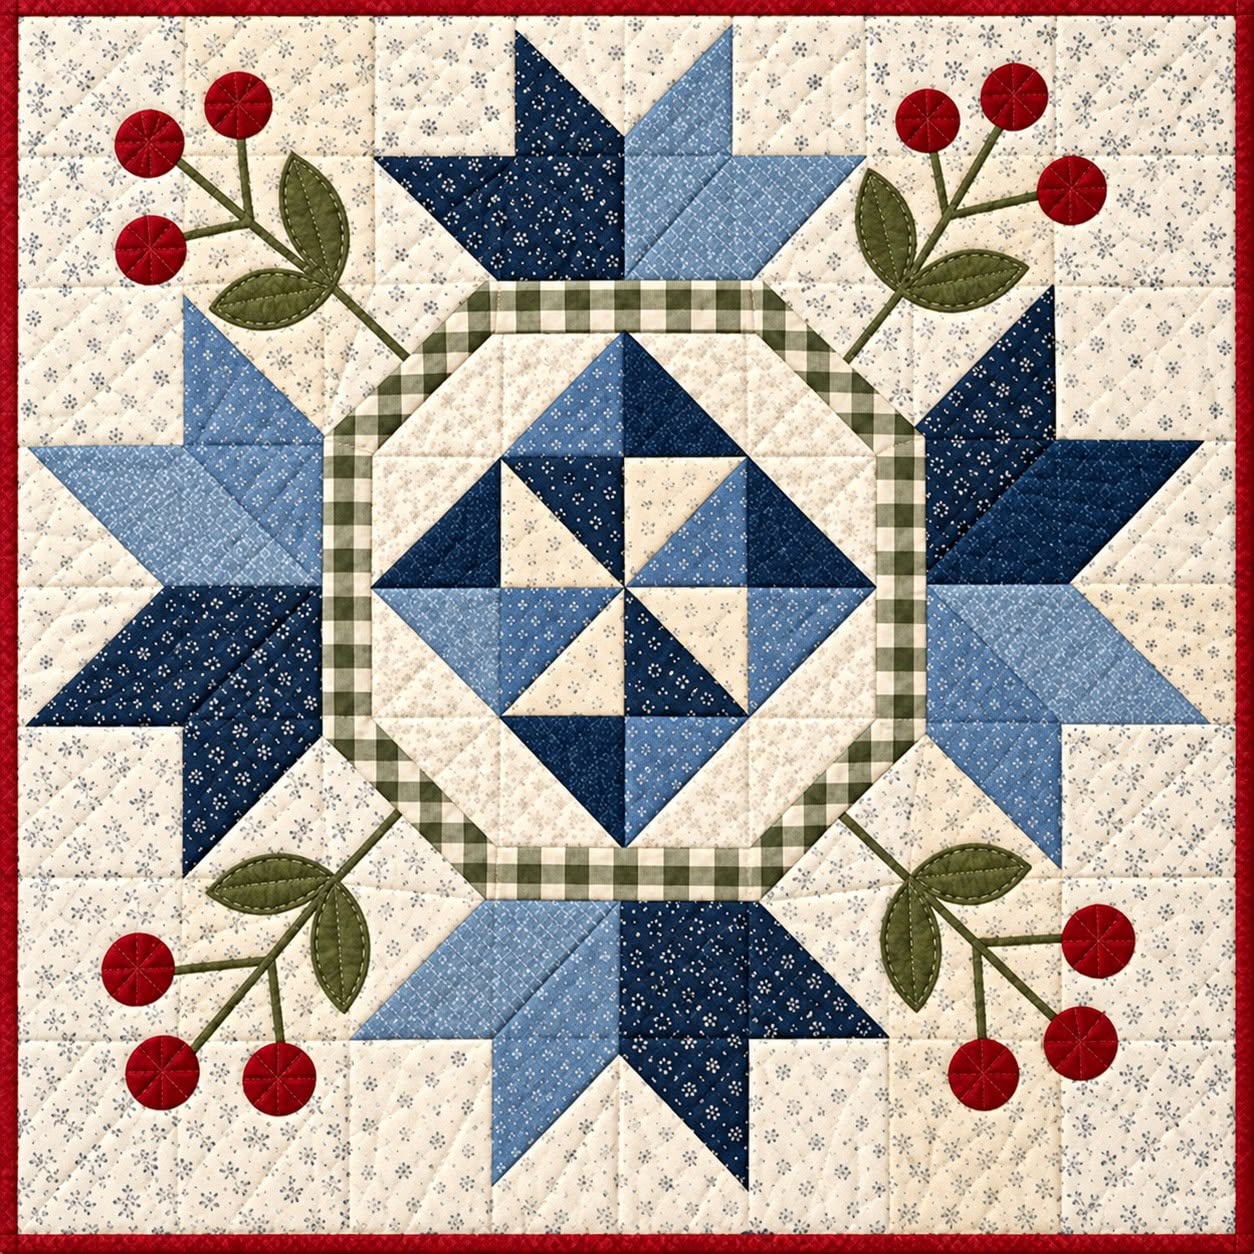
The “Star and Fruit” Quilt Block Tutorial Pattern is a charming project that combines classic patchwork geometry with appliqué-inspired botanical details. The design shown in the reference image brings together several traditional quilting elements: pointed stars, a central geometric medallion, a framed octagonal area, leaves, stems, and small red fruit motifs. The contrast between deep navy blue, soft blue, cream, muted green, and rich red creates a warm country-style appearance that can work beautifully as a wall hanging, table topper, decorative quilt panel, or the starting point for a larger quilt. Although the finished block looks detailed, it becomes much easier to understand when the construction is divided into manageable sections and assembled gradually.
One of the most attractive characteristics of the “Star and Fruit” Quilt Block Tutorial Pattern is the balance between precise piecing and organic decoration. The central portion uses triangles arranged into a pinwheel-like geometric star, while larger blue stars extend toward the four sides of the composition. In the corners, curved stems, leaves, and red berries soften the straight lines of the patchwork. This mixture makes the project particularly interesting for quilters who want to practice half-square triangles, accurate seam matching, appliqué, pressing, layering, and quilting in a single project. The small-scale prints visible in the design also demonstrate an important quilting principle: fabric does not need to be completely solid to provide strong visual contrast.
Before beginning, it is useful to remember that a handmade version does not have to reproduce every tiny detail of the reference image exactly. Fabric availability, print scale, seam allowances, and the intended finished size can all influence the final result. For a practical version, you can choose a finished square of approximately 45 cm × 45 cm, then adapt the individual pieces proportionally. Use 100% quilting cotton for easy cutting and pressing, coordinating cream prints for the background, several shades of blue for the stars, olive or sage green for the leaves and frame, and deep red fabric for the fruit. You will also need batting, backing fabric, coordinating thread, an iron, a rotary cutter, an acrylic ruler, a cutting mat, pins or clips, and your preferred tools for appliqué.
Planning Fabrics and Preparing the “Star and Fruit” Quilt Block Tutorial Pattern
Begin by studying the design as a collection of separate visual zones rather than one complicated block. There is a central geometric unit, a light octagonal frame, a green checked inner border, four prominent blue star arrangements, four botanical corner motifs, and a neutral background. Identifying these areas before cutting is one of the easiest ways to prevent confusion during construction. A quick paper sketch can also help you record where each blue shade and directional print will eventually appear.
DISCOVER MORE FREE PATTERNS HERE!
For the background, select a cream, ivory, or warm off-white quilting cotton with a subtle print. Small floral, dotted, or low-volume patterns are especially suitable because they provide visual texture without competing with the stars. The photograph demonstrates this principle well: the light background is not completely plain, yet it still functions as a neutral space. In quilting, this type of fabric is often called a low-volume fabric, meaning that its printed elements have relatively little contrast when viewed from a distance.
Choose at least three blue fabrics for the geometric sections. A dark navy print, a medium denim-like blue, and a softer dusty blue create enough variation to define the different star points. You can introduce an additional blue print if desired. Rather than selecting fabrics only because they look attractive individually, place them next to one another before cutting. Strong differences in value—light, medium, and dark—will make the star quilt block easier to see.
The green details require two slightly different approaches. A checked, plaid, or small geometric green fabric works beautifully for the narrow octagonal frame, while olive or muted green fabrics can be used for the appliqué leaves. If you cannot find the exact fabrics shown in the inspiration image, focus on maintaining similar color relationships rather than searching for identical prints. Quilting is often more successful when fabrics coordinate naturally instead of attempting an exact reproduction.
For the fruit, choose deep red or burgundy scraps that stand clearly against the cream background. The circular fruits can be made with appliqué circles approximately 2.5 to 3.5 cm in diameter, depending on your final block size. Leaves can be roughly 5 to 7 cm long, with their dimensions adjusted to fit comfortably into each corner. Stems may be made from narrow bias strips, embroidered lines, or machine-stitched curves.
Before making the decorative elements, prepare the geometric pieces. For a project around 45 cm square, start with slightly oversized squares for the triangle units and trim them after sewing. A common quilting seam allowance is approximately 6 mm (1/4 inch). Because the central medallion contains many intersecting seams, cutting accurately and maintaining a consistent seam allowance are more important than trying to sew quickly.
Piecing the Central Star and Large Blue Star Units
The center of the “Star and Fruit” Quilt Block Tutorial Pattern is constructed from contrasting triangles arranged around a common midpoint. An approachable method is to create half-square triangle units, commonly abbreviated as HSTs. An HST is a square made from two triangular pieces of fabric joined diagonally. These units are among the most widely used building blocks in traditional and modern patchwork because they can form stars, pinwheels, diamonds, chevrons, and many other patterns.
To make an HST, place one light square and one blue square right sides together. Draw a diagonal guideline from one corner to the opposite corner. Stitch approximately 6 mm away from the guideline on both sides, cut along the drawn line, and press the resulting units open. Trim each unit carefully so all finished HSTs are exactly the same size. Repeat this process using different combinations of cream, medium blue, and dark blue fabrics.
Arrange the completed triangles before joining them permanently. The central motif should appear to rotate around the midpoint, alternating light and dark sections. Refer to the image frequently and pay particular attention to triangle orientation. It is surprisingly easy to rotate one HST in the wrong direction. Taking a quick photograph of the correct arrangement before sewing the rows together can provide a convenient reference while you work.
Sew the central units into short rows, pressing the seam allowances in alternating directions whenever practical. This allows neighboring seams to nest, helping the corners meet more precisely. Join the rows and check the center intersection before proceeding. If the points are slightly imperfect, avoid repeatedly unpicking tiny discrepancies. A handmade quilt can remain attractive without every intersection being mathematically perfect.
Next, construct the four larger blue stars that surround the center. These stars use combinations of dark navy, medium blue, light blue, and neutral background pieces. Depending on your preferred piecing technique, their pointed sections can be assembled from HSTs, quarter-square triangles, or individually cut triangles. For beginners, slightly oversized triangle units that are trimmed after sewing are often easier to control.
Lay the four stars around the central medallion before assembling the entire background. Rotate each one so its visual direction corresponds with the reference composition. The stars should appear to extend outward from the central framed section while remaining separated by areas of cream fabric. Once satisfied with the placement, sew the patchwork sections together gradually and press after every major seam. Careful pressing helps the finished quilt block pattern remain flat and square.
Creating the Octagonal Frame, Leaves, Stems, and Red Fruit
The framed center gives this design much of its distinctive character. Surround the pieced central star with a generous cream border, then create the narrow green checked frame around it. The visual goal is an octagonal appearance, with angled corners rather than a conventional square border. This frame acts as a transition between the small geometric center and the much larger stars surrounding it.
An easy way to approach the octagonal frame is to construct four straight strips and four shorter angled corner sections. Measure the central unit only after it has been pieced and pressed because actual measurements can vary slightly from theoretical cutting dimensions. Cut the green strips a little longer than necessary, position them carefully, and trim the corners after confirming the angles. Accurate measuring at this stage prevents distortion later.
The botanical appliqué can be prepared separately. Draw simple elongated leaf shapes onto paper or appliqué templates. Each leaf should have a gently pointed end and a rounded base, similar to the leaves visible in the photograph. Trace the shapes onto your chosen green fabrics. You may use fusible appliqué, turned-edge appliqué, or traditional needle-turn appliqué depending on your experience and the finish you prefer.
For a beginner-friendly method, lightweight fusible web can simplify the process considerably. Follow the manufacturer’s directions for the fusible material, attach it to the wrong side of the appliqué fabric, and cut out the leaves and fruit circles. Arrange the pieces in the four corner areas before permanently securing them. Keep enough distance from the outer edges for trimming, quilting, and binding.
Create slender stems extending from the leaves toward the fruit. Narrow bias strips provide a dimensional fabric look, while decorative machine stitching offers a faster alternative. You can also use a dense straight stitch or a narrow zigzag stitch to suggest delicate branches. Arrange the red fruit in small clusters, varying their positions slightly so the botanical sections feel natural rather than mechanically identical.
Once everything is positioned correctly, secure the appliqué. A small zigzag, blanket stitch, satin stitch, or straight-edge appliqué stitch can all work well. The choice depends on the style you want. Blanket stitch appliqué creates a visible handmade-inspired outline, whereas a narrow matching stitch produces a quieter finish. Stitch the leaves and fruit carefully, avoiding excessive tension that could cause the background fabric to pucker.
Assembling, Quilting, Binding, and Finishing the Project
After the center, surrounding stars, and appliqué sections have been completed, join all remaining background sections to form the full square. Measure the block through its center horizontally and vertically rather than relying only on the outer edges. If necessary, trim very small irregularities while keeping the design centered. Avoid aggressive trimming because cutting too much can reduce the seam allowance around star points near the perimeter.
Press the completed top carefully from the reverse side. Use an up-and-down pressing motion instead of aggressively sliding the iron across the fabric. Sliding can stretch bias edges, particularly around triangular patchwork. At this point, the “Star and Fruit” Quilt Block Tutorial Pattern should clearly display its central pinwheel-style geometry, octagonal green frame, four large blue stars, and four red-fruit botanical accents.
Prepare a backing piece and batting slightly larger than the quilt top on every side. Place the backing wrong side up, position the batting over it, and place the quilt top right side up. Smooth all three layers from the center outward. Secure the quilt sandwich with safety pins, basting spray used according to its directions, or thread basting. The layers should remain smooth without being stretched.
For quilting, simple lines can complement the detailed patchwork beautifully. Consider stitching in the ditch around the central medallion and major star shapes, then adding gentle diagonal or curved quilting in the cream background. Echo quilting around the leaves and red fruit can emphasize the appliqué motifs. Beginners do not need an elaborate free-motion design; consistent straight-line quilting can create an attractive and polished result.
Once quilting is complete, trim the batting and backing so they align with the quilt top. Prepare double-fold binding from coordinating fabric. A navy, muted green, cream, or subtle print would all complement this design. Join the binding strips diagonally, press them lengthwise, and sew the binding around the perimeter. Take extra care at each corner to create neat mitered corners.
Give the finished project one final inspection. Remove loose threads, check the appliqué edges, and gently press where necessary. Your completed “Star and Fruit” Quilt Block Tutorial Pattern can be displayed as a decorative wall panel, incorporated into a larger quilt, transformed into a table topper, or adapted into a cushion front. More importantly, the project provides useful practice in geometric piecing, color placement, appliqué, quilting, and finishing techniques.
FAQ About the “Star and Fruit” Quilt Block Tutorial Pattern
Is the “Star and Fruit” Quilt Block Tutorial Pattern suitable for beginners?
Yes, especially for an adventurous beginner who already understands basic straight stitching. The project includes several techniques, so it is best approached one section at a time. Practicing a few half-square triangles on scrap fabric before starting the main block can make the process much easier.
What type of fabric works best for this quilt project?
Good-quality 100% cotton quilting fabric is an excellent choice because it cuts cleanly, presses well, and is easy to sew. Small-scale prints are particularly effective for a design like this because they add texture without hiding the geometric shapes.
How large should the finished quilt block be?
There is no mandatory size. A square of approximately 45 cm × 45 cm is a practical starting point for a decorative panel, but the pattern can be enlarged or reduced. Remember that changing the finished size requires proportional changes to the stars, center medallion, leaves, fruit, and borders.
What is a half-square triangle in quilting?
A half-square triangle, or HST, is a square patchwork unit divided diagonally into two fabric triangles. It is one of the fundamental units used in quilt making. In this project, HST-style construction can simplify many of the blue and cream geometric sections.
Do I need to use exactly the same colors shown in the photograph?
No. The blue, cream, green, and red combination creates a traditional country-inspired palette, but the design can be personalized. Burgundy and beige can produce a warmer look, while turquoise and gray could create a more contemporary version. The most important factor is maintaining enough value contrast between neighboring pieces.
How can I make my star points match more accurately?
Accurate cutting, consistent 6 mm (1/4-inch) seam allowances, careful pressing, and trimming HST units before assembly all help. Pinning important intersections before stitching can also prevent the layers from shifting.
Should the fruit and leaves be appliquéd before or after quilting?
For this type of project, attaching the appliqué to the quilt top before creating the quilt sandwich is generally straightforward. You can then quilt around the appliqué shapes to emphasize them and add texture.
Can I sew the appliqué by hand?
Absolutely. Needle-turn appliqué can create a beautiful traditional finish. Machine appliqué is usually faster, while hand appliqué provides more control over curved edges and gives the project a classic handmade character.
What batting should I use?
A low- or medium-loft batting is practical for a decorative quilt panel. Cotton or cotton-blend batting can provide good stitch definition without making the finished piece excessively bulky. The ideal choice also depends on whether the project will become a wall hanging, cushion, table topper, or part of a larger quilt.
How can I prevent the center from becoming bulky?
Press seams carefully and distribute seam allowances rather than allowing many layers to accumulate in one direction. Trimming unnecessary fabric from seam allowances should only be done when you are confident it will not weaken the construction.
Can this block be used to make a full-size quilt?
Yes. You could repeat the complete block several times or use it as a central feature surrounded by simpler coordinating blocks. Repeating only the large star motifs is another way to develop a larger quilt while keeping the Star and Fruit quilt design as the main focal point.
What quilting design works best over the finished block?
There is no single correct choice. Stitching in the ditch emphasizes the piecing, echo quilting highlights the stars and appliqué, and gentle free-motion quilting can fill the cream negative space. If you are new to quilting, straight or softly curved lines are often easier to manage.
How do I keep the finished quilt block square?
Measure frequently throughout construction. Trim individual HST units before assembling them, press without stretching, and measure the completed top through the horizontal and vertical centers. These habits reduce accumulated inaccuracies and make the final binding easier to attach.
Can scraps be used for this pattern?
Yes. The “Star and Fruit” Quilt Block Tutorial Pattern is particularly suitable for using coordinated scraps because the stars, leaves, berries, and center contain many relatively small pieces. Keeping the background fabrics visually quiet will help varied scraps look intentional rather than overly busy.
Conclusion
Completing Your “Star and Fruit” Quilt Block Tutorial Pattern
The “Star and Fruit” Quilt Block Tutorial Pattern combines some of the most enjoyable elements of traditional quilting in one decorative project. Beginning with carefully selected cream, blue, green, and red fabrics, the construction develops from geometric triangle units into a central rotating motif, an octagonal frame, four large stars, and charming fruit-and-leaf appliqué details. Breaking the design into these individual sections makes an intricate-looking project much more approachable.
Throughout the process, the most important skills are accurate cutting, consistent seam allowances, careful pressing, half-square triangle construction, color placement, appliqué, layering, quilting, and binding. These techniques are useful far beyond this single project, making the tutorial a valuable opportunity to build confidence for future quilt patterns.
Remember that handmade quilting leaves plenty of room for personal interpretation. You can change the colors, experiment with prints, enlarge the central star, simplify the appliqué, or repeat the block to create a much larger quilt. What matters most is maintaining the visual balance between the bold geometric stars and the softer botanical details.
EASILY FIND THE FREE PDF FOR THIS PATTERN HERE!
Once completed, this project can become a beautiful handmade decoration as well as a practical demonstration of several essential quilting techniques. The combination of blue patchwork stars, red fruit appliqué, green leaves, a framed center, and a soft neutral background gives the finished piece a timeless character that can work with both traditional and updated fabric collections. If you make your own “Star and Fruit” Quilt Block Tutorial Pattern, leave your sincere opinion about the project. Which part did you enjoy most—the geometric stars, the central medallion, or the fruit appliqué? Your suggestions for different colors, fabrics, sizes, and creative variations are also welcome and can inspire new interpretations of this beautiful quilt design.