
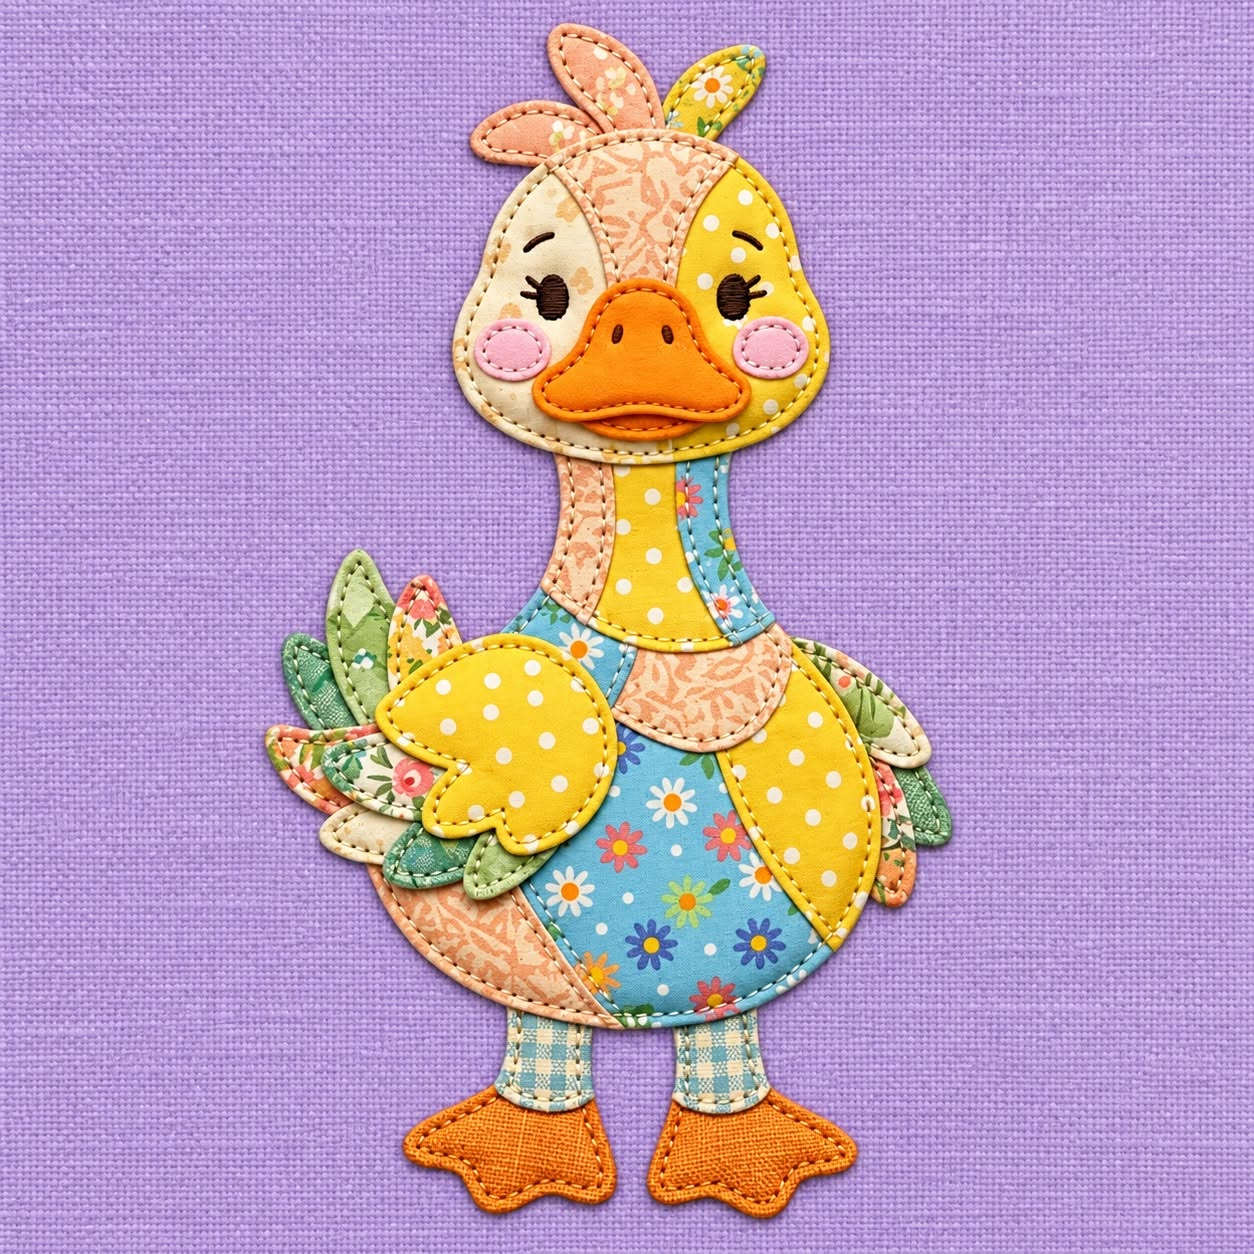
The Cute Duck Appliqué Template Pattern is a cheerful sewing project that combines colorful fabrics, simple appliqué shapes, decorative stitching, and playful details to create a charming handmade duck. Inspired by the project shown in the reference image, this design uses a mixture of yellow, peach, blue, green, orange, and floral fabrics to give the duck a warm patchwork appearance. The finished appliqué can become part of a quilt, nursery decoration, fabric wall hanging, tote bag, cushion cover, table decoration, or another creative sewing project. One of the most attractive features of this pattern is that every section can be customized, allowing you to use scraps from previous projects while creating something completely original. Even beginners can work through the project by preparing one piece at a time and assembling the duck gradually.
The main idea behind the Cute Duck Appliqué Template Pattern is to transform the duck into several manageable fabric shapes rather than trying to construct the entire character from a single complicated piece. The head, beak, neck, body, wings, tail feathers, legs, feet, cheeks, and decorative head feathers can all be traced and cut separately. This technique makes fabric appliqué easier because each component can be positioned independently before it is permanently sewn. The visible stitching around the shapes adds definition and also reinforces the handmade character of the project. By combining patterned cotton fabrics with solid colors, you can create contrast between the different sections while maintaining a harmonious overall design. Careful cutting, pressing, positioning, and stitching are the most important steps for achieving clean results.
Another advantage of this Cute Duck Appliqué Template Pattern is its flexibility. You do not need to reproduce every fabric shown in the example exactly. Yellow polka dots can be replaced with gingham, floral cotton, stripes, tiny geometric prints, or solid fabric. The blue floral body section can become turquoise, green, pink, or any color that coordinates with your collection. Even the orange beak and feet can be changed if you want a more imaginative character. The objective is to preserve the recognizable silhouette while allowing the fabric selection to reflect your own style. In this tutorial, you will learn how to prepare the materials, create the individual template pieces, assemble the appliqué in the correct order, add finishing details, and understand the most common questions associated with this type of sewing project.
Materials and Fabric Selection for the Cute Duck Appliqué Template Pattern
Start by selecting several pieces of quilting cotton fabric in coordinating colors. For a look similar to the reference project, prepare yellow fabric for the sides of the face and wings, peach or beige fabric for parts of the head and body, light blue floral fabric for the neck and center body, green fabrics for the tail feathers, and orange fabric for the beak and feet. Small scraps are usually enough for many pieces, which makes this an excellent fabric scrap project. Mixing tiny prints with solid fabrics helps prevent the design from becoming visually overwhelming.
DISCOVER MORE FREE PATTERNS HERE!
You will also need a base material to support the appliqué. Depending on the final project, this could be cotton fabric, felt, canvas, quilted fabric, or another stable textile. If you plan to turn the duck into a separate fabric ornament instead of attaching it directly to a quilt block, consider using lightweight batting or interfacing between the layers. This creates the slightly padded appearance visible in the reference design and gives the finished duck appliqué more dimension.
A temporary or permanent fusible web can make the assembly process considerably easier. Fusible web is a thin adhesive material that bonds fabric pieces to the background when pressed according to the product instructions. It helps keep small appliqué shapes from shifting during sewing. Although it is possible to make the project without fusible web, beginners may find it especially useful for pieces such as the cheeks, beak, small head feathers, and narrow sections of the neck.
Prepare standard sewing supplies including sharp fabric scissors, small detail scissors, pins or fabric clips, an iron, an ironing surface, matching or contrasting thread, and a sewing machine if you prefer machine appliqué. A washable or removable fabric marking tool is also useful for transferring shapes and placement marks. If you prefer hand sewing, the entire project can be completed with a needle and thread using small blanket stitches or running stitches around the edges.
Thread choice has a strong influence on the finished appearance. Neutral thread creates subtle outlines, while darker or contrasting thread emphasizes each individual piece. The inspiration image uses visible decorative stitching that gives the project a charming handcrafted look. You can imitate this effect with blanket stitch, straight stitch, or a narrow zigzag stitch. Test your stitch settings on fabric scraps before working on the final pieces, especially when sewing around curves.
Before cutting anything, wash and press the fabrics if that is part of your normal quilting routine. Wrinkled fabric makes tracing and accurate cutting more difficult. Press each scrap until it lies completely flat, but avoid stretching it while ironing. Organizing the fabrics by color and body section before cutting can also save time. Once your materials are prepared, the next stage of the Cute Duck Appliqué Template Pattern is creating and arranging the individual template pieces.
Creating and Preparing the Duck Appliqué Template Pieces
Begin by studying the duck as a collection of basic shapes. The head resembles a rounded pear or oval shape, while the body is a larger rounded form. The neck is long and slightly tapered. The beak is a flattened orange oval with a gentle point at each side, and the feet are broad shapes with small toe-like curves. Breaking the illustration into these simple components makes the appliqué template much easier to reproduce and sew.
For the head, create one main outer shape and then divide the face into several decorative fabric sections. The reference project combines peach, cream, and yellow areas, producing a patchwork effect. You can create a central forehead piece, two side face sections, two small pink cheek shapes, and several decorative feathers at the top. Add a small seam allowance only if you intend to turn the raw edges under. For raw-edge fusible appliqué, cut directly on the template line.
Create the beak as a separate template so it can overlap the lower portion of the face. An orange or burnt-orange fabric works particularly well because it stands out clearly against yellow and peach fabrics. The beak should be wide enough to become one of the character’s main facial features. You can add two small nostrils later using embroidery or fabric paint suitable for textile crafts. A decorative stitched line near the bottom of the beak can suggest the mouth.
The neck can be divided into multiple vertical or curved sections to reproduce the patchwork style shown in the photo. Consider using a peach strip on one side, yellow polka-dot fabric in the middle, and floral blue fabric on the opposite side. At the bottom of the neck, add a rounded bib-like piece before connecting it to the body. This layering creates additional depth and makes the Cute Duck Appliqué Template Pattern visually interesting.
For the body, create a large rounded base shape and then divide the visible surface into three or four sections. The center can feature floral fabric, while the outer pieces can use yellow and peach prints. Prepare two wing templates, making one wing more visible than the other depending on how you want to position the duck. The large front wing in the reference design has rounded feather-like curves along its lower edge, which makes the character especially playful.
Finally, prepare several tail feather shapes in different sizes. Green, beige, peach, floral, and patterned scraps can be layered behind the body to create a full tail. Also cut two narrow leg pieces and two orange feet. Before sewing, place every fabric appliqué piece on a flat surface and arrange the entire duck. Photographing or sketching the final arrangement can help you remember the layering order after the pieces have been moved to the ironing board or sewing machine.
Step-by-Step Assembly and Stitching of the Cute Duck Appliqué Template Pattern
Begin assembly with the pieces that will sit farthest behind the design. In this project, the tail feathers should generally be positioned first because much of their lower section disappears behind the body. Arrange the feathers in a fan shape, alternating colors and prints so that adjacent pieces remain easy to distinguish. Once you are satisfied with the placement, temporarily secure them using fusible web, pins, or small amounts of fabric-safe adhesive intended for sewing.
Position the main body over the lower portion of the tail feathers. Next, place the decorative body sections on top of the base, carefully aligning their edges. If you are using fusible appliqué, press each piece following the temperature recommendations for your adhesive. Avoid moving the iron back and forth aggressively because this can shift small pieces. A pressing motion is generally easier to control when assembling detailed patchwork appliqué designs.
Add the neck so that its lower edge overlaps slightly with the upper body. Position the different neck panels and the rounded lower neck detail. Then place the head above the neck, checking that the character remains centered and balanced. Add the facial fabric sections, cheeks, beak, and decorative feathers at the top of the head. Before permanently attaching everything, stand back and check the proportions. Small adjustments at this stage can significantly improve the final result.
Place the wings after the central body sections are secure. The front wing should overlap part of the body to create a dimensional effect. A second smaller wing can appear on the opposite side. Use curved shapes rather than sharp corners whenever possible because soft curves match the friendly look of the Cute Duck Appliqué Template Pattern. When attaching the legs, position them behind the lower body so only the intended portion remains visible, then place the orange feet at the bottom.
After all shapes have been attached, stitch around the edges. A blanket stitch appliqué finish is especially suitable because it provides both decoration and reinforcement. You may also use a narrow zigzag stitch or a simple straight stitch approximately 1–2 mm inside the raw edge. Sew slowly around the face, beak, feathers, and wings, reducing the speed when approaching tight curves. Stop with the needle lowered, lift the presser foot, rotate the fabric slightly, and continue sewing for smoother outlines.
Finish the facial details last. The eyes can be created using small pieces of dark fabric, embroidery, or carefully stitched shapes. Add eyelashes with embroidery thread if desired. The cheeks can be pink fabric circles or rounded ovals, while small embroidered lines can give them extra expression. Add the nostrils and mouth detail to the orange beak. Press the completed project from the reverse side when appropriate, then trim loose threads. Your Cute Duck Appliqué Template Pattern is now ready to become part of a larger sewing creation.
FAQ About the Cute Duck Appliqué Template Pattern
What is the Cute Duck Appliqué Template Pattern? The Cute Duck Appliqué Template Pattern is a sewing design in which separate fabric shapes are layered and stitched together to create a decorative duck. Unlike a traditional pieced quilt block, appliqué allows curved and irregular shapes to be placed directly onto a fabric background. This makes it ideal for animals, flowers, characters, and other detailed motifs that would be difficult to construct with standard geometric patchwork.
Is this duck appliqué suitable for beginners? Yes, the design can be beginner-friendly when approached one section at a time. New sewists should begin with larger shapes such as the body, head, and wings before working with tiny pieces. Using fusible web for appliqué can simplify the process because it holds the pieces securely before stitching. Practicing decorative stitches on scrap fabric is also helpful before sewing the final project.
What fabrics work best for appliqué? Medium-weight cotton quilting fabrics are among the easiest options because they cut cleanly, press well, and are widely available in many prints. Small-scale patterns work especially well for this design because the prints remain visible even on small pieces. Combining floral fabric, polka dots, gingham, solids, and subtle geometric prints can create the cheerful patchwork style associated with the duck shown in the reference.
Can I resize the Cute Duck Appliqué Template Pattern? Absolutely. One of the benefits of an appliqué template is that the design can be enlarged or reduced according to the final project. A larger version can work beautifully on a wall hanging or quilt center, while a smaller duck may suit a tote bag, cushion, fabric basket, or decorative panel. Remember that very small versions will require greater precision because details such as cheeks, feathers, and facial features become harder to stitch.
Should appliqué pieces have a seam allowance? It depends on the technique. For raw-edge appliqué, the fabric is usually cut directly along the final outline because the edges remain visible and are secured with stitching. For traditional turned-edge appliqué, additional fabric must be left around the template so the edges can be folded underneath. Beginners who want a result similar to the reference project may find raw-edge appliqué more straightforward, especially when using fusible web.
How can I make the finished duck look more professional? Accuracy and patience make the biggest difference. Press fabrics before cutting, trace templates carefully, use sharp scissors, arrange all pieces before attaching them, and sew slowly around curves. Keep the stitch length consistent and trim loose threads as you work. Choosing coordinated fabrics is equally important. Repeating the same colors in different areas of the Cute Duck Appliqué Template Pattern helps connect all of the individual pieces and creates a polished final composition.
Conclusion
Creating the Cute Duck Appliqué Template Pattern is a wonderful way to combine appliqué, patchwork, decorative stitching, and creative fabric selection in one colorful sewing project. Throughout this tutorial, you learned how to choose suitable cotton fabrics, divide the duck into manageable template pieces, prepare the head, neck, body, wings, tail, legs, feet, and facial details, organize the correct layering sequence, and finish the edges with decorative stitching. The most important lesson is to build the design gradually rather than trying to assemble everything at once. Careful preparation makes even detailed appliqué much easier to manage.
EASILY FIND THE FREE PDF FOR THIS PATTERN HERE!
You can also personalize this pattern almost endlessly. Change the colors, mix your favorite scraps, enlarge the design for a quilt panel, or reduce it for a smaller decorative project. Whether you prefer traditional country fabrics, modern prints, pastel colors, or bright combinations, the Cute Duck Appliqué Template Pattern can become a unique handmade piece that reflects your own sewing style. Use the finished duck on quilts, cushions, bags, wall hangings, nursery decorations, or other fabric projects where a cheerful appliqué motif would feel at home. If you make your own version of this Cute Duck Appliqué Template Pattern, leave your sincere opinion about the project and share your suggestions. Which fabric combination would you choose for the duck? Your ideas and creative variations can inspire even more ways to transform this adorable appliqué into a beautiful handmade project.