
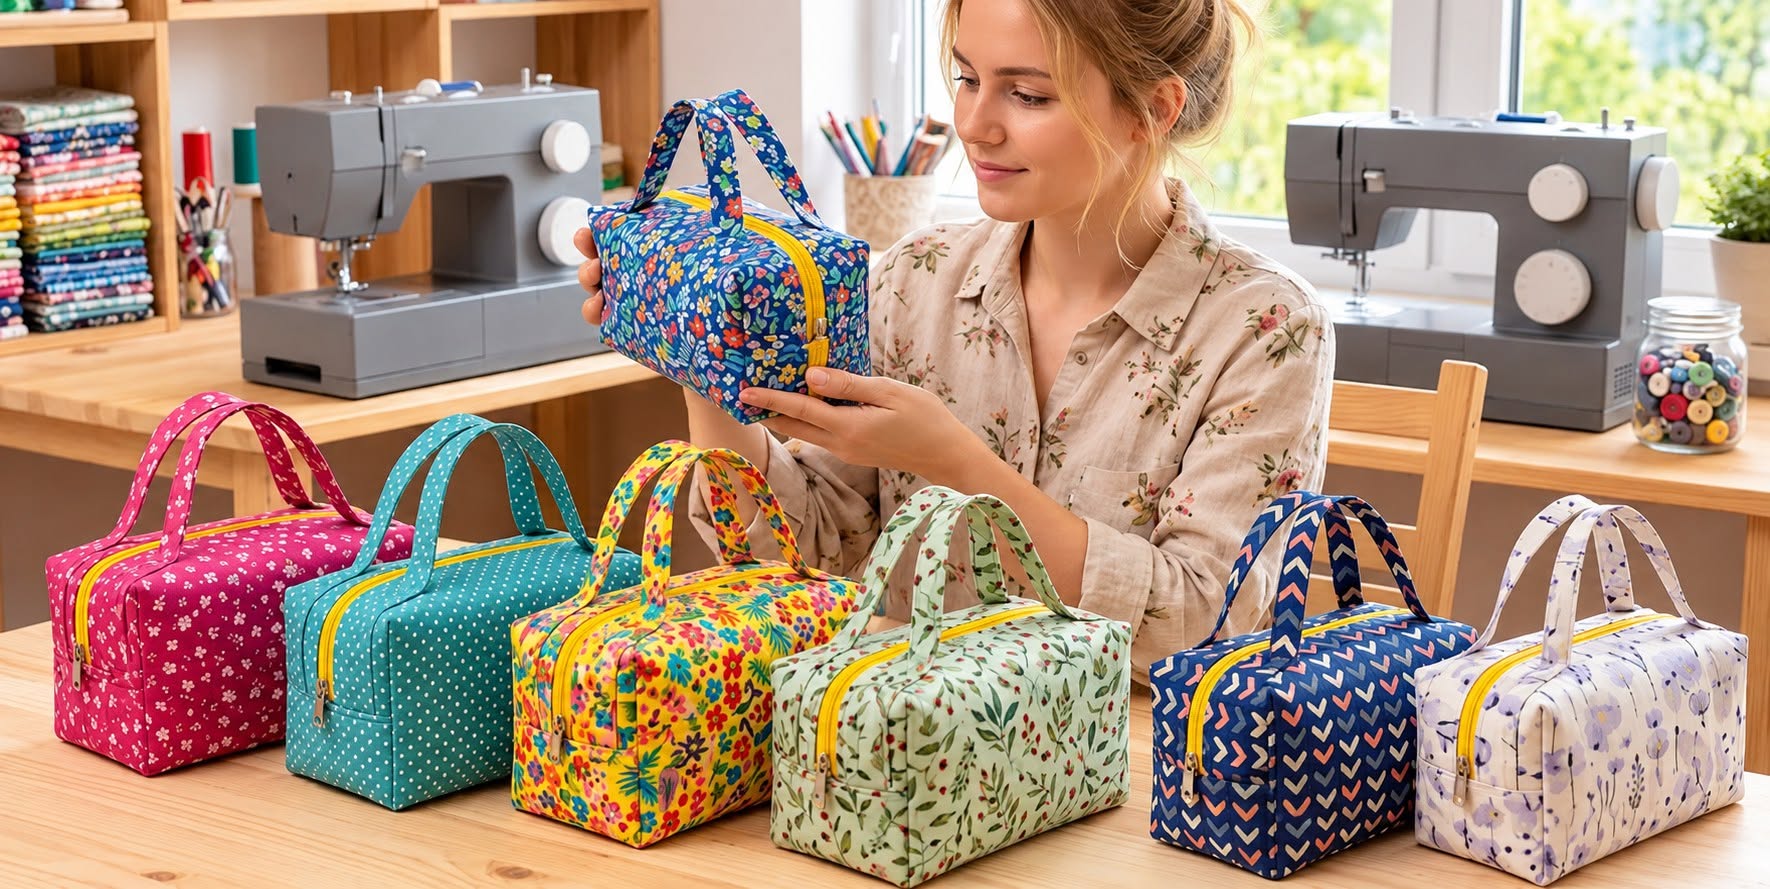
The Toiletry bag with handles and zipper Pattern is a practical sewing project that combines everyday usefulness with a polished handmade look. Inspired by the structured fabric bags shown in the photo, this design features a roomy rectangular body, a secure top zipper, two comfortable fabric handles, and enough internal space for cosmetics, toiletries, sewing supplies, travel accessories, or other small essentials. One of the best things about this project is its flexibility: you can create a colorful floral version, a minimalist neutral bag, or a coordinated set using several complementary fabrics. The boxy construction also makes the finished piece stand upright on a table, which improves organization and makes everything inside easier to reach. Even if you have only basic sewing experience, the process can be completed successfully when each part is prepared carefully. Throughout this tutorial, you will learn how to select the fabric, stabilize the panels, install the zipper, make the handles, create the boxed corners, add a lining, and finish the bag professionally.
Working with a Toiletry bag with handles and zipper Pattern is also an excellent way to practice several useful sewing techniques in one manageable project. You will learn how interfacing changes the structure of fabric, why accurate seam allowances matter, how zipper placement affects the final shape, and how boxed corners transform flat rectangular panels into a three-dimensional bag. The handles add both decorative appeal and practical value, especially when the bag is used for travel. Another advantage is that the design works beautifully with cotton prints, quilting cotton, canvas, denim, or other medium-weight fabrics. For a result similar to the photograph, bright patterned cotton combined with a contrasting zipper creates a cheerful handmade appearance. A good lining fabric keeps the inside clean and neat, while fusible interfacing or batting adds the firmness needed for the bag to maintain its rectangular shape instead of collapsing when placed on a surface.
Before starting your Toiletry bag with handles and zipper Pattern, gather your materials and prepare a comfortable sewing area. For a medium-size toiletry bag, you can begin with two exterior fabric rectangles measuring approximately 30 x 22 cm (11.8 x 8.7 inches), two lining rectangles of the same size, and two pieces of fusible interfacing or thin batting measuring slightly smaller than the exterior panels. You will also need a zipper approximately 32 to 35 cm (12.5 to 13.8 inches) long, matching sewing thread, scissors or a rotary cutter, pins or sewing clips, an iron, a ruler, and a sewing machine. For the handles, prepare two fabric strips approximately 35 x 8 cm (13.8 x 3.1 inches). These measurements can be adjusted depending on the size you want, but keeping the proportions similar will help reproduce the attractive box-shaped appearance of the bags in the reference photo.
Materials, Fabric Selection, and Cutting the Pattern Pieces
Choosing the correct fabric is an important first step when making a Toiletry bag with handles and zipper Pattern. Quilting cotton is an excellent choice because it is easy to cut, press, and sew, while also offering a huge variety of prints. Floral patterns, small geometric designs, polka dots, botanical prints, and colorful motifs all work particularly well for this style of bag. If you want a more durable travel version, lightweight canvas can also be used. Avoid fabrics that stretch significantly because they can make the bag difficult to shape accurately.
DISCOVER MORE FREE PATTERNS HERE!
The exterior fabric determines most of the visual character of the finished toiletry bag. To recreate the cheerful look shown in the photo, select a colorful printed fabric with a medium or small-scale design. A print that appears balanced across the entire surface works especially well because the bag will be viewed from several directions. Cut two exterior rectangles measuring approximately 30 x 22 cm. Take time to make each rectangle perfectly square because inaccurate cutting can cause the zipper and side seams to become uneven later.
Next, prepare two matching pieces of lining fabric. The lining should be lightweight but durable enough to withstand frequent use. Cotton is a reliable option, although a coated or water-resistant lining can be useful when the bag will hold cosmetics or toiletries. Cut two lining rectangles measuring the same size as the exterior pieces. Using a contrasting lining can make the interior more attractive and also make small items easier to see when the bag is open.
Structure is essential for achieving the boxy appearance associated with this zippered toiletry bag. Apply fusible interfacing to the wrong side of both exterior fabric pieces according to the manufacturer’s temperature recommendations. Thin fusible fleece can create a soft padded appearance, while medium-weight interfacing produces a firmer shape. If you prefer a quilted finish, attach thin batting and add simple rows of stitching before assembling the bag.
For the two fabric handles, cut strips approximately 35 x 8 cm each. Fold each strip lengthwise with the wrong sides together and press a crease. Open the strip, then fold both long raw edges inward until they meet at the center crease. Fold the strip in half again and press. Stitch close to both long edges to create a strong, neat handle approximately 2 cm wide. Repeat the same process with the second strip.
Finally, prepare the zipper and check all your pieces before sewing. A zipper slightly longer than the top edge is easier to install because you can move the zipper pull away from the sewing area. A contrasting yellow zipper, for example, can create the bright visual detail seen in many colorful handmade bags. At this stage, your Toiletry bag with handles and zipper Pattern should include two stabilized exterior panels, two lining panels, two finished handles, and one zipper ready for installation.
How to Sew the Zipper and Attach the Handles
Begin the construction by positioning the zipper along the upper edge of one exterior fabric panel. Place the exterior fabric right side facing upward, then place the zipper right side down along the top edge. The zipper teeth should face toward the center of the fabric. Place one lining piece on top with its right side facing downward. The zipper will now be sandwiched between the exterior fabric and the lining.
Secure the layers with sewing clips or pins and sew along the zipper using a zipper foot. Keep the seam straight and maintain an even distance from the zipper teeth. Once stitched, fold the exterior fabric and lining away from the zipper and press carefully. Topstitch close to the folded edge. This small line of stitching helps prevent the fabric from catching in the zipper and gives the handmade toiletry bag a more professional finish.
Repeat the same process on the opposite side. Position the second exterior panel right side up, align the remaining zipper edge right side down, and place the second lining piece on top. Sew the layers together and press them away from the zipper. Add another line of topstitching. Open and close the zipper several times to confirm that the fabric moves freely and nothing interferes with the zipper teeth.
Now position the handles. Measure approximately 7 to 8 cm (2.8 to 3.1 inches) from each side of the exterior panels and mark the placement points. Each handle should form a smooth arch without twisting. Position the raw ends of one handle along the upper part of the first exterior panel. Attach the second handle to the opposite exterior panel using exactly the same spacing so that both sides remain symmetrical.
Baste the handle ends securely within the seam allowance. For additional strength, you can sew across each end two or three times. Make sure the handles point toward the center of the panels while you continue sewing the bag. Keeping them away from the side seams will prevent them from being accidentally caught during construction. Reinforcing this area is especially important because the handles will receive regular pulling and lifting.
At this point, your Toiletry bag with handles and zipper Pattern should already begin to resemble the project shown in the reference image. The zipper forms the central opening, while the handles sit neatly on both sides of the top section. Before moving forward, check that the handles are equal in length and that the zipper is centered. Small corrections are much easier to make now than after the bag has been fully assembled.
Sewing the Body, Lining, and Boxed Corners
Open the zipper at least halfway before sewing the body of the bag. This detail is extremely important because the partially open zipper will provide the opening needed to turn the finished project right side out. Arrange the exterior panels with their right sides facing each other. At the same time, bring the lining panels together with their right sides facing one another. The zipper should sit between the two sections.
Match the edges carefully and secure everything with sewing clips. Sew around the exterior fabric using approximately a 1 cm seam allowance. Continue around the lining but leave an opening of about 8 to 10 cm (3.1 to 3.9 inches) along the bottom lining seam. This opening will later allow the entire bag to be turned right side out. Reinforce the beginning and end of the opening with backstitching.
To create the recognizable rectangular structure, the boxed corners must now be formed. At each bottom corner of the exterior fabric, mark and remove a square approximately 4 x 4 cm (1.6 x 1.6 inches). Repeat the same process on the lining. If you prefer, these squares can be removed before sewing the side seams. The size of the square determines the depth of the finished bag, so larger squares create a wider base.
Open one cut corner and bring the side seam and bottom seam together. The seams should meet exactly in the center. Flatten the corner so that it forms a straight line, secure it with clips, and sew across using a 1 cm seam allowance. Repeat this process on all exterior and lining corners. When opened, each stitched corner creates depth and transforms the flat panels into the three-dimensional body required for a boxy toiletry bag.
Trim unnecessary bulk from thick seam allowances if needed, but do not cut too close to the stitching. This is particularly helpful when using batting or heavier interfacing. Check the corner seams to ensure that they are strong and symmetrical. Consistent boxed corners are one of the most important details for producing a professional-looking Toiletry bag with handles and zipper Pattern, so take your time during this step.
Turn the entire bag right side out through the opening left in the lining and then through the open zipper. Gently push out the corners using your fingers or a blunt turning tool. Avoid sharp objects that could puncture the fabric. Once the exterior has taken shape, tuck the lining inside the bag. You should now see the complete rectangular form, structured sides, top handles, and centered zipper.
Finishing, Customizing, FAQ, and Final Sewing Tips
Close the opening in the lining by folding the raw edges inward and pressing them flat. Sew close to the folded edge with a straight stitch. If you prefer an invisible finish, the opening can also be hand stitched. Push the lining completely inside the bag and smooth it into each corner. Press the exterior gently, taking care around synthetic zippers and interfacing that may react to excessive heat.
Inspect the zipper area and topstitch any sections that need additional stability. Good topstitching does more than decorate the bag; it also helps the layers stay flat during repeated opening and closing. If your fabric is heavily patterned, matching thread will create a subtle finish. Contrasting thread can be used when you want the stitching itself to become part of the design.
One reason the Toiletry bag with handles and zipper Pattern is so versatile is that it can easily be customized. Add an interior slip pocket for small cosmetics, a divided pocket for brushes, or elastic loops for bottles. You can also add a small exterior label, decorative quilting, piping, or a coordinating zipper tab. These details are optional, so beginners can keep the first version simple and add more features to later bags.
Size customization is equally easy. For a small cosmetic case, reduce the rectangular panels while maintaining similar proportions. For a larger travel organizer, increase both the width and height and use stronger interfacing. Remember that changing the boxed corner measurement will also change the final depth. Creating a few different sizes from the same basic zippered bag pattern can produce a useful matching travel set.
Fabric combinations can completely transform the design. A floral cotton with a bright zipper creates a playful bag, while linen-look fabric with a neutral zipper produces a more understated style. Denim gives the bag a casual and durable character. You can even use coordinated scraps for the handles or create a patchwork exterior. The essential construction method remains the same regardless of the fabric style you choose.
Most importantly, work slowly and press the fabric whenever the instructions call for it. Pressing is one of the simplest ways to improve the appearance of a sewing project because it keeps seams crisp and helps panels align correctly. Accurate cutting, consistent seam allowances, careful zipper installation, and symmetrical handles are the details that will make your finished Toiletry bag with handles and zipper Pattern look clean, balanced, and professionally handmade.
FAQ About the Toiletry Bag with Handles and Zipper Pattern
Is the Toiletry bag with handles and zipper Pattern suitable for beginners?
Yes. This project is suitable for confident beginners who already understand basic straight stitching. The zipper may seem challenging at first, but using a zipper foot and sewing slowly makes installation much easier. The project is also a useful introduction to boxed corners and lined bag construction.
What is the best fabric for a toiletry bag with handles?
Quilting cotton is one of the easiest materials to use, especially for beginners. Canvas provides additional durability, while denim creates a stronger and more structured bag. Lightweight fabrics usually benefit from fusible interfacing or batting to prevent the finished bag from looking too soft.
How much fabric do I need for one toiletry bag?
For the medium-sized version described in this tutorial, approximately half a meter of exterior fabric and half a meter of lining fabric should provide enough material, including the handles. Actual requirements can vary depending on fabric width, print direction, and whether additional pockets are added.
What kind of zipper works best?
A regular nylon coil zipper is easy to sew and works well for this project. Choosing a zipper slightly longer than the bag opening can simplify installation. Once the zipper is secured, the excess length can be trimmed carefully if necessary.
Why should I use interfacing?
Interfacing gives the fabric stability and helps the bag maintain its rectangular form. Without sufficient support, lightweight cotton may collapse when the bag is empty. Medium-weight fusible interfacing works well for a crisp finish, while fusible fleece produces a softer padded appearance.
How can I make the bag washable?
Choose washable cotton fabrics, polyester thread, and washable interfacing. Prewashing the fabric before cutting can also reduce future shrinkage. If you use specialty materials such as laminated fabric, check the care requirements because some surfaces should not be exposed to high heat.
Can I add waterproof fabric to the lining?
Yes. Water-resistant or coated lining can be useful for bags designed to carry toiletries. However, these fabrics may require clips instead of pins because pinholes can remain visible. Use a suitable needle and test the stitching on a scrap before assembling the complete bag.
How can I make the handles stronger?
Use interfacing inside each handle or cut the handles from a stronger material. Topstitching along both edges also increases stability. Reinforce the handle attachment points with additional rows of stitching because these areas receive the most stress when the bag is lifted.
How do I make the toiletry bag larger or smaller?
Adjust the dimensions of all exterior and lining panels by the same proportion. Remember that the boxed corner size affects the depth of the bag. Before cutting expensive fabric, making a simple test version from inexpensive cotton can help you confirm the proportions.
Why does my zipper look wavy after sewing?
A wavy zipper can result from stretching the fabric while sewing, using excessive presser-foot pressure, or pulling the zipper tape. Allow the machine to feed the layers naturally. Stabilizing lightweight fabric before installing the zipper can also help produce a smoother result.
Can pockets be added to this pattern?
Absolutely. An interior slip pocket can be sewn onto the lining before the main assembly begins. You can also create zipper pockets, divided compartments, or elastic holders. Just make sure all pocket components are completed before the lining panels are joined together.
How can I achieve the structured appearance shown in the photo?
The key elements are accurate rectangular panels, strong interfacing or thin batting, symmetrical boxed corners, careful pressing, and neat zipper installation. These features work together to create the sturdy box-shaped toiletry bag appearance seen in the reference project.
Conclusion
The Toiletry bag with handles and zipper Pattern is a rewarding sewing project that teaches several valuable techniques while producing something genuinely useful. Starting with simple rectangular fabric pieces, you learned how to stabilize the exterior, prepare strong fabric handles, install a zipper between the exterior and lining layers, assemble the body, create boxed corners, turn the bag correctly, and finish the lining neatly.
The most important lesson is that professional-looking sewing does not depend on complicated construction. Accurate measurements, careful cutting, steady stitching, frequent pressing, and attention to small details can completely change the final result. Once you understand the basic construction of this zippered toiletry bag, you can easily adapt the measurements, fabrics, colors, pockets, handles, and decorative details.
You can make one bag for cosmetics, another for travel toiletries, another for sewing accessories, or create several coordinated sizes as a complete organizer set. Bright floral fabrics give the project a cheerful personality, while neutral fabrics can create an elegant minimalist version. The same Toiletry bag with handles and zipper Pattern can therefore produce many different styles without changing the fundamental sewing method.
I hope this step-by-step guide helps you confidently create your own structured fabric bag with practical handles and a secure zipper. If you make this project, leave your sincere opinion about the tutorial and share any suggestions, fabric combinations, size adjustments, or creative details you would like to see in future sewing projects.