
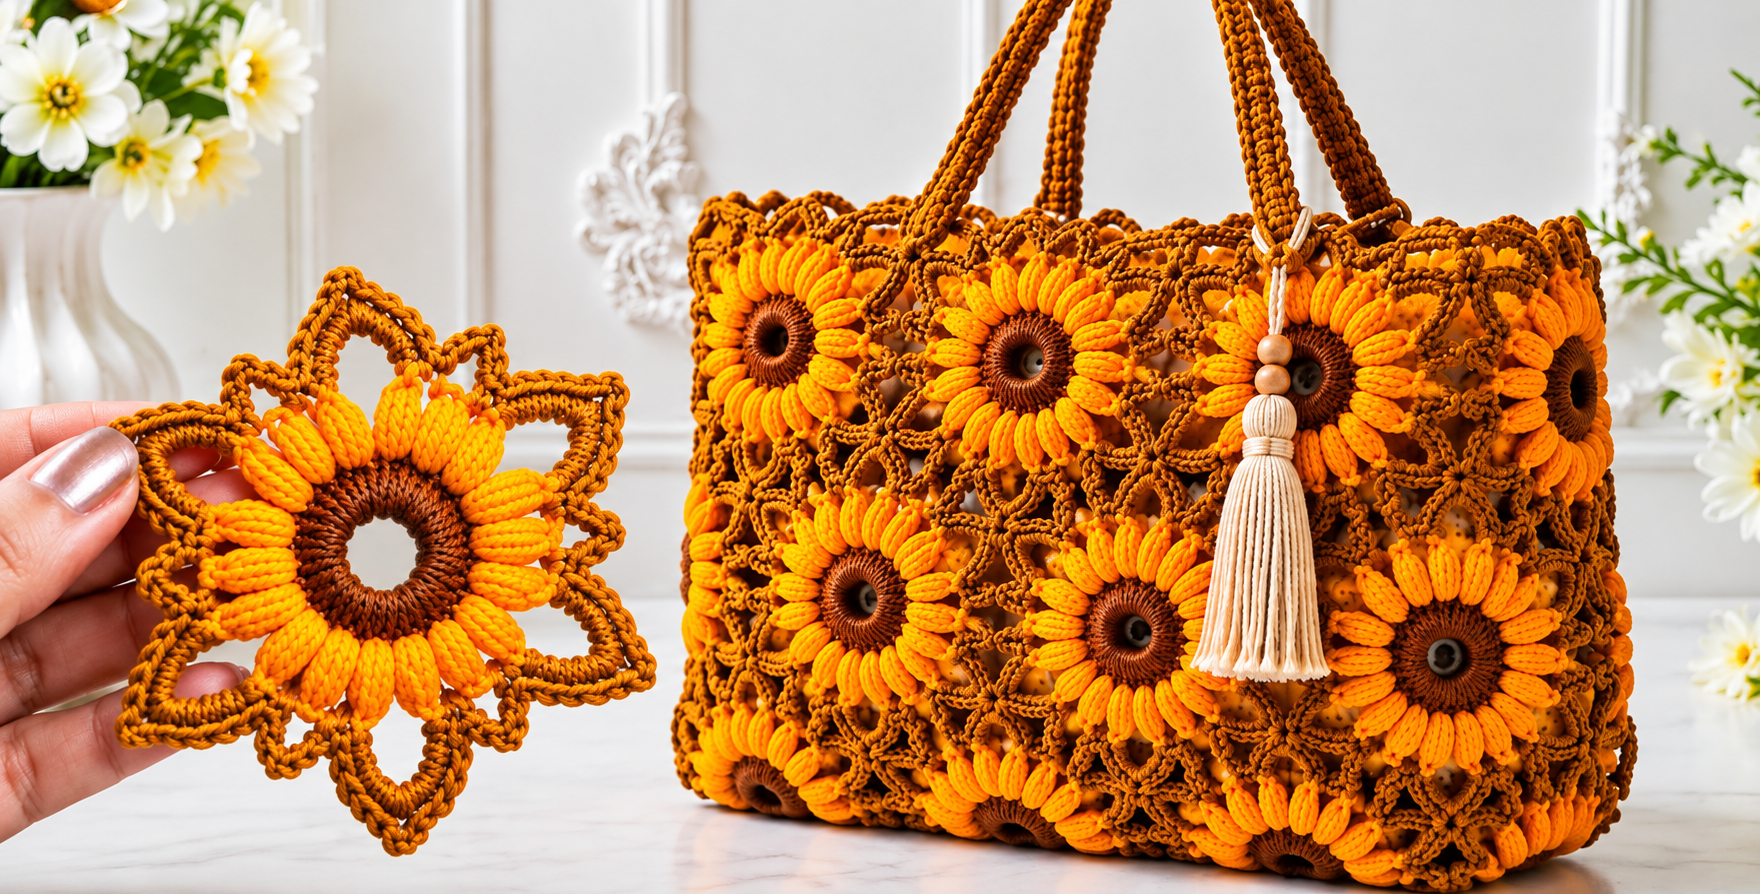
The Crochet bag with a sunflower motif Pattern is a beautiful project for anyone who loves combining practical accessories with handmade floral details. Inspired by the warm colors and cheerful appearance of sunflowers, this crochet bag uses individual flower motifs that are joined together to create a textured and eye-catching surface. The pattern can be adapted to different bag sizes, making it suitable for a small handbag, a medium everyday tote, or even a larger market-style bag. Throughout this tutorial, you will learn how to crochet the sunflower centers, build the petals, create the surrounding joining sections, assemble the motifs, crochet the bag structure, and add sturdy handles. The instructions are written with accessibility in mind, so crocheters with basic knowledge of common stitches can follow the process while improving their motif-making and assembly skills.
One of the most interesting features of a crochet sunflower bag is the way simple stitches can create a surprisingly detailed result. You do not need an enormous collection of complicated techniques to achieve the floral appearance. Most of the design can be made using chain stitches, slip stitches, single crochet, half double crochet, double crochet, treble crochet, and clusters or puff-style stitches for additional texture. The sunflower motifs are normally worked from the center outward, beginning with brown yarn and transitioning to yellow, golden, orange, or mustard tones for the petals. A coordinating neutral or earthy shade can then be introduced around each flower to turn the circular motif into a shape that can be joined easily. Working carefully during this stage helps the finished bag remain balanced and prevents the motifs from becoming distorted.
The Crochet bag with a sunflower motif Pattern is also an excellent opportunity to personalize a handmade accessory. You can use bright golden petals for a classic sunflower appearance, burnt orange for an autumn-inspired look, cream for a softer farmhouse effect, or several yellow shades for more visual depth. Cotton yarn is particularly practical because it produces defined stitches and a sturdy fabric, although cotton blends can also work very well. Before beginning, it is helpful to crochet one complete test motif and measure it. The final dimensions of each motif will determine how many flowers you need for the front, back, sides, and bottom of your bag. This simple preparation makes the assembly process much easier and allows you to customize the pattern without depending on one fixed bag measurement.
Materials, Crochet Abbreviations, and Preparing the Sunflower Motifs
For the Crochet bag with a sunflower motif Pattern, prepare medium-weight cotton or cotton-blend yarn in dark brown, golden yellow or orange, and a coordinating shade for the motif borders. You will also need a crochet hook suitable for your yarn, scissors, a yarn needle, stitch markers, and optional bag lining. A hook between approximately 3.5 mm and 5 mm works for many medium-weight yarns, but always check the yarn label and your personal tension. If you crochet loosely, using a slightly smaller hook can help make the bag more structured.
DISCOVER MORE FREE PATTERNS HERE!
Before following the instructions, become familiar with the crochet abbreviations used throughout the pattern. CH means chain, SL ST means slip stitch, SC means single crochet, HDC means half double crochet, DC means double crochet, and TR means treble crochet. When you see ST or STS, it refers to stitch or stitches. YO means yarn over, while REP means repeat. Understanding these basic crochet terms will make the sunflower pattern much easier to follow.
Begin the center of the sunflower with brown yarn. Make a magic ring, or alternatively CH 4 and join with a SL ST to form a ring. CH 2 for height and work 12 DC into the center. Pull the magic ring closed and join with a SL ST into the first stitch. This creates a compact foundation for the flower. If you prefer a denser center, you can use HDC instead of DC, but keep the stitch count consistent across every motif.
For the second center round, CH 2 and work 2 DC into each stitch around. You should finish with approximately 24 stitches if you started with 12 stitches. Join with a SL ST. This round makes the sunflower center wider and provides enough spaces for the petals. For extra texture, replace ordinary DC stitches with small puff stitches by repeatedly pulling up loops in the same stitch and closing them together.
Change to golden yellow, orange, or mustard yarn to begin the petals. Attach the new yarn to any stitch, then work CH 3, 2 TR in the same stitch, CH 3, SL ST into the next stitch. This forms one raised petal. Repeat the sequence around the flower. Depending on your preferred petal density, you may work petals into every stitch or distribute them across pairs of stitches. Keep your tension consistent so every sunflower has approximately the same diameter.
After completing the petals, place the motif on a flat surface and gently shape it with your fingers. The petals should spread outward without excessive curling. If they curl slightly, that is usually normal and can be corrected during blocking. Repeat the entire sunflower process until you have enough motifs for your planned bag size. Creating all the flower centers first, followed by all the petals, can make production faster and help you maintain consistent tension throughout the sunflower crochet pattern.
Creating the Motif Border and Joining the Crochet Flowers
Once the flowers are finished, the next step in the Crochet bag with a sunflower motif Pattern is transforming the round flowers into motifs that can be connected. Attach the border color behind one petal. CH 1 and work SC stitches evenly around the flower, inserting the hook into suitable spaces behind the petals rather than through the decorative front sections. This creates a stable foundation without flattening the sunflower design.
On the following round, begin shaping the motif. For a square sunflower block, distribute four corners evenly around the circle. A simple corner can be made with 2 DC, CH 2, 2 DC in the same space. Between the corners, work DC or HDC stitches evenly across each side. The exact number depends on your sunflower size, but all four sides should contain the same number of stitches. This symmetry is important because it makes joining the blocks considerably easier.
Continue with another border round if necessary. CH 2, work one DC into each stitch, and place 2 DC, CH 2, 2 DC into every corner space. This extra round provides additional space between the sunflower petals and the seams of the bag. It also helps protect the raised petals from becoming trapped when the blocks are joined. For a more open appearance, you can alternate DC stitches with CH 1 spaces instead of making a completely solid border.
Before joining, lay all the completed blocks on a table. Arrange them until the distribution of colors and flowers looks balanced. For a medium bag, you might use several motifs across the front and repeat the same arrangement for the back. Additional blocks can form the sides and bottom. The exact number is flexible because the crochet sunflower bag pattern can easily be adjusted according to the dimensions of your individual motifs.
To join two motifs, place them with their edges aligned. You can use a yarn needle and mattress stitch for a nearly invisible seam, or crochet the pieces together with SL ST or SC. For a decorative raised seam, place the wrong sides together and work SC through corresponding stitches on both motifs. For a flatter appearance, place the right sides together and work SL ST along the edge before opening the blocks flat.
Join the motifs into horizontal or vertical strips first, then connect the strips to create larger panels. Check the alignment after every seam rather than waiting until the complete panel is assembled. Corners should meet neatly, and the sunflower centers should remain aligned. Careful assembly is especially important in the Crochet bag with a sunflower motif Pattern because the repeated flowers naturally draw attention to any uneven seams.
Assembling the Bag and Crocheting a Strong Top Edge
After joining enough motifs for the front panel, create a second panel of equal size for the back. If your design includes separate side panels, prepare those as well. You can also make the bag from one long rectangular arrangement of motifs that wraps from the front, across the bottom, and up the back. Either construction method works, so choose the one that best matches the shape you want.
For a structured base, crochet a rectangular bottom using SC stitches. Begin with a foundation chain matching the width of the bag and work SC back and forth until the rectangle reaches the required depth. A dense single crochet base is helpful because the bottom of a bag receives more pressure than the decorative panels. You can also hold two strands of yarn together to create a firmer foundation.
Attach the front and back panels to the base using SC or SL ST. Next, connect the sides. Make sure the sunflowers face outward and all seams are secure. Reinforce the bottom corners with several additional stitches if necessary. Avoid pulling the joining yarn too tightly because overly tight seams can cause the finished bag to wrinkle or curve unexpectedly.
Once the main body is assembled, attach yarn at the upper edge. CH 1 and work one SC into each available stitch or seam space around the opening. Join with a SL ST. Work another two to five rounds of SC, depending on how wide you want the top band to be. This simple border stabilizes the motifs and creates a strong foundation for attaching the handles.
If the top edge looks wavy, you may have too many stitches. Reduce several stitches evenly during the next round. If the opening pulls inward too strongly, add a few evenly distributed increases. Maintaining a smooth top edge is one of the details that gives a handmade crochet bag a more polished appearance.
At this stage, you can add an optional fabric lining. Measure the interior of the assembled bag and cut two fabric pieces slightly larger than the internal dimensions to allow for seam allowances. Sew the lining separately and attach it by hand along the upper crochet border. A lining helps prevent small objects from passing through open crochet spaces and can reduce stretching when the bag carries heavier belongings.
Making the Handles, Finishing Details, and Customizing the Pattern
Strong handles are essential for the Crochet bag with a sunflower motif Pattern. One easy method is to crochet long straps using SC. CH enough stitches to reach your preferred handle length, then work SC across the chain. Turn and repeat for several rows until the strap reaches the desired width. Longer straps create a shoulder bag, while shorter straps produce a traditional handbag.
For stronger crochet handles, work a foundation chain and crochet around both sides of it instead of working in rows. This creates a strap with rounded edges and reduces stretching. You can also insert cotton cord inside a crocheted tube. The cord carries much of the weight, while the crochet exterior keeps the handmade look consistent with the rest of the bag.
Position the handles carefully before sewing them in place. Measure the distance from each side of the bag so the handles are symmetrical. Use strong yarn and a yarn needle to stitch each end securely through several rows of the upper border. Sew through the attachment area multiple times. The handles should feel stable when the bag is gently lifted.
Decorative finishing details can make the sunflower motif crochet bag even more special. A handmade tassel in cream, brown, or gold can be attached near one handle. Wooden beads can add a rustic accent. You can also crochet a small button loop, add a magnetic closure to the lining, or create an interior crochet pocket for lightweight items.
Blocking is the final step for improving the appearance of the motifs. Lightly dampen the bag or use the blocking method appropriate for your yarn fiber. Shape the sunflower petals and straighten the motif borders. Allow the project to dry completely while maintaining its intended shape. Avoid excessive heat, particularly with synthetic yarn, because high temperatures can permanently affect some fibers.
The finished Crochet bag with a sunflower motif Pattern can be customized almost endlessly. Try cream borders for a light summer style, dark brown for a strong rustic look, olive green for a botanical theme, or neutral beige for a softer appearance. You can enlarge the bag by adding more motifs, reduce it for a small purse, or use the sunflower squares to create matching accessories such as a small pouch or decorative pocket.
FAQ – Frequently Asked Questions About the Crochet Bag with a Sunflower Motif Pattern
Is the Crochet bag with a sunflower motif Pattern suitable for beginners?
Yes, especially for confident beginners who already understand chain, single crochet, double crochet, slip stitch, and basic joining. The sunflower motif may look detailed, but it is created gradually in rounds. Making one practice flower before starting the complete bag is a good way to become comfortable with the stitch sequence.
What yarn is best for a crochet sunflower bag?
Cotton and cotton-blend yarns are excellent choices because they provide good stitch definition and usually create a stable fabric. Medium-weight yarn is especially convenient for bags. Very soft yarns can still be used, but the finished bag may require a lining or stronger base to maintain its shape.
How many sunflower motifs do I need for the bag?
The number depends on the dimensions of each finished motif and the size of bag you want. Measure one blocked motif first. Then calculate how many blocks are needed across the desired width and height. Remember to include the front, back, sides, and bottom if all of these sections will be made from motifs.
Can I make the sunflower bag larger?
Absolutely. One of the benefits of a crochet motif bag is that resizing is straightforward. Add another row or column of sunflower squares to increase the dimensions. You can also enlarge individual motifs by adding more border rounds before joining them.
How can I keep crochet bag handles from stretching?
Use tight SC stitches, select a slightly smaller crochet hook, or add a strong internal cord. Sewing the straps securely across a larger attachment area also distributes the weight more effectively. A fabric or commercial bag strap can be used if maximum durability is preferred.
Does the crochet bag need a lining?
A lining is optional, but it is highly recommended for an openwork sunflower design. It can help maintain the bag’s shape and prevent small personal items from slipping through the crochet spaces. A lining can also include pockets for additional organization.
Why are my sunflower motifs different sizes?
Differences usually come from changes in crochet tension, hook placement, or stitch count. Count the stitches after every round and try to maintain consistent tension. Blocking can correct small differences, but significant variations are easier to solve before the motifs are joined.
How do I make the sunflower petals more textured?
Try puff stitches, clusters, or groups of treble crochet stitches. Using two similar shades of yellow can also create visual dimension. For example, darker golden yarn can be used near the center while brighter yellow is introduced on the outer petals.
Can leftover yarn be used for this project?
Yes. A sunflower motif design is well suited to leftover yarn as long as the yarns have reasonably similar thickness and fiber characteristics. You can create slightly different shades of flowers while maintaining one consistent border color to visually connect the complete design.
How do I wash a handmade crochet sunflower bag?
Always consider the care instructions for the yarn used in the project. Gentle hand washing is often a practical choice for structured crochet bags. Avoid aggressive twisting, reshape the bag after washing, arrange the petals carefully, and allow it to dry thoroughly before using it again.
Can I use this pattern to make other projects?
Yes. The individual sunflower crochet motifs can be adapted for cushion covers, table runners, decorative panels, small pouches, blankets, or appliqué-style decorations. Once you understand how to make and join the flower blocks, the same construction principle can be applied to many creative projects.
Conclusion
The Crochet bag with a sunflower motif Pattern combines beautiful floral crochet with practical bag construction in a project that can be personalized in many ways. Starting with a compact brown center, you learned how to build textured sunflower petals, create structured borders around the motifs, join the blocks into panels, assemble the bag body, reinforce the opening, and make strong crochet handles. You also learned how a lining, reinforced base, decorative tassel, beads, and thoughtful color combinations can enhance both the appearance and usefulness of the finished accessory.
More importantly, the modular construction makes this crochet sunflower bag pattern easy to adapt. Once you have created one successful sunflower motif, you can repeat it as many times as necessary and arrange the flowers according to the size and style you prefer. Whether you choose traditional golden sunflowers with brown centers or create your own color combination, consistent tension and careful assembly are the keys to achieving a polished result.
A handmade sunflower bag can be both a practical accessory and a satisfying demonstration of crochet craftsmanship. Take your time with each motif, check your stitch counts, secure every joining seam, and enjoy watching the individual flowers become a complete bag. If you make your own version of this Crochet bag with a sunflower motif Pattern, leave your sincere opinion about the project and share your suggestions for colors, handles, borders, or other details you would like to try.