
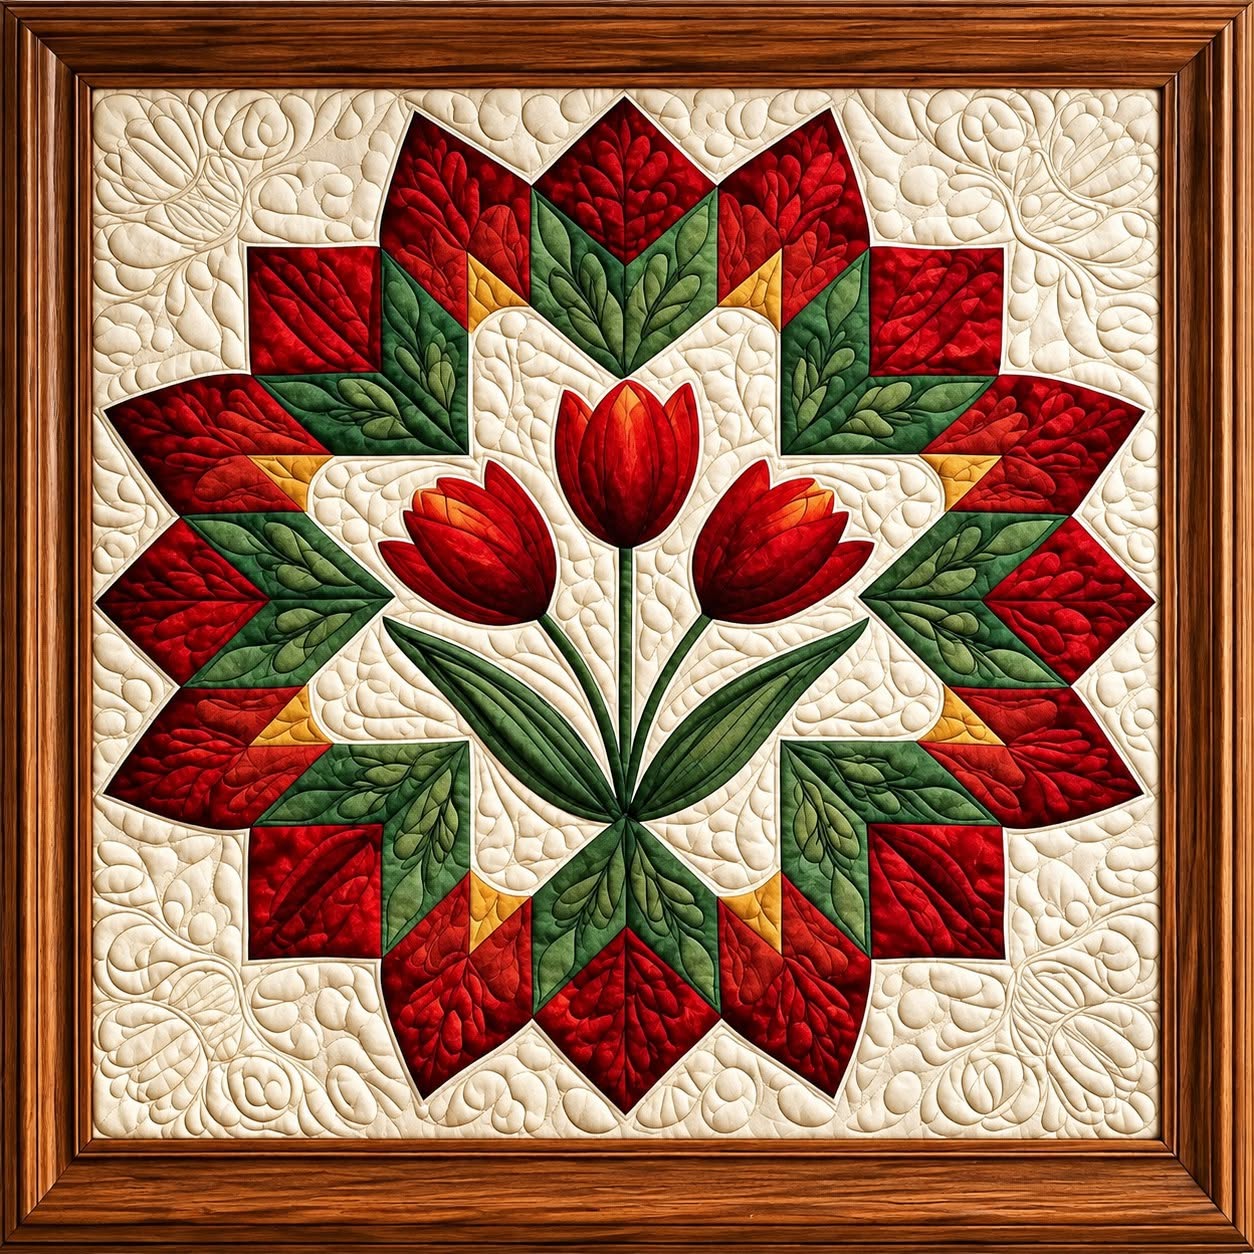
The Tulip Star Patchwork Panel Fabric Pattern is a striking fabric art project that brings together traditional patchwork geometry, floral appliqué, decorative quilting, and carefully balanced color placement. Inspired by the panel shown in the reference image, this design features three elegant red tulips surrounded by a large star-shaped arrangement of red and green patchwork pieces.
The cream background provides visual breathing space and allows the intense reds, deep greens, and small golden accents to stand out beautifully.
Because the design combines straight-edged patchwork with curved floral appliqué, it is an excellent project for sewists who want to practice more than one quilting technique in a single decorative panel.
The finished piece can be displayed as fabric wall art, transformed into a quilt centerpiece, or incorporated into a larger bed quilt.
Its symmetrical composition also gives the project a traditional appearance while the tulip motif adds a softer, more organic character.
Throughout this tutorial, you will learn how to plan, cut, assemble, appliqué, quilt, and finish your own version of the Tulip Star Patchwork Panel Fabric Pattern.
One of the most important ideas behind this Tulip Star Patchwork Panel Fabric Pattern is the relationship between the central floral motif and the geometric border surrounding it.
The tulips naturally attract the eye to the center, while the angular red and green shapes form a star or wreath-like structure around them.
This balance is what makes the project look complex even though it can be constructed gradually from smaller sections.
Rather than trying to sew the entire design at once, the best approach is to divide the project into manageable stages: background preparation, patchwork units, tulip appliqué, assembly, quilting, and finishing.
Working in stages improves accuracy and gives you opportunities to check alignment before continuing.
It also makes the pattern suitable for confident beginners who are ready to explore patchwork quilting, fabric appliqué, and decorative free-motion quilting.
Fabric selection plays an especially important role in recreating the appearance of the photographed panel.
Choose several shades of red fabric for the tulip petals and surrounding star blocks instead of relying on only one red tone, because subtle variation adds depth and keeps the design from looking flat.
For the leaves and stems, combine medium and dark green quilting cotton, while a warm cream or ivory fabric works beautifully for the background.
Small pieces of mustard, ochre, or muted gold can be inserted between selected patchwork sections to create the tiny highlights visible around the design.
Whenever possible, choose 100% quilting cotton because it is stable, easy to cut accurately, and responds well to both appliqué and machine quilting.
Wash, dry, and press all fabrics before cutting so that the completed Tulip Star Patchwork Panel Fabric Pattern remains flat and consistent after future cleaning.
Planning the Tulip Star Patchwork Panel Fabric Pattern
Begin by deciding the final dimensions of your panel. A practical decorative size is approximately 70 cm x 70 cm, although you can enlarge or reduce the project according to the space where it will be displayed. Create a square paper layout first and lightly mark the horizontal center, vertical center, and both diagonals. These reference lines will help you keep the large star arrangement symmetrical as you work.
DISCOVER MORE FREE PATTERNS HERE!
Next, study the structure of the outer patchwork design. The photographed project uses repeated angular sections formed from red rectangles, red triangles, green leaf-shaped or geometric areas, and small golden triangles. You do not need to reproduce every internal seam exactly to achieve a similar visual effect. Instead, concentrate on maintaining an even radial arrangement around the center.
For a panel around 70 cm square, cut a cream background slightly larger than your intended finished size, such as 75 cm x 75 cm. The extra fabric provides trimming room after quilting. You can build the star directly on this background through appliqué, or you can create separate pieced units and join them together before adding the central tulips.
To make the geometric sections, cut several red squares and rectangles measuring approximately 8 to 12 cm, along with green pieces of similar proportions. Include triangular units created from squares cut diagonally. Maintain a standard 0.6 cm seam allowance when sewing patchwork pieces so that your finished sections remain predictable and easier to align.
Arrange the pieces on a large flat surface before sewing. Begin with four main directional points at the top, bottom, left, and right, then fill the diagonal areas. This method helps preserve the symmetrical star shape. Step away from the layout occasionally and look at the design from a distance; imbalance is much easier to notice when you are not standing directly above the fabric.
Take a photograph of the final arrangement before moving the pieces to the sewing machine. This simple step is extremely useful when working with a detailed Tulip Star Patchwork Panel Fabric Pattern, because dozens of similarly colored sections can easily be rotated or placed in the wrong position. Once you are satisfied with the arrangement, label the units by section and begin construction.
Sewing the Patchwork Star and Preparing the Tulips
Start sewing the smallest patchwork combinations first. Join red and green pieces using a 0.6 cm seam allowance, then press the seams carefully after every step. Pressing is just as important as stitching because flat seams allow neighboring units to fit together accurately and prevent unwanted bulk.
Create several red-and-green units that alternate color direction. Some should emphasize red toward the outside of the panel, while others should place green closer to the center. This variation helps imitate the layered botanical appearance seen in the reference piece and creates the impression that leaves are growing between the geometric star points.
Add the small golden or mustard triangles sparingly. These pieces act as highlights rather than dominant colors. Placing them between selected red and green sections gives the patchwork star additional movement and breaks up large areas of strong color. Keep their size relatively small so the tulips remain the main focus.
Once the surrounding star units are complete, arrange them again on the cream background. Check that opposite points appear balanced and that the center remains open enough for the three tulips. Depending on your preferred construction method, you can sew these patchwork units into a complete ring or secure them individually using appliqué techniques.
Now create paper templates for the tulip appliqué. The central flower should be slightly taller than the two side flowers. A useful starting size is approximately 18 cm high for the central bloom and 14 to 16 cm high for each side bloom. Draw separate petal sections so you can use different shades of red and create a layered appearance.
Prepare templates for the stems and leaves as well. The center stem should rise vertically, while the side stems can angle gently outward. Add several elongated leaves measuring roughly 15 to 22 cm long. The leaves should taper toward the tip, creating graceful curves that contrast beautifully with the sharp angles of the surrounding Tulip Star Patchwork Panel Fabric Pattern.
Creating the Floral Appliqué and Quilting Texture
Trace the tulip templates onto fusible web if you prefer fusible appliqué, remembering to reverse the templates before tracing. Fuse the shapes to the wrong side of your selected fabrics according to the fusible product instructions. Cut carefully along the traced lines, remove the backing paper, and begin positioning the flowers on the cream center.
Place the central tulip first because it establishes the vertical axis of the composition. Position the two side tulips slightly lower and angle them outward. The flowers should appear connected but not crowded. Leave enough cream background between the petals to keep each blossom clearly recognizable.
Add stems beneath the flowers and arrange the green leaves around them. Some leaves can overlap the stems, while others can extend toward the lower patchwork star. Overlapping pieces create natural visual depth. Before permanently fusing anything, stand back and confirm that the floral group is centered within the surrounding geometry.
Once the arrangement looks balanced, fuse or pin the appliqué pieces in place. Stitch around every tulip, leaf, and stem using a narrow blanket stitch, small zigzag stitch, or straight appliqué stitch. For a handcrafted appearance similar to the photographed piece, choose thread colors that blend with each fabric rather than using one contrasting thread for every shape.
Prepare the quilt sandwich by placing backing fabric on the work surface, followed by batting and the completed quilt top. Smooth each layer carefully and secure them with basting spray or quilting pins. A medium-loft cotton or cotton-blend batting provides enough body to make the decorative stitching visible without creating excessive thickness.
The dense quilting is one of the most distinctive features of the Tulip Star Patchwork Panel Fabric Pattern. Quilt veins inside the leaves and curved petal lines inside the tulips, following the natural direction of each shape. On the cream background, add flowing feathers, leaves, spirals, or free-motion floral designs. Dense background quilting causes the appliqué and patchwork sections to appear slightly raised, giving the panel its rich, dimensional finish.
Finishing and Displaying the Patchwork Panel
After completing the quilting, spread the panel flat and inspect the surface. Look for loose threads, skipped areas, or fabric distortion. Trim excess batting and backing carefully, using a large quilting ruler to restore perfectly straight edges. Check each corner with a square ruler before cutting so the final panel does not appear twisted inside its frame or binding.
If you intend to use the piece as a traditional quilted wall hanging, create double-fold binding using fabric that complements the design. Deep red, dark green, cream, or warm brown can all work well. A 6 to 7 cm wide binding strip is usually sufficient for a medium-sized wall panel before it is folded and attached.
Sew the binding around the front edge, mitering each corner carefully. Fold the binding toward the back and secure it by hand for an invisible finish or machine stitch it for faster construction. If you plan to frame the quilt as shown in the photograph, binding can be optional because the wooden frame may cover the raw perimeter.
For wall hanging without a wooden frame, add a fabric sleeve across the upper back edge. Cut a strip approximately 10 to 12 cm wide, fold and sew it into a tube, then attach it securely to the back without stitching through the visible front. A dowel or narrow hanging rod can then slide through the sleeve.
Before displaying the finished Tulip Star Patchwork Panel Fabric Pattern, gently steam or block the quilt if necessary. Avoid pressing aggressively over raised quilting because doing so may flatten the beautiful texture you worked to create. Instead, smooth the panel carefully and allow it to rest completely flat before hanging.
The completed project should combine bold red tulips, rich green leaves, geometric patchwork star blocks, a neutral cream background, and expressive quilting. Whether you place it in a wooden frame, hang it as textile art, or use it as the central medallion of a larger quilt, the design creates a strong handmade focal point that celebrates both traditional quilting and floral appliqué.
FAQ – Frequently Asked Questions About the Tulip Star Patchwork Panel Fabric Pattern
What is a Tulip Star Patchwork Panel Fabric Pattern?
A Tulip Star Patchwork Panel Fabric Pattern is a decorative quilt design that combines a star-inspired geometric patchwork arrangement with tulip-shaped fabric appliqué. The geometric elements provide structure, while the tulips and leaves create a softer floral centerpiece.
Is this project suitable for beginners?
A patient beginner can complete the project, especially when using fusible appliqué. However, the detailed free-motion quilting and symmetrical patchwork arrangement may require additional practice. Beginners can simplify the background quilting and still create an attractive result.
What is the best fabric for this patchwork panel?
High-quality 100% cotton quilting fabric is the most practical choice. It cuts accurately, presses well, remains stable during appliqué, and works with both domestic sewing machines and longarm quilting machines.
How much fabric do I need?
For a panel around 70 cm square, approximately 1 meter of cream fabric provides a comfortable amount for the background and small adjustments. Fat quarters or fabric remnants are usually sufficient for the red, green, and golden patchwork sections and tulip appliqué. You will also need backing fabric and batting slightly larger than the quilt top.
Can I change the colors of the tulips?
Yes. Although red creates the dramatic traditional appearance shown in the reference design, the tulip appliqué pattern can be made in pink, purple, yellow, orange, burgundy, or even multiple colors. Keep enough contrast between the flowers and background so the floral shapes remain visible.
Do I need a special sewing machine?
No special machine is required for the basic patchwork and appliqué. A standard sewing machine with straight stitch and zigzag capabilities is sufficient. A free-motion quilting foot is helpful if you want to reproduce the detailed background texture.
Should the appliqué be done before quilting?
Yes. Normally the tulip, leaf, and stem pieces are positioned and stitched to the quilt top before the quilt sandwich is assembled. Quilting is then added through the quilt top, batting, and backing, which gives the appliqué additional definition.
How do I keep the star symmetrical?
Mark the center lines and diagonal lines on your background before arranging the blocks. Build the design from the four main directions outward, repeatedly comparing opposite sections. Using identical templates for repeated units also improves consistency.
Can I make the panel larger?
Absolutely. Enlarge every template and patchwork unit by the same percentage. For example, enlarging each component by 25% will preserve the overall proportions. Remember that a larger panel also requires additional backing fabric, batting, and quilting time.
Can I hand quilt this project?
Yes. Hand quilting can give the Tulip Star Patchwork Panel Fabric Pattern a beautiful traditional character. Outline quilting around the tulips and leaves is especially effective. You can then add simple curved motifs in the cream sections instead of extremely dense machine quilting.
What type of batting works best?
Cotton batting offers a flatter traditional finish, while a cotton-polyester blend can produce slightly more loft. If you want the tulips and geometric pieces to stand out strongly against the background quilting, select batting that provides moderate definition without becoming too bulky.
How can I create the raised effect around the flowers?
The dimensional effect comes mainly from quilting density. Quilt the cream background more densely than the tulips and patchwork pieces. The heavily quilted areas compress while the less densely quilted shapes remain fuller, making the flowers and leaves visually rise from the surface.
Can this design be used in a full-size quilt?
Yes. The finished panel can become a central medallion for a larger quilt. Add several patchwork borders around it until the quilt reaches your desired size. Repeating tulip blocks or star motifs in the borders can help maintain a cohesive design.
Do I have to place the finished quilt inside a wooden frame?
No. The frame shown in the inspiration image creates an elegant textile-art presentation, but regular quilt binding and a hanging sleeve work just as well. The best finishing method depends on where you plan to display the project.
Conclusion
The Tulip Star Patchwork Panel Fabric Pattern brings together some of the most enjoyable elements of quilting: geometric patchwork, colorful fabric selection, floral appliqué, layered construction, and decorative quilting. By beginning with a carefully marked background, building symmetrical red and green patchwork units, preparing individual tulip templates, and positioning the flowers before quilting, you can gradually recreate the sophisticated appearance of the reference panel without treating the project as one overwhelming task.
The key to a polished result is accuracy combined with patience. Measure each patchwork unit carefully, press every seam, check the symmetry repeatedly, and take time when arranging the tulip appliqué. Once the quilt sandwich is prepared, decorative stitching becomes the final artistic layer. Leaf veins, petal details, feathers, curves, and floral background quilting can transform simple pieces of fabric into richly textured textile art.
EASILY FIND THE PDF FOR THIS PATTERN HERE!
This Tulip Star Patchwork Panel Fabric Pattern can also become a starting point for your own interpretation. Change the tulip colors, alter the number of flowers, simplify the quilting, enlarge the star, or transform the finished panel into the center of a full quilt. The structure is flexible enough to preserve its recognizable character while still giving each maker room for creativity. If you make your own version, leave your sincere opinion about the project and share any suggestions that could make the pattern even more useful for other quilting enthusiasts. Your ideas about color combinations, appliqué methods, quilting designs, or finishing techniques can inspire new interpretations of this beautiful Tulip Star Patchwork Panel Fabric Pattern.