
The Felt Snowman Appliqué Complete Step-by-Step Fabric Pattern is a charming Christmas sewing project that combines simple felt shapes, decorative hand stitching, and traditional holiday colors to create a cheerful snowman holding a decorated Christmas tree. This handmade design is especially attractive because the individual pieces are easy to recognize and can be assembled gradually, making the project suitable for beginners as well as experienced crafters. The main materials are felt sheets in white, black, red, green, yellow, orange, and brown, along with embroidery thread and basic sewing supplies. Instead of requiring complicated machinery or advanced quilting techniques, this project relies mostly on careful cutting, layering, and simple stitches. The finished appliqué can become a wall decoration, Christmas ornament, decorative panel, pillow embellishment, table decoration, or part of a larger holiday sewing project. Throughout this tutorial, you will learn how to recreate the main elements visible in the reference design while adapting the dimensions to your preferred finished size.
Understanding what the term Felt Snowman Appliqué Complete Step-by-Step Fabric Pattern means can make the construction process much easier. A felt appliqué is a decorative sewing technique where separate fabric shapes are cut and layered over a background before being stitched into place. The snowman fabric pattern refers to the collection of template shapes needed to construct the snowman’s body, head, hat, scarf, mittens, facial features, and other details. Because felt does not fray easily along its cut edges, it is one of the most beginner-friendly materials for this type of Christmas craft. The reference project also includes a layered felt Christmas tree appliqué, which introduces additional shapes but still uses the same basic cutting and stitching technique. When all of these components are combined carefully, they create a three-dimensional-looking design with texture, personality, and a cozy handmade appearance.
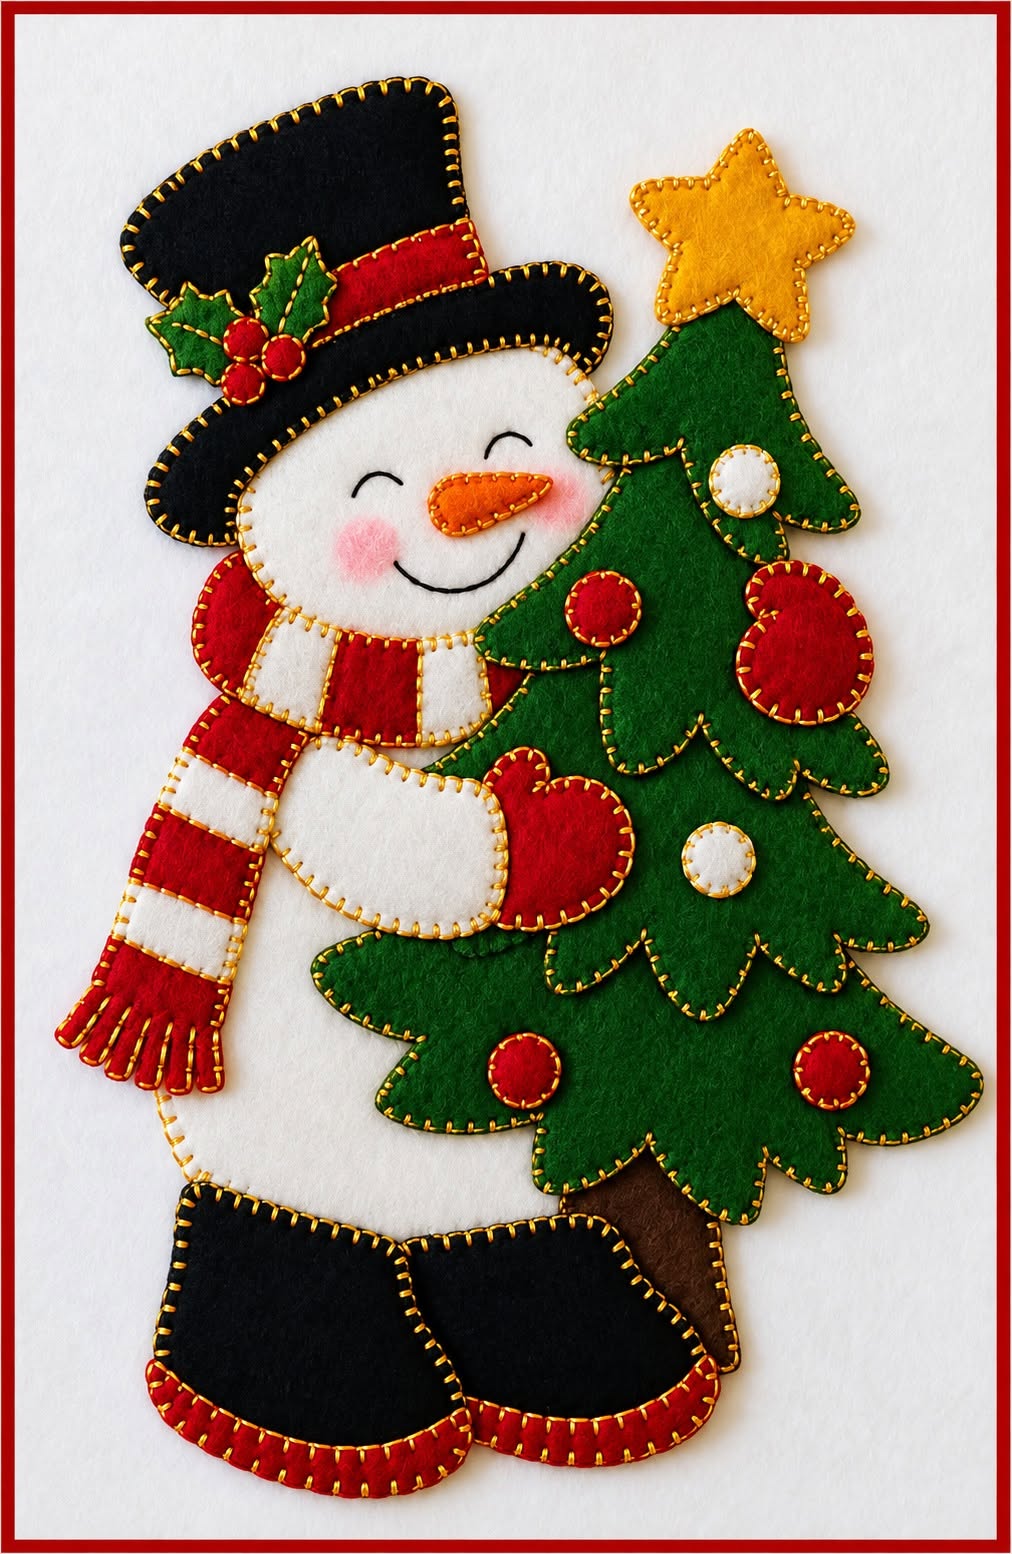
Before beginning your Christmas felt sewing project, it is helpful to study the image and identify the major layers. The snowman is created from a large white body and round white head, while black felt forms the top hat and boots. Red and white strips create the striped scarf, red felt becomes the mittens and tree ornaments, and green felt forms both the holly leaves and Christmas tree. A yellow felt star sits above the tree, an orange carrot shape creates the nose, and a small brown section forms the tree trunk. Decorative blanket-style stitches around most edges give the appliqué its distinctive handmade finish. Preparing every piece before permanent assembly will help you maintain correct proportions and prevent smaller components from disappearing underneath larger layers. With an organized workspace and a little patience, the Felt Snowman Appliqué Complete Step-by-Step Fabric Pattern can be assembled smoothly from the largest background pieces to the smallest decorative details.
Materials, Measurements, and Pattern Preparation
Begin your Felt Snowman Appliqué Complete Step-by-Step Fabric Pattern by gathering good-quality craft felt. You will need approximately one sheet each of white felt, black felt, dark green felt, bright red felt, yellow felt, orange felt, and brown felt. If you are making a larger wall hanging, purchase additional white and green felt because the body and tree require the largest pieces. Medium-weight felt is generally easy to cut while remaining firm enough to maintain the shapes of the hat, branches, mittens, and star.
DISCOVER MORE FREE PATTERNS HERE!
For sewing, prepare embroidery floss or strong hand-sewing thread in white, black, red, green, yellow, orange, and brown. Matching thread produces a subtle finish, while contrasting thread creates the clearly visible decorative edging seen in the reference project. You will also need embroidery needles, sharp fabric scissors, small detail scissors, pins or fabric clips, a washable fabric marker, paper, and a pencil. Optional supplies include fabric-safe adhesive or fusible web for temporarily holding the pieces before stitching.
A convenient finished size for the complete design is approximately 35 to 40 cm tall and 25 to 30 cm wide. These measurements are only a starting point, so you can enlarge or reduce the design depending on whether you want a wall decoration, cushion appliqué, ornament, or holiday banner. For a project around 38 cm tall, make the snowman body approximately 24 cm high by 15 cm wide, with a head around 12 to 14 cm across. The Christmas tree can measure roughly 28 cm high by 17 cm wide at its broadest section.
Create the snowman appliqué pattern templates on ordinary paper before cutting your felt. Sketch a slightly rounded body, a separate circular head, two boots, two mittens, the hat crown, hat brim, hat band, scarf pieces, carrot nose, holly leaves, and berries. For the Christmas tree, draw three or four overlapping triangular branch sections rather than one plain triangle. This layered approach creates the fuller tree silhouette seen in the image.
The tree decorations require only simple templates. Draw a five-pointed star approximately 6 to 7 cm wide, several circles around 2 to 3 cm across, and one slightly larger rounded red ornament. You will also need a narrow brown trunk measuring approximately 3 cm wide and 7 cm long. Keep the circles slightly irregular if you want a softer handmade appearance instead of a perfectly manufactured look.
Before cutting all the final pieces, arrange your paper templates together on a flat surface. Check the proportions of the hat against the head, the scarf against the snowman’s neck, and the tree against the body. The snowman should appear partly behind the tree, creating the impression that it is holding or hugging it. Once the overall composition looks balanced, label each template with its color and quantity so that the felt Christmas appliqué pattern is easy to follow during cutting.
Cutting and Sewing the Snowman Appliqué Pieces
Start construction with the largest white sections. Trace the snowman body and head templates onto white felt, then carefully cut along the lines with sharp fabric scissors. Smooth, confident cuts will give the edges a cleaner appearance. Position the head slightly overlapping the upper body area, remembering that part of the connection will later be covered by the scarf and tree.
Next, cut the black felt top hat into two main pieces: the tall crown and the curved brim. The reference design uses a playful shape rather than a perfectly straight formal hat, so a little asymmetry can add character. Cut a narrow red strip for the hatband and place it near the lower part of the crown. Add two or three green holly leaves and three small red berries near one side of the band to create the festive accent.
Prepare the facial features before permanently attaching the tree because the tree will partially overlap the snowman’s face. Cut a small tapered orange felt carrot nose approximately 4 cm long. Instead of felt pieces for the eyes and mouth, use black embroidery thread. Two short curved lines can create gently closed eyes, while a longer curved stitched line forms the smile. A small amount of pink felt, fabric blush, or carefully applied textile pigment may be used for the cheeks if desired.
The striped scarf is one of the most noticeable features of this Christmas snowman appliqué. Create a curved neck section using alternating red and white pieces, then make a long hanging scarf tail using several rectangular sections arranged in alternating colors. For a finished appliqué around 38 cm tall, the hanging scarf section can be approximately 18 to 20 cm long and 5 cm wide. Cut several narrow strips at the lower end to imitate fringe.
Cut two red felt mittens, making one slightly visible beside the snowman’s body and positioning the other around the front edge of the tree. The front mitten can be designed with a rounded thumb so that it appears to wrap naturally around the tree. This small positioning detail gives the flat appliqué a stronger sense of depth. Stitch around the edges using white or contrasting thread to reproduce the handmade blanket-stitch effect.
Finally, cut two large black boots with gently curved toes. Add narrow red felt soles underneath or across the lower edges, as shown in the reference design. Position one boot slightly angled so the stance feels relaxed rather than completely symmetrical. Before attaching them permanently, place the body, head, hat, scarf, mittens, and boots together and make small adjustments until the snowman looks balanced.
Building the Felt Christmas Tree and Decorative Details
The tree is constructed from several overlapping dark green felt layers. Begin with the smallest upper triangular branch section, followed by progressively wider sections beneath it. Rather than creating perfectly straight triangular edges, draw gentle scallops or downward-facing branch points. These irregular edges produce the soft evergreen appearance visible in the finished felt Christmas tree appliqué.
Arrange the green layers so that each upper piece overlaps the next section slightly. The finished tree should taper naturally toward the yellow star at the top and widen toward the base. When placed beside the snowman, part of the tree should overlap the body, scarf, and mitten. This layering is essential because it makes the two figures appear connected rather than positioned independently next to each other.
Cut the yellow felt star and position it directly above the narrow upper section of the tree. A five-point star approximately 6 cm wide works well for a medium-sized project. Stitch around the perimeter using yellow, gold, or slightly contrasting thread. Keep your stitches consistent in length because the star sits near the top of the design and naturally attracts attention.
For the ornaments, cut several small circles from red and white felt. The reference design distributes them across the tree without making the arrangement perfectly symmetrical. Place a few red circles on different branch levels and add two or three white circles for contrast. You can also create a larger rounded red ornament near the upper side of the tree to add variety in both shape and scale.
Cut a short brown felt tree trunk and position it behind the lowest branch section so only the bottom portion remains visible. The trunk should extend downward between the tree and the snowman’s boots. Because this piece belongs visually behind the branches, it should be attached before the lowest green tree section is permanently stitched. Layering pieces in the correct order makes the finished work appear cleaner.
At this stage, place every component together without sewing permanently. Check that the star remains fully visible, the tree does not completely hide the snowman’s face, and the mitten appears to hold the tree naturally. Also verify that the scarf hangs comfortably along the opposite side of the body. This dry layout process may seem simple, but it is one of the best ways to prevent positioning mistakes before completing your felt appliqué.
Assembly, Blanket Stitching, Finishing, and Display Ideas
When you are happy with the arrangement, begin attaching the major pieces from back to front. If your appliqué will be mounted on a felt background, position the snowman body first and secure it using pins, clips, or tiny dots of fabric-safe adhesive. Use a blanket stitch around the perimeter. Insert the needle at regular intervals and keep each loop close to the edge for the neat handcrafted appearance characteristic of felt appliqué.
Attach the head next, followed by the hat, scarf, boots, and visible rear mitten. Stitch each piece individually rather than attempting to sew through several thick layers at once. This keeps the edges defined and gives every component its own outline. When working around small curves, shorten the distance between stitches slightly so that the thread follows the shape smoothly.
Now secure the tree trunk and begin adding the green tree sections from the lowest layer upward. Stitch around all exposed edges while allowing overlapping areas to remain neat and flat. Add the red and white ornaments after the primary tree shape is secure. Small decorative pieces are easiest to control if you first hold them in position with a tiny dab of fabric adhesive before stitching.
Place the star at the top, then attach the forward mitten so that it overlaps the tree edge. Finish the hat with its red band, holly leaves, and berries. Add the carrot nose and embroider the eyes and smiling mouth with black embroidery floss. For the rosy cheeks, use soft pink felt circles, embroidery, or a very small amount of fabric-safe coloring applied gradually.
Inspect your completed Felt Snowman Appliqué Complete Step-by-Step Fabric Pattern for loose threads and uneven areas. Tie thread ends securely on the back and trim unnecessary excess. If the felt has become slightly distorted while being handled, place the project flat beneath a clean cloth and gently press it using a method appropriate for the type of felt you selected. Avoid excessive heat, particularly with synthetic craft felt.
The finished appliqué can be used in many Christmas sewing projects. Attach it to a rectangular felt panel for a wall decoration, sew it onto a holiday cushion cover, add it to a fabric gift bag, or use a smaller version for a Christmas ornament. You can also create several variations by changing scarf colors, ornament arrangements, or facial expressions while keeping the same basic snowman appliqué fabric pattern.
Frequently Asked Questions – Felt Snowman Appliqué
What is the best fabric for a snowman appliqué?
Felt is one of the easiest materials because its edges usually do not require hemming. Wool-blend felt often provides a firm, refined appearance, while acrylic craft felt is an accessible choice for casual decorative projects. Cotton can also be used, but its raw edges normally require additional finishing or fusible appliqué techniques.
What stitch should I use around felt appliqué pieces?
The blanket stitch is a popular choice because it both secures and decorates the edges. It creates the visible looping border seen around many pieces in this project. A whip stitch or small running stitch can also work if you prefer a simpler appearance.
Do I need a sewing machine for the Felt Snowman Appliqué Complete Step-by-Step Fabric Pattern?
No. The entire project can be completed with hand stitching. In fact, visible hand stitches are an important part of the cozy handmade character of this particular design. A sewing machine may be useful if you decide to attach the finished appliqué to a cushion, banner, or larger fabric panel.
How large should I make the snowman appliqué?
A height between 35 and 40 cm works well for a decorative panel similar to the reference image. However, the pattern can be resized. A 15 to 20 cm version can work as a smaller ornament, while a larger design can become a wall hanging or the center of a Christmas quilt block.
How can I make all the stitches look even?
Mark tiny guide points around complicated shapes before sewing and maintain approximately the same distance between each stitch. Work slowly around curves, stars, mittens, and narrow tree branches. Consistency is more important than absolute perfection because small variations contribute to the handmade appearance.
Should the pieces be glued before sewing?
Temporary fabric adhesive can make assembly easier, especially when handling small ornaments, berries, and the star. However, use only a small quantity and confirm that the adhesive is suitable for fabric. Pins or fabric clips can also hold larger pieces in place.
How do I keep the felt Christmas tree from looking flat?
Use several overlapping branch layers rather than cutting the tree as one simple triangle. Different branch widths, gently irregular edges, and carefully positioned ornaments create visual depth. Overlapping the tree with the snowman’s mitten and body also helps establish dimension.
Can beginners make this snowman fabric pattern?
Yes. The project uses straightforward shapes and basic stitches, making it suitable for someone learning felt appliqué sewing. Beginners may find it helpful to make paper templates first and practice the blanket stitch on scrap felt before working on the final pieces.
Can I change the colors of the original design?
Absolutely. The traditional combination of red, white, black, green, and yellow produces a classic Christmas appearance, but you could use blue, silver, pink, burgundy, cream, or pastel shades. Keeping strong contrast between the snowman, tree, clothing, and ornaments will help the individual shapes remain recognizable.
What can I make with the finished felt appliqué?
The completed piece can decorate pillows, Christmas stockings, banners, wall panels, table runners, fabric bags, tree skirts, quilt blocks, or framed textile artwork. A reduced version can also become a lightweight hanging Christmas decoration.
How should I store felt Christmas decorations after the holidays?
Store the finished project completely dry and preferably flat. Place clean tissue or soft fabric between decorated pieces to prevent friction. Avoid folding directly across the star, hat, or tree because repeated creasing can eventually distort the felt.
Conclusion
The Felt Snowman Appliqué Complete Step-by-Step Fabric Pattern shows how basic pieces of felt can become a detailed and cheerful handmade Christmas decoration. Beginning with paper templates allows you to control the proportions, while carefully cutting the snowman body, hat, scarf, mittens, boots, Christmas tree, ornaments, and star makes the assembly process much easier. Building the design from the background toward the foreground creates the overlapping effect that makes the snowman appear to hold the tree naturally.
You also learned how the blanket stitch adds both strength and decorative texture to the project, why overlapping tree layers create greater depth, and how small details such as holly berries, embroidered facial features, rosy cheeks, striped scarf pieces, and contrasting ornaments give the appliqué its personality. Because the design can be resized and recolored, the same basic pattern can inspire many different holiday decorations.
EASILY FIND THE PDF FOR THIS PATTERN HERE!
Whether you use your finished piece on a cushion, wall hanging, Christmas banner, gift bag, quilt panel, or seasonal ornament, this felt snowman appliqué is a project that can be personalized while preserving the warm handcrafted style of the original inspiration. Take your time when arranging the pieces before sewing, focus on neat but natural stitching, and enjoy transforming simple felt shapes into a complete festive scene. If you make your own version of the Felt Snowman Appliqué Complete Step-by-Step Fabric Pattern, leave your sincere opinion about the project and share any suggestions or creative changes you would make. Your ideas about colors, decorations, stitches, and finishing details can inspire even more beautiful variations of this Christmas felt design.