
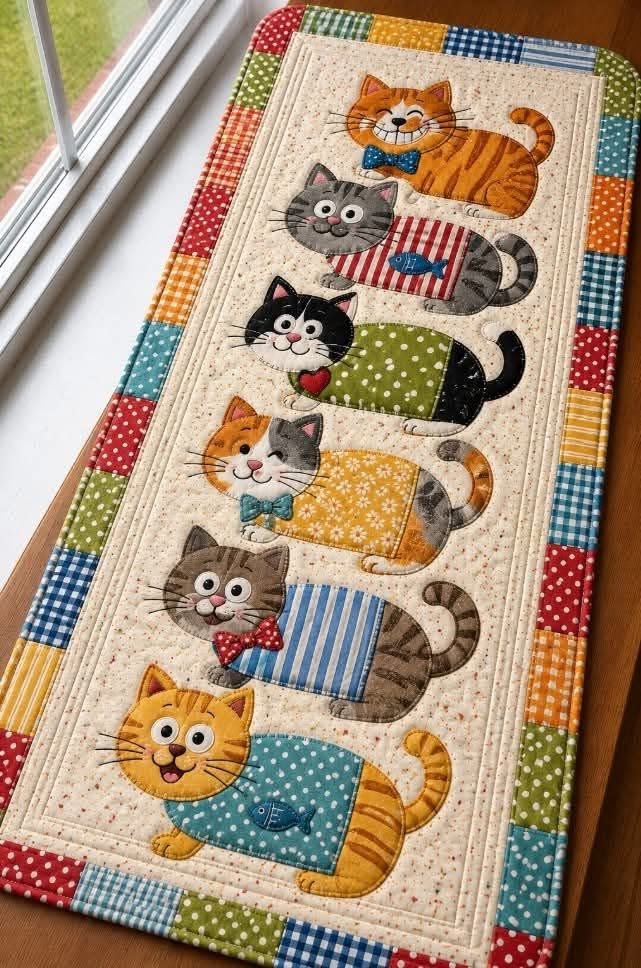
The Quilted Cat Print Table Runner Pattern is a cheerful sewing project that combines playful cat appliqué, traditional quilting, colorful patchwork, and practical home décor in one charming piece. Inspired by the photographed runner, the design features a vertical collection of whimsical cats, each with a different personality, fabric print, body shape, and decorative detail. A patchwork border made from gingham, polka dots, checks, and small-scale prints frames the central panel and gives the project a warm handmade character. Whether placed on a dining table, sideboard, kitchen island, or craft-room table, this runner can instantly add color and personality to a space while showing off your sewing skills.
One of the most appealing aspects of this Quilted Cat Print Table Runner Pattern is that it can be customized without losing the spirit of the original design. The photographed project uses six cats arranged vertically on a neutral background, with orange, gray, black, brown, green, yellow, blue, and red fabrics providing contrast. Some cats wear bow ties, while others feature small fish, hearts, stripes, dots, or floral-style prints on their bodies. Instead of searching for identical fabrics, you can use the photograph as inspiration and build your own coordinated palette. This makes the project especially useful for consuming fabric scraps, leftover quilting cotton, and small pieces that might otherwise remain unused.
Although the finished runner looks detailed, it becomes much easier when divided into manageable stages. The basic construction involves preparing a central background, making individual cat appliqué pieces, assembling the cats from simple shapes, stitching them securely, adding a colorful patchwork frame, creating a quilt sandwich, quilting the layers, and finishing the outer edge with binding. Beginners can simplify facial details and use fewer fabric prints, while experienced quilters can add free-motion quilting, embroidered whiskers, decorative stitching, and more intricate appliqué. The following tutorial explains a practical way to recreate the look of the Quilted Cat Print Table Runner Pattern from beginning to end.
Materials, Fabrics, and Planning the Cat Table Runner
Begin by deciding the approximate finished dimensions of your quilted table runner. Based on the tall, narrow proportions of the reference project, a finished size of approximately 45 cm wide by 100–115 cm long works well for many tables. These measurements do not need to be exact because the pattern can be adapted to your available space. Before cutting anything, measure the table where you intend to use the runner and make sure there will be enough room around it.
DISCOVER MORE FREE PATTERNS HERE!
For the main panel, select a light neutral quilting cotton such as cream, ivory, oatmeal, or very pale beige. A subtly textured or speckled fabric works especially well because it gives the background visual interest without competing with the cats. Cut the background slightly larger than the intended finished central area. Extra fabric around the edges gives you room for trimming after the appliqué and quilting stages.
Next, gather a varied selection of 100% cotton quilting fabrics for the cats. The visual charm of the original comes from mixing orange, charcoal gray, black, brown, turquoise, mustard, green, red, and blue. Look for small polka dots, gingham, stripes, checks, tiny flowers, and other small-scale prints. Since the appliqué pieces are relatively compact, large prints may disappear when cut into the individual shapes.
You will also need batting and backing fabric. A thin cotton or cotton-blend batting is ideal for a table runner because it provides enough body for the quilting while allowing the project to lie relatively flat on the table. Cut both batting and backing several centimeters larger than the completed quilt top. The extra margin makes basting and quilting much easier.
For construction, prepare coordinating sewing thread, an iron, fabric scissors or a rotary cutter, quilting ruler, cutting mat, pins or clips, and your preferred appliqué product. Fusible web is particularly convenient for this project because it helps hold the individual cat pieces in position before stitching. You can also use traditional needle-turn appliqué if you prefer a softer handcrafted finish.
Finally, plan the layout before cutting all the cats. The photographed Quilted Cat Print Table Runner Pattern uses six cats stacked vertically, leaving comfortable breathing room between the figures. Sketch six rectangles on paper to represent their approximate positions. Alternate the body colors so that two similar cats are not directly beside one another, and distribute dark and light colors throughout the panel to maintain visual balance.
Creating and Appliquéing the Six Cat Designs
Start by making a reusable cat appliqué template. Each cat can be constructed from simple components: a rounded head, two triangular ears, an elongated oval or rectangular body, four small paws, and a curved tail. Because the cats in the inspiration image have deliberately whimsical proportions, perfect anatomical accuracy is unnecessary. Slightly oversized heads and rounded bodies actually contribute to the friendly character of the design.
Trace each template component onto the paper side of fusible web, remembering that the shapes will reverse when fused to the fabric. Leave a little space between the traced pieces and cut them apart roughly. Fuse each shape onto the wrong side of the selected quilting cotton according to the manufacturer’s temperature instructions. After the pieces cool, cut precisely along the drawn outlines.
Create visual variety by giving every cat a distinctive fabric body print. For example, the first cat can combine an orange head and tail with a warm brown striped body and blue bow tie. Another can use a charcoal head with a red-and-white striped body. A black-and-white cat looks especially striking with a green polka-dot body, while an orange-and-gray cat can be paired with a yellow floral print. Blue stripes and turquoise dots are excellent choices for the remaining cats.
Position the first cat near the upper portion of the background and temporarily arrange every component before removing the fusible backing. Check the head, body, legs, tail, and accessory placement together. When you are satisfied, fuse the pieces permanently. Repeat this process down the entire panel, checking the overall arrangement frequently so that the six figures remain evenly spaced and visually centered.
Stitch around the appliqué edges using a small blanket stitch, zigzag stitch, or straight appliqué stitch. A dark neutral thread can create the illustrated outline visible in the reference image, while matching threads produce a softer finish. Sew slowly around ears, paws, tails, and curved faces. Reducing the stitch length slightly can make tight curves easier to control.
Add the faces only after the major appliqué pieces are secure. Eyes can be created with layered fabric circles, embroidery, or carefully stitched appliqué. Add small noses, smiling mouths, and embroidered whiskers to create expression. Decorative accessories such as bow ties, a heart, and small fish motifs help distinguish one cat from another. These details are important because they transform a collection of simple shapes into the playful characters that define the Quilted Cat Print Table Runner Pattern.
Building the Patchwork Border and Quilting the Runner
Once the central cat panel is complete, square it carefully with a quilting ruler. Avoid trimming too close to the cats; the neutral space surrounding them is part of the composition. A narrow cream inner border can be added around the appliqué panel before the colorful patchwork frame. This creates separation between the detailed cats and the busier outer fabrics.
To reproduce the lively border from the photograph, cut numerous small rectangles or squares from your leftover quilting fabric scraps. Use colors already found in the cat appliqués, including red, turquoise, green, mustard, navy, orange, and cream. Mix gingham, dots, checks, and stripes. Consistency in piece size will keep the border organized even though the prints themselves are intentionally varied.
Sew the patchwork units together using a consistent 6 mm seam allowance, pressing seams as you work. Construct two long border strips for the sides and two shorter strips for the top and bottom. Arrange the colors before sewing so that identical fabrics are distributed rather than clustered. Attach the side strips first, press the seams, and then add the upper and lower sections.
Now prepare the quilt sandwich. Place the backing fabric wrong side upward on a clean flat surface, position the batting over it, and place the completed quilt top right side upward. Smooth all three layers carefully from the center toward the edges. Secure them with quilting safety pins, temporary basting spray, or long hand-basting stitches.
The neutral background offers an excellent area for subtle quilting. You can use straight-line quilting, gentle free-motion stippling, or irregular meandering stitches around the cats. Quilt close to the appliqué outlines to help the figures stand out slightly from the background. Additional parallel lines around the inner frame can reproduce the structured appearance visible in the inspiration piece.
Quilt the patchwork border as well so the entire runner has an even texture. Straight stitching through the center of each patchwork section is an easy option. Once quilting is complete, inspect both sides for puckers or loose threads and trim the batting and backing flush with the quilt top. The Quilted Cat Print Table Runner Pattern should now have a neat rectangular shape ready for its final binding.
Binding, Finishing Details, Care, and Creative Variations
Prepare the binding from coordinating cotton fabric. You can use one solid color for a clean frame or make scrappy binding from several leftover fabrics. Cut strips approximately 6 to 6.5 cm wide, join them end to end, and press the long strip in half lengthwise with wrong sides together. Make enough binding to travel around the entire runner with some extra length for joining the ends.
Attach the binding around the quilt using your preferred method. Machine-sew it to the front with approximately a 6 mm seam allowance, carefully folding neat miters at the corners. Wrap the binding toward the back and secure it either by hand with an invisible stitch or by machine. Take extra care around the corners because crisp corners dramatically improve the finished appearance.
After binding, inspect all of the cat appliqué details. Make sure the whiskers, eyes, mouths, bows, fish, and heart are securely attached. Trim loose threads and gently press the runner according to the requirements of your fabrics and batting. Avoid pressing dimensional embellishments directly with excessive heat.
You can personalize this project by changing the number of cats. A shorter runner might feature three or four figures, while a longer dining-table version could include seven or eight. Another possibility is to use fabrics that resemble beloved household pets. Black, white, ginger, tabby, calico, and gray fabric combinations can create a wonderful family of patchwork cats.
Seasonal variations are also possible. Red, green, cream, and gold fabrics can produce a festive winter version, while pastel colors work beautifully for spring. Warm orange, rust, brown, and olive fabrics can create an autumn-inspired runner. The fundamental construction method remains the same, making the Quilted Cat Print Table Runner Pattern highly adaptable.
For a coordinated handmade collection, use the same cat templates on placemats, mug rugs, cushion covers, wall hangings, or fabric tote bags. The individual characters can even be used separately. Once you understand the basic fusible appliqué technique, the project becomes more than a single table runner—it becomes a reusable design concept for many future sewing projects.
FAQ About the Quilted Cat Print Table Runner Pattern
What is a Quilted Cat Print Table Runner Pattern?
A Quilted Cat Print Table Runner Pattern is a sewing and quilting design that combines cat-shaped fabric appliqués with a layered, quilted table runner. The design described here uses multiple colorful cats arranged vertically on a neutral central panel and surrounded by a scrappy patchwork border.
Is this cat table runner suitable for beginners?
Yes. A confident beginner can make this project by working slowly and completing one cat at a time. Fusible appliqué simplifies positioning considerably. Beginners may want to use a simple zigzag or blanket stitch around the shapes rather than attempting complicated free-motion techniques.
What fabric is best for a quilted cat table runner?
Good-quality quilting cotton is one of the easiest options because it cuts cleanly, presses well, and is available in countless colors and small prints. Cotton is particularly convenient for the cat bodies, patchwork border, background, backing, and binding.
How large should the finished table runner be?
There is no universal size because tables vary considerably. Approximately 45 cm by 100–115 cm is a practical starting range for a runner with six vertically arranged cats. Measure your own table before cutting the final background and adjust the proportions accordingly.
Do I need fusible web for the cat appliqué?
It is not absolutely necessary, but fusible web makes the process much easier, especially when a design contains many small components. It stabilizes the shapes before stitching and reduces movement around ears, tails, paws, and facial pieces.
Can I make the cats with fabric scraps?
Absolutely. In fact, scrap quilting works especially well for this pattern. Small remnants can become ears, paws, bow ties, bodies, hearts, fish, or border blocks. Using scraps also encourages interesting combinations of checks, dots, stripes, and other prints.
Should the appliqué be completed before quilting?
For this method, yes. Assemble and stitch the cat appliqués onto the background first. Add the borders to complete the quilt top, and then layer the top with batting and backing. Afterward, quilt through the complete sandwich.
How can I make the cats look more expressive?
Small details make a significant difference. Vary the eye shapes, eyebrows, mouth curves, whiskers, noses, bow ties, and body fabrics. Slight changes in ear position can also give each cat a different personality while maintaining a consistent overall style.
What quilting style works best around appliqué cats?
Simple echo quilting, meandering, stippling, or straight lines can all work effectively. Quilting close to the outer edge of each cat helps define its silhouette, while background quilting creates texture and helps keep the three quilt layers securely connected.
Can the runner be machine washed?
If all fabrics, threads, batting, and appliqué materials you selected are washable, the finished runner can generally be gently washed according to those materials’ care instructions. Prewashing fabrics can also help reduce unexpected shrinkage or color bleeding, particularly when strong reds, blues, and other saturated colors are used.
Can I change the colors shown in the original design?
Yes. Color customization is one of the best features of this cat quilt pattern. You can use coordinated modern fabrics, vintage-inspired prints, pastels, neutral tones, rainbow scraps, or colors chosen to match your home décor.
How do I prevent the table runner from becoming wavy?
Accurate cutting, consistent seam allowances, careful pressing, and even quilting are important. Avoid stretching the borders while attaching them, and baste the quilt sandwich thoroughly before quilting. When sewing appliqué, do not pull or push the background fabric excessively.
Can I make matching placemats from the same pattern?
Yes. Choose one or two cat designs for each placemat and reduce the background dimensions accordingly. Repeating the same patchwork border fabrics can create a coordinated dining set without requiring every piece to be identical.
How long does a Quilted Cat Print Table Runner Pattern take to make?
The time depends on experience and the amount of decorative detail included. The six individual cat appliqués will generally require more time than assembling the rectangular border. Working in stages—cutting, fusing, appliquéing, bordering, quilting, and binding—makes the project easier to manage.
What makes this design visually interesting?
The combination of whimsical cat appliqué, contrasting body fabrics, expressive faces, small decorative motifs, neutral negative space, and a colorful patchwork frame creates visual variety without losing cohesion. Repeating the cat shape ties the design together while the different prints prevent it from looking repetitive.
Conclusion: Completing Your Quilted Cat Print Table Runner Pattern
Creating a Quilted Cat Print Table Runner Pattern is a rewarding way to combine appliqué, patchwork, quilting, and decorative sewing in one practical project. Starting with a neutral background allows the colorful cats to become the central focus, while varied fabrics give every character its own distinctive appearance.
The process becomes manageable when approached step by step: prepare the materials, create the templates, cut and fuse the cat appliqué pieces, stitch the individual characters, assemble the colorful patchwork border, make the quilt sandwich, quilt the layers, and finish everything with binding. Careful pressing and accurate stitching throughout these stages will help produce a polished result.
Most importantly, this pattern leaves plenty of room for creativity. Your cats do not need to look exactly like those in the inspiration image. Different colors, prints, expressions, accessories, and border combinations can make your runner completely unique while preserving the playful personality of the original Quilted Cat Print Table Runner Pattern.
EASILY FIND THE FREE PDF FOR THIS PATTERN HERE!
Once finished, the runner can become a cheerful handmade accent for a kitchen, dining room, sewing room, or family gathering space. The same techniques can also be adapted for placemats, cushions, wall quilts, and other cat-themed quilting projects. If you make your own version, leave your sincere opinion about the project and share your suggestions. Which fabric combination would you choose for the six cats, and what would you change or add to make this Quilted Cat Print Table Runner Pattern uniquely yours?