
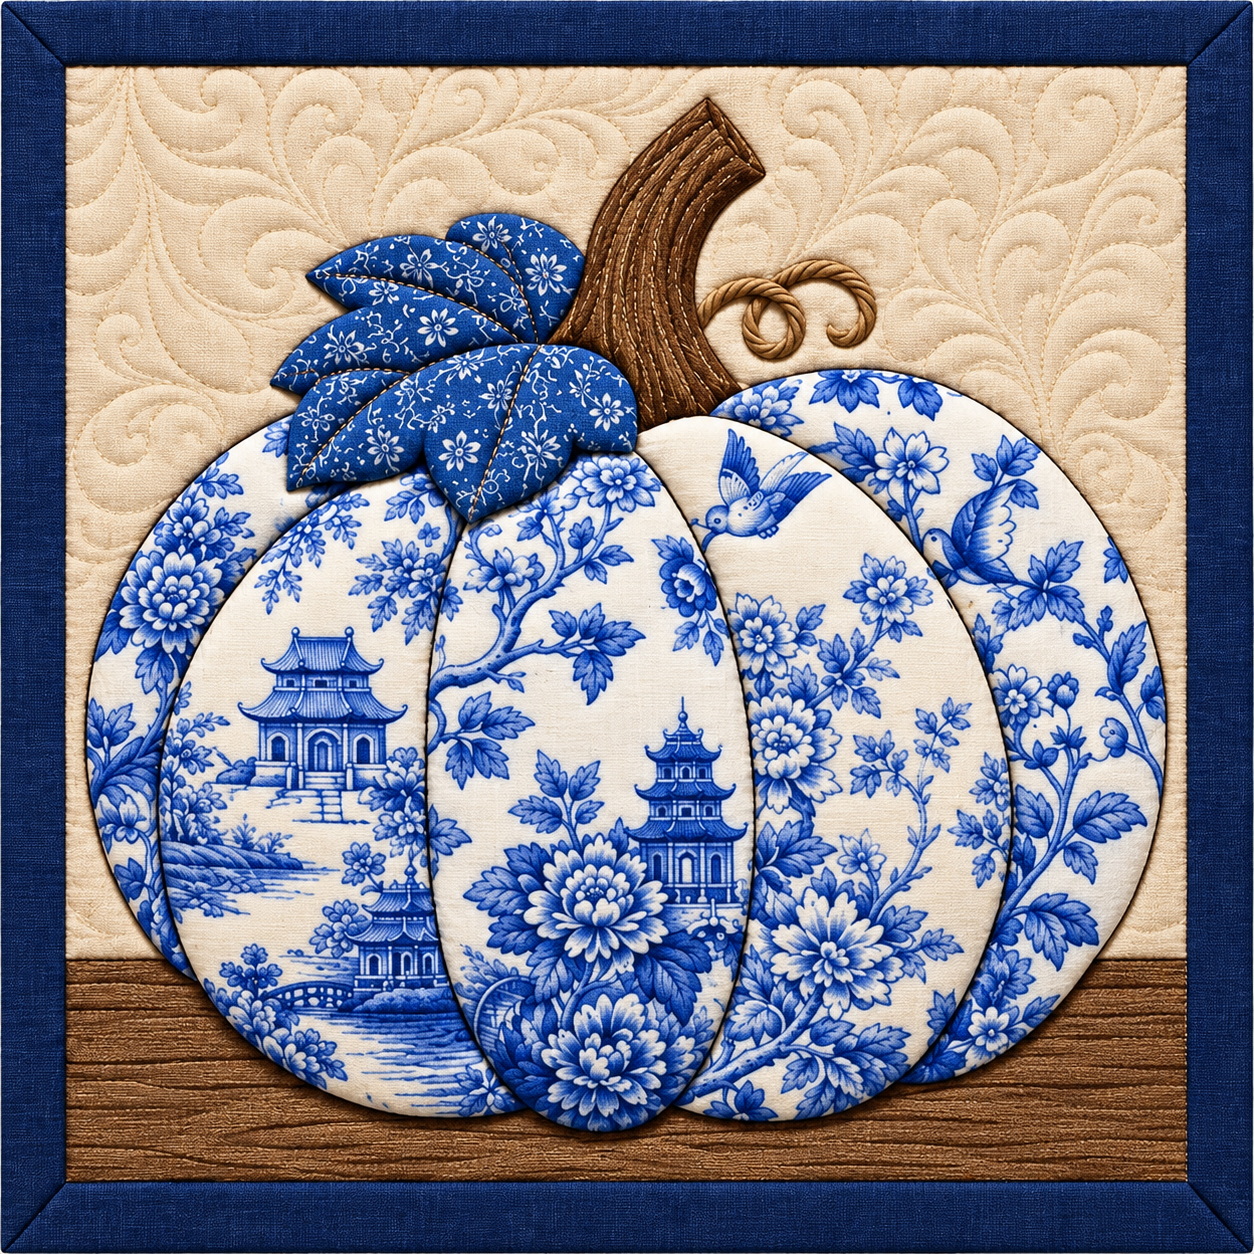
The Pumpkin Themed Patchwork Panel Pattern is a charming sewing project that combines the warmth of autumn décor with the precision and creativity of traditional patchwork and appliqué. Inspired by the image, this design features a large segmented pumpkin as the main focal point, framed by a dark fabric border and placed against a softly quilted background. The most distinctive feature is the use of blue-and-cream printed fabrics rather than the expected orange palette, giving the pumpkin an elegant porcelain-inspired appearance. Floral motifs, birds, architectural details, and botanical prints can all become part of the pumpkin surface, making the finished panel feel decorative and sophisticated. This project can be adapted for a wall hanging, table decoration, seasonal textile panel, or handmade gift. It is also a wonderful opportunity to practice curved appliqué, layered fabric construction, decorative quilting, and careful fabric placement while creating something that looks impressive without requiring an extremely complicated block structure.
When planning a Pumpkin Themed Patchwork Panel Pattern, it helps to think of the project as a collection of simple layers rather than one difficult design. The foundation consists of a backing fabric, batting, and a neutral background fabric, while the pumpkin itself is assembled from several elongated curved sections. Each pumpkin segment can feature a different portion of a coordinated print, creating movement and visual interest across the finished shape. A brown stem rises from the center, blue fabric leaves overlap its base, and a small curled vine provides an additional decorative detail. Beneath the pumpkin, a brown wood-inspired fabric strip visually grounds the composition. Finally, a deep blue border frames the entire piece. Understanding these individual elements before cutting fabric makes the sewing process much easier because you can prepare and position every component before committing to permanent stitching.
The beauty of this fabric pumpkin panel comes from contrast, texture, and thoughtful fabric selection rather than from complicated construction. Beginners can simplify the project by using raw-edge fusible appliqué, while experienced quilters may choose turned-edge appliqué, hand stitching, or detailed free-motion quilting. The exact dimensions can also be adjusted according to the intended use. A medium wall panel, for example, could measure approximately 45 × 45 cm, while the pumpkin itself could occupy roughly 34–38 cm of the central area. These measurements are suggestions rather than strict requirements because the proportions can be enlarged or reduced while preserving the same visual concept. Before beginning, wash and press fabrics when appropriate, check that all materials are clean and colorfast, and make a paper template of the complete pumpkin. Careful preparation will help the Pumpkin Themed Patchwork Panel Pattern remain symmetrical, balanced, and easier to assemble.
Materials, Fabric Selection, and Preparing the Pumpkin Pattern
Start by selecting several coordinated quilting cotton fabrics for the pumpkin. The pictured project uses a blue-and-cream palette that resembles traditional decorative porcelain, but the same technique works beautifully with orange, rust, burgundy, green, navy, or even scrap fabrics. Choose prints that have enough contrast to reveal the individual pumpkin sections. Large floral or scenic prints can create dramatic central panels, while smaller botanical prints work well toward the outer sections. Using different areas of the same fabric collection is an effective way to create variety without making the design feel visually disconnected.
DISCOVER MORE FREE PATTERNS HERE!
For the background, choose a light neutral cotton such as cream, ivory, beige, or soft tan. You will also need quilt batting, backing fabric, fabric for the outer border, brown fabric for the pumpkin stem, and additional fabric for the leaves. A narrow brown strip can be added along the lower portion of the design to reproduce the wood-like surface visible in the inspiration image. Basic supplies include fabric scissors or a rotary cutter, cutting mat, quilting ruler, pins or clips, sewing thread, an iron, and a sewing machine.
The pumpkin is constructed from multiple elongated curved shapes arranged side by side. To make your own pumpkin appliqué template, first draw the complete pumpkin outline on paper. Divide the shape vertically into approximately five large curved sections. The central section should be relatively straight and prominent, while the sections become progressively more curved toward the left and right edges. Keeping the pumpkin slightly wider near its lower half will produce the full, rounded silhouette associated with a mature pumpkin.
Cut the paper sections apart only after checking that they fit together correctly. Number them from left to right so their original positions are never confused. When transferring each section to fabric, remember to consider your appliqué technique. For raw-edge fusible appliqué, the template can generally follow the finished outline. For turned-edge methods, add an appropriate seam allowance around the pieces. Always follow the instructions for the specific fusible product or appliqué technique you are using.
Fabric placement deserves special attention because it determines the personality of the finished patchwork pumpkin. Before cutting, move each paper template across your printed fabric and look at the motifs that will appear inside the finished shape. This process is often called fussy cutting when a specific printed motif is deliberately positioned within a pattern piece. A flower, bird, landscape, or architectural feature can become the focal point of an individual pumpkin segment. Try to distribute large motifs throughout the pumpkin instead of concentrating all of them on one side.
Once the pumpkin sections have been cut, place them on the background fabric without attaching anything. Add the paper shapes for the stem, leaves, and vine and evaluate the overall composition from a short distance. Make small adjustments until the pumpkin appears centered and balanced. Taking a quick reference photo at this stage can help you remember the final arrangement while sewing. This dry-layout step is particularly useful for the Pumpkin Themed Patchwork Panel Pattern, where overlapping curved pieces must work together visually.
Building and Sewing the Segmented Patchwork Pumpkin
Begin assembly with the background layer lying completely flat. Mark its horizontal and vertical center lightly with a removable fabric-marking tool if necessary. Position the middle pumpkin section first because it establishes the alignment for every other piece. Place the neighboring sections on either side, allowing their curved edges to meet naturally. The outer pieces should complete the rounded silhouette without creating sharp gaps or unexpected corners.
If you are using fusible appliqué, prepare the pumpkin pieces according to the fusible manufacturer’s instructions and secure them one at a time. Avoid permanently fusing every piece until you are satisfied with the entire arrangement. Curved sections can shift surprisingly easily, and a few millimeters of movement may affect the symmetry of the pumpkin. Press carefully rather than sliding the iron across the fabric, which can distort the pieces.
Stitch around each pumpkin segment using your preferred appliqué stitch. A narrow zigzag, blanket stitch, or straight stitch close to the raw edge can all work well. Matching thread creates a subtle finish, while contrasting thread emphasizes the segmentation. Decorative golden, cream, or blue stitching can be especially attractive with the porcelain-inspired fabric palette. Keep the stitching consistent around the curves and reduce sewing speed when approaching tighter areas.
To create the dimensional appearance shown in the inspiration, emphasize the curved lines between pumpkin sections. These seams or stitched outlines imitate the natural ribs of a pumpkin and are essential to the design. Gentle quilting lines following each curved segment can make the sections appear fuller. Avoid excessive quilting directly over detailed printed motifs if you want birds, flowers, buildings, or other decorative features to remain clearly visible.
Next, create the pumpkin stem appliqué from medium or dark brown fabric. The stem should rise upward from the center and curve slightly to one side rather than appearing perfectly straight. You can use a wood-grain print or add several lines of decorative stitching to a plain brown fabric. Parallel curved stitches are an easy way to suggest natural bark texture. Position the lower end of the stem behind the upper pumpkin sections so the construction appears layered and realistic.
Finish this stage by adding fabric leaves near the stem. The pictured design uses several overlapping blue leaves, which coordinate beautifully with the printed pumpkin. Cut approximately five leaf shapes in slightly different sizes and arrange them in a fan-like cluster. Stitch around their edges and optionally add a central vein to each leaf. A narrow fabric tube, cord, bias strip, or decorative stitched line can form the curled pumpkin vine, completing the recognizable autumn silhouette.
Quilting the Background and Adding the Coordinated Fabric Border
After the appliqué is secure, prepare the quilt sandwich by placing the backing fabric wrong side up, batting in the middle, and decorated panel on top. Smooth each layer carefully to eliminate wrinkles. Baste the layers using your preferred quilting method. The background is highly visible around the pumpkin, so good preparation here will noticeably improve the professional appearance of the finished panel.
The inspiration image features dense swirling quilting across the cream background. You can reproduce this effect with free-motion quilting using feathers, spirals, leaves, loops, or flowing curves. Beginners do not need to reproduce an elaborate pattern. Gentle meandering stitches or repeated curved lines can provide enough texture to distinguish the background from the appliqué. Practice your quilting motif on a fabric-and-batting scrap before working on the final panel.
Keep the quilting density relatively consistent throughout the background. Dense quilting tends to compress the background, allowing the less densely quilted pumpkin to appear slightly raised. This is one reason the appliqué can achieve a dimensional look even without heavy padding. If greater dimension is desired, a small amount of additional batting can be placed behind selected pumpkin sections before final quilting, although this optional technique requires more careful trimming and stitching.
A brown horizontal strip near the bottom can create the impression that the pumpkin is resting on a wooden surface. Select a wood-grain fabric or brown textured cotton and position it behind the lower pumpkin area before completing the final assembly. Horizontal quilting lines can strengthen the illusion of wooden boards. This element is optional, but it gives the composition a visual foundation and prevents the pumpkin from appearing to float in the center of the panel.
The outer border should coordinate with the strongest color in the pumpkin. For the blue-and-cream version, a deep navy fabric border creates an elegant frame and makes the lighter center stand out. Cut border strips consistently and sew opposite sides first, pressing the seams carefully. Then attach the remaining two strips. Accurate measurement is more important than simply cutting strips longer than necessary because properly measured borders help keep a quilted panel square.
After attaching the border, quilt it lightly if desired and prepare the edges for finishing. Traditional quilt binding provides a neat, durable result. Cut binding strips, join them into one continuous length, fold and press them, then sew them around the perimeter while creating clean mitered corners. The binding may match the border for a seamless framed appearance or provide a subtle contrast. Once finished, press the Pumpkin Themed Patchwork Panel Pattern carefully without flattening any dimensional details.
Finishing Details, Display Ideas, FAQ, and Final Project Tips
Inspect the entire panel before considering it finished. Trim loose threads and check every appliqué edge, especially around the narrow leaf tips, stem, and vine. Look at the pumpkin from several feet away to make sure the curved sections create one continuous silhouette. Small inconsistencies are part of handmade work, but correcting loose stitching now will improve durability and keep the panel looking neat after storage or seasonal use.
If the project will become a quilted wall hanging, add a hanging sleeve to the back before completing the final hand stitching on the binding. A fabric sleeve allows a lightweight rod to support the panel without clips or visible hardware touching the front. Make sure the sleeve is slightly shorter than the finished width and positioned below the top edge so it remains hidden from the front.
This project can also be transformed into other decorative pieces. A smaller pumpkin can become a cushion front, table mat, placemat, tote bag panel, or seasonal mini quilt. A larger version can become the center of an autumn wall quilt. Because the Pumpkin Themed Patchwork Panel Pattern depends primarily on recognizable shapes rather than one specific fabric collection, it is easy to customize while retaining the original design concept.
For a traditional autumn interpretation, substitute orange, gold, rust, brown, and forest-green fabrics for the blue-and-cream palette. For farmhouse décor, try muted checks, linen-look fabrics, and small florals. For a contemporary interpretation, use monochromatic fabrics or geometric prints. The most important principle is maintaining enough value contrast between the pumpkin, background, stem, and border for every major element to remain clearly recognizable.
Beginners should concentrate on accurate cutting, careful placement, and controlled stitching rather than complicated quilting. The appliqué pumpkin pattern already provides plenty of visual detail, so simple background quilting can still produce a beautiful result. Experienced makers can add trapunto-style dimension, hand embroidery, decorative machine stitches, intricate free-motion quilting, or carefully fussy-cut printed motifs. Both approaches can create an attractive finished piece.
Before storing the panel, make sure it is completely clean and dry. Fold it loosely rather than creating the same sharp folds every season, or store it flat when possible. If displayed as seasonal décor, keep prolonged exposure to strong direct sunlight in mind because some textile dyes can fade over time. Thoughtful finishing and storage help protect the hours of cutting, appliqué, stitching, and quilting invested in your handmade Pumpkin Themed Patchwork Panel Pattern.
FAQ About the Pumpkin Themed Patchwork Panel Pattern
Is the Pumpkin Themed Patchwork Panel Pattern suitable for beginners?
Yes. The project can be beginner-friendly when made with raw-edge fusible appliqué and simple machine quilting. The curved pumpkin sections require patience, but they do not require complicated piecing. Beginners can start with larger pieces and simple straight or blanket stitching before experimenting with more advanced decorative quilting.
What is the best fabric for a patchwork pumpkin panel?
Good-quality quilting cotton is an excellent choice because it is stable, easy to cut, widely available, and suitable for both appliqué and machine quilting. Coordinated cotton prints are especially useful when you want different pumpkin segments to look varied while still belonging to the same overall color palette.
Does a pumpkin quilt have to use orange fabric?
No. A pumpkin is recognizable primarily because of its rounded segmented silhouette, stem, leaves, and vine. Blue-and-cream fabric, as demonstrated by this design, can create a sophisticated alternative to traditional autumn colors. Green, white, burgundy, gray, and multicolored scrap pumpkins can also work beautifully.
How many sections should the fabric pumpkin have?
Approximately five prominent vertical sections create a balanced result for this style, although you can use more or fewer depending on the size and desired detail. An odd number often works particularly well because it provides a natural central segment with matching sections spreading toward both sides.
What type of stitch is best around the appliqué?
A blanket stitch, narrow zigzag, satin stitch, or straight stitch close to the edge can all be appropriate. The best option depends on whether you want the edges to look decorative, nearly invisible, or intentionally rustic. Test the stitch length and width on a scrap containing the same fabric and fusible material before sewing the actual pumpkin.
Can I make the pumpkin sections look raised?
Yes. Strategic quilting can create a dimensional effect because densely quilting the background compresses it while leaving the pumpkin less compressed. More advanced quilters may also use additional batting behind individual appliqué sections. Any added bulk should be distributed evenly to avoid distortion.
How can I enlarge or reduce the pumpkin template?
Create the complete template first and resize all components by the same percentage. The pumpkin sections, stem, and leaves must remain proportional. After resizing, place the paper templates together on the intended background to verify that enough room remains for quilting and borders.
What makes the blue pumpkin design visually interesting?
The combination of blue floral fabric, cream negative space, curved segmentation, botanical imagery, and a dark coordinating border creates strong visual unity. Scenic and floral motifs placed inside different pumpkin sections add detail without changing the basic construction method.
Can fabric scraps be used for this project?
Absolutely. A scrap fabric pumpkin is an excellent variation. Sort scraps by color family or value before cutting so the finished pumpkin remains cohesive. Scraps are particularly useful for leaves, individual pumpkin segments, stems, and small decorative details.
How can I keep the appliqué pieces from shifting while sewing?
Arrange all components first, confirm their placement, and secure them with a suitable appliqué method before stitching. Fusible web is particularly convenient for raw-edge appliqué. When sewing curves, work slowly and reposition the fabric frequently instead of pulling it around the presser foot.
What quilting design works best behind the pumpkin?
Swirls, leaves, feathers, loops, and meandering patterns complement the organic pumpkin silhouette. However, there is no requirement to use dense free-motion quilting. Simple waves or gentle curves can produce a clean background and may be easier for someone completing a first quilted appliqué panel.
Can the finished pattern be used for more than a wall hanging?
Yes. The same Pumpkin Themed Patchwork Panel Pattern concept can be resized for pillow covers, table runners, tote bags, placemats, mini quilts, or seasonal textile decorations. Adjust the batting and finishing method according to how the finished item will be used.
Conclusion
The Pumpkin Themed Patchwork Panel Pattern brings together several enjoyable sewing techniques in one distinctive project: fabric selection, fussy cutting, curved appliqué, layered construction, decorative stitching, quilting, borders, and binding. Starting with a carefully prepared pumpkin template makes the entire process easier. From there, each curved section can be cut from a coordinated print and arranged to form the full pumpkin, followed by the brown stem, layered leaves, curled vine, textured background, grounding strip, and contrasting outer border.
EASILY FIND THE FREE PDF FOR THIS PATTERN HERE!
The blue-and-cream interpretation demonstrates that autumn sewing does not have to depend on traditional orange fabrics. By combining an unmistakable pumpkin silhouette with elegant botanical prints, it is possible to create a seasonal project that can remain attractive well beyond fall. Whether you keep the porcelain-inspired palette or redesign the Pumpkin Themed Patchwork Panel Pattern using your favorite fabrics, careful cutting, balanced placement, secure appliqué stitching, and thoughtful quilting will help produce a polished handmade panel. If you make your own version, leave your sincere opinion about the project and share your suggestions for colors, fabrics, quilting details, or other creative variations you would love to try.