
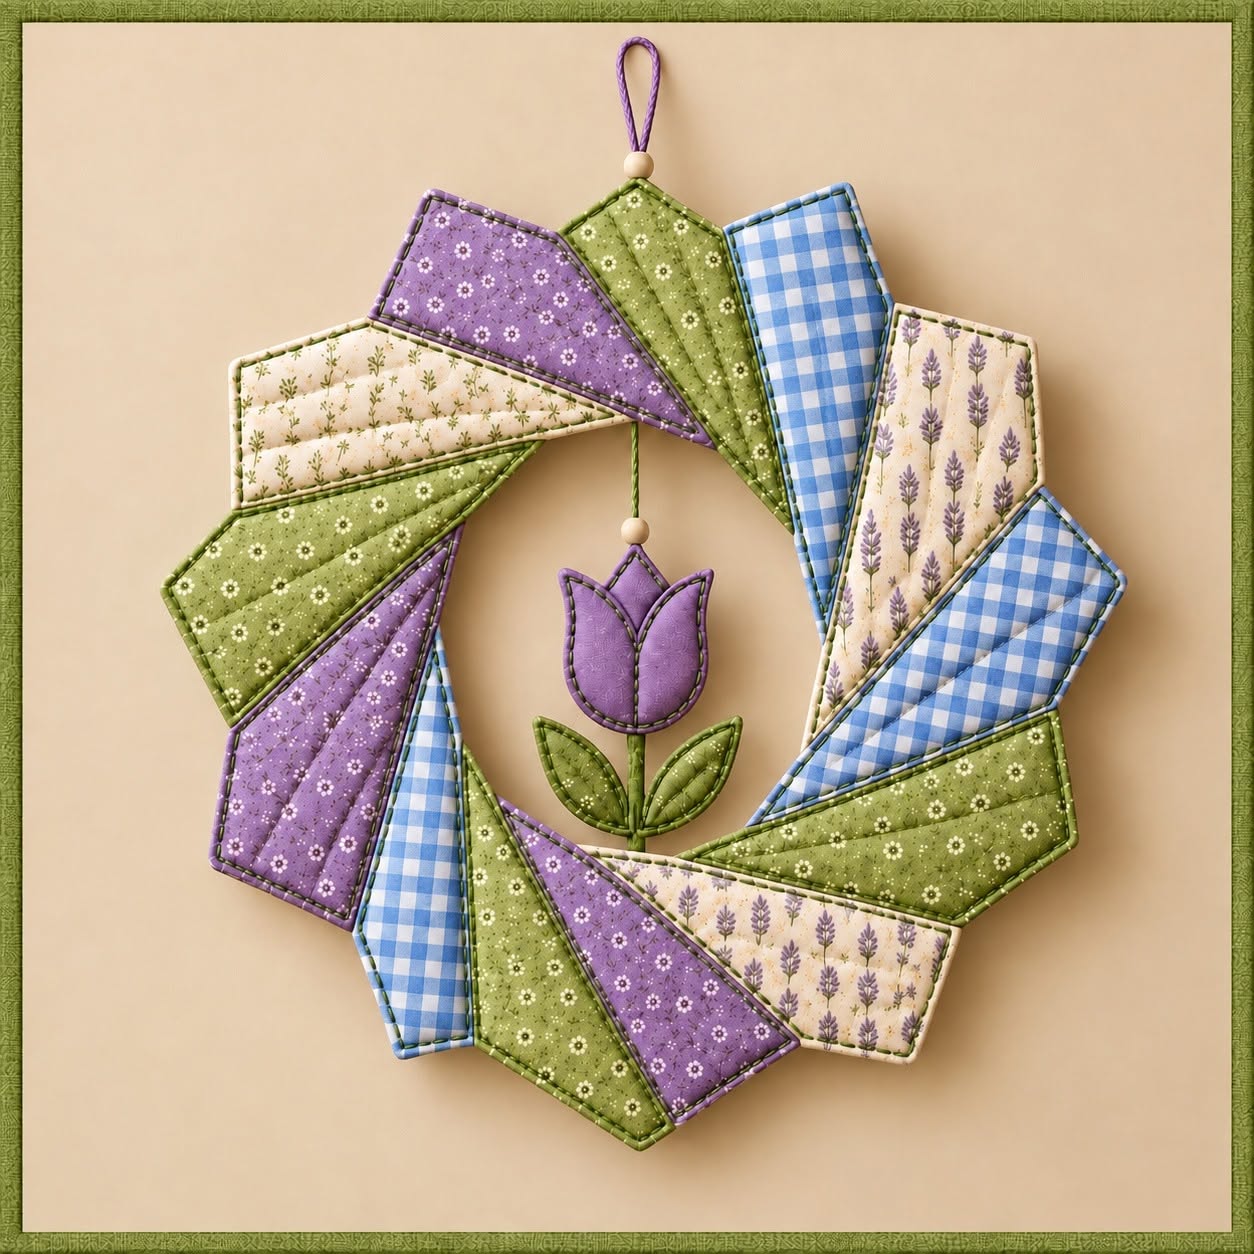
The Patchwork Tulip Wreath Fabric Pattern is a charming sewing project that combines traditional patchwork, decorative appliqué, and soft floral colors in a design that can bring warmth to almost any room. Inspired by the wreath shown in the reference image, this project features overlapping fabric segments arranged in a circular composition, with a delicate tulip hanging gracefully in the open center. Lavender purple, soft green, warm yellow, and neutral cream fabrics work beautifully together, creating a balanced handmade appearance without making the finished piece feel overly busy. Small floral prints, gingham fabrics, and subtle botanical patterns add texture and visual interest while keeping the overall look coordinated. The project can be displayed on a wall, door, sewing-room cabinet, or decorative hook, making it a versatile piece of fabric art. Although the design looks sophisticated, it can be approached step by step by anyone who is comfortable with basic sewing techniques and is willing to work carefully with fabric placement and pressing.
Creating a Patchwork Tulip Wreath Fabric Pattern is also a wonderful opportunity to use smaller pieces of fabric left from previous sewing or quilting projects. Instead of requiring large cuts of matching material, the wreath becomes more interesting when several coordinating prints are combined. The most important consideration is maintaining harmony between the colors rather than trying to make every fabric identical. A collection containing approximately four main color families works especially well, such as purple, green, yellow, and cream. Within those families, different prints can be mixed, including tiny flowers, checks, dots, lavender motifs, and traditional quilting patterns. Each fabric section contributes to the circular movement of the wreath, while visible topstitching can enhance the handcrafted character. The hanging tulip in the center becomes the focal point and provides a lovely contrast to the geometric construction surrounding it.
Another appealing feature of the Patchwork Tulip Wreath Fabric Pattern is how easily the project can be customized. The finished wreath can be made approximately 30 to 40 cm in diameter for a medium wall decoration, although the pattern may be enlarged or reduced depending on where it will be displayed. Cotton quilting fabric is generally the easiest material to control because it presses neatly and holds its shape well, while lightweight fusible interfacing or batting can provide structure and softness. The outer pieces can be lightly padded to create the dimensional fabric appearance visible in the inspiration image. Beginners may prefer to use fewer fabric prints, while experienced quilters can incorporate additional textures, decorative stitching, or carefully coordinated scraps. By understanding how the individual segments, central opening, tulip appliqué, and hanging loop work together, you can recreate the design while still giving your finished wreath its own personality.
Choosing Fabrics and Preparing the Patchwork Wreath Pieces
Begin your Patchwork Tulip Wreath Fabric Pattern by selecting the fabric palette. For a result similar to the inspiration image, gather several cotton fabrics in lavender purple, sage or olive green, golden yellow, and soft cream. Small-scale patterns are particularly effective because the individual wreath sections are relatively narrow. Floral prints, gingham checks, tiny geometric designs, and subtle botanical fabrics can all be combined. Try laying the fabrics next to one another before cutting anything. Alternating light, medium, and slightly darker values around the wreath will help each section remain visible once the pieces overlap.
DISCOVER MORE FREE PATTERNS HERE!
For a wreath approximately 34 cm in diameter, prepare roughly 12 to 14 elongated patchwork sections. Each section can begin as a rectangle approximately 8 cm wide by 17 cm long, although the exact size can be adjusted according to your preferred finished diameter. To create the slightly tapered and angular appearance seen in the project, shape one or both ends of each rectangle with gentle diagonal cuts. You do not need every piece to be identical because slight differences can give the arrangement a natural patchwork appearance. However, keeping the overall length consistent will make the circular assembly easier.
Each fabric segment can be given more structure by pairing it with lightweight batting or thin fusible fleece. Cut the stabilizer slightly smaller than the outer fabric if you want to reduce bulk around the seams. You can construct each section by placing two fabric pieces with right sides together and the stabilizer behind them, sewing around the edges while leaving a small turning opening. Use a seam allowance of approximately 0.7 to 1 cm. Trim bulky corners carefully, turn the piece right side out, and press it into shape.
After pressing, close the turning opening with a narrow topstitch around the perimeter. A stitch line approximately 2 to 3 mm from the edge gives the pieces a finished look and helps control the layers. Coordinating thread will create a subtle appearance, while slightly contrasting thread can emphasize the handmade details. The inspiration image shows defined edges around each section, so careful topstitching is an effective way to reproduce that visual character. Maintain a comfortable stitch length and guide the fabric slowly around angled corners.
Once all of the fabric sections are prepared, arrange them on a flat surface before sewing them together. Position the pieces in a circular formation, allowing the ends to overlap slightly. Rotate each piece so that the wreath seems to spiral gently around the central opening. Avoid placing identical colors side by side too frequently. For example, a sequence might move from purple to green, then yellow, cream, lavender, and another green fabric. Continue experimenting until the distribution feels balanced from every direction.
Take a photograph of your preferred arrangement before moving the pieces. This simple step can be very useful because the wreath may shift while you begin joining the sections. Mark the back of the pieces with removable labels or small numbers if needed. At this stage, also check the central opening. The hole should be large enough for the tulip to remain clearly visible without touching too many surrounding pieces. For a 34 cm wreath, an opening around 13 to 16 cm across can create a pleasing proportion.
Assembling the Circular Patchwork Structure Step by Step
The circular structure is the defining feature of the Patchwork Tulip Wreath Fabric Pattern, so assemble it gradually rather than trying to sew everything together at once. Begin by overlapping the lower portion of one segment with the edge of the next. The overlap may be approximately 2 to 4 cm, depending on the width and angle of the pieces. Pin or clip the fabrics temporarily and continue around the complete circle. Before stitching, hold or carefully lift the arrangement to make sure it keeps its shape.
When you are satisfied with the placement, secure the overlapping sections using discreet straight stitches. You can stitch directly along part of the existing topstitching so the joining seams are less noticeable. Another option is to make several short reinforced stitches where each section meets the next. The purpose is to create a stable wreath while allowing the overlapping construction to remain visible. Avoid excessive stitching through the center of each segment because it can flatten the lightly padded appearance.
Continue joining one section at a time while regularly checking the circle. Patchwork wreaths can gradually become distorted if all pieces are pulled in the same direction during sewing. After attaching several segments, place the project flat and measure the outer diameter vertically and horizontally. Small variations are perfectly acceptable in a handcrafted wreath, but a major difference may indicate that one overlap is too deep or another section is positioned at the wrong angle.
Pay special attention when connecting the final section to the first because this closes the circle. Instead of forcing the last piece into position, loosen one or two earlier overlaps if necessary. The wreath should sit naturally without strong tension. Once the final connection is secured, examine every joined area from both the front and back. Add a few extra stitches where needed, particularly around sections that will support the hanging loop.
To make the hanging loop, cut a strip of coordinating fabric approximately 4 cm wide by 16 to 20 cm long. Fold the long raw edges toward the center, press them, then fold the strip in half again to create a narrow fabric strap. Stitch close to the open edge. Alternatively, a fabric-covered cord or sturdy decorative ribbon can be used. Fold the finished strap into a loop and attach both ends firmly to the back of the top section of the wreath.
Before adding the central flower, hang the wreath temporarily and observe its balance. If one side appears noticeably heavier, you may need to move the hanging point slightly or reinforce a different section. This test is much easier to perform before the tulip is attached. The finished Patchwork Tulip Wreath Fabric Pattern should hang naturally with the central opening remaining visually centered and the overlapping fabric pieces creating a continuous sense of movement.
Making the Tulip Appliqué and Creating the Center Decoration
The tulip is the focal detail that transforms the fabric circle into a recognizable Patchwork Tulip Wreath Fabric Pattern. Start by drawing or tracing a simple tulip shape approximately 6 to 8 cm tall onto paper. The flower can be composed of three gently pointed petals: one central petal and two side petals that curve slightly outward. Keep the design uncomplicated because clean shapes are easier to sew and remain visible from a distance.
Transfer the tulip shape to purple fabric and prepare it using your preferred appliqué technique. Fusible appliqué is one of the easiest methods. Apply lightweight fusible web to the wrong side of the fabric according to the manufacturer’s instructions, trace the flower shape, and cut carefully around the outline. Position the tulip on a small stabilizing layer if you want the flower to have additional body. Another approach is to create a lightly padded tulip using two fabric layers and thin batting.
For the stem, cut a narrow green strip approximately 0.8 to 1 cm wide and around 6 to 8 cm long. Fold the raw edges inward before pressing so they are hidden. Two simple leaf shapes can then be cut from coordinating green fabric. Make the leaves approximately 4 to 5 cm long, positioning one on each side of the stem. Slightly different green tones can make the foliage appear more dimensional and closer to the handcrafted look of the inspiration project.
Assemble the flower by placing the stem first, followed by the leaves and finally the tulip blossom. Stitch around each appliqué piece with a narrow straight stitch, blanket stitch, or small zigzag. A blanket stitch is especially appropriate for a traditional fabric-craft appearance because it outlines the shapes clearly. Choose thread that coordinates with the fabric or use slightly deeper shades to emphasize the petals and leaf edges. Sew slowly around the pointed sections of the tulip to preserve its shape.
The completed tulip can be suspended from the top inside edge of the wreath. Create a narrow fabric cord, embroidery thread loop, or decorative string approximately 8 to 12 cm long, adjusting it according to the size of the central opening. Attach one end securely behind the upper section of the wreath and the other end to the top of the tulip. The flower should hang freely near the center without extending significantly below the lower inner edge.
Check the flower position while the wreath is hanging. The tulip should look centered when viewed naturally rather than only when measured on a flat table. If necessary, shorten or lengthen the suspension cord by a small amount. A tiny decorative bead or knot above the tulip can also be added if desired, echoing the charming handmade detail visible in the reference design. Once the position is correct, reinforce the attachment points carefully so the centerpiece remains secure during storage or display.
Finishing, Styling, and Personalizing the Fabric Wreath
Finishing details can greatly improve the overall appearance of your Patchwork Tulip Wreath Fabric Pattern. Begin by trimming any remaining loose threads and checking every topstitched edge. Press individual fabric sections carefully if they became wrinkled during construction, but avoid flattening padded pieces too aggressively. A light press from the back is usually enough to restore the shape without removing the soft dimension that gives the wreath its quilted character.
Inspect the back of the wreath and secure any visible knots or thread ends. If you prefer a more polished reverse side, small matching fabric patches can be hand-sewn over the main joining points. This is optional, especially if the wreath will remain against a wall or door. However, clean finishing can make the project feel more professional and can be helpful if you plan to give the wreath as a handmade gift.
Color balance is another important part of the final review. The Patchwork Tulip Wreath Fabric Pattern works especially well when the same colors appear at different positions around the circle. Purple can be repeated in several locations, for example, while yellow sections can act as bright accents. Green fabrics visually connect the wreath with the flower leaves, while cream prints soften the transition between stronger colors. This repeated palette creates unity even when many fabric patterns are used.
You can also personalize the wreath according to the season or decorating style. Spring versions may feature lavender, yellow, sage, and cream, while a brighter version could use coral, turquoise, pink, and fresh green. For autumn décor, consider rust, mustard, olive, and warm beige. The tulip itself can also be changed to red, pink, yellow, or white. The construction technique remains essentially the same, allowing one basic design to inspire many different finished projects.
When displaying the wreath, choose a location where the fabric details can be seen without excessive exposure to moisture or strong direct sunlight. A sewing room, craft area, bedroom wall, hallway, covered interior door, or decorative wall hook can all work well. Because the project is lightweight, a simple wooden peg or decorative hook is generally sufficient. The fabric construction also makes the wreath easier to store than many rigid seasonal decorations.
Finally, treat your completed Patchwork Tulip Wreath Fabric Pattern as a creative foundation rather than a design that must always be reproduced exactly. Decorative embroidery, tiny buttons, additional flowers, fabric-covered beads, lace details, or contrasting stitching can all be incorporated in future versions. The most attractive handmade projects often include small individual choices that reflect the maker’s own style. By combining careful construction with thoughtful fabric selection, you can create a wreath that feels coordinated, cheerful, and genuinely unique.
FAQ – Frequently Asked Questions About the Patchwork Tulip Wreath Fabric Pattern
What is the best fabric for making a Patchwork Tulip Wreath Fabric Pattern?
Quilting cotton is usually one of the best choices because it is easy to cut, press, sew, and topstitch. It is also available in an enormous variety of small-scale floral prints, gingham checks, botanical motifs, and coordinating colors. Cotton fabric works especially well when combined with lightweight batting or fusible fleece for additional structure.
How large should the finished fabric wreath be?
A medium wreath can measure approximately 30 to 40 cm in diameter. Around 34 cm is a practical size for many wall displays. However, the design can be resized. If you enlarge the wreath, remember to increase the length and width of every patchwork section proportionally so the final circle remains balanced.
Do I need batting inside the fabric pieces?
Batting is not absolutely required, but a thin layer can improve the dimensional appearance of the wreath. Lightweight fusible fleece, thin batting, or another soft stabilizer helps the individual pieces maintain their shape and creates the gently padded effect commonly associated with quilted decorations.
Can beginners make this fabric wreath?
Yes. The design may look complex because of the number of overlapping sections, but the sewing techniques are manageable when completed gradually. Beginners should focus on creating each fabric section separately before arranging the complete circle. Careful pinning, pressing, and testing the layout before final stitching can make the process much easier.
How many different fabrics should I use?
There is no strict number, but approximately 8 to 12 coordinating fabrics can provide attractive variety. Some fabrics can be repeated more than once around the wreath. For an easier project, choose four or five prints. For a more detailed scrap-quilt appearance, use a larger collection while keeping the colors coordinated.
How can I keep the wreath from becoming uneven?
Arrange all pieces on a flat surface before sewing and check the outside diameter frequently during assembly. Avoid pulling the pieces tightly when stitching the overlaps. It can also help to photograph the arrangement before sewing so you have a reference if pieces move during construction.
Can the tulip be sewn directly to the wreath instead of hanging?
Yes. The hanging tulip creates an attractive sense of movement, but it can also be attached to a transparent or matching fabric backing placed behind the central opening. Another option is to appliqué the flower onto a small neutral fabric circle and attach that panel behind the wreath.
What type of stitch works best for the tulip appliqué?
A narrow blanket stitch, small zigzag, or straight appliqué stitch can all work well. Blanket stitching provides a traditional decorative outline, while a small zigzag can secure raw edges effectively. Choose a method you can control comfortably, particularly around the pointed tulip petals.
Can I make the wreath from fabric scraps?
Absolutely. This is one of the strongest advantages of the Patchwork Tulip Wreath Fabric Pattern. Small fabric leftovers from quilting and sewing projects can be combined into the individual segments. Choosing scraps from similar color families will help the final wreath appear intentional rather than random.
Can I wash a finished patchwork wreath?
Because decorative wreaths contain layered sections, appliqué, stabilizers, and hanging components, frequent machine washing is generally unnecessary. Light dust can usually be removed gently. If the project requires deeper cleaning, the safest method will depend on the specific fabrics, batting, adhesives, and embellishments you used during construction.
Conclusion
The Patchwork Tulip Wreath Fabric Pattern combines several enjoyable sewing techniques in one decorative project: fabric selection, patchwork construction, light quilting, topstitching, appliqué, and simple dimensional assembly. The process begins by selecting coordinated purple, green, yellow, and cream fabrics, then creating approximately 12 to 14 padded fabric sections. Those sections are overlapped in a circular arrangement, stitched securely, and finished with a hanging loop. A handmade tulip created from purple and green fabric completes the center and gives the wreath its distinctive floral character.
EASILY FIND THE PDF FOR THIS PATTERN HERE!
By working carefully through each stage, you can adapt the project to different fabric collections, sizes, seasons, and decorating styles. The most important ideas are to maintain balanced colors, test the circular layout before stitching, keep the overlaps consistent, and allow the central tulip enough space to remain clearly visible. Whether you make the Patchwork Tulip Wreath Fabric Pattern from newly purchased quilting cotton or treasured scraps from previous projects, the finished piece can become a beautiful example of practical and creative fabric art. I would love to know your sincere opinion about this project. Would you keep the lavender, green, yellow, and cream palette, or would you create the wreath in completely different colors? Leave your thoughts and suggestions, including any details you would add or change in your own version. Your ideas can inspire new variations of this Patchwork Tulip Wreath Fabric Pattern and encourage other sewing enthusiasts to experiment with their own fabric combinations.