
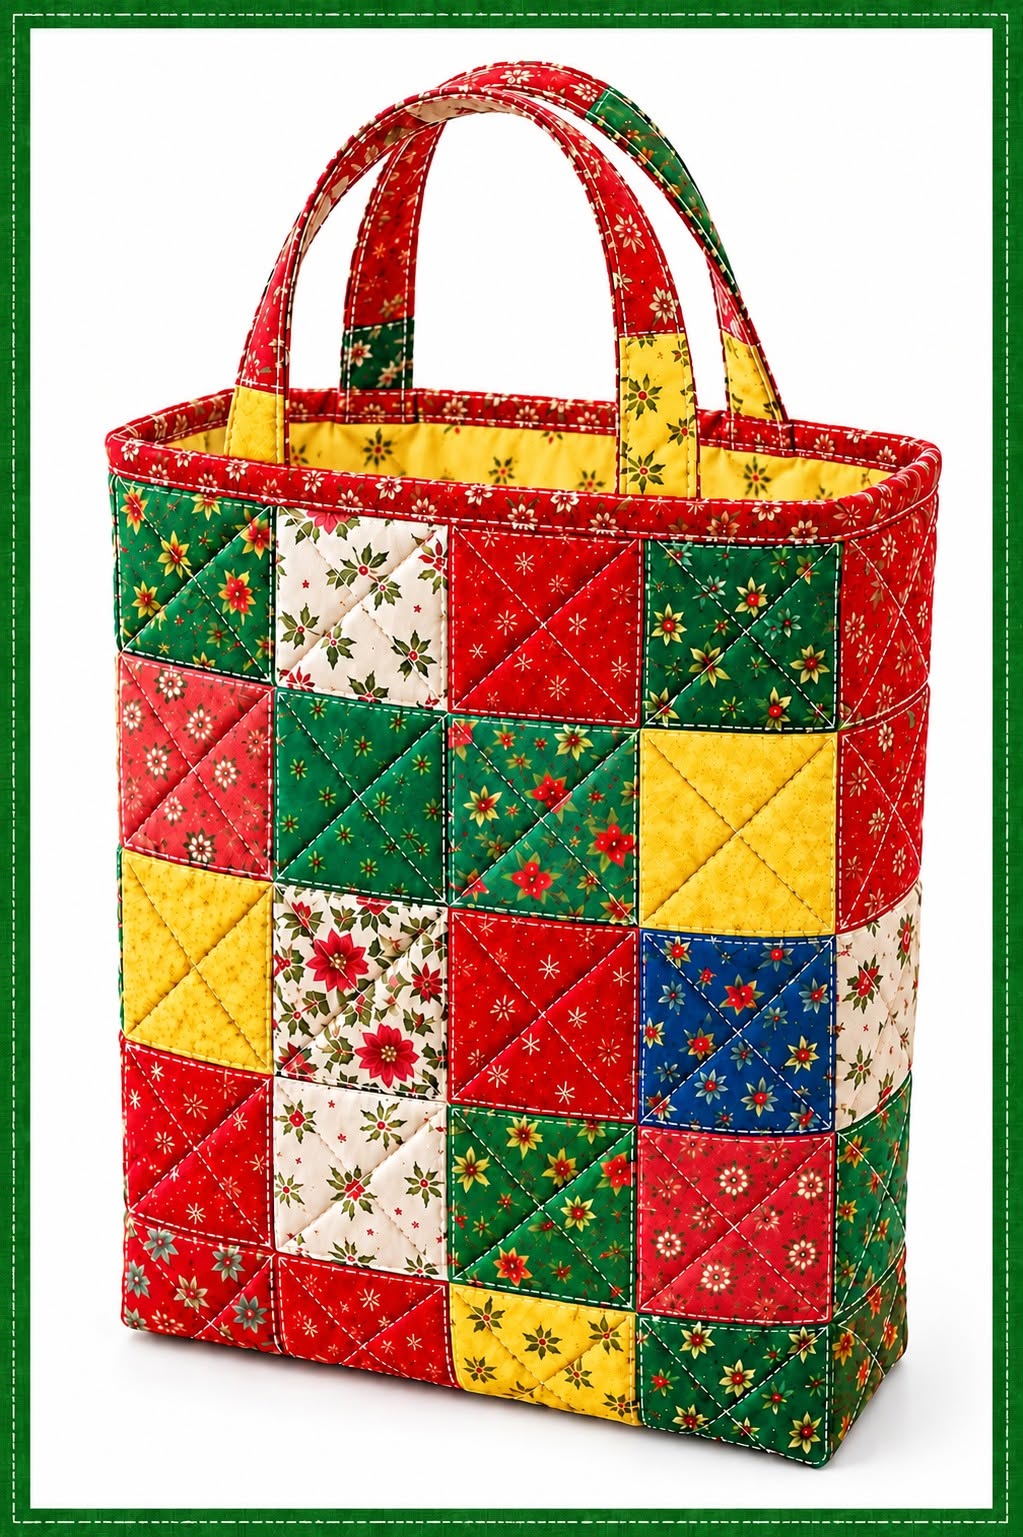
Patchwork Tote Bag Fabric Pattern is a charming sewing project that combines traditional quilting techniques with the practicality of a roomy handmade tote. Inspired by the bag shown in the photo, this design uses small fabric squares in classic red, green, cream, blue, and floral prints to create a warm patchwork appearance that works beautifully for holiday sewing, everyday shopping, craft storage, or handmade gifts. The quilted surface gives the bag structure while keeping it soft and comfortable to carry. One of the greatest advantages of this project is that it can be adapted to fabric scraps already available in your sewing room. By combining coordinated cotton prints, careful piecing, simple quilting, and sturdy handles, you can create a professional-looking tote without relying on complicated construction techniques. This makes the project approachable for confident beginners while still being enjoyable for experienced quilters looking for a useful way to turn small fabric pieces into something functional.
The term Patchwork Tote Bag Fabric Pattern refers to both the visual arrangement of fabric pieces and the construction plan used to transform those pieces into a finished tote. Patchwork is the technique of joining smaller pieces of fabric together to create a larger textile surface, while a tote bag is a reusable open-top bag usually supported by two handles. In this design, the patchwork becomes more durable through quilting, which joins the pieced exterior to batting or another stabilizing layer. The result is not simply a decorative patchwork panel but a structured fabric bag designed for regular use. The pattern can be customized with seasonal fabrics, modern prints, solids, reproduction quilting cottons, or coordinated scraps. The photo provides excellent inspiration for a traditional color palette, but the same construction method can be used for spring florals, farmhouse neutrals, bright rainbow fabrics, patriotic colors, or any combination that suits your personal style.
Before starting your Patchwork Tote Bag Fabric Pattern, it is helpful to understand the overall construction process. First, you will choose and cut the fabric squares that create the exterior panels. Next, those squares will be joined into rows and then assembled into larger patchwork sections. The completed panels are layered with batting and backing or lining fabric before being quilted for strength and texture. After quilting, the bag body is constructed by joining the side and bottom seams, and the lower corners can be boxed to create additional depth. Long fabric handles are reinforced and stitched securely to the bag, while binding or a neat facing finishes the upper edge. Taking time to press accurately, maintain consistent seam allowances, and check measurements throughout the project will make assembly much easier and will help your finished tote look balanced, straight, and professionally sewn.
Materials, Measurements, and Fabric Preparation
For a medium-to-large Patchwork Tote Bag Fabric Pattern similar to the photographed project, gather several coordinating quilting cotton fabrics for the exterior. A combination of approximately six to ten prints gives the patchwork interesting variety without making it feel visually chaotic. You will also need cotton batting or fusible fleece, lining fabric, matching sewing thread, a sewing machine, iron, ironing board, rotary cutter, quilting ruler, cutting mat, fabric scissors, pins or sewing clips, and a removable fabric marker. For extra stability, lightweight woven interfacing can also be added to the lining or handles. Choose good-quality cotton fabrics because they are easy to cut accurately, press well, and hold quilting stitches beautifully.
DISCOVER MORE FREE PATTERNS HERE!
A practical square size for this style of tote is approximately 10 cm x 10 cm before sewing. If you use a seam allowance of about 0.6 cm, each finished square will become slightly smaller after joining. You can create each main exterior panel using a grid of approximately four squares across and five squares down, depending on the final dimensions you prefer. Two panels made this way create a generously sized tote. The exact number of squares is flexible, which is one reason this Patchwork Tote Bag Fabric Pattern works especially well for scrap quilting. Larger squares create a faster project with a bolder visual effect, while smaller squares produce a more detailed traditional patchwork appearance.
Prewash your fabric if you normally prewash quilting cotton, especially when combining strong colors such as red, green, and blue with cream or white backgrounds. This helps reduce the possibility of uneven shrinkage later. Once dry, press every fabric before cutting because wrinkles can affect measurement accuracy. Trim away uneven selvage edges, place the fabric flat on your cutting mat, and use a rotary cutter with a quilting ruler for clean, straight cuts. Accurate cutting is one of the most important steps in any fabric pattern because even a difference of a few millimeters can become noticeable after several squares have been joined together.
Arrange the cut squares on a large table or design surface before sewing. Try to distribute similar colors evenly rather than placing all red or green fabrics together. In the photographed inspiration, red, cream, green, and blue prints are mixed throughout the surface, creating a lively but coordinated composition. Floral prints give the project a traditional handmade character, while small-scale motifs keep individual squares from overwhelming the design. Take a quick photo of your preferred layout before moving the pieces. This simple step can help you remember the arrangement when carrying rows between your cutting table, ironing station, and sewing machine.
The patchwork technique used here is based on joining individual squares with a consistent seam allowance. Set your machine for a straight stitch of approximately 2.0 to 2.5 mm. Test the stitch on a fabric scrap first and check that the thread tension looks balanced on both sides. A quarter-inch quilting foot can be useful because it helps maintain approximately 6 mm seams, but a standard sewing foot can also work if you carefully follow your machine’s seam guide. Consistency matters more than the exact seam width because matching square intersections depends on every piece being sewn at the same distance from the raw edge.
For the handles, cut long fabric strips approximately 10 to 12 cm wide and around 55 to 65 cm long, depending on how high you want the tote to sit when carried. Longer handles are better for shoulder carrying, while slightly shorter handles work well for carrying the bag by hand or on the forearm. You can piece multiple fabrics together to make patchwork handles similar to those shown in the photograph. Add interfacing or batting inside each handle for strength. Preparing these components at the beginning helps the project move smoothly once the main bag panels are complete.
Sewing and Quilting the Patchwork Panels
Begin assembling the first exterior panel by sewing the squares into horizontal rows. Place the first two squares right sides together, align the edges carefully, and stitch using your chosen seam allowance. Add the next square to the row using the same method until the entire first row is complete. Repeat this process for every row. Avoid stretching the fabric as it moves under the presser foot because distortion can cause your finished patchwork panel to become uneven. Chain piecing can speed up this stage: sew several pairs continuously without cutting the thread between them, then separate the pieces afterward.
Press the seams carefully after completing each row. Many quilters press alternating rows in opposite directions because this allows the seam allowances to nest together when the rows are joined. For example, press the seams of the first row toward the right and those of the second row toward the left. When the rows are placed right sides together, the seam intersections should naturally fit against each other. Pin or clip these points before sewing. This technique helps create neat corners where four patchwork squares meet and gives your Patchwork Tote Bag Fabric Pattern a cleaner finished appearance.
Join the rows one at a time until your first full patchwork panel is complete. Press the completed panel from both the back and front using an up-and-down pressing motion rather than sliding the iron aggressively across the fabric. Repeat the same construction method for the second exterior panel. Compare both panels when finished and trim their outer edges if necessary so they are identical in size. Squaring the panels before quilting is an important step because uneven edges can make bag assembly more difficult later.
Next, create a quilting sandwich for each panel. Place a piece of backing or lining fabric down, add a slightly larger piece of cotton batting, and position the patchwork panel on top with the right side facing upward. Smooth every layer from the center outward to remove wrinkles. Secure the sandwich with quilting safety pins, basting spray suitable for quilting, or temporary hand-basting stitches. Keep the layers flat but do not stretch them. Proper basting prevents shifting and puckering while you quilt.
The photographed bag uses simple diagonal quilting that creates subtle diamond shapes across the patchwork squares. To reproduce this look, use a removable fabric marker and quilting ruler to draw diagonal guidelines from corner to corner. Sew along these lines with a straight stitch, working gradually across the entire panel. Begin near the center and move outward when possible. Quilting not only adds visual texture but also permanently joins the exterior fabric and batting, giving the tote the durability and body required for everyday use.
After quilting both panels, inspect the stitching and remove any visible temporary markings according to the marker manufacturer’s directions. Trim away excess batting and backing so all layers align with the edges of the patchwork. Check again that the front and back panels remain the same dimensions. If desired, sew a line of stitching approximately 3 to 5 mm from the raw edges to keep the quilted layers together during final construction. This stay-stitching is especially helpful around the upper opening and corners of a quilted fabric tote bag.
Constructing the Tote, Handles, and Professional Finishing Details
Place the two quilted bag panels right sides together and align the side and bottom edges. Pin or clip securely, especially where patchwork seams intersect. Sew down one side, across the bottom, and up the opposite side using approximately a 1 cm seam allowance for strength. Backstitch at the beginning and end. For an especially durable tote, stitch the seams a second time a few millimeters inside the original line or finish the raw allowances with a zigzag stitch. If your design includes separate lining pieces, construct the lining in the same basic shape but leave an opening in the bottom seam for turning.
To give the Patchwork Tote Bag Fabric Pattern a three-dimensional base, create boxed corners. With the bag still inside out, flatten one lower corner so the side seam lines up directly with the bottom seam. Use a ruler to mark a straight line approximately 5 to 7 cm across the triangular corner, depending on how deep you want the bag. Sew along the marked line, then repeat on the opposite corner using the exact same measurement. Trim the triangular excess fabric while leaving a safe seam allowance. When the bag is turned right side out, the boxed corners form a flat base that increases storage capacity.
Prepare each handle by folding the long strip in half lengthwise with wrong sides together and pressing to create a center crease. Open the strip and fold both long raw edges toward the center line. Insert a narrow strip of interfacing or batting if additional reinforcement is desired. Fold everything together again so the raw edges are enclosed. Topstitch along both long sides approximately 3 mm from the edges. If making patchwork handles, join the small fabric sections first, press the joining seams flat, and then construct each handle using the same folding method.
Position the handles on the bag before attaching the lining or upper binding. Measure carefully from each side so both handles are perfectly centered and symmetrical. A spacing of approximately 10 to 14 cm between handle ends often works well for this type of tote, although the exact placement depends on the overall width of your bag. Make certain neither handle is twisted. Baste each end securely to the upper edge and reinforce the attachment with several rows of stitching. Handles experience considerable tension during use, so this area deserves extra attention.
For a clean interior, insert the lining into the quilted exterior with right sides facing each other. Align the upper raw edges and match the side seams. Sew around the entire opening while keeping the handles tucked safely between the layers. Turn the bag right side out through the opening previously left in the lining bottom. Push out the corners gently and press the upper edge carefully. Close the lining opening with a narrow machine stitch or invisible hand stitching. Push the lining inside the bag and smooth it into the boxed corners.
Finish the upper opening by topstitching approximately 3 to 5 mm from the edge. A second parallel row of stitching can add strength and create a polished appearance. The photographed inspiration also shows a decorative fabric finish around the top edge, so you may alternatively use bias binding or a coordinated fabric strip. Give the entire tote a final press, protecting synthetic batting from excessive heat if necessary. Check for loose threads and uneven areas. At this stage, your Patchwork Tote Bag Fabric Pattern has been transformed from individual fabric squares into a fully functional quilted accessory.
Frequently Asked Questions About the Patchwork Tote Bag Fabric Pattern
What fabric is best for a Patchwork Tote Bag Fabric Pattern? Quilting cotton is one of the easiest materials to use because it is stable, widely available, easy to cut, and comes in countless coordinated prints. Cotton-linen blends can also work, but beginners may find standard quilting cotton easier to piece accurately. For the lining, quilting cotton or another medium-weight woven cotton is usually sufficient. If you want a very structured bag, combine the exterior with cotton batting, fusible fleece, or lightweight interfacing.
Can beginners make this patchwork tote bag? Yes. This project is suitable for beginners who already understand basic straight stitching and fabric cutting. The majority of the construction involves sewing squares together, quilting straight lines, and creating simple bag seams. The most important skills are accurate cutting and maintaining a consistent seam allowance. Beginners can simplify the design by using larger squares and straight-line quilting. Completing the project slowly and pressing after each construction stage will usually produce better results than rushing through several seams at once.
How many fabric squares are needed for the tote? The number depends on the desired dimensions and square size. A design using four squares across and five squares vertically requires 20 squares for each main panel, or approximately 40 squares for the front and back combined. Additional pieces may be needed for side sections, handles, binding, or decorative details. One advantage of the Patchwork Tote Bag Fabric Pattern is its flexibility: you can increase or decrease the grid dimensions without changing the fundamental sewing method.
Do I need batting inside the bag? Batting is highly recommended if you want the soft quilted appearance seen in the photo. It adds structure, protects the patchwork seams, and makes the quilting stitches more visible. Cotton batting creates a traditional quilted finish, while fusible fleece generally provides slightly more body. For a lightweight shopping tote, batting can be omitted and replaced with interfacing, but the finished bag will look flatter and will not have the same padded texture.
How can I make the handles stronger? Reinforce handles with woven interfacing, batting, or an internal strip of cotton webbing. Stitch along both long edges of each handle and attach the ends securely to the bag. A square-with-an-X reinforcement pattern can be added where the handles meet the bag body if your construction method leaves those areas visible. Avoid positioning handle ends too close to the raw upper edge because a larger attachment area distributes weight more effectively and reduces strain during repeated use.
Can I customize the colors and size of the pattern? Absolutely. Customization is one of the best features of a Patchwork Tote Bag Fabric Pattern. Traditional Christmas fabrics can create a festive tote similar to the photographed inspiration, while pastel florals create a spring design and neutral fabrics produce a modern farmhouse look. You can also enlarge or reduce the square dimensions, change the number of squares, add interior pockets, install a magnetic snap, include a zippered pocket, or add a removable base insert. The core patchwork-and-quilting construction remains essentially the same.
Conclusion
Creating a Patchwork Tote Bag Fabric Pattern is a satisfying way to combine practical sewing with traditional patchwork and quilting techniques. Throughout this project, you learned how to select coordinated fabrics, cut accurate squares, organize a balanced patchwork layout, sew rows with consistent seam allowances, press intersections correctly, create quilted panels, construct boxed corners, reinforce fabric handles, add a lining, and finish the upper edge neatly. Each stage contributes to the durability and appearance of the final tote, so careful preparation is just as valuable as decorative creativity.
This project is also an excellent opportunity to use favorite fabric scraps and experiment with color combinations. Once you understand the basic construction, the same Patchwork Tote Bag Fabric Pattern can become the foundation for many different designs, from seasonal bags and shopping totes to quilting project bags and handmade gifts. Changing the fabrics, square sizes, quilting lines, handle length, or interior features gives every version its own personality while preserving the reliable construction method.
EASILY FIND THE PDF FOR THIS PATTERN HERE!
Most importantly, enjoy the handmade process. Patchwork does not need to be perfectly identical from one project to another; the individual fabric choices and small details are part of what give a handmade tote its character. If you create your own version of this Patchwork Tote Bag Fabric Pattern, leave your sincere opinion about the project and share any suggestions, color combinations, construction ideas, or creative modifications you would like to try. Your ideas can inspire new variations and make future patchwork projects even more interesting.