
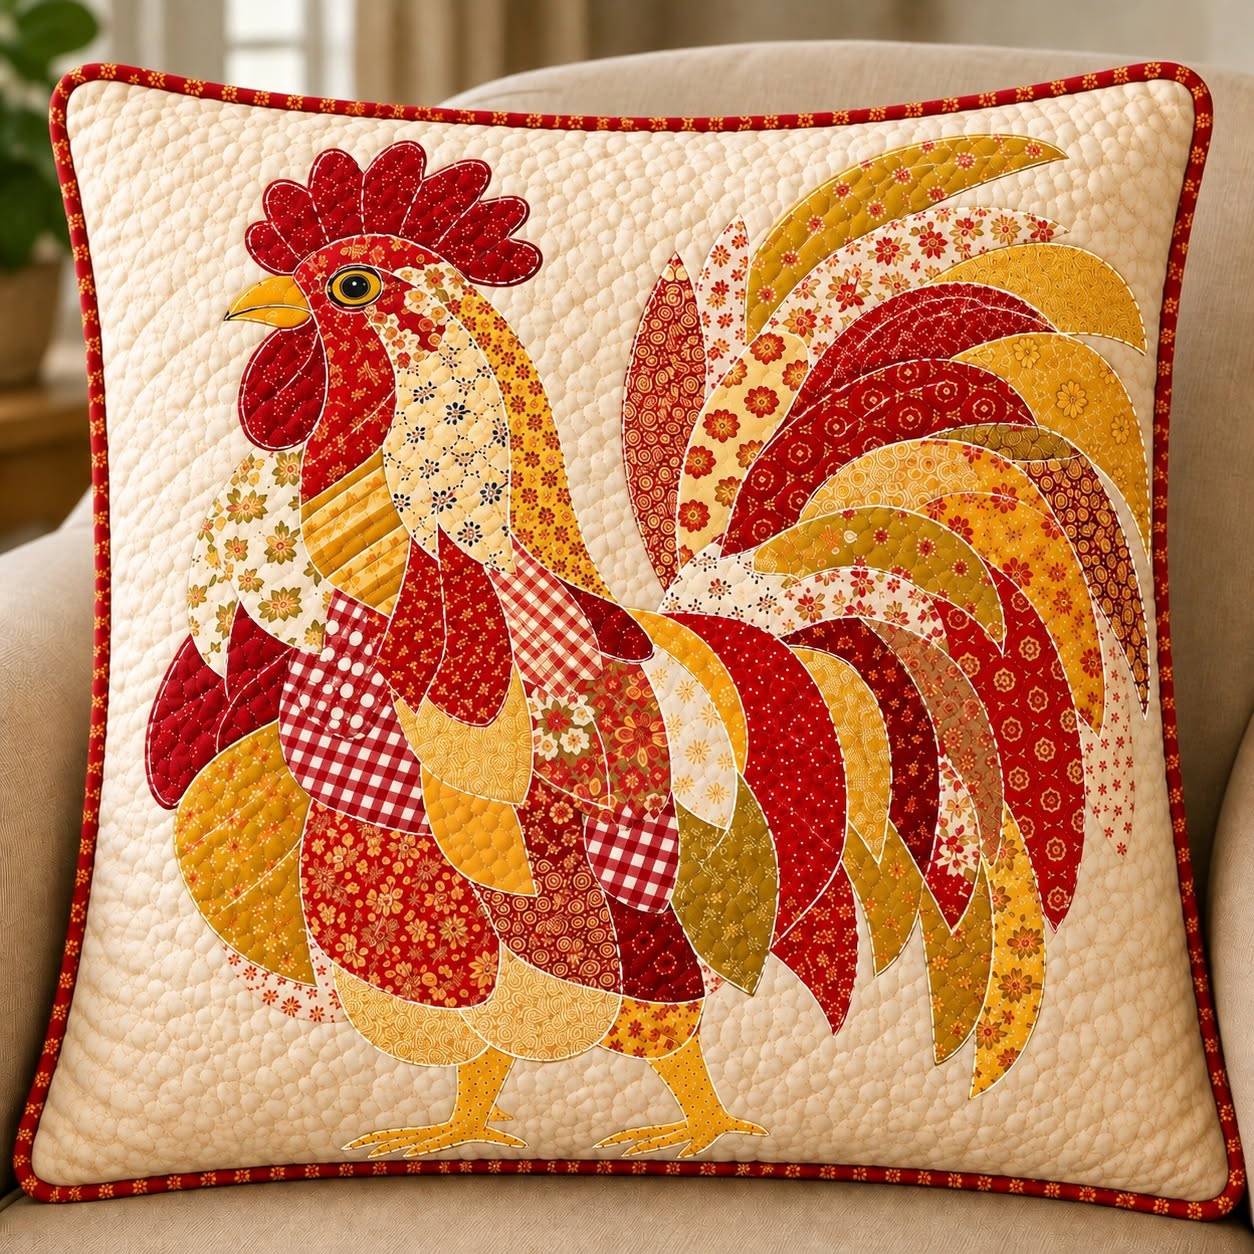
The Cushion with Rooster Appliqué Fabric Pattern is a charming sewing project that brings together traditional appliqué, patchwork-inspired fabrics, quilting, and decorative finishing in one warm and inviting piece. Inspired by the cushion shown in the reference image, this project features a proud rooster assembled from many individual fabric shapes, each contributing color, texture, and personality to the finished design. The combination of cream background fabric with earthy shades of burgundy, mustard, rust, forest green, gray, and floral prints creates a cozy country aesthetic that works beautifully in farmhouse, rustic, cottage, and traditional interiors. Although the finished rooster looks intricate, the construction becomes much easier when the design is divided into manageable appliqué sections and completed one layer at a time.
Creating a rooster appliqué cushion also gives sewists an excellent opportunity to use small pieces of fabric that might otherwise remain unused. Scraps containing tiny flowers, geometric prints, checks, neutral textures, and vintage-inspired patterns can become feathers, wings, tail sections, and body details. This is one of the reasons an appliqué fabric pattern can be such a rewarding project: the maker does not need every piece to match perfectly. Instead, variety is part of the design. The finished rooster gains visual depth from the contrast between prints, while the quilting stitches around and behind the appliqué provide dimension. With careful preparation and a logical assembly order, even someone who has never made a detailed animal appliqué can approach this project confidently.
Another attractive feature of the Cushion with Rooster Appliqué Fabric Pattern is its flexibility. You can follow the earthy palette shown in the image or personalize the project with modern colors, bright scraps, monochromatic fabrics, or fabrics coordinated with your own room. The basic techniques remain the same: prepare the cushion background, create paper templates, cut the fabric components, position the appliqué, secure every piece, quilt the cushion front, and assemble the finished cover. Throughout this tutorial, you will learn not only how to reproduce the overall appearance of the project but also why certain techniques are useful. Understanding the purpose of fusible appliqué, layering, quilting, binding, and fabric selection makes it much easier to adapt the pattern to future sewing projects.
Preparing Fabrics, Tools, and the Rooster Appliqué Pattern
Begin by deciding on the finished size of your cushion. A practical size for a decorative square cushion is approximately 45 × 45 cm, although you can enlarge or reduce the project according to your preference. Cut the cream or light neutral background fabric slightly larger than the planned finished size, approximately 50 × 50 cm. This extra fabric gives you room for quilting and final trimming. Choose a quality cotton because quilting cotton is stable, easy to press, and well suited to detailed appliqué work.
DISCOVER MORE FREE PATTERNS HERE!
Next, organize the fabrics for the rooster. The image uses a wonderfully varied combination of country-style fabric scraps, including burgundy, rust, mustard yellow, cream, gray, black, green, and brown. Floral prints are mixed with checks and tiny geometric patterns. Collect approximately 15 to 25 different scraps if you want a similarly rich patchwork effect. Small pieces are sufficient because most individual appliqué sections are relatively narrow. Before cutting, press every scrap so the pattern pieces can be traced and cut accurately.
Create the rooster appliqué templates by breaking the bird into recognizable sections. You will need shapes for the comb, beak, face, wattle, neck feathers, breast, wing, body, legs, feet, and numerous tail feathers. Tail feathers should be long, curved shapes with slightly different widths and lengths. The body can also be divided into several overlapping curved pieces to create the patchwork appearance seen in the photograph. Numbering the templates is extremely helpful because complex appliqué becomes much easier when every shape has an intended position.
For a clean and beginner-friendly construction method, use fusible web appliqué. Trace each template onto the paper side of lightweight fusible web, leaving approximately 1 cm between the traced shapes. Remember that fusible appliqué templates are usually traced in reverse because they will flip when fused to the back of the fabric. Rough-cut around each traced shape, then fuse the pieces to the wrong side of the selected fabrics according to the manufacturer’s temperature instructions. Allow the pieces to cool before cutting precisely along the traced lines.
Prepare the cushion front for quilting by placing the cream background fabric over a piece of thin batting. Add a lightweight backing fabric beneath the batting to create a three-layer quilting sandwich. The backing will eventually be hidden inside the finished cushion, so it can be a simple cotton or muslin. Lightly press the top beforehand, but avoid stretching it. Keeping the foundation flat is important because the appliqué cushion pattern contains many pieces, and distortion in the background can make positioning more difficult.
Finally, arrange your tools before beginning the assembly process. Useful supplies include sharp fabric scissors, small appliqué scissors, an iron, pressing cloth, sewing machine, neutral and coordinating threads, pins or temporary fabric adhesive, quilting ruler, rotary cutter, cutting mat, seam ripper, and marking pencil. Preparing everything beforehand makes the workflow smoother. The decorative complexity of the Cushion with Rooster Appliqué Fabric Pattern comes from many small steps rather than difficult construction, so good organization is one of the easiest ways to improve accuracy.
Building the Rooster Body and Layering the Fabric Appliqué
Start assembling the rooster by positioning the largest body shapes on the cream cushion background. Do not fuse anything immediately. Place the main body, breast, wing, and neck sections first and check that the bird is centered with enough empty space around all sides. In the reference design, the rooster occupies most of the cushion surface while still leaving a comfortable cream border. Taking a photograph of your arrangement before fusing can provide a useful reference if the pieces are accidentally moved.
Once the overall proportions look correct, begin layering the fabric appliqué pieces from the sections that should appear furthest behind. Tail feathers are particularly important because several shapes overlap. Place the longest feathers first and gradually add shorter feathers toward the foreground. Vary the colors rather than placing similar fabrics next to each other. Dark burgundy can sit beside green, for example, while mustard, gray, cream, and rust provide contrast. Alternating values helps individual feathers remain visible even from across the room.
Continue with the body by overlapping curved fabric sections to imitate natural plumage. The rooster shown in the image does not rely on one large solid body shape; instead, numerous patterned pieces create a patchwork rooster design. This technique is ideal for scrap fabrics and allows the maker to experiment freely. Position larger pieces along the breast and lower body and use narrower pieces near the neck and wing. Keep stepping back from the work to evaluate the balance of light and dark areas.
The head is one of the most expressive parts of the rooster appliqué pattern. Use a rich red or burgundy fabric for the comb and wattle, a golden or mustard fabric for the beak, and a contrasting circular appliqué for the eye. Tiny details can be sewn rather than cut if preferred. A small black stitched circle surrounded by a lighter fabric ring can create a strong focal point. Make sure the eye is positioned carefully, because even a few millimeters can change the expression of the finished rooster.
When you are satisfied with the arrangement, fuse the pieces gradually rather than pressing the entire design at once. Work from the lower layers upward. Protect the fabrics with a pressing cloth and use an up-and-down pressing motion instead of sliding the iron across the surface. Sliding can distort the shapes before the adhesive bonds completely. Properly secured pieces make the next stage, machine appliqué stitching, much easier and reduce the chance of small feather tips lifting during sewing.
Finish the appliqué stage by stitching around every exposed fabric edge. A small zigzag stitch, blanket stitch, or narrow straight stitch can all work depending on the appearance you prefer. A blanket stitch creates a traditional decorative outline, while a narrow straight stitch gives the design a softer raw-edge look. Choose thread colors that blend with individual fabrics or use one neutral shade throughout. Slowly pivot around curves and feather points to maintain smooth outlines and enhance the handcrafted character of the Cushion with Rooster Appliqué Fabric Pattern.
Quilting the Cushion Front and Adding Professional Details
After the rooster appliqué has been fully stitched, move to the quilting stage. Quilting adds more than decoration: it joins the cushion top, batting, and backing while creating texture that emphasizes the rooster. Start by securing a few important areas within the bird. You can stitch along selected feather seams, body curves, and wing divisions. These lines reinforce the appliqué and help give different sections a slightly raised appearance against the quilted background.
The cream background shown in the reference cushion has noticeable stitched texture, which beautifully contrasts with the colorful rooster. You can reproduce this effect using free-motion quilting, gentle meandering lines, loops, or irregular curves. Beginners can use a walking foot and create softly curved or parallel lines instead. There is no requirement for every stitch to be identical. In fact, slightly organic quilting complements the traditional handmade character of an appliqué cushion.
Avoid excessively dense quilting directly over the rooster unless that is a deliberate artistic choice. Leaving parts of the appliqué somewhat less quilted allows the bird to remain visually prominent. The background can receive denser stitches so it appears slightly flatter. This difference creates subtle dimension and is commonly used in appliqué quilting projects. If certain feathers seem too flat, add a few decorative stitched lines inside them to suggest the direction and movement of the plumage.
When the quilting is complete, place the cushion front on a cutting mat and square it carefully. Trim it to the desired final dimension, such as 45 × 45 cm. Check all four corners with a quilting ruler and make sure opposite sides are equal. Accurate trimming is essential because a beautifully appliquéd front can appear uneven after assembly if the cushion edges are not square. This step also removes any distortion created during quilting.
The narrow decorative border visible around the reference cushion can be recreated with fabric piping or a slim binding-style trim. Select burgundy, dark red, or another fabric already used in the rooster. Piping gives the cushion a structured professional outline and frames the cream background without competing with the appliqué. You can purchase premade piping or create your own using bias strips and piping cord. Sew the piping around the cushion front with the raw edges aligned, clipping the seam allowance gently around corners when necessary.
Before assembling the back, inspect the entire cushion front closely. Trim loose threads, reinforce any appliqué edge that has not been completely secured, and lightly press the project from the reverse side. Avoid pressing heavily over dimensional quilting. This quality-control stage may seem minor, but it contributes significantly to a polished result. A well-finished Cushion with Rooster Appliqué Fabric Pattern should look intentional both from a distance and when someone examines the detailed stitching closely.
Sewing the Cushion Cover and Creating the Final Farmhouse Look
For the cushion back, choose either a simple envelope closure or a zipper closure. An envelope cushion back is ideal for beginners because it does not require special hardware. Cut two backing fabric panels wide enough to overlap by approximately 12 to 15 cm at the center. Hem the overlapping edges, place both panels right sides together over the cushion front, and align all outer edges carefully. The finished back can coordinate with the neutral front or feature one of the patterned fabrics used in the rooster.
Pin or clip the cushion layers together, paying particular attention to the piping if you added it. Sew around all four sides using a consistent seam allowance, following the previous piping stitch line when appropriate. Reinforce the corners with several extra stitches. Because the envelope opening provides access for turning, there is no need to leave a gap along the outer seam. Trim bulky corners carefully without cutting through the stitching.
Turn the cushion cover right side out through the envelope opening. Use a blunt turning tool to gently shape the corners without pushing through the fabric. Run your fingers around the piping and seams so the edges sit correctly. Give the finished cover a light press from the back, protecting the appliqué and quilting. Insert a cushion form slightly fuller than the finished cover dimensions if you want the plump, comfortable appearance shown in the inspiration image.
Take a moment to shape the cushion by distributing the insert evenly toward each corner. A properly filled cushion gives the rooster fabric appliqué the smooth surface it needs to display all the small pieces clearly. If the insert is too small, the front may wrinkle and make the rooster appear distorted. If it is excessively large, the seams and appliqué may experience unnecessary tension. A balanced insert produces a full but relaxed appearance.
Color placement plays a major role in achieving the rustic character of the original project. Warm reds, golden yellows, olive greens, browns, creams, and charcoal tones naturally create a farmhouse cushion aesthetic. However, the same pattern can look completely different when sewn in blues and whites, bright rainbow scraps, pastel fabrics, or contemporary monochrome prints. The pattern provides the structure, while fabric choices give the rooster its individual personality.
The completed Cushion with Rooster Appliqué Fabric Pattern can become a statement piece on an armchair, bench, sofa, bed, or reading chair. More importantly, the project teaches several reusable sewing skills: working with templates, selecting contrasting prints, layering fusible appliqué, stitching curved shapes, quilting a layered surface, making piping, and constructing a removable cushion cover. Once these techniques become familiar, they can easily be adapted to birds, flowers, animals, seasonal motifs, and countless other decorative fabric appliqué projects.
Frequently Asked Questions About the Cushion with Rooster Appliqué Fabric Pattern
Is the Cushion with Rooster Appliqué Fabric Pattern suitable for beginners? Yes. The large number of fabric pieces may make the rooster appear complicated, but the individual techniques are approachable. Beginners should work slowly, label the templates, arrange all pieces before fusing, and begin with a simple edge stitch. Breaking the rooster into small sections turns an intimidating design into a sequence of manageable sewing tasks.
What is the best fabric for rooster appliqué? Cotton quilting fabric is generally one of the easiest options because it cuts cleanly, presses well, and comes in countless prints. Small-scale floral, geometric, check, and tone-on-tone fabrics are especially effective because the patterns remain visible inside smaller feather shapes. Very heavy fabrics can make overlapping appliqué sections bulky.
Do I need fusible web to make the appliqué? Fusible web is not absolutely required, but it makes detailed designs considerably easier to control. It temporarily bonds each fabric shape to the background and prevents movement during stitching. Traditional needle-turn appliqué can also be used, although it requires additional seam allowance around the templates and considerably more hand-sewing time.
What stitch should I use around the appliqué pieces? Blanket stitch and narrow zigzag stitch are popular choices for machine appliqué, while a small straight stitch can be used for a raw-edge appearance. There is no single correct option. The best stitch depends on whether you want decorative outlines, subtle edges, or a more rustic handmade finish.
How do I prevent the cushion front from becoming distorted during quilting? Start with a background piece larger than the desired finished measurement, use evenly distributed quilting, and avoid pulling or stretching the fabric while sewing. Quilt outward gradually and square the panel only after all quilting has been completed. This gives you enough extra material to correct small changes in shape.
Can I use fabric scraps for this rooster cushion? Absolutely. Scrap fabrics are particularly suitable for this project because the rooster is intentionally made from many different prints. Small remnants can become tail feathers, breast pieces, wings, neck sections, or head details. Mixing scraps is also an excellent way to create a truly unique patchwork appliqué cushion.
How many different fabrics should I use? There is no fixed number, but approximately 15 to 25 prints can create the varied appearance shown in the inspiration image. You can use fewer fabrics and repeat them strategically, or use many different scraps for a highly detailed patchwork look. Aim for a balance of dark, medium, and light values so neighboring shapes remain distinguishable.
Can the rooster appliqué pattern be enlarged? Yes. Individual templates can be enlarged proportionally to make a larger cushion, wall hanging, quilt block, or decorative panel. When resizing the design, leave enough background fabric around the rooster so the composition does not feel crowded. Remember that larger appliqué shapes may also benefit from additional quilting or interior stitching.
Should the appliqué be completed before quilting? For this particular style, completing and securing the appliqué before the main background quilting is usually the easiest method. This allows the quilting to flow naturally around the rooster and helps integrate the design into the cushion surface. Some decorative quilting lines can also be added inside the rooster after the edges are stitched.
Can I wash the finished appliqué cushion? A removable cushion cover made from washable cotton fabrics is generally easy to maintain. Prewashing fabrics before construction can reduce the possibility of later shrinkage or color transfer. When laundering a detailed appliqué piece, gentle washing and mild detergent help protect both the quilting stitches and the decorative fabric edges.
Conclusion
The Cushion with Rooster Appliqué Fabric Pattern combines the warmth of traditional patchwork with the personality of an expressive farmhouse rooster. The project begins with thoughtful fabric selection and carefully prepared templates, then develops through layered fusible appliqué, edge stitching, decorative quilting, trimming, piping, and final cushion construction. By approaching the design one feather and one fabric shape at a time, even a detailed rooster becomes achievable.
One of the most valuable lessons from this project is that beautiful patchwork does not depend on perfectly matching fabrics. Contrasting floral prints, checks, geometric designs, neutrals, and richly colored scraps work together to give the rooster movement and individuality. The cream quilted background provides visual calm, while the patterned plumage becomes the centerpiece of the appliqué cushion.
The techniques explained here can also serve as a foundation for many future sewing projects. Once you understand how to prepare templates, arrange overlapping pieces, secure appliqué, quilt around a motif, and finish a cushion professionally, you can apply those same skills to other animals, botanical motifs, seasonal designs, wall hangings, table décor, bags, and quilts.
EASILY FIND THE PDF FOR THIS PATTERN HERE!
Most importantly, allow your own fabric collection and personal taste to influence the final piece. A handmade Cushion with Rooster Appliqué Fabric Pattern does not need to be an exact copy of another cushion to be successful. Small variations in color, stitching, print placement, and quilting are what make handmade work special. If you create your own version, leave your sincere opinion about the project and share your suggestions for colors, fabrics, quilting styles, or other appliqué designs you would like to try next.