
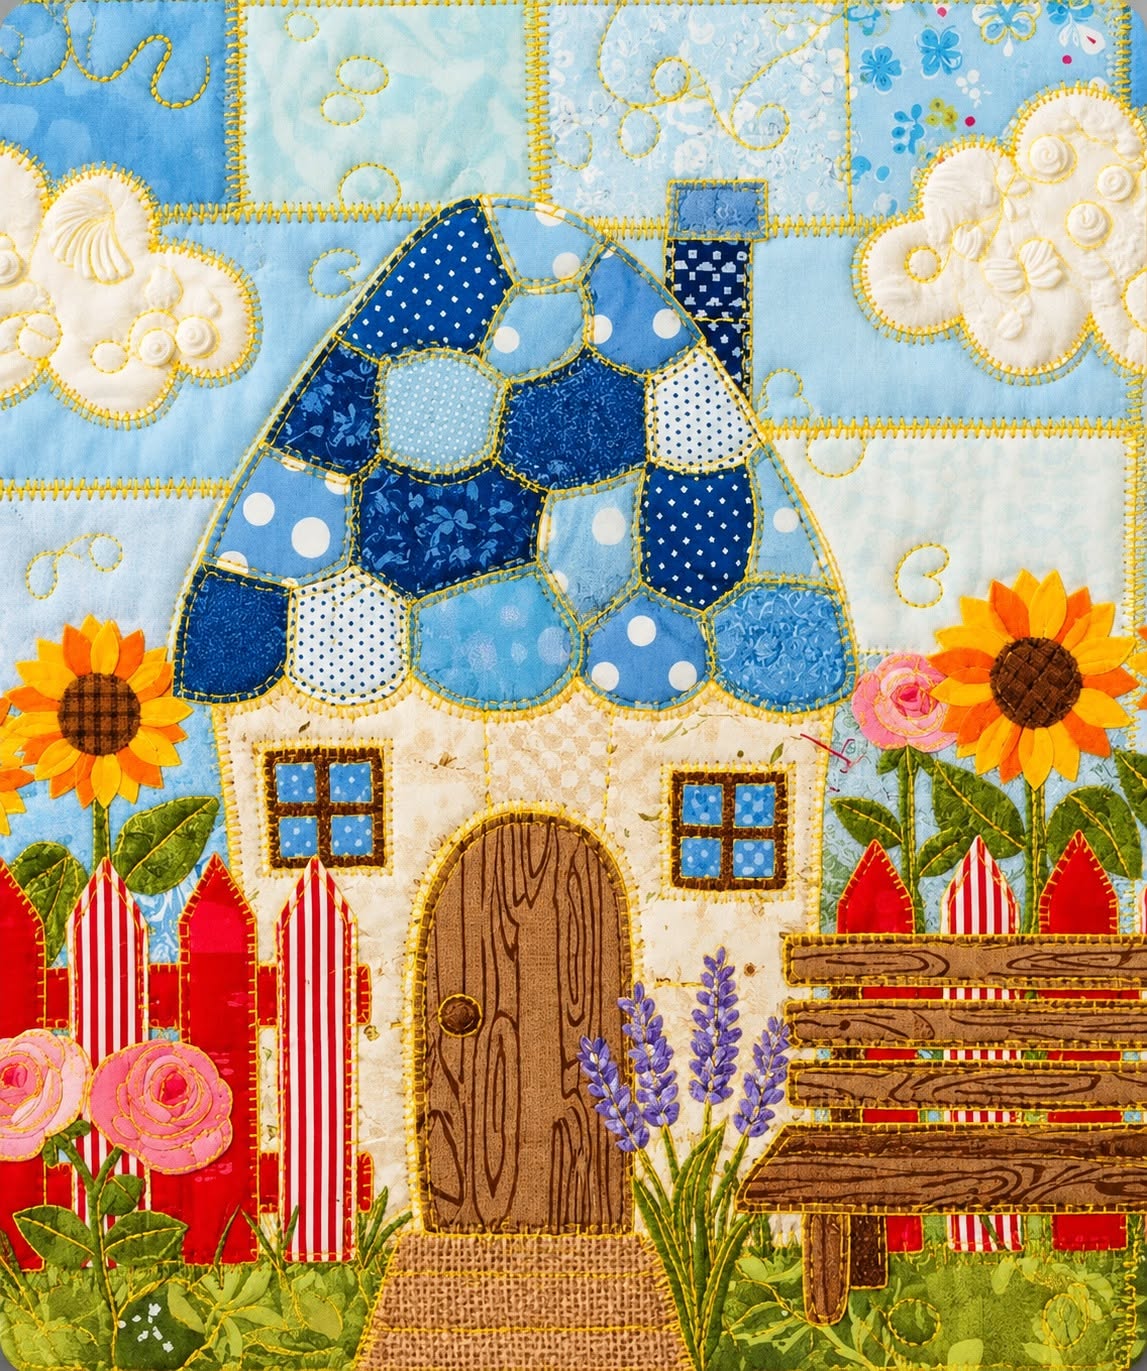
Cottage in Bloom Quilted and Appliqué Wall Panel Fabric Pattern is a cheerful textile project that combines the charm of a storybook cottage with the warmth of traditional quilting and fabric appliqué. Inspired by the handmade wall panel shown in the reference image, this design brings together a cozy cottage, a patchwork blue roof, colorful flowers, a rustic fence, soft clouds, and a garden filled with personality. The project is especially appealing because every section can be built from small fabric scraps, making it an excellent way to turn leftover cotton pieces into something decorative and memorable. Rather than depending on perfect symmetry, the composition celebrates the slightly irregular shapes and visible stitching that give handmade textile art its character. Beginners can simplify individual elements, while experienced quilters can add more detailed embroidery, free-motion quilting, layered appliqué, and decorative textures. The result is a fabric wall panel that feels bright, welcoming, and full of handcrafted detail.
Creating a Cottage in Bloom Quilted and Appliqué Wall Panel Fabric Pattern also provides an opportunity to explore several essential sewing techniques in one manageable project. The background uses basic patchwork construction, while the cottage and garden introduce fabric appliqué, layering, edge stitching, and decorative quilting. The blue roof can be assembled from several differently patterned fabrics to create the appearance of overlapping shingles, while the walls of the cottage can remain neutral so that the windows, wooden door, flowers, and fence stand out clearly. Small visual contrasts are important in this type of design: dark blue beside pale blue, warm brown against cream, vivid red next to green, and sunny yellow flowers against a soft sky. These combinations help separate each shape and make the overall picture easy to understand even from across a room. At the same time, variations in fabric texture and print prevent the panel from looking flat.
One of the most enjoyable aspects of this project is that the pattern does not need to be treated as an exact architectural drawing. A quilted cottage wall hanging works best when it has a playful, handcrafted appearance, so slightly curved windows, uneven flower petals, whimsical roof sections, and irregular fence boards can actually improve the character of the finished piece. Before sewing, it is helpful to study the entire composition and divide it into visual layers: background, cottage, roof, fence, flowers, garden, and decorative stitching. Working from the largest shapes toward the smallest prevents unnecessary confusion and makes placement much easier. You can temporarily arrange the fabric pieces on the quilt top before permanently attaching anything, allowing you to adjust proportions and colors until the scene feels balanced. This planning stage is one of the most important parts of achieving a polished Cottage in Bloom Quilted and Appliqué Wall Panel Fabric Pattern.
Materials, Fabric Selection, and Preparing the Quilt Background
Begin by choosing a firm but easy-to-sew cotton fabric for the foundation of the wall panel. Quilting cotton is an excellent option because it stays relatively stable while still allowing several layers of appliqué and decorative stitching. For the background, select several pieces in pale blue, powder blue, aqua, white, and very light cream. These colors will form the sky and create the patchwork appearance visible behind the cottage. Using fabrics with subtle floral prints, tiny dots, tonal patterns, or delicate textures can make the background more interesting without distracting from the main design.
DISCOVER MORE FREE PATTERNS HERE!
To make the background, cut rectangular and square sections in different sizes and arrange them into horizontal rows. The pieces do not have to be identical because the slightly irregular arrangement contributes to the handmade appearance of the Cottage in Bloom Quilted and Appliqué Wall Panel Fabric Pattern. Sew the sections together using a consistent seam allowance, pressing each seam carefully after stitching. Alternate the direction in which seams are pressed whenever possible to reduce bulk. When all rows are complete, join them to create one continuous background panel.
Prepare the quilt sandwich by placing backing fabric on a flat surface with the wrong side facing upward. Position batting over the backing, followed by the completed patchwork background with the right side facing upward. Smooth all three layers carefully to remove wrinkles or folds. Secure the layers with safety pins, temporary basting spray, or long hand-basting stitches. A thin or medium-weight batting generally works well for a decorative wall hanging because it provides enough dimension without making the smaller appliqué pieces difficult to sew.
At this stage, you can add preliminary quilting stitches to the background. Straight stitching near the patchwork seams reinforces the construction and creates a charming segmented effect. You may also add free-motion loops, swirls, circles, leaves, or simple organic shapes inside selected blue squares. Keep the quilting relatively subtle because the cottage will eventually cover a large portion of the center. Lightly quilted background sections provide texture while still allowing the main appliqué design to remain visually dominant.
The clouds can be prepared from white, ivory, or cream fabric. Draw simple rounded cloud shapes onto fusible appliqué paper, cut them slightly outside the drawn line, and fuse them to the wrong side of the selected fabric according to the manufacturer’s instructions. Cut the cloud shapes accurately and arrange them across the upper part of the sky. Once satisfied with their position, fuse them to the background. A small blanket stitch or narrow zigzag stitch around the edges can secure each cloud while giving the panel a traditional appliqué quilt appearance.
Before moving to the cottage, check the overall size and balance of your background. Leave enough space near the bottom for grass, flowers, and the fence, while maintaining open sky near the top. The house should occupy the central area but should not completely overwhelm the surrounding garden. If desired, lightly mark important placement lines using a removable fabric marker. These guidelines can indicate the center of the cottage, the roofline, the lower garden area, and the future position of the bench or fence. Careful preparation makes the next stages of the Cottage in Bloom Quilted and Appliqué Wall Panel Fabric Pattern much easier.
Building the Cottage, Patchwork Roof, Door, and Windows
The cottage body is one of the largest individual appliqué pieces, so choose a neutral fabric that contrasts clearly with the blue roof. Cream, beige, ivory, or very pale tan works beautifully. Cut a simple cottage shape with straight sides and enough height to accommodate the door and two windows. Fuse the shape onto the center of the prepared quilt background and secure the edges with blanket stitching, zigzag stitching, or raw-edge appliqué stitching. A slightly darker thread can create a visible handmade outline, while matching thread gives a cleaner appearance.
The patchwork roof is the most distinctive part of the Cottage in Bloom Quilted and Appliqué Wall Panel Fabric Pattern. Instead of cutting one solid roof piece, create multiple rounded or irregular sections that resemble individual shingles. Use a mixture of navy, medium blue, pale blue, floral blue, polka dots, and small geometric prints. Begin with a simple dome-shaped roof outline, then divide the interior into overlapping sections. The pieces can be positioned like a mosaic, with darker colors distributed throughout the arrangement to create visual rhythm.
Attach the roof pieces from the lower row upward so that the arrangement naturally suggests overlapping shingles. Place the darkest blue fabrics between lighter pieces instead of grouping all dark colors together. Secure each shingle with small zigzag stitches, blanket stitching, or free-motion stitching close to the raw edge. Slight variations in size are desirable because they strengthen the whimsical character of the design. Once all pieces are attached, sew around the outside silhouette of the roof to visually unite the individual fabric sections.
For the chimney, use a narrow rectangle of dark blue fabric combined with a smaller top section. Tiny printed fabrics work especially well because they resemble patterned bricks when viewed from a distance. Place the chimney behind or partially underneath the roof before finishing the upper edge. Decorative horizontal stitching can add extra definition. Because the chimney is a small detail, strong contrast is usually more effective than complicated construction.
Next, create the windows using brown fabric for the frames and medium or bright blue fabric for the glass. Two small square windows positioned on opposite sides of the cottage create balance. Each window can be divided into four panes using narrow brown fabric strips or dense satin stitches. Keep their proportions similar, but do not worry if they are not mathematically identical. The informal style of fabric appliqué wall art allows small differences to become part of the charm.
The door should be large enough to act as the main focal point on the cottage body. Choose medium or dark brown fabric and cut a rounded-top door shape. Add stitched vertical lines and curved marks to imitate natural wood grain. A small circular appliqué or embroidered detail can become the door handle. Stitching a darker outline around the door separates it from the cream cottage wall and gives it greater visual depth. With the roof, door, chimney, and windows completed, the central architecture of the Cottage in Bloom Quilted and Appliqué Wall Panel Fabric Pattern is ready for the garden details.
Creating the Flower Garden, Fence, and Decorative Landscape
The garden transforms the cottage from a simple building into a lively quilted landscape. Start with several green fabrics in different shades and prints. Cut irregular grass strips, leaves, stems, and small plant shapes. Layer these pieces across the bottom edge of the cottage and background, allowing some sections to overlap the base of the house. Combining light green, olive, forest green, and patterned fabrics creates natural variation and prevents the landscape from appearing like one solid strip.
Sunflowers provide strong bursts of yellow and orange. For each flower, cut an assortment of pointed or rounded petals and arrange them around a brown circular center. Layering two shades of yellow with a few orange petals creates greater dimension. The center can be made from a checked or textured brown fabric, then enhanced with crosshatching stitches. Place the tallest sunflowers near the outer sides of the composition so they frame the cottage rather than hide it.
Pink roses bring a softer visual contrast. They can be made by layering several rounded pink fabric pieces, starting with larger outer shapes and gradually adding smaller sections toward the center. Curved embroidery stitches can suggest the spiral structure of a rose without requiring overly complicated appliqué pieces. Attach narrow green stems beneath the flowers and surround them with pointed leaves. These smaller blossoms help connect the larger sunflowers to the green garden below.
Lavender flowers positioned near the cottage door add another color family to the Cottage in Bloom Quilted and Appliqué Wall Panel Fabric Pattern. Cut thin green stems and narrow leaves, then create small purple petals or use dense embroidery stitches to form clusters of blossoms. Several stems grouped together are more effective than one isolated flower. Use different tones of violet, lavender, and soft purple to create depth. These upright flowers also help draw attention toward the entrance of the cottage.
The red-and-white picket fence adds a cheerful country-style element to the scene. Cut individual vertical fence posts from solid red fabric and striped red-and-white fabric. Giving the tops simple pointed shapes creates the familiar picket fence silhouette. Position several posts behind flowers and foliage to make the landscape appear layered. Horizontal fabric strips or stitched lines can connect the posts. Avoid making every post exactly identical, as a little irregularity maintains the handmade cottage aesthetic.
A rustic wooden bench or horizontal fence section can be added to one side of the cottage using brown fabric strips. Draw or stitch irregular dark lines across the brown pieces to imitate wood grain. Stack the strips with small gaps between them, then add vertical support pieces underneath. This brown feature balances the large brown door on the opposite side of the scene. Once the bench, fence, flowers, stems, and grass are positioned, step back and evaluate the composition before permanently stitching every edge.
Finishing, Quilting Details, Binding, and Displaying the Wall Panel
After all appliqué components have been attached, add decorative stitching throughout the design. This is where the Cottage in Bloom Quilted and Appliqué Wall Panel Fabric Pattern truly develops its handmade personality. Outline important shapes, including the roof, cottage, door, flowers, leaves, clouds, and fence. You can use blanket stitch for a traditional appliqué look or free-motion stitching for a more artistic finish. Coordinating thread blends gently into the fabrics, while contrasting thread emphasizes the illustrated quality of the project.
Add texture inside larger empty spaces with additional quilting. The cottage walls can contain delicate loops, leaves, or wandering lines, while sections of the sky may include circles or cloud-like curves. Avoid quilting too densely around small appliqué details because excessive stitching can make the design visually busy. A good approach is to alternate heavily textured sections with quieter areas. This creates contrast not only through fabric color but also through surface texture.
Check the back of the panel frequently while quilting to make sure there are no large thread tangles or unwanted folds. If the quilt sandwich begins shifting, pause and re-baste the layers. Because wall panels often contain many small appliqué pieces, it is helpful to work gradually from the center toward the outer edges. This approach helps distribute tension evenly and reduces distortion. When all quilting is finished, press the panel gently from the back using a protective pressing cloth if necessary.
Trim the outer edges so that the quilted wall panel forms a clean rectangle or square. Use a quilting ruler and rotary cutter when available, checking each side carefully before cutting. Prepare binding strips from coordinating fabric. Blue binding can blend with the sky, green can connect visually with the garden, and red can echo the fence. Join the binding strips, press them in half lengthwise, and sew them around the outer edge of the quilt.
If the finished project will be displayed on a wall, consider adding a hanging sleeve to the back before completing the binding. Cut a strip of fabric slightly shorter than the width of the panel, form it into a tube, and hand-stitch it across the upper back. A small wooden dowel or hanging rod can then slide through the sleeve. This method allows the wall quilt to hang smoothly without visible clips or pins damaging the fabric.
The completed Cottage in Bloom Quilted and Appliqué Wall Panel Fabric Pattern should feel colorful, textured, and personal rather than mechanically perfect. Small variations in flower shapes, roof pieces, stitched outlines, and fence posts are part of what makes handmade textile art appealing. You can also adapt the concept for different seasons by changing the flowers, sky, garden colors, or cottage fabrics. Once the basic construction method is understood, the same pattern idea can inspire many unique appliqué wall hanging projects.
Frequently Asked Questions About Cottage in Bloom Quilted and Appliqué Wall Panel Fabric Pattern
What is the best fabric for making this quilted cottage wall panel?
Quilting cotton is generally the easiest fabric to use because it is stable, widely available, and easy to combine with fusible appliqué. Cotton scraps with small-scale prints are especially useful for the roof, flowers, fence, and garden because the prints remain recognizable even after being cut into small shapes.
Can beginners make the Cottage in Bloom Quilted and Appliqué Wall Panel Fabric Pattern?
Yes. Beginners can simplify the number of roof pieces, use fusible web instead of turned-edge appliqué, and choose basic straight or zigzag stitching. The project can gradually become more detailed as confidence improves. The design is forgiving because the whimsical cottage style does not require perfectly identical shapes.
What is fabric appliqué?
Fabric appliqué is a sewing technique in which smaller fabric shapes are placed over a larger foundation fabric and secured with stitching. In this project, the cottage, roof sections, windows, flowers, fence, clouds, and garden are all created using appliqué. Fusible web can temporarily bond the shapes before stitching, making placement much easier.
What is the difference between quilting and appliqué in this project?
Appliqué creates the visible picture by attaching fabric shapes to the background. Quilting joins the quilt top, batting, and backing together with stitches. The quilting can also add decorative texture to the sky, cottage walls, plants, and other areas. Combining these two techniques creates the dimensional appearance seen in textile wall art.
Do I need a special sewing machine for this project?
No. A standard sewing machine capable of straight stitch and zigzag stitch is enough for most of the project. Decorative stitches are optional. Free-motion quilting can add beautiful detail, but it is not required. Hand stitching can also be used for appliqué outlines and embroidered accents.
Can I use fabric scraps for the roof and garden?
Absolutely. This design is ideal for scrap quilting because the roof is intentionally made from many small blue fabrics and the garden uses several shades of green, pink, yellow, purple, brown, and red. Using scraps can actually make the finished panel more interesting because each piece contributes a different texture or print.
How can I prevent appliqué pieces from fraying?
Fusible web helps stabilize raw edges, but edge stitching provides additional protection. A narrow zigzag, satin stitch, blanket stitch, or closely spaced straight stitch can secure the perimeter of each piece. Some quilters intentionally allow a small amount of fraying because it creates a soft, rustic appearance after the quilt is handled.
Should the wall panel be washed after completion?
A decorative wall quilt usually does not need frequent washing. If you plan to wash it, consider prewashing fabrics beforehand, especially strong reds and dark blues that could release excess dye. Use gentle washing methods and avoid excessive agitation to protect small appliqué details.
How can I make the flowers look more dimensional?
Use multiple fabric shades within each flower, overlap petals, add embroidered outlines, and vary the direction of quilting stitches. For sunflowers, a textured brown center with crosshatching can create excellent depth. Roses benefit from several overlapping pink shapes arranged from larger outer petals toward smaller central pieces.
Can this design be resized?
Yes. The basic shapes can be enlarged or reduced depending on the desired wall panel size. When resizing, keep the relationship between the cottage, roof, flowers, and fence reasonably consistent. Very small versions may require simplifying details such as individual roof shingles or tiny flower petals.
How do I choose colors that work well together?
Start with one dominant color family, such as the blues used in the roof and sky, then introduce warm contrasting accents through red, yellow, pink, and brown. Green naturally connects the garden elements. Repeating the same color in different parts of the panel helps create visual unity.
Can hand embroidery be added to the quilt?
Yes. Hand embroidery can add stems, flower centers, wood grain, roof outlines, tiny leaves, cloud details, and decorative marks around the cottage. These small stitched accents are especially effective in a quilted and appliqué wall panel because viewers often examine decorative wall quilts at close range.
Conclusion
The Cottage in Bloom Quilted and Appliqué Wall Panel Fabric Pattern combines patchwork, quilting, fabric appliqué, decorative stitching, and scrap-friendly construction into one colorful textile project. By starting with a soft patchwork sky, building the cottage from large appliqué shapes, assembling a varied blue shingle roof, and gradually adding windows, a wooden door, flowers, foliage, fencing, and rustic garden details, you can recreate the charming handcrafted atmosphere of the reference design.
The most important lesson is to build the scene in layers. Begin with the largest background shapes, continue with the cottage and roof, and finish with smaller decorative details. Thoughtful fabric contrast makes individual elements easy to recognize, while quilting and embroidery add the texture that turns a flat arrangement of fabric into expressive textile art.
EASILY FIND THE PDF FOR THIS PATTERN HERE!
Whether you follow the composition closely or personalize it with different flowers, colors, fabrics, and stitching styles, the project offers plenty of room for creativity. The finished Cottage in Bloom Quilted and Appliqué Wall Panel Fabric Pattern can become a beautiful handmade decoration and a useful project for practicing several important quilting and appliqué techniques at the same time. If you try this project, leave your sincere opinion about the design and share any suggestions you would use to personalize it. Your ideas about different roof colors, flower combinations, borders, quilting patterns, or seasonal variations can inspire even more creative versions of this cheerful cottage wall panel.