
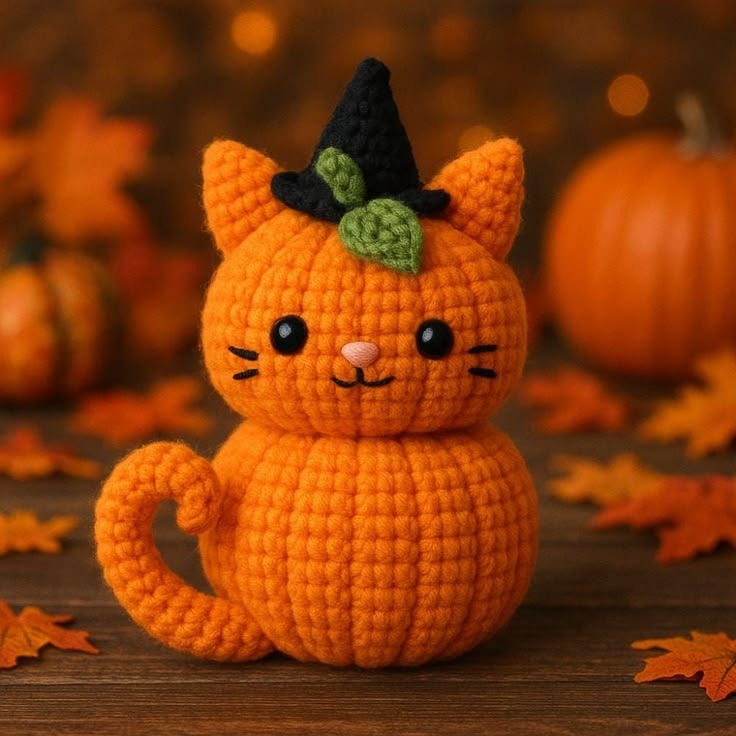
The Crochet Pumpkin Cat Amigurumi Pattern is a charming seasonal project that combines the rounded shape of a fall pumpkin with the sweet features of a handmade crochet cat. Inspired by cozy autumn colors, Halloween decorations, and classic amigurumi crochet, this design is ideal for anyone who enjoys making decorative characters with yarn. The finished piece features a plump orange body, a rounded cat head, pointed ears, a curled tail, and a miniature witch hat decorated with green leaves. Although the character looks detailed, most of the construction relies on basic single crochet stitches, increases, decreases, and simple shaping techniques. This makes the project approachable for confident beginners while still offering enough detail to keep experienced crocheters interested. By working carefully through each round and assembling the individual parts in the correct order, you can create a polished pumpkin cat that works beautifully as a fall centerpiece, shelf decoration, handmade gift, or Halloween accent.
One of the most useful things to understand before beginning this Crochet Pumpkin Cat Amigurumi Pattern is how amigurumi construction differs from traditional flat crochet. Most pieces are crocheted continuously in spirals rather than joined at the end of every round, allowing the surface to remain smooth without a visible seam. A stitch marker is therefore essential because it identifies the first stitch of each round and helps prevent counting mistakes. Throughout this tutorial, standard U.S. crochet terminology is used, including MR (magic ring), sc (single crochet), inc (increase), dec (decrease), sl st (slip stitch), ch (chain), and FO (fasten off). The pattern can be adjusted slightly depending on yarn thickness, hook size, and personal tension, so your finished cat may vary somewhat in size. What matters most is maintaining firm, even stitches so the stuffing remains hidden and the finished amigurumi keeps its rounded pumpkin-like structure.
For a medium-sized Crochet Pumpkin Cat Amigurumi Pattern, prepare approximately 100–130 g of orange worsted-weight or medium-weight yarn, plus small amounts of black, green, and pink yarn. A 3.0 mm to 3.5 mm crochet hook usually creates a dense fabric with this yarn weight, although you can move down a hook size if your stitches naturally feel loose. You will also need polyester fiberfill, a yarn needle, scissors, stitch markers, and optional safety eyes approximately 10–12 mm in diameter. If the finished cat will be given to a very young child, embroidered eyes are generally a more appropriate alternative to removable plastic components. Keep all yarn tails long enough for sewing because neat assembly makes a major difference in the final appearance. Once your materials are organized, you can begin creating the pumpkin-shaped body that gives this autumn cat its recognizable silhouette.
Crochet Materials, Abbreviations, and Pumpkin Body Construction
Before starting the body, become familiar with the crochet shorthand used throughout the pattern. MR means magic ring, sc means single crochet, inc means work two single crochets into the same stitch, and dec means combine two stitches into one decrease. When instructions appear inside brackets or parentheses, repeat that sequence the indicated number of times. For example, [4 sc, inc] × 6 means crochet four single crochets, make one increase, and repeat that sequence six times. These simple crochet keys form the foundation of nearly every round in the pumpkin cat.
DISCOVER MORE FREE PATTERNS HERE!
Begin the body with orange yarn using Round 1: MR, 6 sc [6]. For Round 2, crochet inc × 6 [12]. Round 3 is [1 sc, inc] × 6 [18], Round 4 is [2 sc, inc] × 6 [24], Round 5 is [3 sc, inc] × 6 [30], and Round 6 is [4 sc, inc] × 6 [36]. Continue increasing gradually until you reach approximately 54 stitches, using the sequence [7 sc, inc] × 6 [54]. This creates a wide circular base rather than a tall cylinder.
For the middle section of the pumpkin body, crochet approximately eight to eleven rounds of 54 sc around without increases. The number of straight rounds controls the height of the pumpkin, so fewer rounds will give you a flatter pumpkin while additional rounds create a taller body. Keep your tension consistent and use a stitch marker at the beginning of every round. The orange fabric should feel firm enough that the fiberfill will not show through. At this stage the piece will resemble a soft bowl that gradually develops into a rounded sphere.
Begin shaping the upper half by reversing your earlier increases. Work [7 sc, dec] × 6 [48], followed by a round of 48 sc if you want a softer transition. Continue with [6 sc, dec] × 6 [42], then [5 sc, dec] × 6 [36], and [4 sc, dec] × 6 [30]. Start adding fiberfill before the opening becomes too narrow. Stuff firmly around the outer edges but avoid creating hard lumps, because the pumpkin should retain a soft, rounded look.
To give the body its characteristic pumpkin sections, you can sculpt it after stuffing. Finish decreasing until only a small opening remains, close the opening, and leave a long orange yarn tail. Thread the tail through a yarn needle, pass it through the center of the body from top to bottom, and bring it around the outside before pulling gently. Repeat this process five or six times at evenly spaced intervals. Each strand creates a subtle indentation that visually divides the body into pumpkin segments.
Do not pull the sculpting strands excessively tight, because heavy tension can distort the crochet fabric. The goal is a gentle ribbed effect that resembles a pumpkin while keeping the body soft and balanced. Secure the yarn discreetly at the bottom and weave the remaining tail inside the stuffing. When the body is sitting upright without leaning, your main pumpkin foundation is complete. This rounded foundation is an important visual feature of the Crochet Pumpkin Cat Amigurumi Pattern and will support the head, tail, and decorative accessories added later.
Crocheting the Cat Head, Ears, Face, and Pumpkin Details
The cat’s head is made separately with orange yarn and uses a similar spherical construction. Begin with MR, 6 sc [6], then work inc × 6 [12], [1 sc, inc] × 6 [18], [2 sc, inc] × 6 [24], [3 sc, inc] × 6 [30], [4 sc, inc] × 6 [36], and finally [5 sc, inc] × 6 [42]. Crochet approximately six or seven rounds of 42 sc without increasing. This creates the broad, rounded cheeks visible in a cute amigurumi-style cat.
If using safety eyes, place them before completing the decreases. A useful starting position is between approximately Rounds 11 and 13 with about seven to nine stitches between the eyes, although exact placement depends on your yarn and hook size. Make sure the eyes are symmetrical before securing the backs. Embroider a small triangular or oval nose with pink yarn between and slightly below the eyes. Then use black embroidery yarn to add a short mouth, whiskers, and optional tiny eyelash-like details.
Finish the head with gradual decreases: [5 sc, dec] × 6 [36], [4 sc, dec] × 6 [30], [3 sc, dec] × 6 [24], [2 sc, dec] × 6 [18], and finally [1 sc, dec] × 6 [12]. Add fiberfill continuously while decreasing so the head remains evenly rounded. Avoid overfilling the bottom because you need a reasonably flat attachment area for sewing it to the pumpkin body. Close the final opening and leave a long yarn tail for assembly.
For each ear, use orange yarn and begin with a small magic ring. Work MR, 4 sc [4], followed by [1 sc, inc] × 2 [6], then [2 sc, inc] × 2 [8], and continue increasing gradually until the ear is approximately 10–14 stitches around. Crochet one final round without increasing to add height. Fasten off with a long sewing tail. The ears should remain lightly stuffed or completely unstuffed so they preserve their pointed cat-like appearance.
Pin both ears to the top of the head before sewing. Place them slightly toward the outer edges rather than directly at the center because this creates the friendly wide-faced expression associated with cute crochet cat amigurumi. Sew through both the ear edge and head stitches using small, consistent stitches. Check the project from the front repeatedly while working to ensure that one ear is not sitting higher than the other. Once secure, hide the yarn tails inside the head with your needle.
Finish the head by adding optional pumpkin-style shaping. Using a long piece of orange yarn, create two or three subtle vertical indentations across the head in the same way you sculpted the body. Keep these lines lighter than those on the body so the cat’s facial features remain clearly visible. The combination of rounded cheeks, pointed ears, embroidered whiskers, and gentle pumpkin grooves creates the distinctive personality of the Crochet Pumpkin Cat Amigurumi Pattern. At this stage, you can already see the character beginning to come together.
Making the Curled Tail, Witch Hat, and Crochet Leaf Decoration
The curled cat tail gives the design additional personality and helps create the playful silhouette shown in pumpkin-inspired amigurumi projects. Begin with orange yarn using MR, 6 sc [6] and crochet in continuous rounds. Work several rounds of 6 sc to form a narrow tube. If you want a slightly thicker tail, increase to 8 or 10 stitches near the base. A length of approximately 20–25 cm works well for a medium-sized cat, although you can customize it according to the proportions of your body.
Stuff the tail lightly as you crochet rather than waiting until the end. Heavy stuffing will make it difficult to curl, while too little stuffing may cause the tube to collapse. Once the desired length is reached, bend the tail into a gentle spiral or question-mark shape. Sew several hidden stitches through adjoining sections of the curl to hold the shape permanently. Leave the bottom few centimeters straight so you have enough surface area to attach the tail firmly to the pumpkin body.
For the witch hat, switch to black yarn. Start at the pointed top with MR, 4 sc [4]. Work one or two rounds evenly, then begin slow increases: [1 sc, inc] × 2 [6], one round of 6 sc, [2 sc, inc] × 2 [8], one round of 8 sc, and continue this progressive pattern until the cone reaches the desired width. Slow increases are essential because they create the tall pointed shape instead of a rounded dome. Lightly stuff the cone only if you want the hat to stand very firmly.
To create the brim, increase more rapidly at the bottom of the cone. For example, if your final cone round has 24 stitches, crochet [3 sc, inc] × 6 [30], followed by [4 sc, inc] × 6 [36]. Work one final round of 36 sc and fasten off. The brim may curve slightly, which adds a handmade storybook quality. Pin the hat between the ears and sew it securely around the inner portion of the brim while leaving the outer edge slightly free.
The green leaves can be made with a simple chain foundation. Ch 6, then starting in the second chain from the hook work sl st, sc, hdc, dc, 5 dc in the last chain. Continue along the opposite side of the foundation chain with dc, hdc, sc, sl st. Fasten off and leave a tail for sewing. Make one large leaf and one smaller leaf using fewer chains if you want a layered arrangement similar to a pumpkin vine.
Sew the green leaves near the base of the black hat, positioning them so they overlap slightly. You can also embroider a short green stem or crochet a tiny chain to imitate a pumpkin vine. These contrasting green details prevent the orange and black palette from looking overly uniform. Combined with the curled orange tail, the miniature witch hat becomes one of the most recognizable decorative features of this Halloween crochet amigurumi design. Make sure each accessory is firmly secured before moving to final assembly.
Assembly, Finishing Techniques, and Customizing Your Amigurumi Cat
Begin the final assembly by positioning the head at the center of the pumpkin body. Use pins to test the placement from the front, back, and both sides before sewing. The face should look slightly forward rather than upward. Thread the long orange yarn tail from the head onto a yarn needle and sew around the neck using small stitches that pass through both pieces. Go around the connection twice if necessary because the head is one of the heavier components.
Attach the curled tail to one side of the lower body. Place the base of the tail low enough that the curl rests naturally beside the pumpkin instead of sticking outward horizontally. Sew through several rows of the tail and body to create a strong connection. You may also add one discreet securing stitch where the upper part of the curl touches the body. This helps preserve the attractive spiral shape without making the attachment obvious.
Check all facial embroidery before completing the project. If the mouth appears uneven, you can carefully remove the embroidery yarn and stitch it again without disturbing the crochet fabric. A small curved mouth beneath the pink nose generally creates a cheerful expression. Add two or three short whisker lines to each cheek using black yarn. Avoid making the whiskers too long because oversized embroidered features can distract from the soft proportions of the pumpkin cat crochet pattern.
You can customize this pattern in many ways without changing its basic construction. Try cream, white, gray, or black yarn for the cat while keeping the pumpkin-inspired orange body. Alternatively, use different shades of orange for the head and body to add visual depth. Purple can replace green for a stronger Halloween palette, while brown or olive-green leaves create a rustic autumn appearance. A tiny crocheted bow, scarf, bell, flower, or miniature pumpkin can also be added as an accessory.
The finished dimensions depend primarily on the yarn and hook combination. Using medium-weight yarn with a 3.0–3.5 mm hook will generally create a decorative amigurumi suitable for a tabletop or shelf. Thicker chenille or plush yarn can produce a much larger and softer version, while lightweight cotton yarn creates a smaller collectible figure. When changing yarn thickness, choose a hook that produces compact stitches rather than relying exclusively on the hook size printed on the yarn label. Dense stitches are particularly important for amigurumi because they keep the stuffing hidden.
Once every component is attached, inspect the entire Crochet Pumpkin Cat Amigurumi Pattern project for loose yarn ends, openings, or uneven stuffing. Use your yarn needle to redistribute small areas of fiberfill if needed. Gently reshape the pumpkin sections and curl the tail with your hands. Make sure the witch hat and leaves sit securely between the ears and that the finished character can remain upright on a flat surface. These finishing touches transform individual crochet pieces into a cohesive handmade autumn decoration.
Frequently Asked Questions About the Crochet Pumpkin Cat Amigurumi Pattern
What crochet skill level is recommended for this pattern?
This pattern is suitable for an advanced beginner or intermediate crocheter. If you already understand the magic ring, single crochet, increases, decreases, and working in continuous rounds, you should be able to complete the project comfortably. The most challenging part is usually assembly rather than the crochet stitches themselves.
What does “inc” mean in an amigurumi pattern?
The abbreviation inc means increase. In this pattern, an increase is created by crocheting two single crochet stitches into the same stitch. Increases expand the circumference of the piece and are used when shaping the round pumpkin body, head, ears, and witch hat.
What does “dec” mean in crochet?
The abbreviation dec means decrease. A decrease combines two stitches into one, reducing the total stitch count. Invisible decreases are especially useful for amigurumi crochet because they create a smoother surface than traditional single crochet decreases.
Do I need to use a magic ring?
A magic ring is recommended because it allows the opening at the center of the first round to close tightly. However, you can also chain two stitches and crochet the required number of single crochets into the second chain from your hook. The important goal is creating a secure center without a visible hole.
How can I stop stuffing from showing between stitches?
Use a crochet hook slightly smaller than the size normally recommended for your yarn and maintain consistent tension. The fabric should feel dense but should not be so tight that inserting the hook becomes difficult. Adding stuffing gradually also makes it easier to control the shape without overstretching the stitches.
Can I make the Crochet Pumpkin Cat Amigurumi Pattern larger?
Yes. The easiest method is to use thicker yarn and a correspondingly larger hook while following the same stitch counts. Plush or chenille yarn can create a significantly larger pumpkin cat. You can also expand the original pattern mathematically by adding additional increase rounds, but this requires adjusting the decrease rounds accordingly.
Can the safety eyes be replaced with crochet or embroidery?
Yes. Black yarn can be used to embroider small oval eyes directly onto the face. You can also crochet tiny black circles and sew them in position. Embroidered features are especially useful when creating handmade toys for young children because they eliminate removable plastic components.
Why does my pumpkin body look more like a ball?
The pumpkin appearance comes mainly from the sculpting strands added after the body is stuffed. Pass strong orange yarn from the top to the bottom of the body several times and pull each strand gently to create evenly spaced indentations. Avoid pulling too tightly or the body may become distorted.
How can I keep the witch hat pointed?
Use firm crochet tension and only a small amount of stuffing inside the cone. You can also shape the point gently with your fingers after assembly. Gradual increases separated by plain crochet rounds create a longer and more defined cone than rapid increases.
How long does this amigurumi project usually take?
The time required depends on experience and crochet speed. The body and head are the largest sections, while the ears, leaves, hat, and tail are comparatively quick. Working carefully instead of rushing is worthwhile because precise stitch counts and neat assembly have a major effect on the finished result.
Can this crochet pumpkin cat be used as fall décor instead of Halloween décor?
Absolutely. Simply omit the witch hat or replace it with a crocheted leaf, flower, scarf, or small stem. The orange pumpkin body and cat features naturally complement autumn crochet decorations, Thanksgiving displays, handmade seasonal gifts, and cozy fall interiors.
How should I care for the finished amigurumi?
Gentle spot cleaning is usually the safest choice because repeated machine washing can affect stuffing, embroidered details, and shaping. If your yarn has specific washing instructions, follow the manufacturer’s care recommendations. Allow the amigurumi to dry completely while maintaining its original shape.
Conclusion
The Crochet Pumpkin Cat Amigurumi Pattern brings together several enjoyable crochet techniques in one playful autumn project. You learned how to build the rounded pumpkin body with progressive increases and decreases, create gentle pumpkin sections through yarn sculpting, crochet a matching cat head and pointed ears, embroider expressive facial details, and construct a flexible curled tail. You also learned how to crochet a miniature black witch hat and decorative green leaves that transform the character into a distinctive Halloween-inspired design.
EASILY FIND THE PDF FOR THIS PATTERN HERE!
More importantly, the pattern demonstrates how simple crochet keys such as MR, sc, inc, dec, ch, and sl st can be combined to create detailed three-dimensional amigurumi. Once you understand these basic techniques, changing the size, yarn colors, expression, accessories, or seasonal theme becomes much easier. Whether you make the pumpkin cat as a decoration, a handmade gift, or simply as a relaxing fall crochet project, careful stuffing and neat assembly will help produce a professional-looking result. If you make your own version of this Crochet Pumpkin Cat Amigurumi Pattern, leave your sincere opinion about the project and share any suggestions for colors, accessories, or pattern variations you would like to try. Your creative ideas can inspire new versions of this adorable pumpkin cat and help make future crochet projects even more useful and enjoyable.