
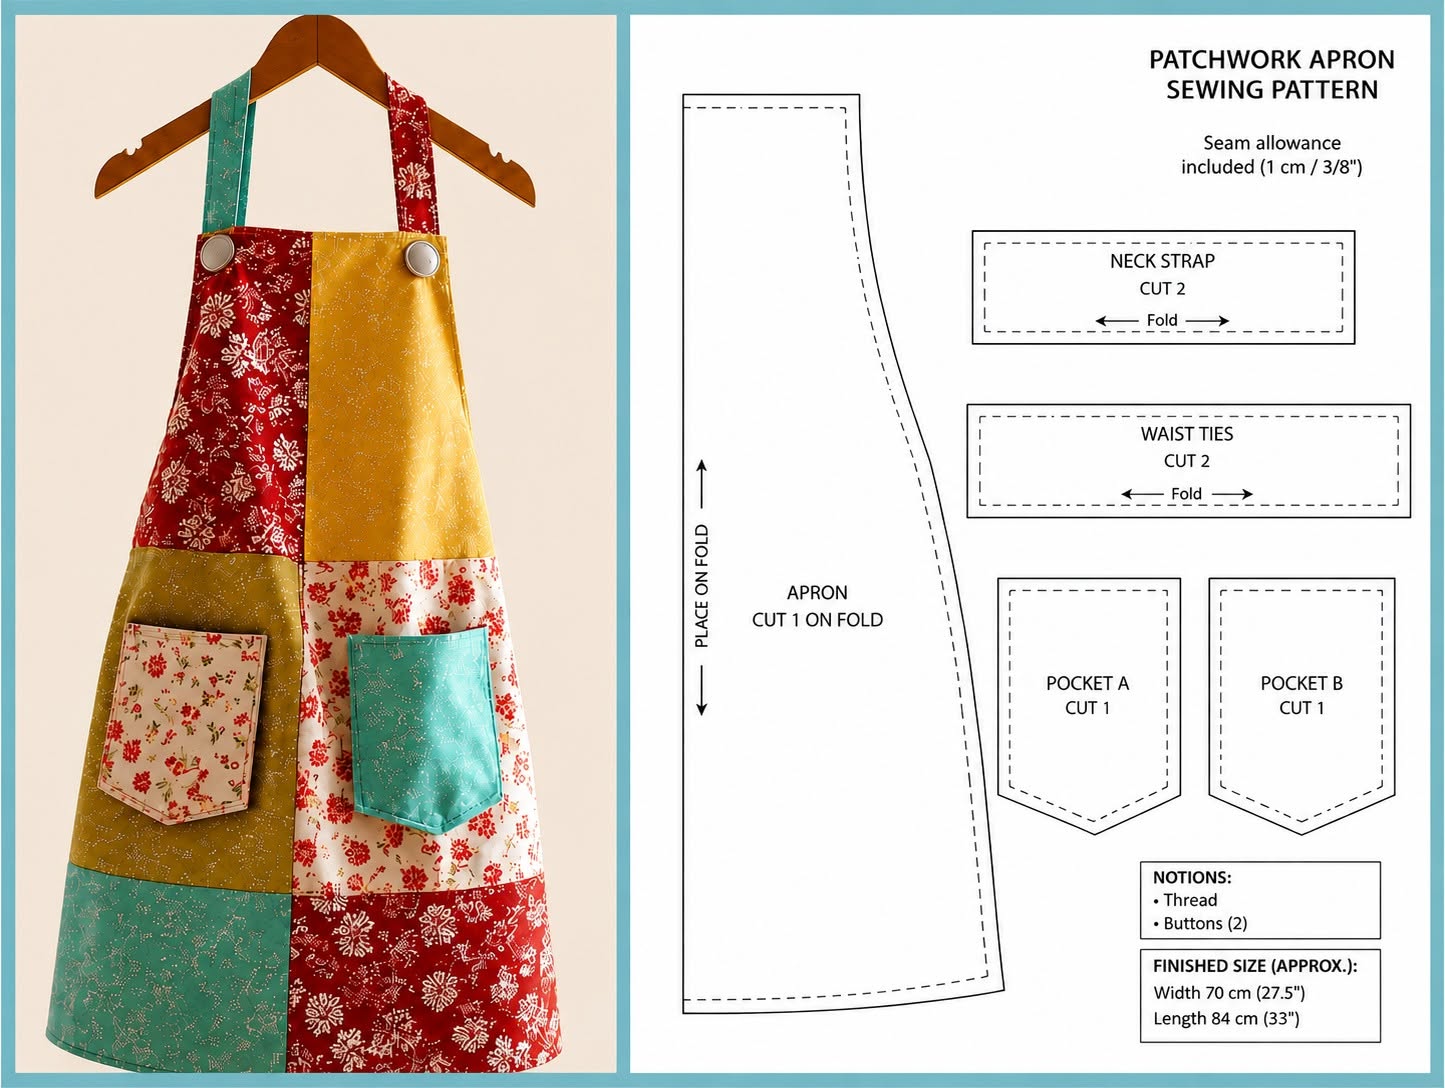
Patchwork Apron Fabric Pattern is a charming sewing project that transforms colorful fabric pieces into a practical apron with a warm, handmade personality. Inspired by the apron shown in the photo, this design combines several floral prints, contrasting colors, roomy front pockets, shoulder straps, and decorative buttons. The arrangement of red, mustard, green, cream, and turquoise fabrics creates an attractive vintage appearance without requiring complicated sewing techniques. It is an excellent project for using leftover cotton pieces from previous quilting or dressmaking projects. Because every fabric section can be customized, no two finished aprons need to look exactly alike. This complete guide explains how to plan, cut, assemble, sew, and finish your own Patchwork Apron Fabric Pattern from beginning to end.
A patchwork apron is created by joining smaller fabric panels before cutting or shaping the final garment. Unlike a traditional apron made from one continuous piece of material, patchwork construction allows the maker to experiment with prints, colors, textures, and block arrangements. The apron in the reference image has a slightly flared shape, a straight upper edge, long shoulder straps, two contrasting pockets, and large decorative buttons near the top corners. Its asymmetrical fabric layout gives the project a relaxed and artistic look while remaining balanced. The design is especially suitable for quilting cotton because this fabric is stable, easy to press, and available in countless patterns. Beginners can complete the project with basic straight stitching, while experienced sewists can add quilting, lining, embroidery, or decorative topstitching.
Creating a reliable fabric apron pattern begins with accurate measurements and thoughtful fabric placement. Before cutting anything, consider where each print will appear and how the colors will flow from the upper section to the lower hem. Larger pieces work well as visual anchors, while smaller floral scraps can connect the different sections. The two pockets should contrast with the background so they are easy to see and use. A lightweight lining can give the apron a clean interior, although it is optional when all seam allowances are neatly finished. By preparing carefully and sewing one section at a time, you can create a durable project that is decorative enough for display and practical enough for cooking, gardening, crafting, or working in a sewing room.
Materials, Measurements, and Pattern Preparation
The main material for this Patchwork Apron Fabric Pattern is medium-weight cotton fabric. Quilting cotton is ideal because it holds its shape, presses well, and can withstand frequent washing. Gather approximately 1½ to 2 yards of assorted fabrics in coordinating colors, depending on the apron size and the number of scraps available. You may use six to ten different prints to reproduce the varied appearance of the photographed apron. Select at least one red print, one mustard or olive print, one cream floral print, and one blue-green print for a similar palette.
DISCOVER MORE FREE PATTERNS HERE!
You will also need matching all-purpose thread, sewing pins or clips, fabric scissors, a rotary cutter, a cutting mat, and a quilting ruler. Keep an iron and ironing board nearby because pressing each seam is essential for smooth patchwork construction. Optional supplies include lightweight cotton lining, fusible interfacing for the pockets and straps, bias tape, decorative buttons, and topstitching thread. Two buttons measuring approximately 1 to 1¼ inches in diameter will create a bold accent near the shoulder straps. The buttons can be functional or purely decorative.
For a medium adult apron, plan a finished body approximately 28 inches long, 13 inches wide across the upper edge, and 24 to 26 inches wide across the lower hem. These measurements can be adjusted according to the wearer’s height and preferred coverage. The slightly wider lower edge creates the gentle A-line silhouette visible in the reference image. Add a ½-inch seam allowance around the outer edges when creating the template. The apron should remain comfortable and loose rather than fitting tightly against the body.
Create a full paper template before arranging the fabric pieces. Draw a horizontal line for the upper edge and mark its center. From each upper corner, draw a slightly angled side seam toward the wider lower edge. Connect the lower points with a softly curved or straight hemline. Fold the paper template in half vertically before cutting to ensure that both sides are symmetrical. Open the paper and label the top, bottom, center, and seam allowance.
The shoulder straps can be cut approximately 3½ inches wide and 26 to 32 inches long before folding and sewing. Their final width will be about 1¼ inches, depending on the seam allowance. Longer straps make the apron more adjustable and allow them to cross at the back or tie comfortably. In the photographed design, the straps appear to attach at the top corners with large buttons. You can sew them permanently beneath the buttons or create buttonholes for removable straps.
Prepare two pocket templates using sturdy paper. A useful finished pocket size is approximately 7 inches wide and 8 inches tall. The pocket can be rectangular, gently tapered, or finished with angled lower corners like the smaller floral pocket in the image. Add a ½-inch seam allowance around the sides and bottom, plus a 1-inch allowance at the upper edge. Making the pockets slightly different in shape or fabric will enhance the creative scrap fabric apron style.
Cutting and Assembling the Patchwork Apron Body
Begin by washing, drying, and pressing all fabrics before cutting. Prewashing removes possible shrinkage and prevents strong colors from bleeding during the first wash of the completed apron. Press out every fold so the measurements remain accurate. Separate the fabrics into larger feature prints, medium connecting pieces, and smaller scraps. Place them near the paper template to begin planning the composition.
Arrange the fabric pieces directly over the paper pattern without cutting the outer apron shape yet. Start with several large sections, such as a red panel on the upper left, a mustard panel on the upper right, a cream floral panel in the middle, and another red section near the lower edge. Add green, blue, or smaller floral pieces to fill the remaining spaces. Allow each fabric section to overlap its neighboring piece by at least ½ inch for seam allowances. Take a photo of the arrangement before moving the pieces.
The apron in the reference image uses an informal block layout rather than equal squares. This is an important feature of the Patchwork Apron Fabric Pattern, because the varied panel sizes create a handcrafted and spontaneous appearance. Some sections are long and rectangular, while others are short or nearly square. Avoid placing too many small pieces together, as this can make the surface look crowded. Balance large prints with calmer tone-on-tone fabrics.
Join the pieces into manageable rows or sections. Place two neighboring fabrics with their right sides together, align the raw edges, and sew using a ½-inch seam allowance. Press the seam toward the darker fabric or press it open to reduce bulk. Continue adding pieces until one complete horizontal or vertical section has been formed. Repeat this process for the remaining groups of fabric.
After assembling the smaller sections, join them together to create one patchwork panel larger than the paper apron template. Match important seam intersections when possible, but do not worry if every seam does not align perfectly. The beauty of this apron comes from its relaxed construction. Press the completed panel carefully from both sides. Check that all seams are secure and that no raw gaps are visible.
Place the full paper template over the completed patchwork panel and position it until the fabric arrangement looks balanced. Pin the template securely or hold it in place with pattern weights. Cut around the apron shape, including the seam allowance that was added to the template. If using a lining, cut one matching apron body from a single piece of coordinating cotton. Mark the strap placement, pocket placement, top center, and side edges with washable fabric chalk.
Sewing the Pockets, Straps, and Apron Edges
To make the pockets, cut one exterior piece and one lining piece for each pocket. Interfacing can be fused to the wrong side of the exterior fabric when extra structure is desired. Place the exterior and lining pieces right sides together and sew around the edges, leaving a 2-inch opening along one side. Clip the corners carefully without cutting through the stitching. Turn the pocket right side out and press it flat.
Close the turning opening by folding the raw edges inward. Topstitch across the upper edge of each pocket approximately ⅛ inch from the edge. A second row of stitching can be added ¼ inch below the first for a professional finish. Position the pockets on the apron while it is lying flat. The left pocket may sit slightly higher than the right pocket to reproduce the playful asymmetry shown in the image.
Pin or clip the pockets securely and check their placement by holding the apron against the body. Sew around the sides and bottom of each pocket, leaving the upper edge open. Reinforce the two upper corners with a small triangle or bar tack because these areas receive the most stress. Keep the stitching even and close to the pocket edge. Large pockets are useful for holding cooking utensils, clothespins, gardening tools, sewing supplies, or a phone.
Prepare each strap by folding it in half lengthwise with the right sides together. Sew along the long edge using a ½-inch seam allowance. Turn the tube right side out with a safety pin or loop turner. Press the strap flat with the seam positioned along one side or centered on the back. Topstitch along both long edges for added strength and a crisp appearance.
For a lined apron, place the straps on the right side of the patchwork panel with their raw ends aligned with the upper corners. Direct the remaining strap length toward the center of the apron and pin it safely out of the seam area. Place the lining over the patchwork panel with right sides together. Sew around the entire outer edge, leaving a 5-inch opening along the bottom or one side. Clip the corners and curved areas before turning the apron right side out.
Push out the corners gently and press the entire apron. Fold the edges of the turning opening inward and pin them together. Topstitch around the apron approximately ⅛ inch from the edge, closing the opening at the same time. Add the large decorative buttons over the strap attachment points. This finishing detail strengthens the vintage character of the handmade patchwork apron and visually connects the straps to the apron body.
Finishing Details, Care, and Creative Customization
Inspect every seam before using the apron. Trim loose thread ends and reinforce any area that appears weak. Press the apron once more, paying special attention to the pockets, outer edges, and strap attachments. A well-pressed project will hang more evenly and display the fabric arrangement more clearly. Allow the apron to cool completely on a flat surface before folding or wearing it.
Decorative topstitching can make the different patchwork sections more noticeable. Stitch approximately ⅛ inch from selected seam lines using matching or contrasting thread. You may also use a decorative machine stitch, but test it on scrap fabric first. Keep embellishments relatively flat so the apron remains comfortable and easy to wash. Simple stitching generally works best with already colorful fabrics.
Personalization is one of the main advantages of a DIY patchwork apron. Embroider a name, short phrase, flower, leaf, or small kitchen motif on one pocket before attaching it. Another option is to add a narrow strip of lace, ric-rac, piping, or fabric trim along the pocket opening. Choose only washable decorations if the apron will be worn regularly. Avoid heavy accessories that might pull on the cotton.
The pattern can also be adapted for children. Reduce the body length, upper width, hem width, strap length, and pocket dimensions according to the child’s measurements. Make sure the straps are secure and not excessively long. Adjustable buttonholes can help the apron grow with the wearer. Bright novelty fabrics featuring animals, fruit, flowers, or craft supplies can make a child-sized version especially appealing.
Wash the completed apron in cool or warm water with similar colors. Use a gentle cycle to preserve the patchwork seams and printed fabrics. Tumble dry on low heat or hang the apron to dry naturally. Press it from the back with a cotton setting when needed. Proper care will help the Patchwork Apron Fabric Pattern retain its shape and color through many uses.
Save the remaining scraps after completing the project. Small pieces can be used to make matching pot holders, coasters, napkin rings, mug rugs, fabric baskets, or a coordinating oven mitt. Repeating several of the apron fabrics in another handmade accessory creates a thoughtful kitchen or craft-room set. The finished apron can also become a meaningful gift for a cook, gardener, artist, teacher, or sewing enthusiast. Its combination of usefulness and personal fabric choices makes it much more special than a mass-produced apron.
Frequently Asked Questions About the Patchwork Apron Fabric Pattern
What is the best fabric for making a patchwork apron?
Medium-weight quilting cotton is one of the best choices because it is easy to cut, sew, press, and wash. Cotton canvas may be used for a sturdier apron, but it creates thicker seam intersections. Very lightweight fabric can work when supported with lining or interfacing. Avoid combining fabrics with extremely different weights unless you have experience managing bulky seams.
Do I need a lining for this apron?
A lining is not absolutely necessary, but it provides a clean interior and hides the patchwork seam allowances. It also gives the apron more body and durability. Without a lining, finish the internal seams with a zigzag stitch, overlock stitch, pinking shears, or binding. A lined version is usually the easiest way to create neat outer edges.
Can the apron be made entirely from fabric scraps?
Yes. This scrap fabric sewing project is ideal for leftover cotton pieces. The scraps must be large enough to include seam allowances and should be in good condition. Combining remnants from several projects can create a colorful memory apron. For visual balance, include a few larger fabric panels instead of using only tiny pieces.
How can I resize the Patchwork Apron Fabric Pattern?
Measure from the upper chest to the desired hemline to determine the apron length. Measure across the chest for the upper width and across the hips for the lower width. Add comfortable ease and seam allowances to each measurement. Redraw the paper template while maintaining the gently flared side seams.
What seam allowance should I use?
A ½-inch seam allowance is practical for both the patchwork pieces and the outer apron construction. It is wide enough to remain secure and easy to press. Experienced quilters may use a ¼-inch allowance for the internal patchwork seams, but consistency is more important than the exact width. Always use the same seam allowance throughout each construction stage.
How do I prevent the patchwork seams from becoming bulky?
Press each seam immediately after sewing it. Alternate the seam direction when joining rows or press the allowances open. Trim unusually wide allowances and avoid placing too many seam intersections in the same area. A wooden seam roller or tailor’s clapper can also help flatten thick sections.
Should the shoulder straps cross at the back?
They may hang straight, cross at the back, or be connected with an additional horizontal strap. Crossing the straps can help prevent them from slipping from the shoulders. Make the straps long enough to test different arrangements before securing the final length. Buttons and buttonholes provide useful adjustment options.
Can I add a waist tie to this design?
Yes. Although the reference apron is supported mainly by shoulder straps, waist ties can be inserted into the side seams. Cut two fabric strips approximately 3 to 4 inches wide and 25 to 30 inches long. Fold, sew, turn, and topstitch them in the same way as the shoulder straps. Attach them near the natural waistline before adding the lining.
How should the pockets be positioned?
Place the pockets where your hands naturally rest when wearing the apron. Most adult apron pockets begin approximately 10 to 14 inches below the upper edge. Pin them temporarily and try on the apron before stitching. The pockets do not need to be perfectly symmetrical, especially when creating an artistic patchwork design.
Is this project suitable for beginners?
Yes. A patient beginner who can sew a straight seam, press fabric, turn a strap, and topstitch an edge can complete this project. The irregular fabric blocks are forgiving because perfect seam matching is not required. Beginners should label the fabric sections and assemble them gradually. Practicing on scraps before sewing the final pieces can improve confidence.
How long does it take to make a patchwork apron?
The project may take four to eight hours, depending on the complexity of the patchwork arrangement and the maker’s experience. Selecting and arranging the fabrics often requires as much time as sewing them. Adding lining, embroidery, adjustable straps, or decorative stitching will extend the construction time. The apron can easily be completed over two relaxed sewing sessions.
Can I sell aprons made from this general pattern style?
Handmade aprons based on your own measurements and original fabric layout can generally be created for personal use, gifts, or small handmade collections. Use fabrics and decorative elements that you are legally permitted to use in products. Describe the item honestly and include accurate care instructions. Each original patchwork arrangement helps make the finished apron unique.
Conclusion
The Patchwork Apron Fabric Pattern is a creative and practical project that combines basic garment sewing with the colorful freedom of patchwork. Throughout this guide, you learned how to select coordinating cotton fabrics, create an adjustable paper template, arrange irregular fabric sections, assemble the apron body, make lined pockets, sew durable straps, add a clean lining, and finish the design with decorative buttons and topstitching. You also discovered ways to resize the pattern, personalize the pockets, add waist ties, reduce seam bulk, and care for the completed apron.
EASILY FIND THE PDF FOR THIS PATTERN HERE!
The most important part of this project is allowing the fabric selection to express an individual style. Warm vintage florals can reproduce the cozy appearance of the reference image, while modern geometric prints, soft pastels, denim scraps, or seasonal fabrics can produce a completely different result. Please leave your sincere opinion about this Patchwork Apron Fabric Pattern and share suggestions for colors, pocket shapes, trims, or other creative details that could make the design even more useful and beautiful.