
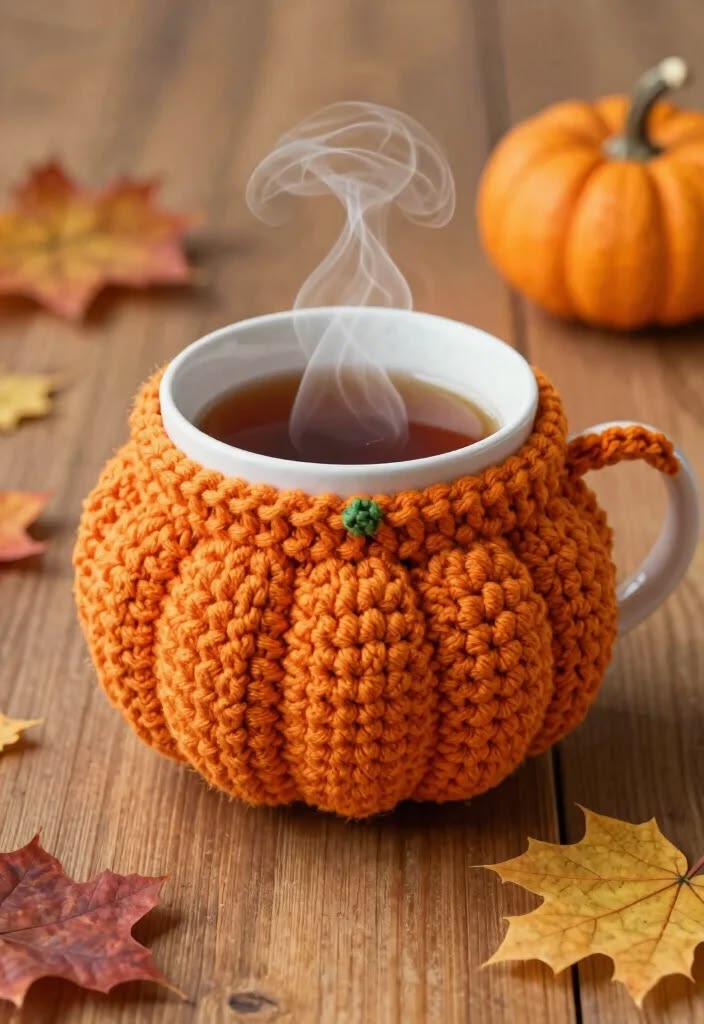
Crochet Pumpkin Mug Cozy Pattern is one of the most charming and practical crochet projects for the fall season. Whether you are creating handmade gifts, decorating your coffee station, or simply adding a cozy touch to your favorite mug, this Crochet Pumpkin Mug Cozy Pattern combines beauty, functionality, and creativity into one enjoyable project. With only a few basic crochet techniques and a little patience, you can transform an ordinary mug into a festive autumn accessory that brings warmth to every cup of coffee, tea, or hot chocolate.
Crochet has always been a relaxing and rewarding craft, and seasonal projects make it even more enjoyable. A pumpkin-shaped mug cozy is an excellent choice because it works up quickly, requires only a small amount of yarn, and allows crocheters to practice texture and shaping techniques without becoming overwhelmed. Beginners can learn valuable skills, while experienced crocheters can customize colors, stitches, and embellishments to create truly unique pieces. Throughout this guide, you will discover every important step needed to complete your own Crochet Pumpkin Mug Cozy Pattern with confidence.
Besides being decorative, a mug cozy serves an important practical purpose. The thick crochet fabric helps insulate warm drinks, making the mug more comfortable to hold while also protecting your hands from excessive heat. This project is perfect for autumn gatherings, Thanksgiving decorations, craft fairs, or thoughtful handmade gifts. By following the instructions below, you will understand not only how to crochet the cozy itself but also why each stitch contributes to the final pumpkin shape, helping you build confidence for future crochet projects.
Choose Materials and Learn the Basic Crochet Stitches
Before beginning your Crochet Pumpkin Mug Cozy Pattern, gather all the necessary supplies. Medium-weight cotton yarn is often recommended because it provides durability, excellent stitch definition, and minimal stretching after repeated use. Acrylic yarn can also work well if you prefer a softer finish, although cotton generally withstands frequent washing better.
DISCOVER MORE FREE PATTERNS HERE!
Select a crochet hook that matches your chosen yarn. Most worsted-weight yarns pair nicely with a 5 mm (H-8) crochet hook, although checking the yarn label is always recommended. You will also need scissors, a yarn needle for weaving in ends, and a stitch marker if desired.
The pumpkin texture comes from simple stitches rather than complicated techniques. This makes the project accessible to beginners while still producing an impressive finished appearance. Consistent stitch tension will help create smooth ridges that resemble a real pumpkin.
The main stitches used in this Crochet Pumpkin Mug Cozy Pattern include the following crochet abbreviations:
ch = Chain
sl st = Slip Stitch
sc = Single Crochet
hdc = Half Double Crochet
dc = Double Crochet
BLO = Back Loop Only
Working into the Back Loop Only (BLO) is what creates the beautiful vertical ridges that mimic pumpkin sections. This simple variation adds remarkable texture without requiring advanced crochet experience.
Always make a quick measurement around your mug before beginning. Different mugs vary slightly in circumference and height, so taking a few seconds to measure ensures your cozy will fit perfectly once completed.
Crochet the Pumpkin Body Step by Step
Begin your Crochet Pumpkin Mug Cozy Pattern by creating a foundation chain long enough to match the desired height of your mug. For many standard mugs, chaining approximately 18 to 22 stitches provides a good starting point, although your measurements should determine the exact number.
Row 1: Starting in the second chain from the hook, work 1 sc in every chain across. Chain 1 and turn your work.
Rows 2 through the remaining rows: Work 1 sc BLO into every stitch across. Chain 1 and turn after each row. Continue repeating this process until the rectangle wraps comfortably around your mug with slight stretch.
The repeated Single Crochet Back Loop Only rows naturally form raised vertical ridges. These ridges become the pumpkin segments once the piece is joined together, giving the cozy its realistic appearance.
When your rectangle reaches the proper width, place it around the mug to test the fit. It should wrap snugly without excessive tension. Adjust by adding or removing rows if necessary before joining the edges.
Join the first and last rows using Slip Stitches through corresponding stitches. This seam creates a continuous tube while maintaining the textured ridges across the entire pumpkin surface.
Shape the Pumpkin and Add the Stem
After creating the tube, thread a long yarn tail onto your yarn needle. Weave the yarn through one end using a simple running stitch around the outer edge. Gently pull the yarn to gather the opening until it closes neatly, then secure with several stitches.
Turn the gathered section inward so the closure becomes hidden inside the mug cozy. This creates a smooth bottom while maintaining a rounded pumpkin appearance on the outside.
Repeat the gathering process on the opposite edge, but before tightening completely, insert your mug inside to ensure the shape remains even. Once satisfied, pull the yarn snugly and fasten securely.
To create the characteristic pumpkin indentations, pass a long strand of matching yarn through the center of the cozy from top to bottom several times. Pull gently to create slight compression, giving the pumpkin a naturally rounded appearance without flattening the fabric.
For the stem, use green or brown yarn. Create a small magic ring, work 6 sc into the ring, and continue crocheting tiny rounds until a short cylinder forms. Stuffing is optional because the stem is very small.
Sew the finished stem securely onto the top center of the cozy. If desired, crochet a tiny green chain and wrap it loosely around the stem to imitate a curling pumpkin vine, adding an extra decorative touch.
Customize, Finish, and Care for Your Mug Cozy
One of the greatest advantages of the Crochet Pumpkin Mug Cozy Pattern is its flexibility. You can easily customize the design using different yarn colors, decorative buttons, embroidered leaves, or textured stitches to match your personal style or seasonal décor.
Orange is the traditional pumpkin color, but cream, sage green, ivory, mustard yellow, burgundy, and even soft pink create beautiful autumn-inspired variations. Neutral shades also blend nicely with farmhouse-style kitchens.
If your mug has an unusually large handle, simply leave a small opening while joining the rectangle instead of forming a complete tube. This customization allows the cozy to fit comfortably without interfering with the handle.
Before weaving in all yarn ends, double-check that every seam feels secure. A tightly finished cozy will withstand frequent use and repeated washing much better than one with loose finishing stitches.
Wash your finished cozy gently using cool water and mild detergent. Reshape it while damp and allow it to air dry completely before placing it back onto your mug. This helps preserve both the texture and overall shape.
Once completed, your handmade pumpkin mug cozy becomes more than just a practical accessory. It becomes a small piece of seasonal décor that reflects your creativity, making every warm drink feel even more inviting during autumn.
Frequently Asked Questions (FAQ)
Is the Crochet Pumpkin Mug Cozy Pattern suitable for beginners?
Yes. This project primarily uses basic stitches such as chain, single crochet, slip stitch, and working in the back loop only. These techniques are commonly taught in beginner crochet classes.
What is the best yarn for a mug cozy?
Cotton yarn is generally recommended because it is durable, heat resistant, washable, and maintains its shape well after repeated use.
How long does it take to finish this project?
Most crocheters can complete the Crochet Pumpkin Mug Cozy Pattern within two to four hours, depending on experience and customization.
Can I adjust the size for different mugs?
Absolutely. Simply adjust the starting chain to match the mug height and continue adding or removing rows until the rectangle wraps comfortably around the mug.
Why are Back Loop Only stitches used?
Working in the back loop creates raised ridges that naturally resemble the sections of a pumpkin, giving the finished cozy its signature textured appearance.
Can I sell finished mug cozies made from this pattern?
Yes. Handmade mug cozies created from your own work are commonly sold at craft fairs, local markets, and online handmade shops. Be sure your finished products meet your local safety and labeling requirements.
Can I decorate the pumpkin further?
Certainly. Embroidered vines, crocheted leaves, wooden buttons, small bows, or textured stems all add personality while keeping the cozy functional.
Does the cozy keep drinks hot longer?
While it is not intended as insulation comparable to a thermos, the crochet fabric provides additional warmth retention and makes holding a hot mug more comfortable.
Conclusion
The Crochet Pumpkin Mug Cozy Pattern is a delightful project that combines seasonal charm with everyday practicality. Throughout this guide, you learned how to choose suitable materials, understand the essential crochet stitches, create the textured pumpkin body using Back Loop Only stitches, shape the cozy into a realistic pumpkin, crochet a decorative stem, and personalize the finished design with creative embellishments. By mastering these simple techniques, you can confidently produce beautiful handmade mug cozies for your own home, thoughtful gifts, or seasonal craft collections.
EASILY FIND THE PDF FOR THIS PATTERN HERE!
Whether you are a beginner looking to expand your crochet skills or an experienced maker searching for a quick autumn project, this Crochet Pumpkin Mug Cozy Pattern offers an enjoyable and rewarding experience. Thank you for reading this tutorial. If you make your own version, please leave your honest opinion in the comments and share your suggestions or creative ideas. Your feedback may inspire other crocheters and help make future tutorials even better.