
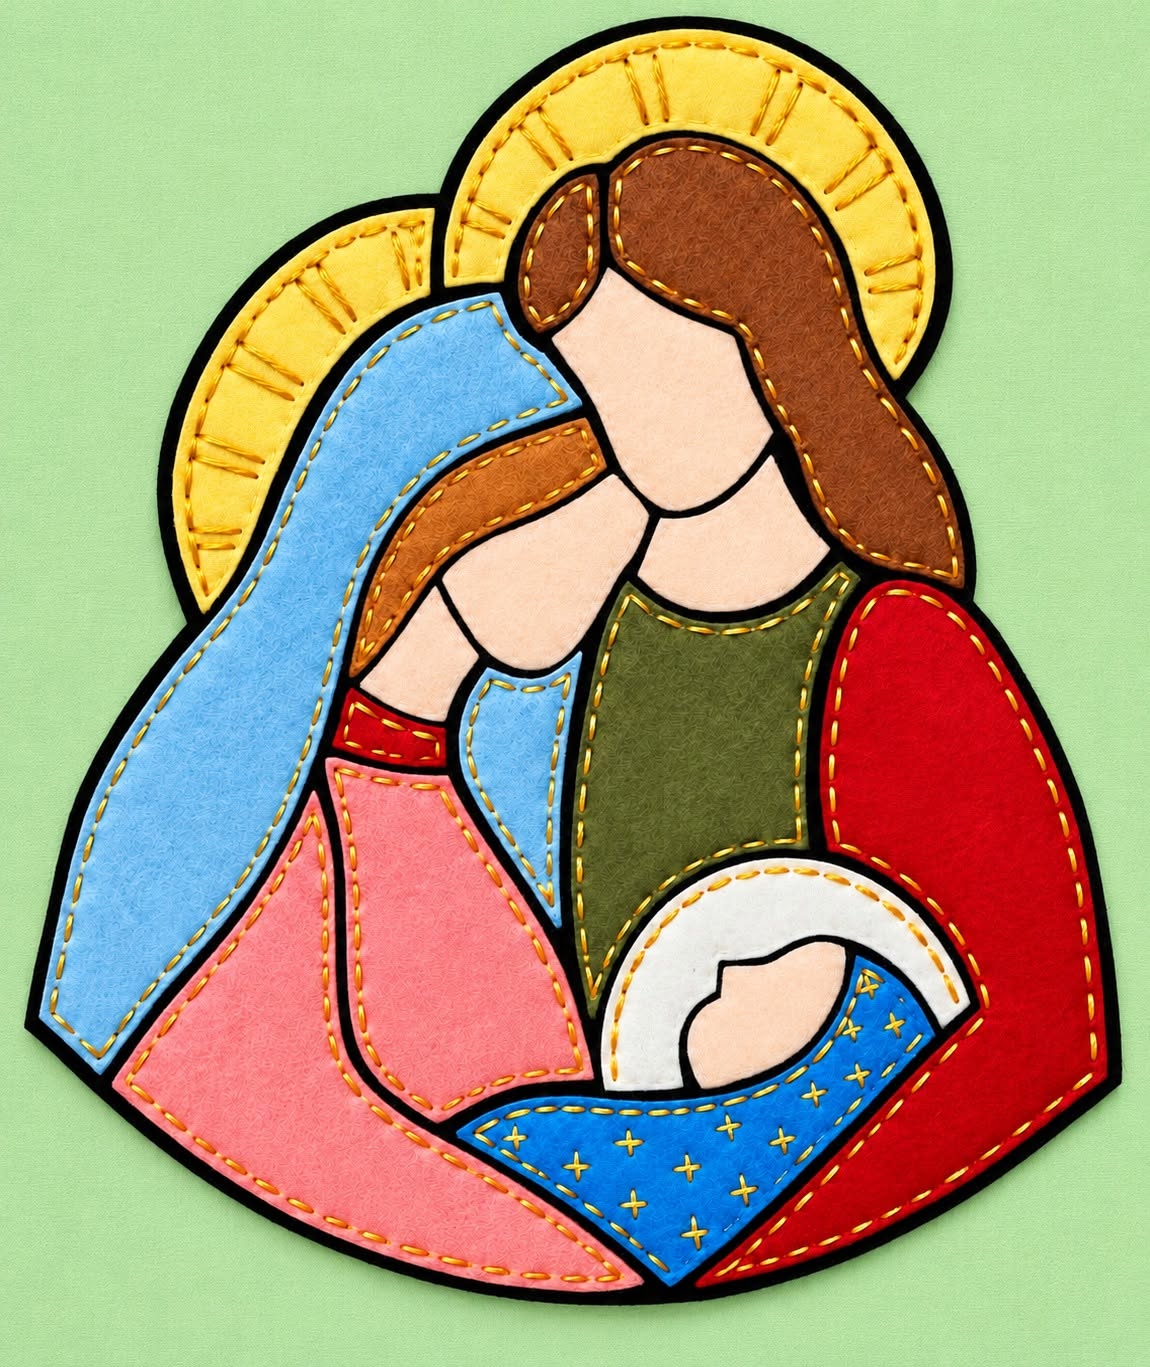
The Mary and Baby Jesus Felt/Quilt Appliqué Pattern is a meaningful handmade project that combines the warmth of traditional appliqué with the soft texture of felt and the decorative beauty of visible stitching. Inspired by the design shown in the photo, the composition features Mary gently leaning toward Baby Jesus while a second adult figure completes the family scene, all surrounded by golden halo shapes. The project uses large, clearly separated fabric pieces, making the design especially suitable for felt appliqué, fabric appliqué, wall panels, seasonal decorations, and handmade Christmas gifts. One of the most attractive details is the strong black outline that separates every section and gives the finished work a stained-glass appearance. Golden decorative stitches soften those dark outlines while adding texture and dimension throughout the design. With careful preparation, even someone with moderate sewing experience can recreate this Mary and Baby Jesus appliqué pattern using simple materials and basic hand-stitching techniques.
This project works especially well because it does not require highly complicated quilting equipment or advanced embroidery knowledge. Most of the visual impact comes from choosing harmonious colors, cutting the shapes accurately, and placing them in the correct order before stitching. In the example, soft blue, pink, cream, brown, green, red, white, and bright yellow create a warm yet colorful interpretation of the Nativity scene. The black foundation between the pieces acts almost like the lead lines in stained glass, while the yellow-gold thread visually connects the entire composition. Because felt does not fray easily, it is a practical material for beginners who want to practice raw-edge appliqué without repeatedly turning fabric edges underneath. Quilters can also adapt the same idea using cotton fabric backed with fusible web, allowing the Mary and Baby Jesus Felt/Quilt Appliqué Pattern to become part of a larger quilt, table runner, hanging panel, cushion, or framed textile artwork.
Before beginning, it is helpful to study the image as a collection of individual shapes rather than as one complicated illustration. Mary can be separated into her blue veil, pink clothing, skin sections, and small red accent near the wrist, while the second figure can be divided into brown hair, green clothing, red outer garment, and skin pieces. Baby Jesus is created from a small peach-colored face or body section surrounded by white and blue pieces. The large yellow halo sections are separate curved elements placed behind the figures, giving the finished piece its recognizable sacred composition. Thinking in layers makes cutting and assembly much easier because each color becomes its own pattern template. This approach is the foundation of successful quilt appliqué, and it allows you to recreate the project cleanly without needing to draw every detail directly on the finished fabric.
Materials and Preparing the Mary and Baby Jesus Felt/Quilt Appliqué Pattern
Begin by gathering good-quality craft felt or quilting cotton in the main colors visible in the project. You will need light blue, soft pink, peach or skin tone, brown, olive green, bright red, royal blue, white, yellow or gold, and black. Felt is the easiest option because its edges remain stable after cutting, but cotton can provide a more traditional quilted appearance.
DISCOVER MORE FREE PATTERNS HERE!
Choose a sturdy black felt sheet or black fabric for the background foundation. The dark background is important because small portions remain visible between the appliqué pieces, creating the bold outlines that define the figures. For a wall hanging, a medium-weight felt foundation usually provides enough structure without becoming difficult to stitch.
You will also need sharp fabric scissors, smaller detail scissors, straight pins or temporary fabric adhesive, an embroidery needle, and gold or yellow embroidery thread. A removable fabric marker can help when transferring the templates. If using quilting cotton rather than felt, consider lightweight fusible web to stabilize the pieces before decorative stitching.
To create the templates, first sketch or trace the major sections of the design individually. Start with the largest shapes: the blue veil, pink robe, red garment, green center garment, halos, white cradle area, and blue lower blanket. After those pieces are planned, create smaller templates for the faces, hands, hair, sleeve details, and Baby Jesus.
Add a small allowance around shapes only if you plan to turn the edges under. For felt appliqué, you can normally cut directly along the finished pattern line because felt does not require a seam allowance. For traditional cotton appliqué with turned edges, approximately 0.6 cm can be added around the template, although the exact allowance can be adjusted according to your preferred technique.
Before cutting the final fabrics, place the paper templates together on a table to check proportions. This simple dry assembly helps reveal pieces that are too large or too small. A balanced template arrangement is especially important for the Mary and Baby Jesus Felt/Quilt Appliqué Pattern, since the figures need to fit naturally inside the rounded outer silhouette.
Cutting and Building the Appliqué Scene Step by Step
Start the actual construction with the background and halo pieces. Cut the overall black foundation slightly larger than the finished design so you have room to trim it later. Position the large golden halo behind the brown-haired figure and the smaller curved halo behind Mary’s head, leaving a visible black border between the yellow sections and nearby appliqué pieces.
Next, cut Mary’s large blue veil. In the photo, the veil flows from the upper-left portion of the design toward the bottom-left side and creates one of the largest continuous shapes in the composition. Place it over the halo area while preserving enough black foundation around the edges to produce the strong outline visible in the finished design.
Add Mary’s pink robe beneath the veil. The pink section should curve across the lower-left portion and gradually move toward the center where Baby Jesus is positioned. Smaller peach pieces can then be placed for Mary’s visible face, arm, and hand, with a narrow red accent between her hand and clothing if you want to reproduce the image closely.
Build the second adult figure using the same layered approach. Begin with the brown hair shape and peach face, then position the olive-green center garment underneath. Add the large red outer section on the right side. The red area should curve toward the bottom and help form the rounded outer silhouette of the entire composition.
Baby Jesus forms the focal point near the bottom center of the project. Position a white curved shape around the baby, followed by the small peach body or face section. Add the royal-blue blanket underneath, allowing it to stretch diagonally across the bottom center. Small golden cross stitches on the blue section can reproduce the decorative texture visible in the original project.
After all pieces are positioned, step away from the project and evaluate the overall balance before stitching anything permanently. Check that Mary’s face naturally angles toward the baby, that the red and pink outer sections create a smooth lower curve, and that the halos remain clearly visible. Adjusting pieces at this stage is much easier than correcting them after sewing.
Stitching, Detailing, and Quilting the Felt Appliqué
When you are satisfied with the placement, secure the largest pieces first using pins, temporary adhesive, or a small amount of fusible web. Work from the background toward the foreground. Keeping the appliqué pieces stable is essential because even minor movement can change the spacing of the black outlines.
The design shown in the photo uses golden running stitches around many of the colored pieces. To recreate this effect, thread an embroidery needle with yellow-gold floss and sew evenly spaced running stitches approximately 0.3 to 0.5 cm from the edges. Consistent spacing creates a neat handmade appearance while still preserving the charm of hand embroidery.
On the golden halos, add short decorative lines radiating outward from the heads. These stitches suggest rays of light and provide extra visual interest without requiring complex embroidery techniques. Keep the stitches relatively consistent in length, but do not worry about absolute mathematical perfection because slight variation reinforces the handcrafted character.
Use the same gold thread to outline the blue veil, pink clothing, brown hair, green garment, red section, and smaller skin-toned pieces. If your black background remains visible between neighboring pieces, the combination of black outlines and golden stitching will produce the stained-glass-inspired effect that makes this appliqué especially distinctive.
For Baby Jesus’ blue blanket, add small cross-shaped stitches throughout the fabric after securing its outer edge. These decorative crosses can be distributed evenly without creating a rigid grid. The purpose is to add texture and help differentiate the blue blanket from Mary’s larger blue veil.
Quilters who want more dimension can place thin batting behind the finished appliqué before attaching a backing fabric. Quilt selectively around the major shapes rather than covering every appliqué area with dense stitching. Gentle quilting preserves the clarity of the Mary and Baby Jesus Felt/Quilt Appliqué Pattern while giving the panel a soft, slightly raised appearance.
Finishing, Displaying, and Customizing Your Handmade Nativity Appliqué
Once every appliqué piece is securely stitched, inspect the entire design for loose threads or uneven sections. Tie off threads on the back whenever possible and trim excess ends carefully. If you used a black foundation larger than the final piece, trim around the completed composition while leaving a narrow black outer border.
For a simple wall decoration, you can attach the finished appliqué to a larger fabric panel. A neutral cream, warm beige, soft gray, or deep green background can work beautifully with the traditional colors. Adding batting and backing will make the project feel more like a small Nativity quilt wall hanging.
Another option is to convert the design into a decorative Christmas cushion. In this case, center the appliqué on a square fabric panel before quilting and assembling the pillow cover. Make sure there is enough blank fabric around the design so seam allowances do not interfere with the outer black border.
The pattern can also be enlarged or reduced depending on the intended use. A large version makes an impressive wall panel, while smaller versions can be adapted for ornaments, fabric banners, gift bags, or decorative blocks. When resizing, keep all pattern pieces at the same percentage so the proportions remain accurate.
You can personalize the Mary and Baby Jesus Felt/Quilt Appliqué Pattern by changing colors while preserving the overall layout. Mary’s robe could be cream, burgundy, lavender, or deep blue, while the surrounding garments could use muted earth tones. Metallic embroidery thread may also be used sparingly for halos or decorative details if you prefer a brighter holiday finish.
Finally, press or flatten the completed piece according to the materials you used. Felt should generally be protected from direct high heat, so avoid pressing it aggressively with a hot iron. Once everything is smooth and secure, the finished project can become a meaningful handmade decoration that combines quilting, appliqué, embroidery, and Christmas textile art in one design.
FAQ – Mary and Baby Jesus Felt/Quilt Appliqué Pattern
What is a Mary and Baby Jesus Felt/Quilt Appliqué Pattern?
A Mary and Baby Jesus Felt/Quilt Appliqué Pattern is a textile design made by layering individually cut fabric or felt shapes to create a Nativity-inspired scene. Each section is stitched onto a foundation fabric, producing a decorative panel that can be used in quilts, wall hangings, cushions, or seasonal decorations.
Is this project suitable for beginners?
Yes. The design contains many pieces, but most of them are relatively large and easy to recognize. Beginners should start with felt because it does not fray easily and works especially well with raw-edge appliqué. Taking time to organize and label each template will make assembly much easier.
What type of felt is best for appliqué?
A medium-weight craft or wool-blend felt is generally a good choice. It should be firm enough to hold its shape but flexible enough to stitch comfortably. Extremely thin felt may stretch, while very thick felt can make several overlapping layers difficult to sew.
Can quilting cotton be used instead of felt?
Yes. Quilting cotton can give the project a more traditional quilt appliqué appearance. When using woven cotton, fusible web or another stabilizer can help control fraying and keep smaller pieces in place during stitching.
Do I need a sewing machine to make this pattern?
No. The entire project can be completed with hand stitching. In fact, the visible running stitches are an important part of the handmade appearance. A sewing machine can be useful if you want to secure layers quickly or add quilting around the completed design.
Which stitch is best for felt appliqué?
Running stitch is ideal for recreating the appearance shown in the photo. Blanket stitch is another popular option and creates a more pronounced decorative border. Both stitches work well for handmade felt appliqué patterns.
Why is black fabric used between the colored pieces?
The black foundation creates visual separation between the appliqué sections. When narrow areas of black remain visible, the design resembles stained glass. This technique also makes each shape easier to recognize from a distance.
How can I make the golden halo details?
Cut the halos from yellow or golden felt and outline them with gold embroidery thread. Add short straight stitches pointing outward around the curved halo shapes. These small details create a radiant effect without requiring difficult embroidery.
Can this design be turned into a quilt block?
Yes. Rather than trimming around the rounded silhouette, place the complete appliqué composition on a rectangular or square foundation. Add borders, batting, and backing to turn it into a Christmas quilt block, wall hanging, or larger quilt centerpiece.
How should the pattern pieces be assembled?
Work from the background toward the foreground. Start with the halos, then add large clothing pieces, hair, faces, arms, smaller accents, and finally the Baby Jesus section. Always test the complete layout before permanently stitching the pieces.
How can I keep the appliqué from moving while sewing?
Use fabric pins, small appliqué pins, temporary textile adhesive, or lightweight fusible web. Avoid excessive adhesive because it can make hand stitching more difficult. The goal is simply to keep each shape stable until it has been sewn securely.
What size should I make the finished project?
There is no required size. A finished piece around 30 to 45 cm wide can work well for a wall panel, while smaller sizes are suitable for ornaments or quilt blocks. Larger versions make it easier to stitch the facial and hand sections accurately.
Can I change the colors in the original design?
Absolutely. The colors can be adapted to coordinate with your Christmas décor, quilt fabrics, or personal style. Maintaining strong contrast between neighboring pieces is more important than reproducing every original color exactly.
Conclusion
The Mary and Baby Jesus Felt/Quilt Appliqué Pattern is a beautiful way to combine traditional Nativity imagery with accessible textile techniques. By breaking the design into individual templates, beginning with the halos and larger clothing sections, layering the smaller facial and hand pieces, and finishing everything with gold decorative stitching, you can recreate the warm handmade appearance seen in the reference image.
Throughout the project, accurate cutting and careful positioning are more important than complicated sewing methods. Felt makes the design particularly approachable because the edges remain stable, while quilting cotton provides another excellent option for anyone who prefers classic fabric appliqué. The black foundation, colorful clothing, golden halos, and blue blanket work together to create the distinctive stained-glass-inspired style of this Mary and Baby Jesus appliqué pattern.
EASILY FIND THE FREE PDF FOR THIS PATTERN HERE!
The finished piece can become a Christmas wall hanging, quilt block, cushion, framed textile panel, seasonal decoration, or meaningful handmade gift. Most importantly, the pattern offers plenty of room for creativity through color choices, stitching styles, fabrics, and decorative details. If you make your own version of the Mary and Baby Jesus Felt/Quilt Appliqué Pattern, leave your sincere opinion about the project and share your suggestions. Your ideas about different colors, stitches, fabrics, or ways to display the finished appliqué can inspire even more creative variations of this special handmade design.