
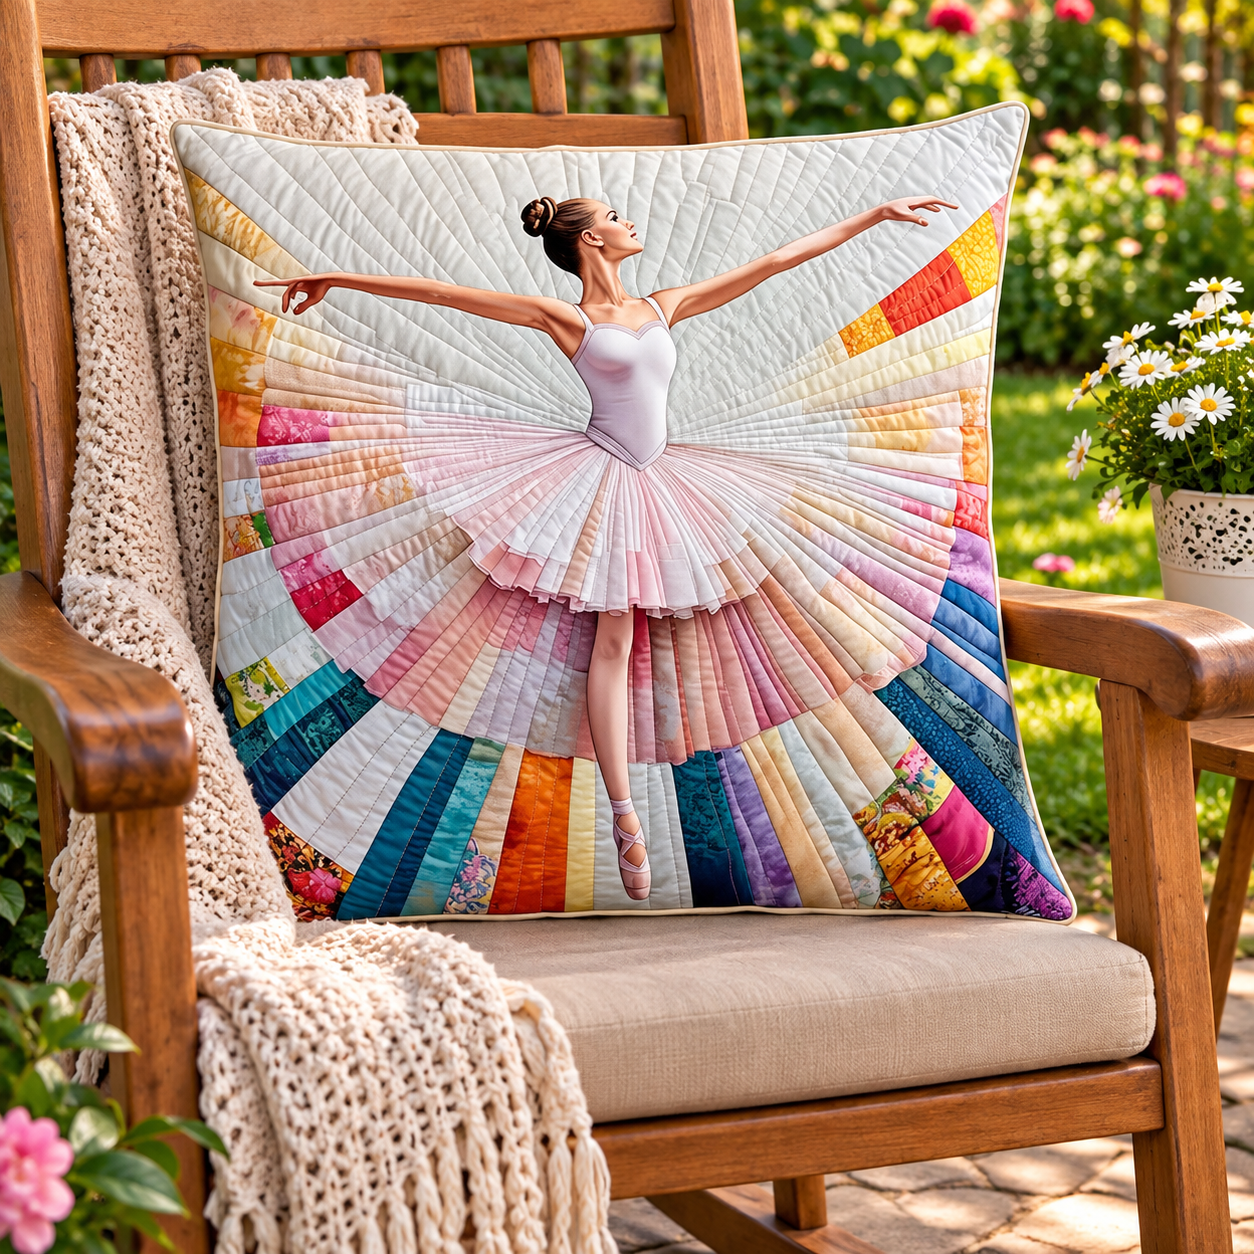
The Ballerina Themed Patchwork Cushion Pattern is a beautiful sewing project that combines the elegance of ballet with the warmth and personality of handmade patchwork. Inspired by the cushion shown in the reference image, this design features a graceful ballerina positioned at the center, while strips of colorful fabric spread outward like rays and visually merge with the dancer’s full skirt. The combination of soft pinks, cream fabrics, floral prints, turquoise, blue, orange, and other coordinated scraps gives the cushion a lively appearance without taking attention away from the main figure. One of the most interesting aspects of this project is how traditional patchwork quilting can be used to create movement, making the fabric appear almost as if it is dancing. The finished cushion can work beautifully in a bedroom, sewing room, reading corner, ballet-themed nursery, or handmade home décor collection. Better still, the project offers an excellent opportunity to transform small fabric remnants into something decorative and memorable.
Creating your own Ballerina Themed Patchwork Cushion Pattern does not require copying every fabric or detail visible in the inspiration photo. The goal is to understand the construction idea and recreate the visual effect using fabrics that are available to you. At its core, the cushion combines a radiating patchwork background, a layered ballerina appliqué, decorative quilting, and a neatly finished cushion cover. The ballerina can be made from separate fabric pieces for the body, leotard, arms, legs, hair, shoes, and tutu, allowing you to personalize skin tones, costume colors, and fabric prints. Beginners can simplify the design by using fewer patchwork sections, while experienced quilters can create narrower strips and more intricate quilting lines. Because handmade patchwork naturally allows variations, every finished cushion will have its own character. This flexibility is one reason the project is both creative and approachable.
Before starting the Ballerina Themed Patchwork Cushion Pattern, it is helpful to decide the final cushion size and organize all the materials in advance. A finished cushion measuring approximately 45 x 45 cm is a practical choice, although the pattern can easily be enlarged or reduced. You will need cotton fabrics in several coordinating colors, light-colored fabric for the upper background, pink fabrics for the tutu, fabric scraps for the lower patchwork rays, backing fabric, batting, thread, scissors or a rotary cutter, ruler, pins or clips, and a sewing machine. Fusible appliqué web can make positioning the ballerina pieces easier, especially for smaller sections such as the ballet shoes and hair. A removable fabric marker is also useful for planning the radiating lines before cutting or quilting. Washing and pressing cotton fabrics before cutting can help reduce unexpected shrinkage later. Good preparation gives the project cleaner seams, more accurate shapes, and a professional-looking finish.
Choosing Fabrics and Planning the Patchwork Layout
The first stage of the Ballerina Themed Patchwork Cushion Pattern is selecting a balanced fabric palette. The reference design uses a mostly light background around the dancer, with increasingly colorful pieces appearing toward the outer and lower areas of the cushion. For a similar effect, choose white, ivory, cream, pale blush, and very light beige fabrics as your foundation colors. These neutral shades create visual space around the ballerina and make the central appliqué easier to see. Cotton quilting fabric is especially suitable because it is stable, easy to sew, and available in many prints. Press every piece carefully before measuring and cutting.
DISCOVER MORE FREE PATTERNS HERE!
Next, collect several fabric scraps for the decorative rays. Soft pink, coral, yellow, turquoise, teal, navy, purple, orange, and floral fabrics can all work together when they are distributed thoughtfully. The colors do not have to match perfectly because patchwork often looks more appealing when it includes small variations. Try mixing solid fabrics with delicate prints instead of using only highly patterned pieces. A few stronger colors placed around the edges can add depth and frame the lighter center. Lay the fabrics next to one another before cutting to check whether the overall palette feels balanced.
To plan the radiating design, cut a paper square the same size as your unfinished cushion front. Mark a central point approximately where the ballerina’s waist will be positioned. From this point, draw several lines extending toward the outer edges of the square. These lines will become guides for the sunburst patchwork sections visible behind and below the dancer. The lines do not need to be perfectly symmetrical, but spacing them evenly will make construction easier. More sections create a detailed effect, while fewer sections make the project faster and more beginner-friendly.
For the lower portion of the cushion, divide some of the large rays into additional rectangular or trapezoid-shaped fabric sections. This is where you can showcase colorful scraps and create the lively patchwork effect seen in the inspiration image. Join smaller scraps together first if necessary, then trim them into the larger wedge shapes. Keep the seam allowance consistent throughout the construction, generally about 0.6 cm or the standard quarter-inch quilting allowance. Press each seam as you work so the finished patchwork remains flat. Alternating darker and lighter fabrics will help define individual rays.
The upper portion of the patchwork should remain quieter because this creates contrast around the dancer’s head and arms. Use mostly light fabrics and subtle prints in this area. You can still add a few pale yellow, peach, or soft pink details close to the sides for continuity. Avoid placing your busiest print directly behind the ballerina’s face because it may compete visually with the appliqué. The purpose of the background is to support the central figure rather than dominate it. A carefully controlled color transition makes the entire patchwork cushion pattern feel more intentional.
Once all the sections have been joined, trim the patchwork front into a perfect square. It is useful to make the front slightly larger than the planned finished measurement because quilting can cause minor shrinkage. For a 45 cm finished cushion, you might prepare a patchwork panel of approximately 47 x 47 cm before quilting and final trimming. Check that the center point remains where you want the ballerina’s waist to sit. Press the entire piece from the reverse side without stretching the fabric. Your colorful foundation is now ready for the ballerina design.
Creating the Ballerina Appliqué and Layered Tutu
The central feature of the Ballerina Themed Patchwork Cushion Pattern is the ballerina appliqué. Begin by drawing or tracing a simplified dancer silhouette onto paper. Separate the figure into manageable pattern pieces, including the head and neck, torso, arms, legs, hair, leotard, ballet shoes, and tutu. Because fabric appliqué works best with clear shapes, extremely tiny details are unnecessary. Focus instead on the recognizable ballet posture: an upright torso, extended arms, elegant legs, and a wide flowing skirt. Label every paper template before cutting it apart.
Transfer the pattern pieces onto the appropriate fabrics. A skin-tone cotton can be used for the arms, legs, neck, and face, while white, pale pink, lavender, or another delicate shade works well for the leotard. Brown, black, auburn, or golden fabric can create the hair depending on your preferred ballerina. If using fusible web, trace the shapes onto the paper side of the fusible material before attaching it to the reverse of the fabric. Remember that fusible appliqué templates may need to be reversed when tracing. Cut each piece carefully with small, sharp scissors.
Position the ballerina on the patchwork panel before permanently attaching anything. Her waist should align closely with the center where the patchwork rays meet. The arms can extend diagonally toward the upper corners, creating the open and graceful pose seen in the inspiration. Check that the head is not too close to the top edge and that sufficient space remains around the figure for quilting. Once you are satisfied with the arrangement, lightly fuse or pin the pieces in position. Work from the lowest layer upward so overlapping sections look natural.
The tutu is one of the most creative sections of this ballet cushion sewing project. Instead of using a single flat piece, create several curved or fan-shaped layers in white, blush, pink, peach, and pale cream. Cut the pieces slightly different in size so that the lower layers remain visible underneath the upper ones. These sections can follow the radiating patchwork lines, making the tutu appear to grow naturally from the background. Press small folds into some pieces if you want additional texture. However, avoid excessive bulk because the cushion front still needs to remain comfortable and easy to quilt.
Secure the appliqué edges using a narrow zigzag stitch, blanket stitch, or small straight stitch near the edge. Choose thread colors that coordinate with each fabric or use a neutral thread throughout for a more subtle effect. Stitch slowly around the arms, legs, and curved edges because these shapes require careful control. If you are new to appliqué, practice on scrap fabric before stitching the final ballerina. Turning the sewing machine needle into the fabric before rotating the work will help produce smoother corners. The objective is neat construction rather than absolute perfection.
Small embroidered or stitched details can be added after the main appliqué is secured. A few simple lines can suggest facial features, hair definition, shoe ribbons, or seams on the leotard. Keep these elements minimal because the fabric shapes already provide much of the visual information. You can also omit facial details entirely for a more modern appliqué style. What matters most is the dancer’s expressive silhouette and the dramatic movement created by her tutu. At this point, the Ballerina Themed Patchwork Cushion Pattern should clearly begin to resemble the final design.
Quilting the Cushion Front and Building the Cover
After finishing the appliqué, prepare the cushion front for quilting. Place the backing layer on your work surface, add a layer of batting, and position the finished patchwork panel on top. Smooth all three layers carefully from the center toward the edges. Secure them using quilting pins, clips, or temporary basting according to your preferred method. A thin or medium-weight batting works well for a decorative cushion because it adds dimension without making the cover unnecessarily stiff. Make sure there are no wrinkles before beginning to quilt.
The quilting visible in the inspiration image follows the same radiating direction as the patchwork. This technique is particularly effective for a Ballerina Themed Patchwork Cushion Pattern because the stitched lines reinforce the illusion of movement. Begin near the central waist area and sew straight or slightly curved lines outward. Space the quilting lines evenly, or allow them to gradually widen as they approach the cushion edges. Quilting can continue through some appliqué areas if desired, although the dancer itself can also remain less heavily quilted. Work slowly to prevent fabric shifting.
Additional quilting lines can be placed inside the tutu to emphasize its pleated appearance. Sew several narrow lines that extend from the dancer’s waist toward the lower curved edge of the skirt. When repeated across multiple fabric layers, these lines produce a beautiful fan-like texture. Use a thread color that blends with the pink and cream fabrics if you prefer a soft appearance. Contrasting thread can also be used when stronger definition is desired. Always test the stitch length and tension on a scrap quilt sandwich first.
Once quilting is complete, trim the cushion front to the exact required size. Check the corners with a quilting ruler to keep them square. If the finished cushion should measure 45 x 45 cm, remember to account for the seam allowance when deciding the cutting size. At this stage, you may also add narrow piping or binding around the edge for a more defined finish. The cushion in the inspiration has a neat outlined edge, which helps contain the many patchwork colors. A cream, pale beige, or soft coordinating color is an elegant choice.
For the cushion back, there are several simple construction options. An envelope closure is beginner-friendly because it does not require a zipper. Cut two fabric rectangles that overlap generously at the center back, finish their inner edges, and position them right sides together with the quilted front. Alternatively, install a concealed zipper along the bottom edge for a cleaner appearance. Choose a durable cotton or cotton-linen fabric for the back. It may be plain because the detailed patchwork front already provides strong visual interest.
Sew around the cushion perimeter with an even seam allowance, reinforcing areas near the opening. Trim excess bulk from the corners carefully without cutting through the stitching. Turn the cover right side out and gently push out the corners with a blunt tool. Press the outer edges if necessary and insert a cushion pad that properly fills the cover. A slightly generous insert can help the cushion maintain its shape and show the quilting texture. Your Ballerina Themed Patchwork Cushion Pattern is now structurally complete.
Finishing Details, Personalization, FAQ, and Conclusion
One advantage of the Ballerina Themed Patchwork Cushion Pattern is that it can be easily personalized. The dancer’s leotard may be pink, lavender, white, blue, or even made from a tiny floral print. Hair and skin-tone fabrics can be selected to represent different ballerinas, making each cushion unique. The surrounding scraps can also reflect a particular bedroom palette or favorite set of colors. Personalization works best when the overall value balance is preserved, keeping the area around the dancer light enough for the silhouette to remain clear.
If you prefer a softer traditional look, choose pastel fabrics throughout the patchwork. Blush pink, ivory, light yellow, peach, mint, and dusty blue create a gentle handmade style. For a more contemporary patchwork cushion, stronger colors such as teal, orange, fuchsia, indigo, and turquoise can be concentrated around the lower and outer edges. Combining these bright fabrics with a white or cream background prevents the design from becoming visually crowded. This gradual transition from light to colorful fabric is one of the most distinctive features of the project.
Beginners should avoid trying to make every patchwork wedge extremely narrow. Larger sections are easier to cut, align, and sew accurately. Once you understand how the rays connect, you can create another version using more pieces and more intricate details. The same principle applies to the ballerina appliqué. Start with a simplified silhouette and a three-layer tutu rather than attempting many tiny fabric sections. A clean and well-sewn simple design usually looks better than a complicated design with difficult-to-control seams.
Accurate pressing is also essential when working on a Ballerina Themed Patchwork Cushion Pattern. Press each patchwork seam as it is completed rather than waiting until the entire panel has been assembled. Use an up-and-down pressing motion instead of aggressively sliding the iron across the fabric, especially around bias-cut wedge edges. Stretching these sections can distort the square and make later assembly difficult. When adding appliqué, follow the instructions recommended for the fusible material being used. Careful pressing contributes significantly to the final quality.
The completed cushion should be handled like other handmade quilted items. When washing becomes necessary, gentle care is preferable because the project contains appliqué, quilting, and many small seams. A removable cushion cover makes maintenance significantly easier because the inner pillow form does not need to be washed each time. Check that all decorative stitching remains secure before cleaning. Allow the cover to dry thoroughly and reshape it carefully afterward. Proper care will help preserve the colors and quilting texture.
Most importantly, treat the reference image as inspiration rather than a requirement for absolute duplication. The beauty of the Ballerina Themed Patchwork Cushion Pattern comes from adapting the concept through your own fabric collection, sewing experience, and creative choices. Different scraps will naturally produce a different result, and that is part of the appeal of patchwork. You can even use meaningful fabric remnants from previous sewing projects to give the cushion a personal history. Every completed version can become a unique handmade decorative piece.
FAQ – Frequently Asked Questions About the Ballerina Themed Patchwork Cushion Pattern
What is a Ballerina Themed Patchwork Cushion Pattern?
A Ballerina Themed Patchwork Cushion Pattern is a decorative sewing project that combines traditional patchwork construction with a ballerina-inspired appliqué. The background is generally assembled from multiple fabric pieces, while the dancer becomes the main focal point. Quilting stitches add both structure and decorative texture.
Is this patchwork cushion suitable for beginners?
Yes, although beginners may want to simplify the number of patchwork sections and appliqué pieces. Larger fabric wedges and a simplified ballerina silhouette make construction much easier. Intermediate sewists can add additional skirt layers, detailed appliqué, piping, and denser quilting.
What type of fabric is best for this project?
Quilting-weight cotton is one of the best choices because it is stable, widely available, and easy to combine with other fabrics. Cotton scraps from previous projects are especially useful for creating the colorful lower patchwork sections. Fabrics of similar weight generally produce the smoothest result.
How large should the finished cushion be?
A 45 x 45 cm cushion is a versatile size for this design, but you can adjust the dimensions according to your needs. Larger cushions provide more room for detailed appliqué and patchwork. Smaller cushions may require simplifying the ballerina design so the individual pieces are not too tiny.
Do I need fusible web for the ballerina appliqué?
Fusible web is not absolutely necessary, but it can make the construction easier. It temporarily stabilizes appliqué pieces and helps keep small shapes in position while they are stitched. Traditional needle-turn appliqué or carefully pinned raw-edge appliqué can also be used.
How can I create the radiating patchwork effect?
Mark a central point near the ballerina’s waist and draw lines extending toward the edges of the cushion. Use these lines as guides for wedge-shaped fabric pieces. Joining different colors and prints along these rays creates the dramatic fan effect visible behind the dancer.
Can the tutu be made from real tulle?
Yes, lightweight tulle can be incorporated as a decorative layer, but cotton fabric is generally easier to sew and quilt. If you use tulle, add it selectively over the fabric tutu rather than relying on it for the entire skirt. This keeps the cushion comfortable and durable.
What colors work best for a ballerina patchwork cushion?
Pink, blush, cream, white, peach, pale yellow, turquoise, teal, and soft blue work especially well. However, there are no strict rules. The important design principle is creating enough contrast between the ballerina appliqué and the patchwork background.
How can I make the cushion look more professionally finished?
Consistent seam allowances, careful pressing, accurate trimming, smooth appliqué stitching, and balanced quilting make a noticeable difference. Adding narrow piping around the cushion can also create a polished edge. Take time at each stage instead of rushing the final assembly.
Can I use the same concept for other sewing projects?
Absolutely. The radiating patchwork design and ballerina appliqué can be adapted for wall hangings, quilt blocks, fabric panels, tote bags, or decorative bed quilts. Adjust the size of the appliqué and background pieces according to the final project.
Conclusion
The Ballerina Themed Patchwork Cushion Pattern combines several enjoyable sewing techniques into one expressive handmade project. Throughout this tutorial, you learned how to select coordinated fabrics, create a radiating patchwork background, prepare a layered ballerina appliqué, build the flowing tutu, quilt the cushion front, construct the backing, and finish the cover neatly. The design may appear detailed at first, but dividing the process into manageable stages makes it much easier to complete.
EASILY FIND THE FREE PDF FOR THIS PATTERN HERE!
The most important idea is to allow your own fabric choices to become part of the design. A handmade patchwork cushion does not need to reproduce every detail of the inspiration image to be successful. By combining accurate sewing with personal color choices and thoughtful quilting, you can create a ballerina cushion that feels completely individual. If you make your own Ballerina Themed Patchwork Cushion Pattern, leave your sincere opinion about the project and share your suggestions. It would be wonderful to know which colors, fabrics, appliqué details, or quilting techniques you would choose for your own version.