
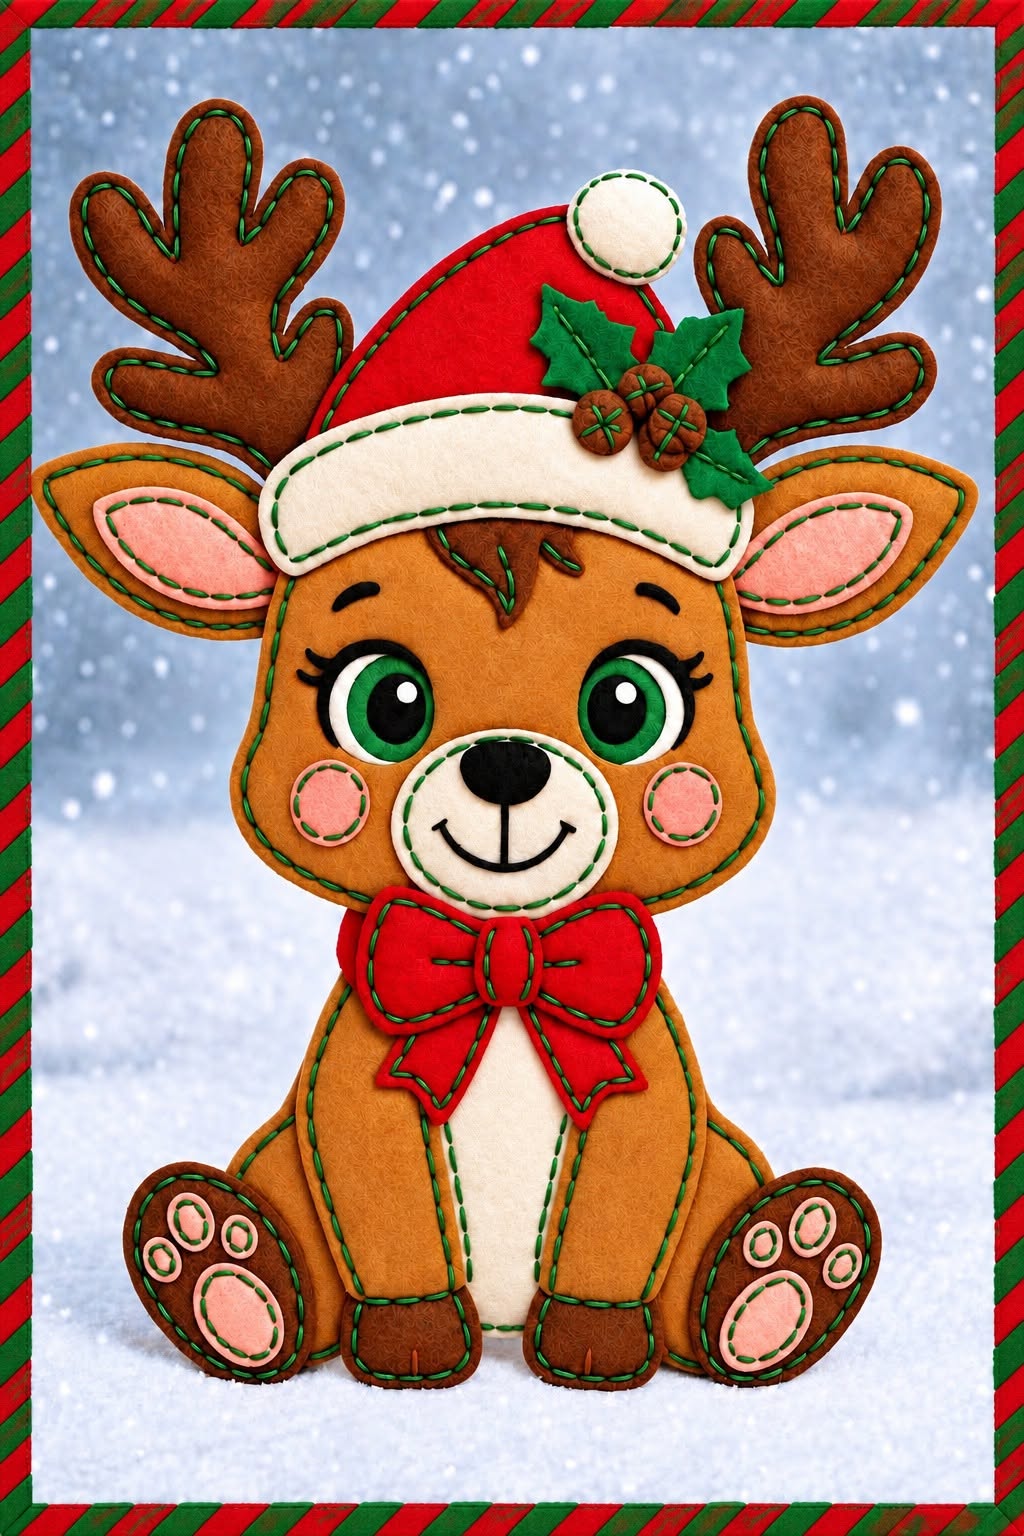
The Felt Christmas Reindeer Sewing Tutorial Pattern is a charming holiday sewing project that combines hand stitching, felt appliqué, simple embroidery, and layered decorative details in one adorable Christmas character. Inspired by the reindeer shown in the reference image, this project features a soft brown reindeer with large antlers, oversized ears, expressive green eyes, rosy cheeks, a cream muzzle, a red bow, and a festive Santa hat decorated with holly leaves and small berries. The finished design works beautifully as a Christmas decoration, shelf ornament, handmade gift, or seasonal craft project. Because felt does not fray easily, it is especially convenient for detailed shapes such as the antlers, facial pieces, paws, and tiny holiday embellishments. You can sew most of the project by hand, although a sewing machine may be used for selected seams if preferred. The goal of this tutorial is to explain how to recreate the appearance of the photographed project while keeping the construction process practical and approachable.
Working with a Felt Christmas Reindeer Sewing Tutorial Pattern also gives you plenty of opportunities to personalize the design rather than simply copying every detail exactly. You can select warm caramel brown for the body, darker brown for the antlers and lower legs, cream felt for the belly and muzzle, soft pink for the inside ears and cheeks, and bright Christmas red for the hat and bow. Small pieces of green felt form the holly leaves, while brown circles or tiny stuffed shapes can imitate the decorative berries or pinecone-style accents seen on the hat. Decorative blanket stitching around the edges adds definition and gives the reindeer its handmade personality. Gold stars can be embroidered or cut from felt to create extra Christmas detail without making the design overly complicated. By planning the colors and layers before sewing, even beginners can produce a polished result with balanced proportions and clean edges.
The most important part of this felt reindeer sewing project is patience during preparation. Before cutting your best felt, sketch every component on paper so you can adjust the proportions of the head, body, ears, antlers, legs, paws, hat, bow, and facial details. The photographed reindeer has a noticeably large head compared with its body, which creates its cute, childlike appearance, while the seated legs and wide feet help visually balance the character. The eyes are another important feature because they give the design much of its personality, so take time to position them evenly before attaching them. Use small amounts of stuffing instead of overfilling the pieces, especially around narrow areas such as the antlers and arms. Consistent hand stitches will make the finished ornament look more professional and will also strengthen the seams. Once the pattern pieces are prepared carefully, the remaining construction becomes much easier and more enjoyable.
Materials and Pattern Preparation for the Felt Christmas Reindeer
Begin your Felt Christmas Reindeer Sewing Tutorial Pattern by gathering good-quality craft felt in medium brown, dark brown, cream, red, green, pink, black, white, and any additional accent colors you want to include. You will also need coordinating embroidery floss, sewing thread, a hand-sewing needle, sharp fabric scissors, polyester stuffing, pins or fabric clips, a washable fabric marker, and paper for drawing the pattern. Small embroidery scissors are particularly useful for cutting the narrow spaces between the antler branches and the curved facial details.
DISCOVER MORE FREE PATTERNS HERE!
Create the basic reindeer pattern on paper before transferring anything to felt. Draw a large rounded head with slightly wider cheeks, followed by a smaller pear-shaped body that narrows toward the neck. Make separate templates for the arms, legs, ears, antlers, feet, muzzle, nose, eyes, belly patch, bow, Santa hat, hat trim, holly leaves, berries, and any decorative stars. For pieces that will be stuffed, remember that you normally need two mirrored layers.
For an ornament similar in proportion to the reference design, you could make the finished reindeer approximately 25 to 30 cm tall, although the project can be enlarged or reduced. A head around 11 to 13 cm wide creates the oversized, cute appearance visible in the design. Keep the body slightly narrower than the head, while allowing enough space for the arms and belly patch. The antlers should extend beyond the top and sides of the head so they remain visually noticeable behind the Santa hat.
Trace each template onto the appropriate felt with a removable fabric marker. When cutting paired components, place two pieces of felt together and cut them at the same time whenever possible. This makes matching shapes easier and prevents one side from becoming noticeably different from the other. Accurate cutting is especially important for the reindeer antlers, eyes, ears, and feet because these symmetrical areas quickly reveal uneven pattern work.
Organize all the cut pieces before sewing. You may find it helpful to place the entire character flat on your work surface as if assembling a puzzle. Position the ears behind the head, set the antlers above them, place the muzzle near the lower middle of the face, and test the eyes before attaching anything permanently. This simple dry-layout step prevents placement mistakes and gives you a chance to adjust the expression.
Finally, choose your stitch style. A blanket stitch works beautifully around the outer edges because it creates the decorative handmade outline visible throughout this type of felt project. Backstitch is useful for facial lines, eyebrows, the mouth, and small decorative markings. Running stitch can be used for simpler areas. Whatever technique you choose, try to maintain equal stitch length and spacing throughout the entire reindeer.
Sewing the Reindeer Head, Face, Antlers, and Christmas Hat
Start construction of the Felt Christmas Reindeer Sewing Tutorial Pattern with the head because it contains most of the visual details. Place the cream muzzle on one brown head piece and secure it temporarily with pins or small fabric clips. Sew carefully around the outer edge using matching or contrasting embroidery floss. Add the black nose near the upper center of the muzzle and embroider a small curved mouth underneath it.
Build the eyes from layered felt pieces. Start with a larger black or very dark outline, add white and green sections for the iris and eye highlights, and finish with a smaller black pupil. The green eyes shown in the inspiration image contrast especially well with brown felt. Before sewing them permanently, position both eyes and check the face from a distance to ensure that they are level and evenly spaced. Add eyelashes and small curved eyebrows with black embroidery floss.
The rosy cheeks can be created from two small circles of pink felt. Sew them symmetrically on either side of the muzzle. For the ears, cut two brown outer ear pieces and two smaller pink inner sections. Stitch the pink sections onto the brown ears before joining or reinforcing the ear layers. Slightly curving or pinching the base of each ear during attachment can create a more three-dimensional appearance.
Next, construct the felt reindeer antlers from dark brown felt. Cut two matching pieces for each antler if you want them lightly stuffed and dimensional. Sew around the edges with contrasting tan or gold-brown thread, leaving a small opening for stuffing. Add only a tiny amount of fiberfill so the narrow branches remain neat. Close the opening carefully and place the antlers behind the head before joining the two main head layers.
The Santa hat is one of the most distinctive Christmas elements in this design. Cut a curved triangular hat from red felt and create a cream band for the bottom. Add a small white or cream pom-pom shape to the tip. Decorative gold stars may be embroidered directly onto the red felt or made from tiny felt appliqués. Sew the decorations onto the hat before attaching it to the reindeer so the stitching remains easy to access.
Finish the hat with holly leaves and berries. Cut three small pointed leaves from green felt and add a center vein with green embroidery thread. Arrange them near one side of the cream hat band and attach two or three small brown or red berry shapes at the center. Once the decoration is complete, place the hat across the upper portion of the head, allowing the antlers to remain visible behind it. Sew the hat securely without flattening the dimensional antlers.
Building the Stuffed Body, Legs, Feet, Arms, and Bow
The body of the Felt Christmas Reindeer Sewing Tutorial Pattern should be compact and slightly rounded. Cut two matching body pieces from medium brown felt and prepare a long cream belly patch for the front. The photographed project uses the lighter center panel to visually separate the two front legs while also adding contrast. Sew the belly patch onto the front body piece before joining the body layers.
Create two arms from brown or golden-brown felt. They may be slightly darker or lighter than the main body if you want a patchwork appearance. Add decorative stitches or small star details before stuffing them. Sew around each arm, leaving the upper edge open, and insert a small amount of polyester stuffing. Avoid filling them too firmly because soft arms are easier to position naturally against the body.
Make the legs in a similar way, using brown felt with darker brown sections near the feet if desired. The seated position is an important part of the project’s character. Rather than making long straight legs, design slightly short, rounded limbs that angle outward. The feet should sit beside the body and face toward the viewer. This arrangement creates the wide, stable silhouette seen in the reference photograph.
For each foot, add a darker brown outer section and several smaller pink or tan paw-pad shapes. A large central pad with three or four small toe pads creates the recognizable animal-paw effect. Stitch each pad individually before assembling the foot. Decorative contrasting thread around the edges emphasizes the layered construction and makes the tiny pieces easier to see.
Now assemble the main body. Place the arms and legs where they need to connect, sandwiching attachment areas between the front and back body layers whenever appropriate. Sew around the outer body edge, leaving an opening large enough for stuffing. Fill the torso gradually, pushing small amounts of stuffing into the upper and lower sections. When the body feels softly firm but not rigid, close the remaining opening with neat stitches.
The red bow at the neck completes the body assembly. Cut two rounded bow loops and a small center strip or circle. For added dimension, the loops can be created from doubled felt and filled with a very small amount of stuffing. Add decorative stitching around the edges and optional gold stars similar to those used on the Santa hat. Attach the finished Christmas reindeer bow directly below the head, centered over the upper chest.
Final Assembly, Decorative Stitching, Finishing, and Display Ideas
Once the head and body are complete, join them securely. The head of this Felt Christmas Reindeer Sewing Tutorial Pattern is intentionally large, so use several strong stitches rather than attaching it at only one point. Position the head slightly forward over the upper body, check that the character remains balanced, and stitch through both layers in several hidden locations. The bow can help conceal the joining seam.
Inspect all outer seams and correct any uneven sections before considering the project finished. If one leg appears slightly flatter than the other, carefully redistribute the stuffing with your fingers. If an ear or antler leans too far to one side, reinforce its base with a few additional stitches. Small adjustments at this stage can noticeably improve the symmetry of the final handmade felt reindeer.
Add optional embroidery to create more visual texture. Small gold stars can decorate the torso, legs, hat, or bow. Simple stitched lines can imitate seams and reinforce the patchwork appearance. If you prefer a traditional rustic style, use tan thread against the brown felt. For stronger contrast, cream, gold, or white embroidery can emphasize the outline of individual components.
You can also personalize the finished project. Embroider a name, year, or short holiday message on the back if the reindeer will be given as a handmade Christmas gift. Another option is to slightly change the hat, bow, or eye colors for each reindeer when creating several pieces. Personal variations make handmade decorations feel unique while preserving the main structure of the Felt Christmas Reindeer Sewing Tutorial Pattern.
For display, the reindeer works especially well as a seated shelf decoration because the wide feet help stabilize the body. Place it on a mantel, craft-room shelf, Christmas table, or holiday display where the details remain visible. If you want to turn a smaller version into a hanging ornament, sew a strong fabric or ribbon loop into the top seam before closing the head. Make sure the loop is firmly anchored inside the felt layers.
The finished result should combine clean construction with the slightly imperfect charm that makes handmade felt projects appealing. Do not worry if every stitch is not identical. What matters most is that the seams are secure, the components are positioned carefully, and the reindeer has a balanced expression. By following these steps patiently, the Felt Christmas Reindeer Sewing Tutorial Pattern becomes a reusable project that can be recreated in different sizes, colors, and decorative styles for many Christmas seasons.
FAQ – Felt Christmas Reindeer Sewing Tutorial Pattern
What is the best felt for making a Christmas reindeer?
Medium-weight craft felt is suitable for most versions of this project. If you want a more refined finish and plan to keep the decoration for many years, denser felt can provide better structure. The most important factor is choosing felt that can hold stitches without stretching excessively, particularly around the antlers, legs, and narrow decorative pieces.
Can beginners make this Felt Christmas Reindeer Sewing Tutorial Pattern?
Yes. The project contains many small pieces, but the individual sewing techniques are relatively straightforward. Beginners can work slowly, starting with the large body and head shapes before moving to the smaller eyes, paw pads, holly leaves, and stars. Practicing blanket stitch on scrap felt first can help you achieve more consistent edges.
Do I need a sewing machine?
No. This felt Christmas sewing project can be completed entirely by hand. In fact, hand sewing gives you more control when working around small curved components such as ears, antlers, feet, facial appliqués, and the bow. A sewing machine is optional and may be used for larger seams if that is your preference.
How much stuffing should I use?
Use enough polyester fiberfill to give the character a soft three-dimensional shape without making the seams bulge. Add stuffing in small portions and distribute it gradually. Narrow areas such as arms and antlers require very little stuffing, while the head and body can be slightly fuller. Overstuffing may distort carefully cut felt shapes.
How can I make the reindeer sit upright?
Design a relatively flat lower body and position the feet wide enough to create visual and physical balance. Do not overstuff the bottom section. Before closing the final seam, place the project on a flat surface and adjust the stuffing until it sits comfortably. The large outward-facing feet can also help stabilize the decoration.
What stitch is best for felt Christmas ornaments?
The blanket stitch is one of the most popular choices because it secures the felt edges while creating an attractive decorative outline. Backstitch works well for eyebrows, mouth details, eyelashes, leaf veins, and other embroidery. Small whip stitches can also be used where you want the seam to be less noticeable.
Can I resize the pattern?
Yes. Every piece can be enlarged or reduced as long as the same proportions are maintained. If you make a very small reindeer, simplify tiny details such as the paw pads or holly berries because they can become difficult to cut and sew. Larger versions allow more elaborate embroidery and appliqué work.
What colors work best for a traditional Christmas reindeer?
Warm brown, dark chocolate brown, cream, red, green, pink, white, and gold create a classic Christmas palette. However, you can personalize the design with burgundy, forest green, pastel tones, or even neutral Scandinavian-inspired shades. Keeping strong contrast between the face, muzzle, eyes, and antlers will help the character remain visually clear.
Can this pattern be used to make Christmas gifts?
Absolutely. A handmade felt Christmas reindeer can be a thoughtful seasonal gift, particularly when personalized with a name, date, different bow color, or embroidered detail. You can also create a family of reindeer in different sizes while keeping the same basic construction method.
How can I keep the small felt pieces from moving while sewing?
Use fabric clips, pins positioned away from the stitching line, or a small temporary hand stitch to hold pieces in place. It is also helpful to arrange the entire design before sewing anything permanently. This is particularly important for the eyes and facial features because even a small positioning difference can change the reindeer’s expression.
Conclusion
The Felt Christmas Reindeer Sewing Tutorial Pattern brings together many enjoyable handmade techniques in a single festive project. You begin by preparing accurate paper templates, choosing complementary felt colors, and cutting the head, body, antlers, ears, limbs, facial details, Santa hat, bow, and Christmas embellishments. From there, the project develops through layered appliqué, decorative blanket stitching, embroidery, careful stuffing, and final assembly.
The most important lessons are to prepare the pattern carefully, test the placement of the facial details before sewing, use small amounts of stuffing, and maintain consistent stitching around the visible edges. Details such as green layered eyes, pink cheeks, dark brown antlers, paw pads, a red Santa hat, a festive bow, holly leaves, berries, and embroidered stars transform simple pieces of felt into a cheerful Christmas character.
EASILY FIND THE FREE PDF FOR THIS PATTERN HERE!
Once you understand the construction process, you can use the same Felt Christmas Reindeer Sewing Tutorial Pattern as the foundation for many personalized versions. Change the colors, enlarge the pattern, simplify the decorative elements, embroider a name, or create several matching reindeer for your seasonal décor. The creative possibilities are wide open while the basic sewing method remains accessible and enjoyable. If you make your own version of this Christmas reindeer, leave your sincere opinion about the tutorial and share your suggestions. It is always interesting to hear which colors, stitches, decorations, or creative changes you would use to make this adorable felt reindeer truly your own.