
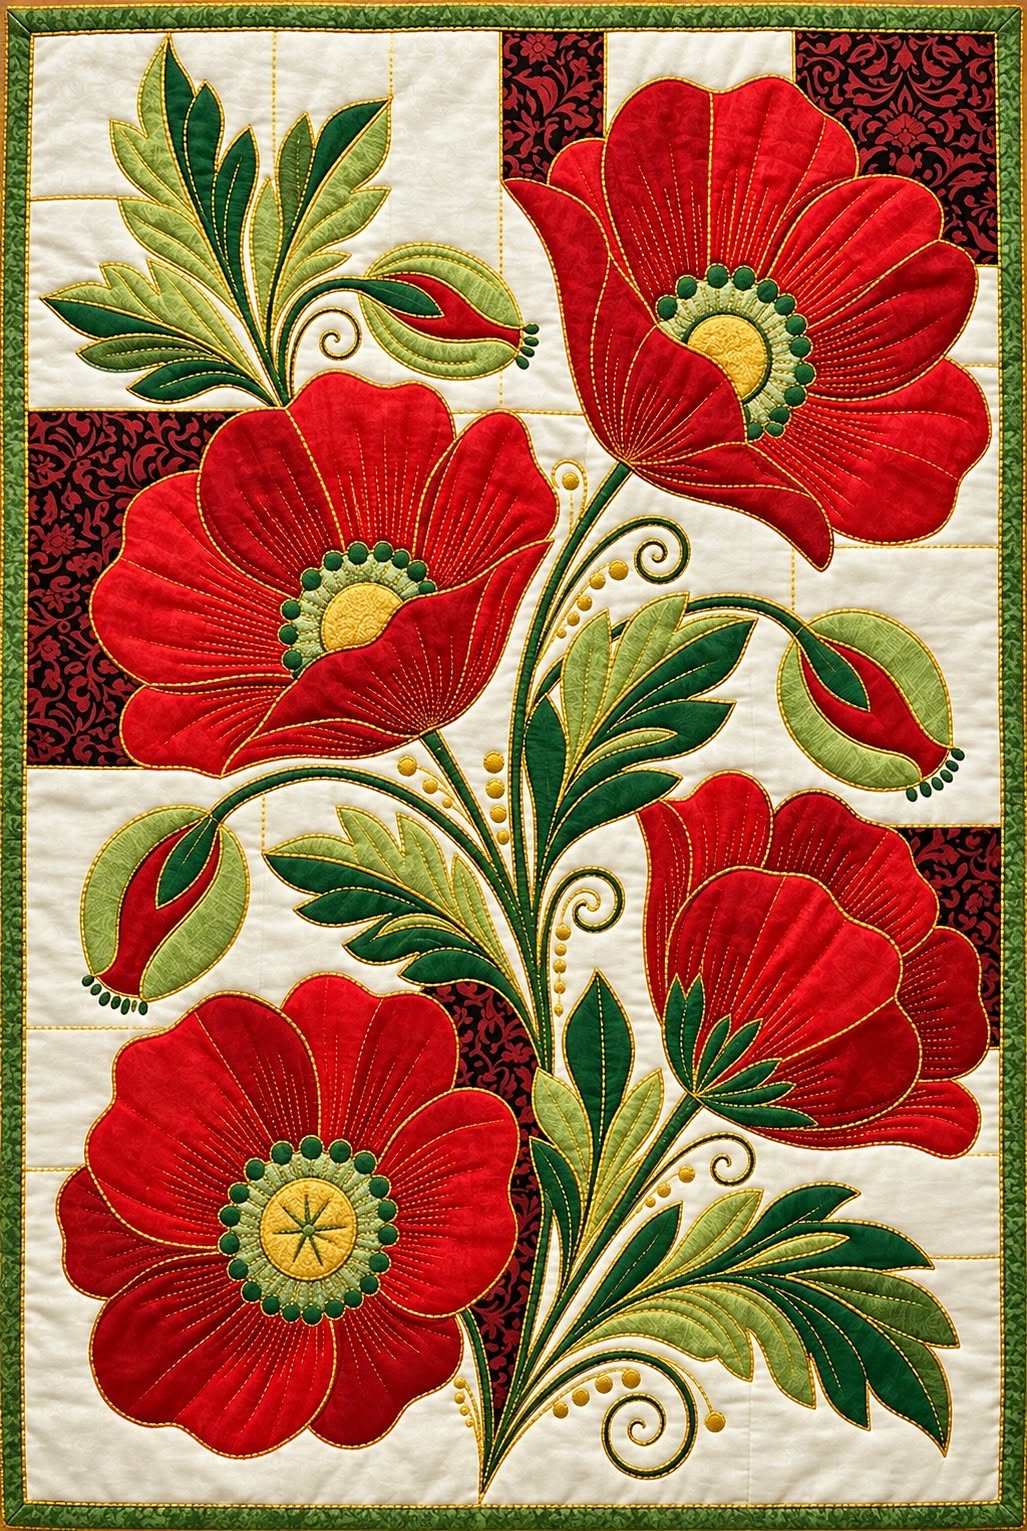
The Quilt Panel with Red Poppy Appliqué Pattern is a striking fabric-art project that combines traditional appliqué, decorative stitching, floral composition, and quilting into one elegant wall panel. The large red poppies immediately become the focal point, while the curved green stems, layered leaves, flower buds, and contrasting background blocks give the design movement and depth. Although the finished piece appears detailed, the project can be approached one element at a time, making it suitable for confident beginners as well as experienced quilters. The secret is to prepare accurate templates, organize the fabrics before sewing, and build the composition gradually instead of trying to complete every detail at once. Using different shades of red and green also helps reproduce the dimensional appearance visible in the inspiration image. Throughout this tutorial, you will learn how to plan, cut, position, appliqué, quilt, and finish your own red poppy quilt panel.
One of the most beautiful characteristics of this Quilt Panel with Red Poppy Appliqué Pattern is the contrast between the bright floral appliqués and the neutral background. Large scarlet petals stand against cream-colored fabric, while darker printed blocks create visual breaks around the flowers. Green foliage provides balance, connecting every flower through flowing stems and decorative curves. Small details around the flower centers and buds make the panel feel handcrafted rather than flat or overly simple. You do not need to copy every shape exactly to create a successful version; the project can be adapted according to the fabrics available in your sewing room. What matters most is preserving the recognizable structure of large poppies, layered leaves, graceful stems, and an attractive rectangular quilt-panel layout.
Before beginning the Quilt Panel with Red Poppy Appliqué Pattern, gather cotton quilting fabrics in several coordinated colors, along with batting, backing fabric, thread, an appliqué adhesive or your preferred appliqué preparation method, scissors, pins, marking tools, and a sewing machine. A practical finished size for a decorative wall panel is approximately 45 cm × 65 cm, although you can enlarge or reduce the measurements while keeping the same proportions. Choose at least two or three red fabrics for the petals, dark and medium greens for leaves and stems, yellow or gold for the flower centers, and cream or off-white fabric for the main background. A black-and-red printed fabric can be used for the contrasting corner sections seen in the inspiration. Washing and pressing your cotton fabric before cutting can reduce unexpected shrinkage later and will make accurate appliqué preparation much easier.
Preparing the Background and Poppy Appliqué Templates
Begin your Quilt Panel with Red Poppy Appliqué Pattern by cutting a cream or ivory background rectangle approximately 45 cm × 65 cm. If you prefer to square the quilt after quilting, cut the background about 2 cm larger on each side. Press the fabric carefully so that it lies completely flat. A smooth foundation is important because wrinkles can affect the placement of the appliqué pieces and cause distortion during stitching.
DISCOVER MORE FREE PATTERNS HERE!
Next, create several contrasting rectangular background sections using a dark floral, damask, or tone-on-tone printed fabric. Looking at the composition, these darker blocks appear in different areas around the flowers rather than covering the entire background. Cut several rectangles and squares in varying sizes, such as 10 cm × 15 cm, 12 cm × 18 cm, and 8 cm × 12 cm. Position them near the corners and edges, leaving plenty of cream background visible between them.
Now prepare the poppy appliqué templates. The project works beautifully with four large poppy flowers, three or four flower buds, several groups of leaves, and long curved stems. Draw each flower as separate overlapping petals rather than one solid shape. Large petals can measure approximately 12 to 16 cm across, depending on the final flower size. Keeping the petals separate makes it possible to overlap them and create the dimensional appearance that gives the panel its artistic character.
For the flower centers, prepare circles or slightly oval shapes between 3 and 5 cm wide. Use golden yellow fabric for the central portion and dark green fabric for the decorative outer ring. Small circular or semicircular pieces around the center can imitate the textured appearance found in natural poppies. These tiny pieces require more patience, so beginners can simplify them by using decorative stitching or embroidered dots instead.
Create leaf templates in multiple sizes instead of repeating a single leaf shape. Large leaves can measure approximately 10 to 14 cm long, while smaller leaves may measure between 5 and 9 cm. Include pointed leaves, narrow curved leaves, and larger rounded leaves. Using light, medium, and dark green fabric will make the floral quilt appliqué appear much richer and more dimensional.
Finally, prepare several curved stem templates or draw stems directly onto the background with a removable fabric marker. Stems can be created from narrow bias strips measuring approximately 0.7 to 1 cm wide. Bias-cut fabric naturally bends around curves more easily than straight-grain strips. Include a few spiral stems near the flowers and buds because these decorative curls are an important visual feature of the Quilt Panel with Red Poppy Appliqué Pattern.
Cutting, Arranging, and Appliquéing the Red Poppy Design
When all templates are ready, transfer them to the selected fabrics. If you are using fusible appliqué, remember that shapes drawn on the paper side of fusible web may need to be reversed before cutting. Trace the flower petals, leaves, buds, centers, and other decorative details carefully. Leave a small amount of space around each traced piece while initially cutting them from the fusible web.
Fuse the prepared shapes to the wrong side of your fabrics according to the adhesive manufacturer’s general heat requirements, taking care not to scorch the cotton. After the pieces cool, cut directly on the template lines. This produces clean, accurate pieces that are much easier to arrange. Keep each flower’s components grouped together in a small container or labeled pile so that similar red petals do not become mixed.
Place the largest red poppies onto the background before positioning smaller elements. One flower can sit toward the upper-right area, another toward the center-left, another toward the lower-left, and a fourth toward the lower-right. Avoid perfectly symmetrical spacing because the flowing botanical arrangement is part of the charm of this red poppy appliqué quilt. Rotate the flowers slightly so that they appear to be growing naturally rather than sitting in identical positions.
Add the stems after finding satisfactory locations for the flowers. The main stems should travel vertically and diagonally through the center of the panel, visually connecting the flowers. Allow some stems to overlap and curve naturally. Then place the leaf clusters around them, alternating light and dark fabrics. Stand a few leaves upright and angle others sideways to create movement.
Position the flower buds near the outer edges of the composition. Each bud can be made from a red inner petal surrounded by overlapping light-green pieces. Add tiny dark-green stitches or small fabric circles at the pointed ends if desired. These buds are important because they lead the viewer’s eye outward and prevent the larger open flowers from making the center of the quilt feel overly heavy.
Once you are pleased with the complete arrangement, secure the appliqués according to your chosen method. Fuse them permanently if using fusible appliqué, or baste them if working with turned-edge appliqué. Stitch around each piece with a narrow blanket stitch, zigzag stitch, satin stitch, or straight appliqué stitch. Matching thread creates subtle edges, while contrasting thread can emphasize the handmade outlines. Work slowly around tight curves, especially around petals and spirals.
Adding Texture, Quilting Details, and Dimensional Effects
The quilting is what transforms the flat arrangement into a finished Quilt Panel with Red Poppy Appliqué Pattern. Begin by emphasizing each poppy petal with interior quilting lines. Follow the natural direction in which a flower petal would grow, beginning near the flower center and stitching outward. Slightly curved lines look more organic than perfectly straight lines and help imitate the veins and folds seen in real poppy petals.
You can add several closely spaced lines inside each petal without filling the entire surface. The objective is to create subtle shadows and texture. Red thread produces a refined tone-on-tone effect, while slightly darker burgundy thread gives the petals more definition. If the petals are different shades of red, select a thread color that blends well across all of them.
The leaves can be quilted in a similar way. Stitch a central vein through each leaf and add smaller angled veins extending toward the edges. Dark green thread creates clear definition, while neutral or lighter green thread results in a softer appearance. Quilting each leaf differently adds interest, especially when several shades of green are grouped closely together.
Decorative circular stitching can be used around the golden flower centers. Begin by outlining the yellow center, then quilt several lines radiating outward. Small dark-green circles around the center can be secured individually or represented with satin stitches, French knots, or dense machine stitching. These details are especially effective because they provide texture at the point where the viewer naturally focuses.
After completing the appliqué details, create a quilt sandwich with the backing fabric, batting, and decorated quilt top. Smooth every layer carefully before pinning or basting. Quilt the cream background using gentle free-motion curves, meandering lines, or widely spaced echo quilting around the flowers and leaves. Keeping the background quilting relatively light allows the large red flowers to remain dominant.
Around the dark printed blocks, simple straight quilting is usually enough. You can stitch close to the seams to stabilize those areas without competing with the floral appliqué. As you quilt, regularly check the back of the panel to make sure there are no folds or puckers. When quilting is finished, square the outer edges carefully so the final panel remains straight and balanced.
Finishing the Quilt Panel and Creating a Professional Display
To finish the Quilt Panel with Red Poppy Appliqué Pattern, prepare binding approximately 6 to 7 cm wide before folding. Green binding works especially well because it connects visually with the stems and leaves while framing the red flowers. Join enough strips to go completely around the panel, then press the continuous binding strip in half lengthwise.
Sew the binding to the front of the quilt using a consistent seam allowance. Take extra care at the corners so they form clean miters. Fold the binding around to the back and secure it by hand for a traditional finish or by machine if you prefer faster construction. Keep the binding width even on all four sides because an uneven frame can distract from an otherwise beautiful quilt.
If the project will become a wall hanging, add a hanging sleeve to the back before completing the final hand stitching. A sleeve around 8 to 10 cm deep is generally large enough for a small hanging rod. Attach it near the upper edge without allowing the stitches to show through on the front. Small corner pockets can also be added if you prefer using a lightweight support rod.
Give the completed panel a careful final press from the back using appropriate heat for your fabrics and appliqué method. Avoid aggressively flattening dimensional quilting because the raised texture is one of the features that makes the poppies visually appealing. If necessary, place a soft towel beneath the quilt while pressing so the quilted areas keep their fullness.
One advantage of this poppy quilt pattern is its flexibility. You can create a smaller version with one flower for a cushion cover, use two flowers for a table runner, or enlarge the composition to create a dramatic wall quilt. The floral colors can also be adapted. While red creates the classic poppy appearance, coral, burgundy, orange, or even artistic blue flowers could produce an entirely different interpretation.
The final project should feel balanced rather than mechanically perfect. Handmade appliqué often becomes more attractive when slight variations in curves, petals, and stitching remain visible. The Quilt Panel with Red Poppy Appliqué Pattern is designed to celebrate fabric texture, color contrast, and expressive quilting. Take time with the arrangement and enjoy the creative process rather than rushing to reproduce every small detail exactly.
FAQ – Frequently Asked Questions About the Quilt Panel with Red Poppy Appliqué Pattern
What is a Quilt Panel with Red Poppy Appliqué Pattern?
A Quilt Panel with Red Poppy Appliqué Pattern is a decorative quilted fabric panel featuring poppy flowers created with appliqué techniques. Separate fabric shapes are layered over a background and stitched into place. Quilting is then added to create texture, stability, and dimension.
Is this red poppy appliqué quilt suitable for beginners?
Yes, although beginners may want to simplify some of the smallest details. The large petals and leaves are relatively easy to cut and appliqué. Small circles, narrow stems, and tight curves require additional patience. Completing one flower at a time makes the project much more manageable.
What fabric is best for a poppy appliqué quilt?
Quality cotton quilting fabric is an excellent choice because it is easy to cut, press, appliqué, and quilt. Using several shades of red quilting fabric and green quilting fabric provides more depth than using only one color for every element.
How large should the finished quilt panel be?
A convenient decorative size is approximately 45 cm × 65 cm, but there is no mandatory measurement. You can reduce the pattern for a cushion, enlarge it for a wall quilt, or change the proportions according to your available space.
Do I need fusible web for appliqué?
No. Fusible web is convenient because it holds the pieces securely before stitching, but traditional needle-turn appliqué, raw-edge appliqué, freezer-paper techniques, or other preferred methods may also be used. Choose the technique that best matches your experience and preferred appearance.
How do I make the poppy petals look dimensional?
Use multiple red fabric shades and overlap individual petals slightly. After appliquéing them, add curved quilting lines that travel from the flower center toward the outer edge. These stitched lines create visual folds and shadows similar to natural petals.
Which colors work best for this quilt panel?
Classic red, burgundy, cream, dark green, light green, gold, and black provide a dramatic botanical palette. The cream background creates breathing room around the appliqués, while darker patterned sections add contrast. You can modify the palette while keeping strong separation between flowers and background.
Can the flowers be sewn by hand?
Absolutely. Hand appliqué produces a soft traditional finish and is especially attractive on curved floral shapes. Machine appliqué is faster, but neither technique is inherently better. The best choice depends on the look you want and the amount of time you wish to spend on the project.
What stitch should I use around the appliqué pieces?
Blanket stitch, narrow zigzag, satin stitch, or straight stitching can all work well. A blanket stitch gives a decorative handcrafted appearance, while a narrow straight stitch produces a cleaner and less visible edge. Always test your stitch on scrap fabric first.
How can I prevent puckering while quilting the panel?
Make sure the top, batting, and backing are smooth before basting. Secure the layers adequately and quilt gradually from central areas toward the edges. Avoid pulling the fabric while stitching, and check the backing frequently to make sure folds are not developing.
Can I turn this pattern into another sewing project?
Yes. Individual poppies from the Quilt Panel with Red Poppy Appliqué Pattern can be adapted for cushions, tote bags, table runners, placemats, fabric organizers, or smaller decorative wall hangings. The appliqué elements are versatile enough to be rearranged into many compositions.
How should I quilt the background around the flowers?
Simple meandering, gentle curves, echo quilting, or spaced free-motion stitching are good options. The background quilting should complement the appliqué instead of overwhelming it. Keeping the design relatively simple makes the red flowers stand out more clearly.
Conclusion
The Quilt Panel with Red Poppy Appliqué Pattern combines bold floral appliqué with expressive quilting to create a decorative project full of color and movement. By starting with a neutral background, adding contrasting printed blocks, preparing individual red petals, building dimensional flower centers, and connecting everything with curved stems and layered green leaves, you can gradually reproduce the character of the inspiration piece without making the construction unnecessarily complicated.
The most important lessons are to organize the appliqué pieces before stitching, work from the largest elements toward the smallest details, use varied shades to create depth, and allow the quilting lines to reinforce the natural shapes of the flowers and foliage. Finishing the project with carefully squared edges and coordinated binding will give your red poppy quilt panel a polished appearance suitable for displaying as handmade fabric art.
EASILY FIND THE FREE PDF FOR THIS PATTERN HERE!
You can also personalize the pattern by changing the flower arrangement, experimenting with different fabrics, simplifying the smaller decorative elements, or adapting individual poppies for other quilt and sewing projects. That creative freedom is part of what makes appliqué quilting so enjoyable. If you make your own Quilt Panel with Red Poppy Appliqué Pattern, leave your sincere opinion about the project and share your suggestions. It would also be wonderful to hear which colors, quilting details, or appliqué techniques you would use to create your own version.