
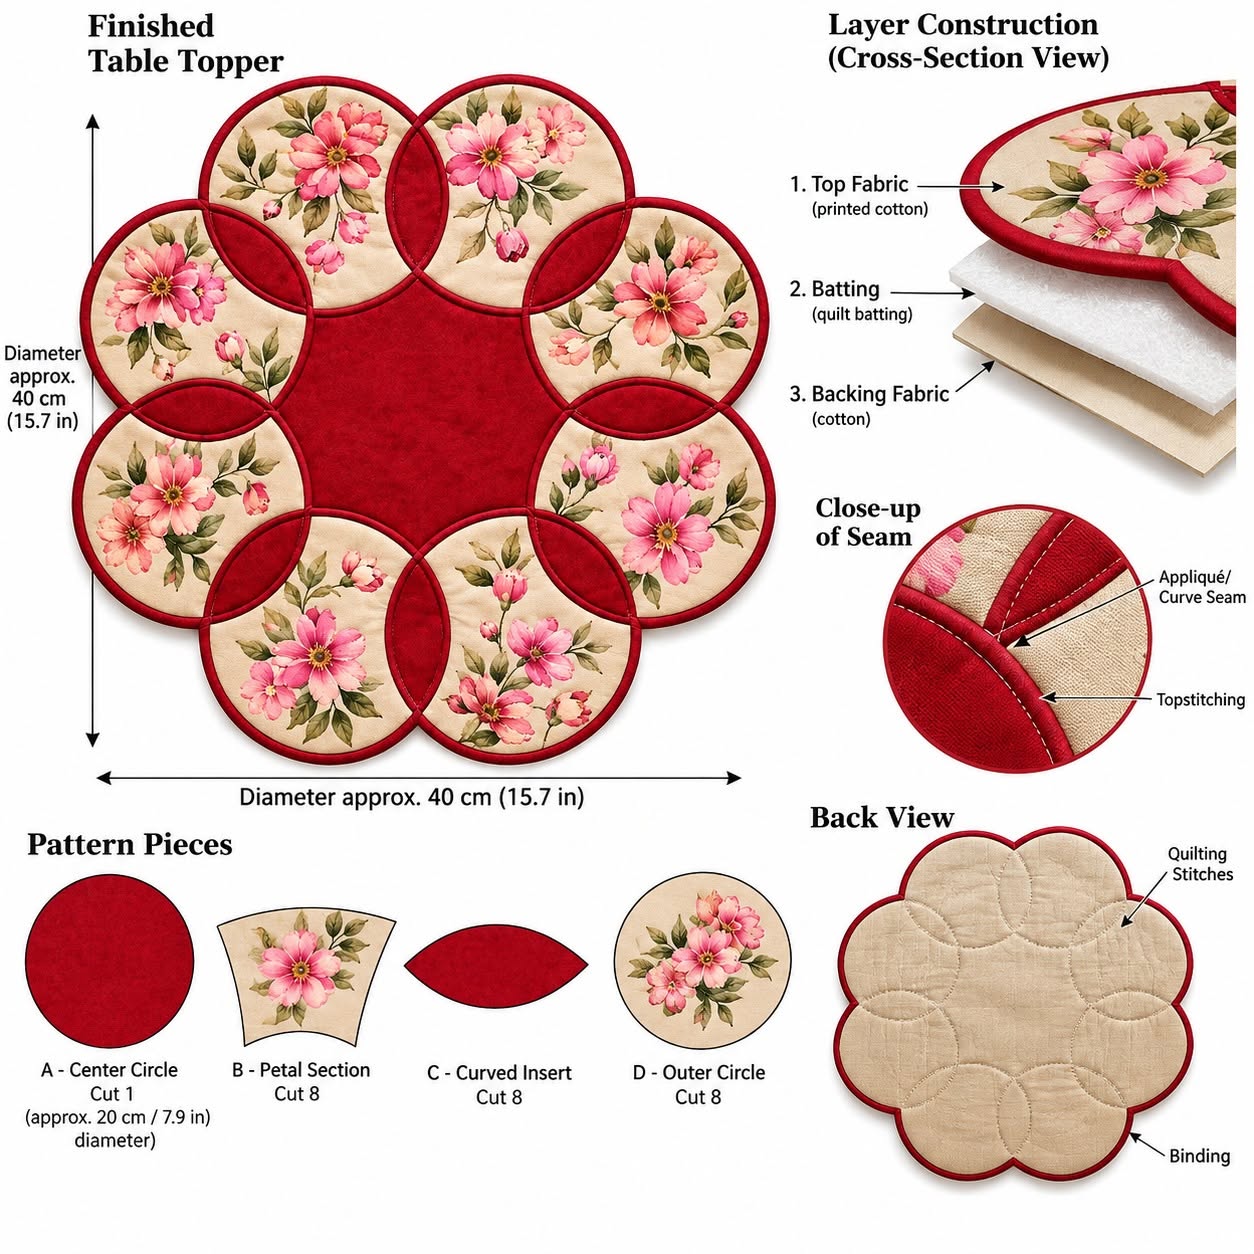
The Floral Bloom Placemat Pattern is a charming sewing project that combines traditional patchwork techniques with a fresh floral design. Inspired by the finished piece shown in the reference image, this placemat is built around a generous green center surrounded by overlapping rounded floral sections that resemble the petals of a blooming flower. The mixture of soft pink blossoms, creamy fabric, leafy details, and rich green accents creates a balanced composition that feels elegant without becoming overly formal. It is an especially attractive project for spring tables, tea settings, family lunches, handmade gifts, or simply adding a more personal touch to everyday décor. Although the finished shape looks sophisticated, the construction becomes much easier when the design is divided into individual circles, curved intersections, and a central section. With careful cutting, consistent seam allowances, and patient pressing, even a confident beginner can work toward a polished result.
One of the most appealing qualities of the Floral Bloom Placemat Pattern is the way fabric placement does most of the decorative work. Instead of relying on complicated embroidery or extremely dense quilting, the design uses floral printed fabric as the visual highlight while solid green fabric provides contrast and definition. The circular pieces create a repeating rhythm around the center, and the curved green sections formed between neighboring circles help connect everything visually. This is an excellent example of how simple geometric shapes can become something much more decorative when they are repeated thoughtfully. You can choose romantic rose prints like those in the image, but the same construction can also be adapted to daisies, lavender prints, vintage botanical fabrics, small-scale country florals, or modern watercolor designs. The important point is to maintain enough contrast between the printed pieces and the solid sections so that the flower-like structure remains easy to see.
Another advantage of making a Floral Bloom Placemat Pattern is the opportunity to practice several useful sewing skills in a single project. You can improve your accuracy while cutting circles, learn how to stabilize rounded pieces, practice sewing smooth curved seams, work with interfacing or batting, and refine your edge finishing with narrow binding. Because the project is relatively compact, it can also be easier to manage than a full quilt while still offering many of the same creative techniques. The measurements suggested throughout this tutorial can be adjusted depending on the size you want, but a finished placemat of approximately 43 to 48 cm across works well for many dining tables. Before cutting your favorite fabric, it is always wise to prepare a paper template and arrange the shapes on a flat surface. This simple planning step can prevent fabric waste and helps you understand how the overlapping petal effect will be created.
Materials, Fabric Selection, and Preparing the Pattern Pieces
Begin the Floral Bloom Placemat Pattern by selecting one main floral fabric and one coordinating solid fabric. For a result close to the reference design, choose a white or cream background fabric printed with medium-sized pink flowers and green leaves. Pair it with a medium or deep leafy green cotton. Quilting cotton is particularly suitable because it is easy to cut, holds its shape well, and remains manageable when sewing curved sections. Prewash the fabrics if you expect the placemat to be washed frequently, then press them thoroughly before cutting.
DISCOVER MORE FREE PATTERNS HERE!
You will also need lightweight batting or fusible fleece to give the placemat a soft but structured feel. Cotton batting works well when you prefer a traditional quilted finish, while thin fusible fleece can make assembly slightly easier because it helps prevent layers from shifting. Prepare matching or coordinating sewing thread, fabric scissors or a rotary cutter, pins or sewing clips, a fabric marker, a ruler, an iron, and a sewing machine. A walking foot can be helpful during the final quilting stage, although it is not absolutely required.
To build the petal arrangement, prepare eight circular floral sections. A convenient starting measurement is approximately 18 cm in diameter for each circle. You can increase or reduce this measurement depending on the finished placemat size you prefer. Create a sturdy cardboard or template-plastic circle first, trace it onto the floral fabric, and cut eight identical pieces. If your fabric contains large blossoms, pay attention to motif placement so that an attractive flower appears prominently in each circle.
Cut matching pieces of batting for the eight circles. Depending on your preferred construction method, you may cut the batting exactly the same size or approximately 5 mm smaller around the edge to reduce bulk. You can also add a backing layer to each circle if you want the individual sections to be fully finished before assembly. For the cleanest appearance, keep every layer smooth and avoid stretching the fabric while cutting because circles can distort easily along their curved edges.
Next, prepare the solid green fabric. You will need enough for the central area, the curved overlap accents, the backing, and the narrow binding around the perimeter. For the center, begin with a piece approximately 26 to 30 cm square and trim it later according to the arrangement of the surrounding circles. The exact center shape is best determined after the eight floral pieces have been positioned, because minor changes in circle size can affect the opening in the middle.
Before sewing anything permanently, arrange the eight circles on a large table. Place them evenly around an imaginary center so that neighboring circles overlap slightly. The overall arrangement should resemble a flower with eight rounded petals. Adjust the spacing until the central opening appears symmetrical. Photographing or lightly marking this arrangement can be useful because you will need to reproduce the same positioning during assembly. Accurate placement at this stage is one of the most important steps for achieving a professional-looking Floral Bloom Placemat Pattern.
Sewing the Rounded Floral Petals and Green Curved Sections
Start sewing by stabilizing each floral circle. Layer the floral cotton with batting and, if desired, a backing fabric. Pin or clip around the circumference, keeping all edges aligned. You may add light quilting inside the circle before assembly, but avoid heavy quilting close to the edges because it can make later joining more difficult. A simple outline around selected floral motifs can give the fabric definition while maintaining flexibility.
The green piping-like edge visible in the finished project is an important detail of the Floral Bloom Placemat Pattern. One method is to use narrow bias binding made from the solid green fabric. Cut bias strips approximately 3 to 3.5 cm wide, join them when necessary, and press them according to your preferred binding method. Because the edges are circular, bias-cut strips are strongly recommended; straight-grain strips are more likely to wrinkle or resist the curve.
Attach the green binding gradually around each floral circle. Sew slowly and avoid pulling the bias strip as you work. Allow the fabric to follow the curve naturally. When turning the binding to the opposite side, press it gently with the tip of the iron before stitching it down. A narrow, even green outline will create the crisp petal definition seen in the inspiration image. Consistency matters more than speed here, so check the width often while sewing.
Once the floral circles are prepared, return them to the eight-petal arrangement. Overlap adjacent circles by approximately 4 to 6 cm, depending on your circle diameter. These overlapping zones create the almond-shaped curved sections visible between the petals. Trace the overlap shape onto green fabric or use the circles themselves as guides to create a template. Cut eight matching green curved pieces, adding your chosen seam allowance if they will be inserted rather than appliquéd.
The green curved pieces can be attached using a neat appliqué technique. Turn the seam allowance underneath, press the curves carefully, and position each green piece over the intersection of two floral circles. Stitch close to the folded edge using matching green thread. Another option is to construct these curved shapes as quilted inserts before joining the circles. The appliqué approach is generally more forgiving for home sewing because small placement adjustments are easier to make.
Continue around the complete arrangement until all eight circles and green intersections are evenly spaced. Check the project repeatedly from a short distance rather than focusing only on the section directly under the needle. Symmetry is a major visual feature of this floral placemat sewing project, and slight differences become easier to notice when the whole piece is viewed together. If necessary, reposition a section before completing the final stitching.
Creating the Green Center and Assembling the Placemat
With the outer floral sections arranged, measure the central opening carefully. The reference Floral Bloom Placemat Pattern features a large solid green center with gently curved edges that follow the surrounding circles. Instead of trying to calculate the center mathematically, place tracing paper over the arrangement and trace the actual opening. This produces a custom template that matches your individual circles and overlap depth.
Add approximately 1 cm seam allowance around the traced center template if you plan to sew the section into place. Cut one green top piece, one batting piece, and one backing piece. If you prefer an appliqué construction, the green center can be cut slightly larger than the visible opening so that its edges extend safely underneath the surrounding floral circles. This method can be particularly helpful when working with multiple curved seams.
Layer the center pieces and quilt them lightly before installation. Simple quilting works best because the solid green fabric already provides strong visual contrast. You might stitch concentric curved lines, a large flower outline, or a subtle crosshatch pattern. Keep the quilting relatively open so the placemat remains soft and flexible. Press the center gently after quilting, avoiding excessive heat if fusible materials have been used.
Position the center underneath or between the surrounding floral sections according to your construction method. Pin extensively and check that no gaps remain around the curved edges. Sew slowly around the entire center. If using appliqué, stitch approximately 2 to 3 mm from the folded edge for a clean finish. Matching green thread helps the stitching blend into the fabric and allows the curved shape to remain the main focus.
After the center is secured, examine every point where circles, green intersections, and the central section meet. These junctions experience more handling and may need a short line of reinforcing stitches. Trim stray threads and carefully press the entire top from both sides. Use a pressing cloth if necessary to protect printed fabric. Proper pressing is essential because it settles curved seams and helps the finished Floral Bloom Placemat Pattern lie flat on the table.
Prepare the final backing by placing the completed top over a larger piece of coordinating fabric. A neutral cream, green, or small floral print works beautifully. Cut the backing slightly larger than the front, smooth it carefully, and baste the layers together. If additional batting is desired for the full placemat, add it between the top and backing now. However, avoid excessive thickness because the overlapping circles already create several fabric layers.
Finishing, Quilting, Binding, and Personalizing the Design
Once all the sections are assembled, add final quilting to stabilize the placemat. Quilt around the center and along selected curved seams rather than covering the floral print with dense stitching. Stitching in the ditch beside the green edges can emphasize the structure while remaining subtle. This technique also helps secure multiple layers and keeps the Floral Bloom Placemat Pattern smooth after washing.
Trim the backing and batting to match the scalloped outer edge of the floral circles. Work slowly around every curve, using small scissors if necessary. The final silhouette should show eight clearly defined rounded petals. Avoid flattening the curved areas during trimming because maintaining these rounded shapes is what gives the project its distinctive flower appearance.
Prepare another length of green bias binding for the entire exterior. Because the finished perimeter contains many curves, make more binding than you think you will need. Attach it to the front with a consistent seam allowance, gently shaping it around each petal. Do not stretch the binding around outward curves because it can cause the finished placemat to curl upward.
Fold the binding to the back and secure it by machine or hand. Hand stitching can create an especially clean finish because no second line of stitching appears on the front. If machine stitching is preferred, work slowly and use matching thread. Press the bound edge carefully after completion. The narrow green border should visually connect with the green center and the smaller curved green sections.
There are many ways to personalize the Floral Bloom Placemat Pattern without changing its basic construction. For a farmhouse table, try cream florals with sage green. For a brighter summer version, use yellow flowers with turquoise or fresh leaf green. Autumn fabrics could combine rust, gold, olive, and cream, while holiday versions might feature red botanical prints with forest green accents. The pattern can even be made from coordinated fabric scraps as long as the overall color palette remains balanced.
Finally, check the placemat for loose threads, uneven stitching, or areas that need reinforcement. Give the project one final press and allow it to cool completely while lying flat. If the fabrics are washable, follow the care instructions appropriate for the materials used. A handmade placemat like this is both decorative and practical, and once you understand the circular construction, making a coordinated set becomes much faster.
FAQ – Frequently Asked Questions About the Floral Bloom Placemat Pattern
What size should a Floral Bloom Placemat Pattern be?
A comfortable finished size is approximately 43 to 48 cm across, although the exact measurement depends on the diameter of the circular petals and how much they overlap. You can make a smaller version for a side table or enlarge the circles for a more dramatic dining-table centerpiece.
Is the Floral Bloom Placemat Pattern suitable for beginners?
Yes, especially for beginners who already know how to operate a sewing machine and sew a consistent seam allowance. The most challenging parts are managing curves and keeping the eight petals symmetrical. Making a paper practice layout before cutting fabric can simplify the process considerably.
What is the best fabric for this placemat?
100% quilting cotton is one of the easiest options because it is stable, easy to press, widely available, and suitable for patchwork techniques. Medium-scale floral prints work particularly well because the flowers remain visible inside each circular section.
Do I need batting inside the placemat?
Batting is recommended because it gives the placemat body and provides a lightly quilted appearance. Thin cotton batting or lightweight fusible fleece is generally enough. Very thick batting can create unnecessary bulk where the circles overlap.
Why should bias binding be used around the circular edges?
Bias binding is cut diagonally across the fabric grain, making it more flexible than straight-grain strips. This flexibility allows it to follow circular and scalloped edges more smoothly, reducing wrinkles and puckering.
Can I make the center from floral fabric instead of green?
Absolutely. The design is customizable. However, using a solid center creates strong contrast and helps the floral petals stand out. If you prefer a printed center, consider choosing a smaller-scale print so the composition does not appear too busy.
Can scraps be used to make this placemat?
Yes. The Floral Bloom Placemat Pattern can be an excellent scrap-friendly project. Each circular petal can use a different coordinating floral print. Repeating the same solid color in the center, binding, and curved intersections will help visually unify assorted fabrics.
How can I prevent the circles from becoming distorted?
Handle the cut circles gently, avoid stretching their edges, and press rather than aggressively ironing back and forth. Stabilizing the pieces with lightweight batting and sewing the bias binding slowly also helps preserve a smooth circular shape.
Can the pattern be enlarged into a table topper?
Yes. Increasing the circle diameter can turn the concept into a decorative quilted table topper. When enlarging the design, remember to increase the center area and curved overlap sections proportionally so the eight-petal layout remains balanced.
How should a handmade floral placemat be washed?
If all fabrics, thread, and batting are washable, use a gentle washing method and avoid excessive agitation. Reshape the placemat while damp and allow it to dry flat when possible. A light press afterward can restore the crisp curved structure.
Conclusion
The Floral Bloom Placemat Pattern transforms simple circles, floral quilting cotton, solid green fabric, batting, and bias binding into an eye-catching flower-shaped table accessory. Throughout this tutorial, we covered how to select coordinated fabrics, prepare eight circular petals, construct the green curved intersections, create a fitted center, assemble the layers, quilt the project, and finish the scalloped perimeter with flexible bias binding.
The key to achieving a beautiful result is careful preparation. Accurate circles, consistent overlaps, patient curved stitching, and frequent pressing help create the balanced flower effect shown in the inspiration image. You do not need complicated decorative techniques to make the project attractive; the combination of floral fabric, curved patchwork, quilting, and contrasting green details already provides plenty of visual interest.
EASILY FIND THE PDF FOR THIS PATTERN HERE!
Once you have completed one placemat, consider experimenting with different botanical prints, seasonal colors, or coordinated scraps to create an entire table set. The same Floral Bloom Placemat Pattern can look romantic, rustic, modern, colorful, or traditional simply by changing the fabrics. If you decide to make this project, leave your sincere opinion about the pattern and share your suggestions. Which colors, floral prints, or finishing details would you choose for your own version? Your ideas can inspire new variations of this beautiful handmade placemat.