
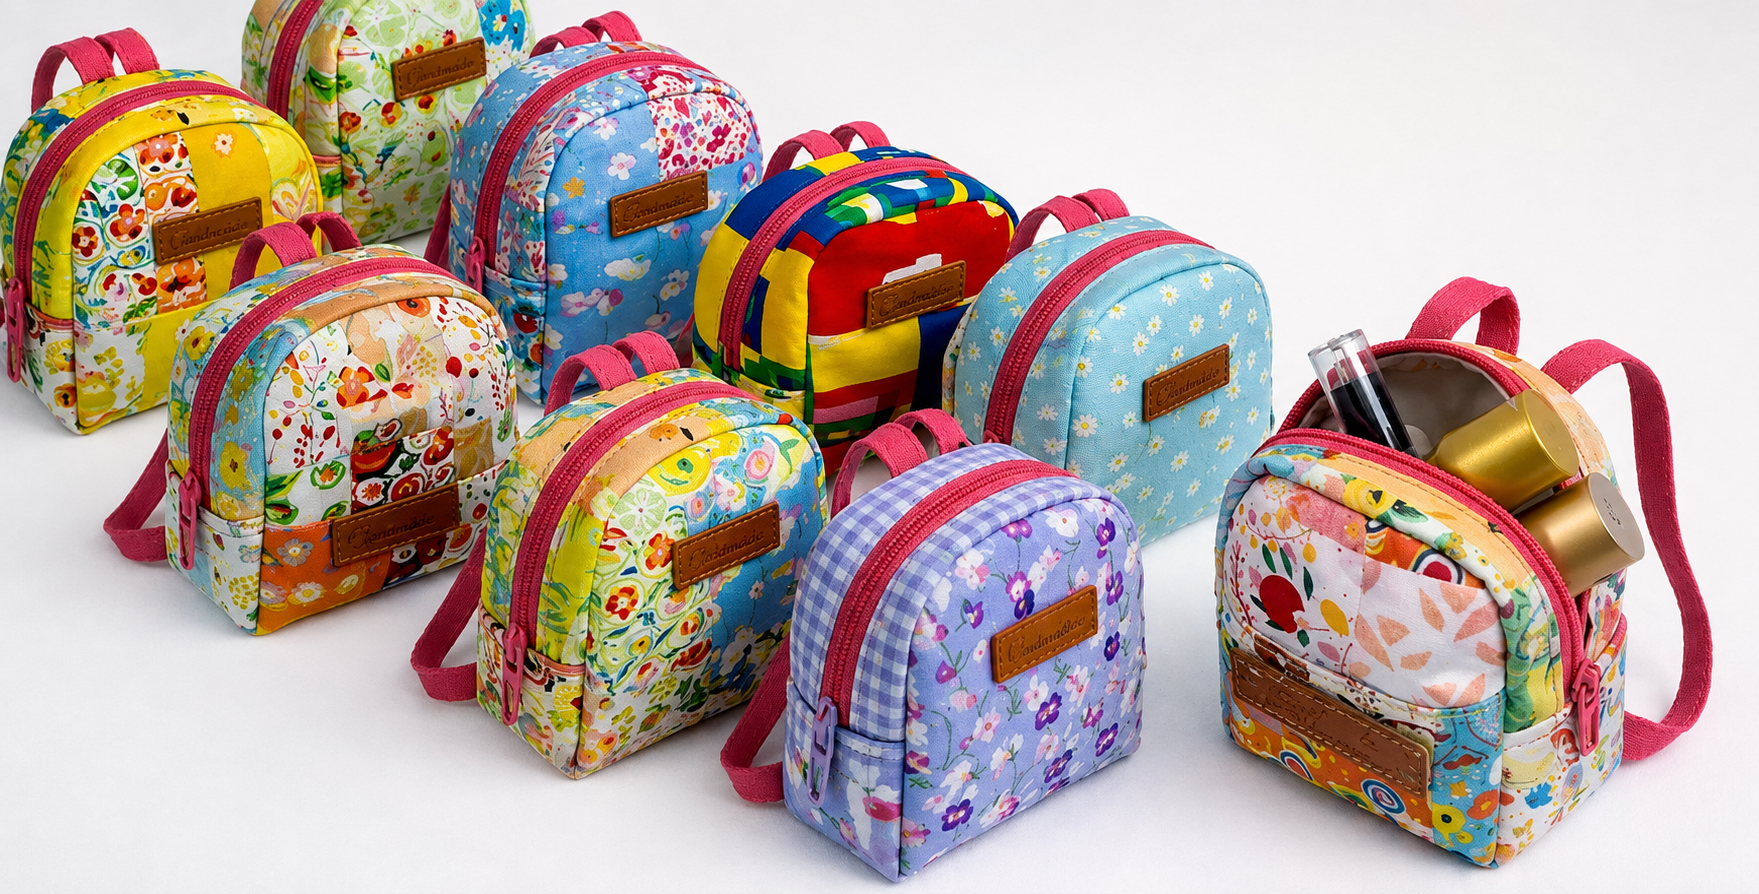
The Fabric scrap toiletry bag Pattern is a creative sewing project that turns small leftover pieces of fabric into a practical, colorful, and highly personal accessory. Instead of allowing beautiful cotton scraps to sit unused in a sewing box, this project gives them a new purpose by combining them into a compact toiletry bag inspired by the cheerful mini bags shown in the reference image. The rounded shape, contrasting fabrics, zipper closure, small handle, and structured body make the finished piece suitable for cosmetics, sewing supplies, travel accessories, or everyday organization. Because every collection of scraps is different, each completed bag naturally becomes unique. This makes the project especially appealing for quilters and sewing enthusiasts who enjoy combining prints, colors, and textures while reducing fabric waste.
One of the greatest advantages of making a Fabric scrap toiletry bag Pattern is that the design can be adapted to the materials you already own. Floral cotton, gingham, geometric prints, novelty fabrics, and small patchwork leftovers can all be mixed together. The colorful appearance seen in the project comes from carefully coordinating several small prints rather than relying on one large piece of fabric. You can create a soft pastel version, a bright rainbow bag, or a more traditional patchwork design depending on your personal style. Besides being attractive, the project teaches useful sewing techniques such as fabric piecing, quilting, zipper installation, lining construction, binding, and working with interfacing. These techniques can later be applied to many other handmade bags and accessories.
Another reason this Fabric scrap toiletry bag Pattern works so well is its combination of beauty and function. A toiletry bag needs enough structure to stand upright, but it should still remain soft and lightweight enough for travel or storage. Adding batting or fusible interfacing between the exterior fabric and lining helps create this balance. The rounded upper corners add a charming backpack-like appearance, while the zipper makes the contents easy to access. A small fabric handle can also be added to the top, making the bag easier to carry or hang. With careful cutting, accurate seams, and patient assembly, even relatively small scraps can be transformed into a polished handmade project that looks intentionally designed rather than simply pieced together from leftovers.
Choosing Fabrics and Preparing the Fabric Scrap Toiletry Bag Pattern
Begin your Fabric scrap toiletry bag Pattern by sorting your fabric scraps according to color, scale, and weight. Medium-weight quilting cotton is an excellent choice because it is easy to sew, presses well, and works beautifully for patchwork. Try combining small floral patterns with checks, stripes, solids, or playful novelty prints. You do not need every fabric to match perfectly. A successful scrap project usually looks more interesting when several coordinating colors repeat throughout the design. Select approximately six to twelve scraps, depending on how many patchwork sections you want to create.
DISCOVER MORE FREE PATTERNS HERE!
Before cutting, press all fabric pieces carefully. Wrinkles can affect measurements and make patchwork seams less accurate. For a compact finished toiletry bag measuring approximately 18 cm wide, 20 cm high, and 8 cm deep, prepare an exterior panel slightly larger than the final size so it can be trimmed after quilting. A useful starting measurement is about 25 cm × 30 cm for each main exterior section. You will later shape the rounded corners and adjust the dimensions according to your preferred bag size. Remember to include a consistent 1 cm seam allowance unless your chosen sewing method requires something different.
To create the colorful exterior shown in the project, cut your scraps into small rectangles, squares, or irregular strips. Pieces between 5 cm and 10 cm are generally easy to manage. Sew two scraps together with right sides facing, using a straight stitch and a consistent seam allowance. Press the seam toward the darker fabric or press it open if the fabric becomes bulky. Continue adding scraps until you have created a patchwork panel larger than your required bag pattern piece. This process is known as fabric piecing, one of the fundamental techniques used in quilting.
Once the patchwork panel is complete, place it over a layer of batting or fusible fleece. Lightweight cotton batting gives the bag a quilted handmade appearance, while fusible fleece creates additional firmness. Cut the stabilizer slightly larger than the patchwork section. If you are using fusible material, follow the recommended pressing method carefully so the adhesive bonds evenly without damaging your fabrics. Stabilizing the exterior is important because a Fabric scrap toiletry bag Pattern needs enough body to maintain its shape after the cosmetics or accessories are placed inside.
Quilt the patchwork panel using simple straight lines. You can stitch approximately 2 cm to 4 cm apart, following the patchwork seams or creating diagonal lines across the surface. Quilting connects the fabric and stabilizer while also adding decorative texture. If you prefer a simpler finish, stitch close to the patchwork seams using a method often called stitching in the ditch. Do not worry if every line is not perfectly identical. Slight variations can contribute to the handcrafted appearance of a scrap fabric project.
After quilting, place your bag template over the panel and trim it to the correct shape. Create two main exterior pieces with rounded upper corners. You will also need two matching lining pieces. For extra organization, prepare an exterior pocket measuring approximately 15 cm × 12 cm before folding and finishing its edges. You may also cut a top handle approximately 8 cm × 4 cm and longer strips for side loops or zipper tabs. Labeling each piece before assembly can make the next stages much easier.
Installing the Zipper and Building the Main Bag
The zipper is an important feature in the Fabric scrap toiletry bag Pattern because it creates a secure opening while reinforcing the rounded shape. Choose a zipper approximately 30 cm to 35 cm long, depending on the size of your bag. A zipper that is slightly longer than necessary is often easier to install because the slider can be moved away from the sewing area. Nylon coil zippers are especially convenient for curved bag projects because they bend more easily than heavy metal zippers.
Prepare the zipper area before sewing the main body. Place the zipper right side down against the right side of the exterior fabric along the curved upper edge. Position the lining fabric over the zipper with its right side facing the exterior. The zipper will be sandwiched between these layers. Pin or clip everything carefully, particularly around the curves. Sewing clips can be useful because multiple layers of fabric, batting, and zipper tape may be too thick for ordinary pins.
Using a zipper foot, sew slowly along the zipper tape. Maintain a consistent seam allowance and gently guide the fabric around each curved section. Avoid pulling the zipper or stretching the fabric because this can cause puckering. After sewing, turn the exterior and lining away from the zipper and press carefully. Topstitch approximately 2 mm to 3 mm from the seam. Topstitching keeps the fabric away from the zipper teeth and gives the project a professional appearance.
Repeat the same zipper installation process with the opposite side of the bag. Check the alignment before sewing so the patchwork sections remain balanced. Once both sides are attached, open and close the zipper several times to ensure it moves freely. If the fabric catches near the zipper teeth, additional topstitching may help flatten the seam. Good zipper preparation is one of the most important steps when creating a neat Fabric scrap toiletry bag Pattern.
If you want to add the small top handle seen on many mini toiletry bags, fold the handle strip lengthwise with right sides together and sew along the long edge. Turn it right side out, press it flat, and topstitch both sides. Alternatively, fold the raw edges toward the center and fold the strip again, creating four layers. Position the handle at the upper center of the bag before joining the remaining body sections. Make sure the handle is securely basted in place because it may receive frequent use.
An exterior pocket can also be added at this stage. Fold the top edge twice, press it, and topstitch. Fold the side and bottom edges toward the wrong side and press again. Position the pocket on the front panel approximately 4 cm to 6 cm above the lower edge. Stitch around the sides and bottom, leaving the top open. A scrap pocket is useful for small brushes, lip balm, sewing clips, or other frequently accessed objects.
Before proceeding to final construction, inspect every seam carefully. Trim loose threads and check whether the zipper ends are secure. Small fabric tabs can be sewn over each zipper end if desired. These zipper tabs improve the finish and prevent bulky seams. If your project has multiple layers, trim excess batting from the seam allowances whenever possible. Reducing unnecessary bulk will make the final assembly smoother and help the bag maintain a clean rounded silhouette.
Creating Structure, Lining, and a Professional Finish
To create the three-dimensional shape of the Fabric scrap toiletry bag Pattern, the lower corners must be boxed or connected to a gusset. One simple method is to cut small squares from the two lower corners of each body piece. For a bag approximately 8 cm deep, cut squares of about 4 cm × 4 cm. When the corners are opened and stitched together, they form the depth of the bag. Always test this measurement with a paper pattern if you want a narrower or wider finished shape.
Place the exterior sections right sides together while keeping the zipper partially open. This detail is essential because the zipper opening will allow you to turn the finished bag right side out later. Match all side and lower edges. Pin or clip carefully, ensuring that the patchwork seams remain aligned where possible. Sew around the exterior using a 1 cm seam allowance, but leave the boxed corner openings unstitched until the side and bottom seams are complete.
To form each boxed corner, pinch the corner so the side seam meets the bottom seam. Align the seam allowances accurately and stitch straight across the opening. Repeat for the second side. These seams create the depth that allows the toiletry bag to stand upright. Reinforce each corner with a second line of stitching if the bag will carry heavier items. Trim excess seam allowance carefully, but avoid cutting too close to the stitching.
Construct the lining using the same method, but leave an opening of approximately 8 cm to 10 cm along the bottom seam. This opening will be used to turn the bag. Cotton lining is easy to work with, but laminated or water-resistant fabric can also be useful for toiletry bags because it makes small spills easier to clean. If you use coated fabric, avoid excessive heat when pressing and use clips rather than pins if puncture marks would be visible.
After the lining and exterior are connected around the zipper, carefully pull the entire bag through the opening in the lining. Work slowly around the curved sections so the seams are not stressed. Push out the corners gently with a blunt turning tool or the rounded end of a wooden stick. Avoid using sharp scissors because they could pierce the fabric. Once everything is turned, check the overall shape and adjust the seams with your fingers.
Close the lining opening with a narrow machine stitch or an invisible hand stitch. Push the lining inside the bag and press the project carefully. Shape the rounded corners and smooth the boxed base. A final line of topstitching around selected areas can enhance the structure. At this stage, the Fabric scrap toiletry bag Pattern should look finished, colorful, and practical, with the patchwork design becoming the main decorative element.
Customizing and Using Your Fabric Scrap Toiletry Bag Pattern
One of the most enjoyable parts of making a Fabric scrap toiletry bag Pattern is customization. You can change almost every detail without changing the basic construction method. For example, a bag intended for children could use bright animal prints and playful colors, while a travel bag might feature calmer tones and a water-resistant lining. A sewing organizer could be made using quilting-themed scraps and additional pockets for scissors, thread, measuring tapes, or clips.
You can also experiment with the patchwork arrangement. Traditional squares produce a classic patchwork bag, while strips create a modern striped effect. Small triangles can produce geometric designs, and irregular scraps can be combined using a technique similar to crazy quilting. When using irregular pieces, begin with one central scrap and sew additional pieces around it until the stabilizer is completely covered. Trim the panel only after the piecing and quilting are finished.
Decorative stitching is another easy way to personalize the project. Straight quilting lines create a clean appearance, but gentle waves, crosshatching, or free-motion quilting can add additional texture. If your fabrics already contain detailed prints, simple quilting is usually enough. The goal is to support the design rather than overwhelm it. Coordinating thread can blend into the fabric, while contrasting thread creates visible decorative lines.
Small labels, appliqués, buttons, or embroidered details can also be added before final assembly. A handmade label positioned on the front pocket gives the Fabric scrap toiletry bag Pattern a polished boutique-style appearance. If the bag is intended as a gift, you can embroider an initial or create a small fabric tag using leftover scraps. Always attach decorative elements securely so they remain durable during regular use.
This project is also a practical example of sustainable sewing. Fabric scraps that might otherwise be discarded can become useful sections of a new item. Even very small pieces can be joined together into larger panels. Keeping a dedicated scrap basket organized by color makes future projects easier. Over time, leftovers from quilts, clothing, cushions, and other sewing projects can become an entirely new coordinated accessory.
The finished bag can be used for far more than toiletries. It can store cosmetics, medications, chargers, craft supplies, small toys, stationery, or travel essentials. Several bags can also be made in different sizes and used as a matching organization set. Once you understand the basic Fabric scrap toiletry bag Pattern, changing the measurements becomes relatively simple, allowing you to create miniature pouches or larger travel organizers using the same construction principles.
Frequently Asked Questions About the Fabric Scrap Toiletry Bag Pattern
What fabric is best for a Fabric scrap toiletry bag Pattern?
Quilting cotton is one of the easiest fabrics to use because it is stable, widely available, and simple to piece together. Canvas can provide additional structure, but it may become bulky when several seams meet. Lightweight cotton scraps combined with batting or fusible fleece usually provide an excellent balance between flexibility and firmness.
How many fabric scraps are needed for one bag?
The exact quantity depends on the size of the scraps and the finished dimensions. For a small toiletry bag, approximately six to twelve medium scraps are usually enough. Very small pieces can also be used if they are sewn together into a larger patchwork panel.
Do I need batting inside the toiletry bag?
Batting is not absolutely required, but it improves the appearance and structure. Without batting or interfacing, the bag may collapse when empty. Fusible fleece, cotton batting, foam stabilizer, or medium-weight interfacing are all possible options depending on how firm you want the finished project to be.
Can beginners make this pattern?
Yes. A beginner who is comfortable with basic straight stitching can complete this project, although installing a zipper around curved edges may require patience. Working slowly, using sewing clips, and practicing the zipper installation on scrap fabric can make the process much easier.
What size zipper should I use?
For a small bag around 18 cm to 20 cm wide, a zipper measuring approximately 30 cm to 35 cm is usually practical. A slightly longer zipper can be easier to handle because the zipper pull can be moved away while sewing.
Can I make the lining waterproof?
Yes. Water-resistant fabric, laminated cotton, or suitable coated fabric can be used for the lining. This is particularly useful for toiletry and cosmetic bags. Remember that some coated materials should not be pressed directly with a hot iron.
How can I prevent bulky seams?
Trim excess batting from the seam allowances and grade thick layers before turning the bag. Press patchwork seams carefully during construction and avoid placing several thick fabric joins at exactly the same position.
Can the Fabric scrap toiletry bag Pattern be enlarged?
Absolutely. The design can be resized by enlarging the main body pattern while maintaining proportional depth and zipper length. When creating a larger version, consider using stronger interfacing or foam stabilizer so the bag maintains its shape.
How should the finished toiletry bag be washed?
Washing instructions depend on the fabrics and stabilizers used. A cotton bag can generally be gently hand washed with mild detergent and air dried. If the bag contains special interfacing, laminated lining, decorative labels, or sensitive embellishments, gentle spot cleaning may be preferable.
Why is patchwork useful for scrap projects?
Patchwork allows many small pieces of fabric to become one larger usable panel. It reduces waste while creating visual variety. A Fabric scrap toiletry bag Pattern is therefore an excellent project for using remnants that are too small for larger sewing projects but still too attractive to discard.
Conclusion
The Fabric scrap toiletry bag Pattern combines practical sewing skills, colorful patchwork, and thoughtful fabric reuse in one rewarding project. Throughout this tutorial, you learned how to select and coordinate scraps, create a patchwork exterior, stabilize and quilt the panels, install a curved zipper, add handles and pockets, construct boxed corners, prepare the lining, and finish the bag neatly. These techniques provide a strong foundation for many other handmade organizers, pouches, and travel accessories.
The most interesting part of this project is that no two bags need to look the same. Every combination of fabric scraps can produce a completely different result, from soft floral designs to bright geometric patchwork. You can also customize the dimensions, pockets, zipper colors, lining, handles, and quilting style to create a version that matches your own needs.
A handmade Fabric scrap toiletry bag Pattern is also a meaningful way to use leftover materials instead of letting them accumulate unused. Small pieces from previous quilting or sewing projects can become part of a functional accessory that can be used every day or given as a handmade gift. If you decide to make this project, leave your sincere opinion about the pattern and share your suggestions. I would love to know which fabric combinations, colors, pocket ideas, or finishing details you would choose for your own Fabric scrap toiletry bag Pattern.