
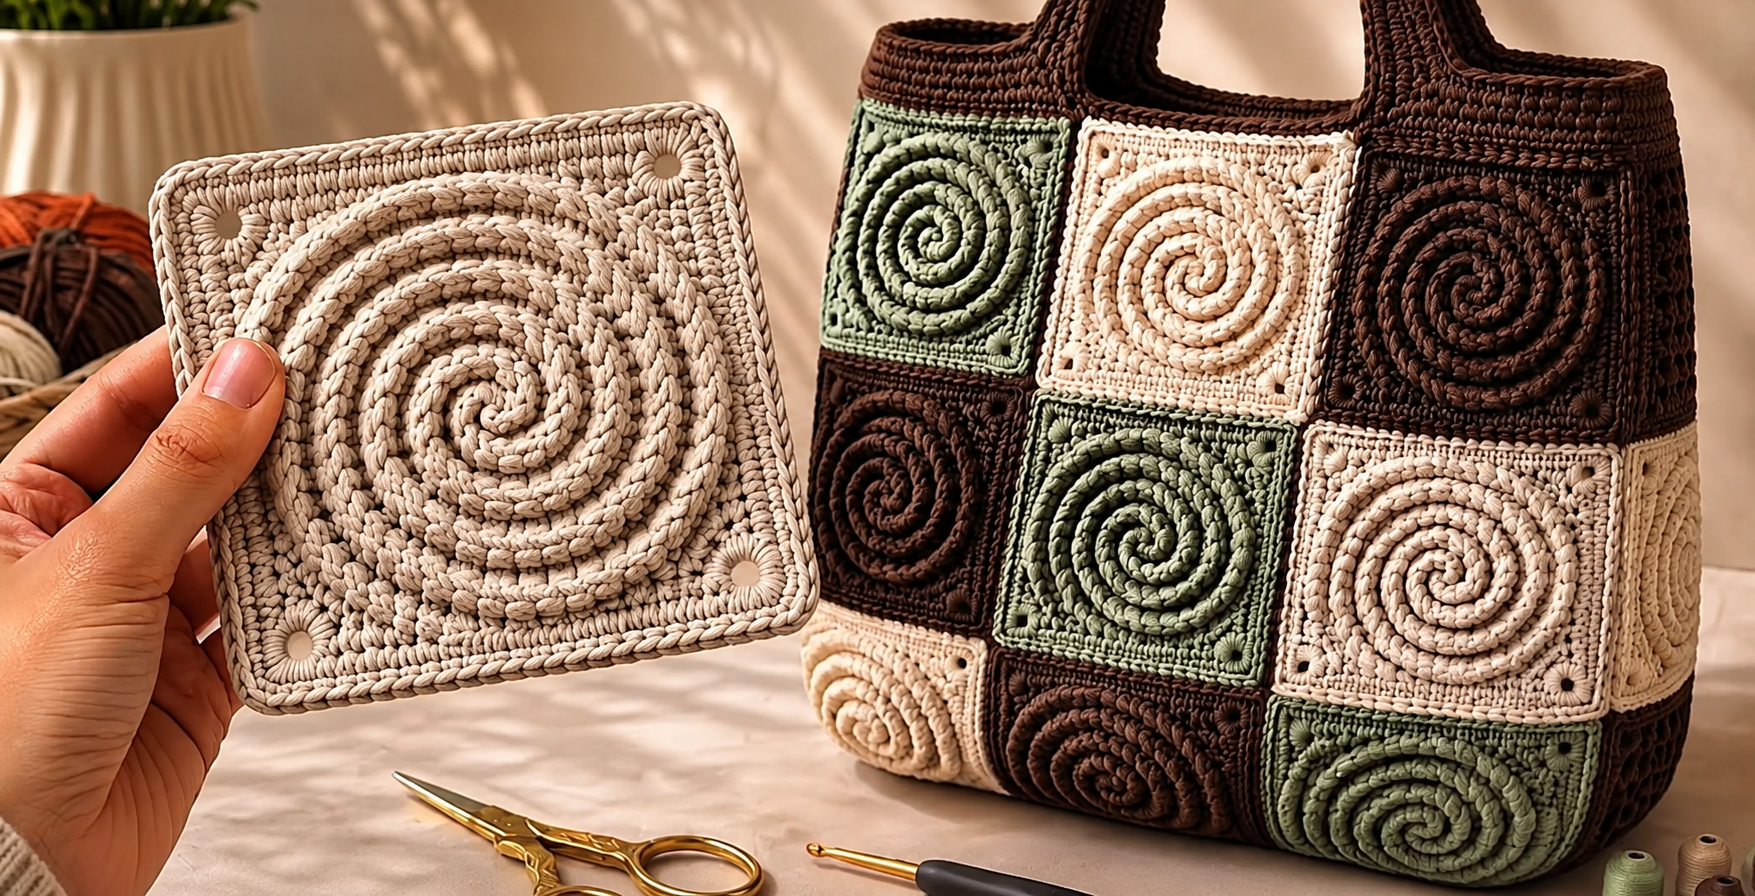
The Crochet for making blankets and bags Pattern is a beautiful way to transform individual crochet squares into practical, decorative projects that can be adapted for many different sizes. The main feature of this design is the textured spiral placed inside a structured square, creating a three-dimensional effect that looks especially attractive when several motifs are joined together. You can work the squares in neutral shades such as cream, beige, brown, and sage green, or create a brighter version using your favorite yarn palette. Because every square is made separately, the project is easy to organize and can be worked on gradually. Beginners can practice the same motif repeatedly, while experienced crocheters can experiment with colors, textures, and joining techniques. Once you understand the basic construction, the same crochet square pattern can become a blanket, tote bag, cushion cover, table runner, or decorative wall piece.
A major advantage of the Crochet for making blankets and bags Pattern is its modular construction. Instead of crocheting an entire blanket or bag in one large piece, you prepare several smaller squares and join them after they are finished. This technique makes the project portable because you can carry a small amount of yarn and work on one motif at a time. It also allows you to control the final dimensions very easily: simply add or remove squares depending on the project you want to create. A small tote might require approximately twelve to eighteen motifs, while a throw blanket can use dozens of squares arranged in rows. The raised spiral detail gives the project a handmade character without requiring extremely complicated stitches. With careful counting, consistent tension, and patient blocking, the finished pieces can look polished and beautifully balanced.
To make this tutorial practical, the instructions below use a simple crochet stitch key that can be followed throughout the project. MR means magic ring, ch means chain, sl st means slip stitch, sc means single crochet, hdc means half double crochet, and dc means double crochet. Inc means working two stitches into the same stitch, while BLO means working through the back loop only and FLO means working through the front loop only. The spiral effect can be created by combining ordinary stitches with surface crochet or raised rounds worked progressively toward the center. For best results, choose a medium-weight cotton or cotton-blend yarn and a crochet hook that produces firm but flexible fabric. Always make one sample square before beginning a large project so you can check your tension, dimensions, and preferred hook size.
Materials, Crochet Stitch Keys, and Preparing the Spiral Square
Before beginning the Crochet for making blankets and bags Pattern, gather your materials and decide how the finished project will be used. For a bag, a firm cotton yarn is especially useful because it helps the sides maintain their shape. For a blanket, a softer cotton blend or acrylic yarn can provide greater flexibility and warmth. A hook between approximately 4 mm and 5 mm often works well with medium-weight yarn, although you should always adjust the hook to your yarn and tension. You will also need scissors, a yarn needle, stitch markers, and optionally fabric lining if you are making a bag.
DISCOVER MORE FREE PATTERNS HERE!
The most important crochet terms for this project are ch, sc, hdc, dc, sl st, MR, BLO, FLO, and inc. These abbreviations form the crochet “key” for reading the instructions. When you see ch 3, for example, make three chain stitches. When you see 2 dc in the next stitch, work two double crochets into the same base stitch. A sl st is commonly used to close a round or move the yarn without adding noticeable height.
Begin the center of your square with an MR, or magic ring. Work ch 1, followed by approximately 8 sc into the ring, then gently pull the yarn tail to close the center. Join the round with a sl st into the first single crochet. This compact center gives the spiral a clean starting point and prevents a large opening from appearing in the middle of your motif. Place a stitch marker at the beginning of the round if you have difficulty recognizing the first stitch.
For the next round, increase evenly by working 2 sc in each stitch around. This expansion produces a flat circular foundation. In the following round, alternate 1 sc in the next stitch, 2 sc in the next stitch around the circle. Continue increasing gradually in later rounds, spacing the increases farther apart each time. The goal is to create a flat disc that does not cup upward or become excessively ruffled.
To create the distinctive raised spiral, you can use surface crochet. After completing the flat circular section, attach a contrasting or matching yarn near the outer edge. Insert the hook through the fabric, pull up a loop, and make a series of sl st following a spiral path toward the center. Keep the surface stitches relaxed so they remain slightly raised instead of pulling the background fabric inward. This technique creates the dimensional rope-like effect that makes the motif visually interesting.
Before converting the circle into a square, check that the spiral lies flat. If the fabric curls, your tension may be too tight. Lightly stretch the motif and adjust the surface stitches before continuing. Maintaining even tension is one of the most important elements of this crochet spiral square, because every motif needs approximately the same dimensions when multiple squares are joined together.
Turning the Crochet Spiral into a Structured Square
Once the circular spiral center is complete, the next stage of the Crochet for making blankets and bags Pattern is transforming the round motif into a square. This is done by creating four clear corner sections around the circle. Attach the working yarn to the outer round and begin with ch 2. Work hdc or dc stitches around the circular edge while planning four evenly spaced corners.
At each corner position, work a combination such as 2 dc, ch 2, 2 dc into the same stitch or space. The ch 2 forms the turning point of the square. Continue crocheting along the next side using one stitch in each base stitch until you reach the next corner. Repeat the corner combination four times. When the round is completed, join with a sl st into the beginning stitch.
The following round strengthens the square shape. Work ch 2, then make one hdc or dc into each stitch along the side. When you reach a ch-2 corner space, work 2 dc, ch 2, 2 dc into that space. Repeat this sequence around all four sides. You should now be able to see straight edges forming around the spiral center.
For a more decorative finish, add a round of sc around the entire motif. Work one sc into each stitch and 3 sc into each corner space. Single crochet creates a firm outer border and makes joining the squares easier later. If your square is intended for a sturdy tote bag, you can add another round of sc in BLO, which creates a subtle ridge and gives the motif extra structure.
The corners shown in this style of motif can also be decorated with small open spaces. To achieve this effect, use ch 1 spaces between groups of stitches near each corner. For example, work sc, ch 1, skip 1 stitch, sc where you want a small decorative opening. Keep these spaces symmetrical on all four corners. Consistency is more important than complexity when making multiple motifs.
After finishing the square, cut the yarn leaving a tail long enough for weaving. Use a yarn needle to secure the ends on the wrong side. Then block the crochet square by gently shaping it to the desired dimensions. Pin each corner evenly and allow the square to dry completely if you are using wet blocking. Blocking is especially helpful for ensuring that dozens of motifs fit together neatly.
Joining the Squares for a Crochet Bag or Blanket
Before joining anything, arrange all your completed motifs on a large flat surface. This planning stage is essential for the Crochet for making blankets and bags Pattern, especially when several colors are involved. Try alternating light, medium, and dark shades instead of placing identical colors next to each other. A palette of cream, chocolate brown, sage green, and warm beige creates a natural handmade appearance similar to classic home décor.
For an invisible or subtle join, place two squares with their right sides facing each other. Insert your hook through the matching outer loops and work sl st along the edge. Keep the stitches loose enough that the seam remains flexible. Alternatively, use sc to join the squares from the right side if you want the seam to become part of the design. A visible single-crochet join creates a slightly raised line between motifs.
When making a blanket, first join the squares into horizontal rows. After all the squares in each row are connected, join the completed rows together. This method makes it easier to keep everything aligned. Periodically place the blanket flat and check that the corners remain square. If the fabric begins to wave, the joining tension may be too loose; if it puckers, the joining stitches may be too tight.
For a tote bag, create two rectangular panels using the desired number of squares. A practical arrangement could use six or nine squares per panel, depending on the dimensions of each motif. Join the squares to form the front and back panels. Additional squares can be used along the sides and base if you want a wider bag. A flat bag can simply be joined around three sides while leaving the top open.
To create strong handles, attach yarn near the upper edge and work a foundation of ch stitches to the desired handle length. Attach the chain to another point on the bag and work several rows of sc back and forth across the chain. For greater strength, make the handles wider or crochet them using sc in BLO. You can also create separate straps and sew them securely to the inside of the bag.
A fabric lining is optional but highly recommended for a frequently used crochet bag. The lining prevents small objects from stretching the stitches and helps the tote maintain its shape. Measure the completed interior before cutting the fabric, leaving a small seam allowance. Sew the lining separately, insert it into the crochet shell, and stitch it carefully around the upper edge by hand.
Finishing, Borders, Customization, and Project Care
A finishing border gives the Crochet for making blankets and bags Pattern a professional appearance. For a blanket, attach yarn to any corner and work one or two rounds of sc around the perimeter. Work three stitches into each corner to prevent the border from pulling inward. After the basic border, you can add a decorative round using hdc, shell stitches, or a simple picot edging.
For a bag, reinforce the upper opening before attaching or completing the handles. Work several rounds of firm sc around the top edge. This creates a stable band that reduces stretching. If you want a thicker rim, work one round through the BLO followed by another regular round. The resulting ridge adds both texture and strength to the finished tote.
Color selection can completely change the personality of this pattern. Neutral shades create a sophisticated rustic look, while bright colors produce a playful modern result. You could make every spiral a different color while keeping all outer borders identical. Another possibility is using one main background shade and alternating two contrasting colors for the raised spiral details.
Yarn texture also affects the final appearance. Smooth cotton highlights every crochet stitch clearly and creates structured squares. Acrylic yarn produces lighter, softer motifs that work particularly well for blankets. Avoid combining yarns with dramatically different thicknesses unless you are comfortable adjusting your stitch counts. Consistent yarn weight helps maintain uniform square dimensions.
When washing your completed project, follow the care instructions for the yarn you selected. Hand washing or a gentle machine cycle is often safest for heavily textured crochet. Reshape blankets while damp and allow them to dry flat when possible. Crochet bags should be emptied before washing, and lined bags may require additional care depending on the fabric used for the interior.
Most importantly, treat the first motif as your test piece. Crochet projects become much easier when you evaluate your stitch tension before producing twenty or thirty squares. Measure the first square, write down your hook size, record your stitch counts, and keep those details nearby. This simple habit makes the Crochet for making blankets and bags Pattern more consistent and much easier to reproduce.
FAQ – Frequently Asked Questions
What yarn is best for the Crochet for making blankets and bags Pattern?
Medium-weight cotton is an excellent option for bags because it produces a firm and durable fabric. For blankets, cotton blends and quality acrylic yarns are also suitable because they can provide more softness and flexibility. The most important point is using approximately the same yarn weight throughout all your squares.
How large should each crochet square be?
There is no mandatory size. A practical motif can measure approximately 12 to 18 cm after blocking, depending on the yarn and hook. Making a test square before starting the complete project allows you to calculate exactly how many motifs you will need.
How many squares do I need to make a blanket?
It depends on your square dimensions and desired blanket size. For example, if your blocked squares measure 15 cm, a blanket arranged with 8 squares across and 10 squares vertically would require 80 motifs before adding the border.
How many crochet squares are needed for a bag?
A small bag might use approximately 8 to 12 squares, while a larger tote could require 12 to 24 or more. The final number depends on whether you use motifs only for the front and back or also for the sides and base.
Can beginners make this crochet spiral pattern?
Yes. Beginners who already understand chain stitches, single crochet, double crochet, slip stitches, and increases should be able to practice the design. The surface crochet spiral may feel unfamiliar at first, but it becomes much easier after one or two practice motifs.
What does BLO mean in crochet?
BLO means Back Loop Only. Instead of inserting the hook through both loops at the top of a stitch, you insert it only through the back loop. This technique produces a visible ridge and can add flexibility and decorative texture.
What does FLO mean in crochet?
FLO means Front Loop Only. The hook is inserted through the front loop of the stitch instead of both loops. FLO can be useful when you want to leave the back loop free for surface details or additional crochet rounds.
Why is my crochet square curling?
Curling usually occurs because the stitch count, increases, or tension are not balanced. If the circular section forms a bowl, you may need more increases or looser tension. If it becomes excessively wavy, you may have too many stitches or increases.
Do I need to block every square?
Blocking is strongly recommended. It helps each square reach consistent dimensions, straightens the edges, improves the corners, and makes joining much easier. Even small differences between motifs can become noticeable in a large blanket.
Can I use the same motif for cushions and other projects?
Absolutely. The modular construction is one of the strongest advantages of this pattern. The same crochet spiral square can be used for cushion covers, table runners, wall hangings, storage baskets, placemats, tote bags, and blankets.
Should a crochet tote bag have a lining?
A lining is not strictly necessary, but it can make the bag more practical. Crochet fabric naturally stretches, especially when carrying heavier objects. A fabric lining helps protect the crochet stitches, supports the structure, and prevents small items from slipping through openings.
How can I make the handles stronger?
Use firm stitches such as single crochet, make the handles several rows wide, and attach them securely across multiple stitches on the bag body. Cotton yarn is useful because it generally stretches less than very soft yarns. Adding fabric reinforcement inside the handles is another option for heavy-use bags.
Conclusion
The Crochet for making blankets and bags Pattern combines a striking textured spiral with the versatility of a classic crochet square. By learning a few essential crochet keys such as MR, ch, sc, hdc, dc, sl st, BLO, FLO, and inc, you can create individual motifs and transform them into completely different handmade projects. The process begins with a circular foundation, develops into a raised spiral, expands into a structured square, and ends with blocking and joining.
Throughout this tutorial, you learned how to build the spiral motif, turn the circle into a square, organize colors, join multiple motifs, construct a blanket, assemble a crochet tote bag, create handles, add borders, and improve durability with an optional lining. The greatest advantage of this crochet pattern is its flexibility: you can begin with only a few squares and continue adding motifs until your project reaches exactly the size you want.
Whether you choose earthy tones for a rustic bag, soft neutrals for an elegant blanket, or vibrant colors for a cheerful handmade accessory, this pattern offers plenty of room for creativity. Take your time with the first square, maintain consistent tension, and record your measurements so every additional motif becomes easier to reproduce. If you make your own version of the Crochet for making blankets and bags Pattern, leave your sincere opinion about the project. I would also love to hear your suggestions about colors, yarn combinations, borders, or other creative ways you would use these spiral crochet squares.