
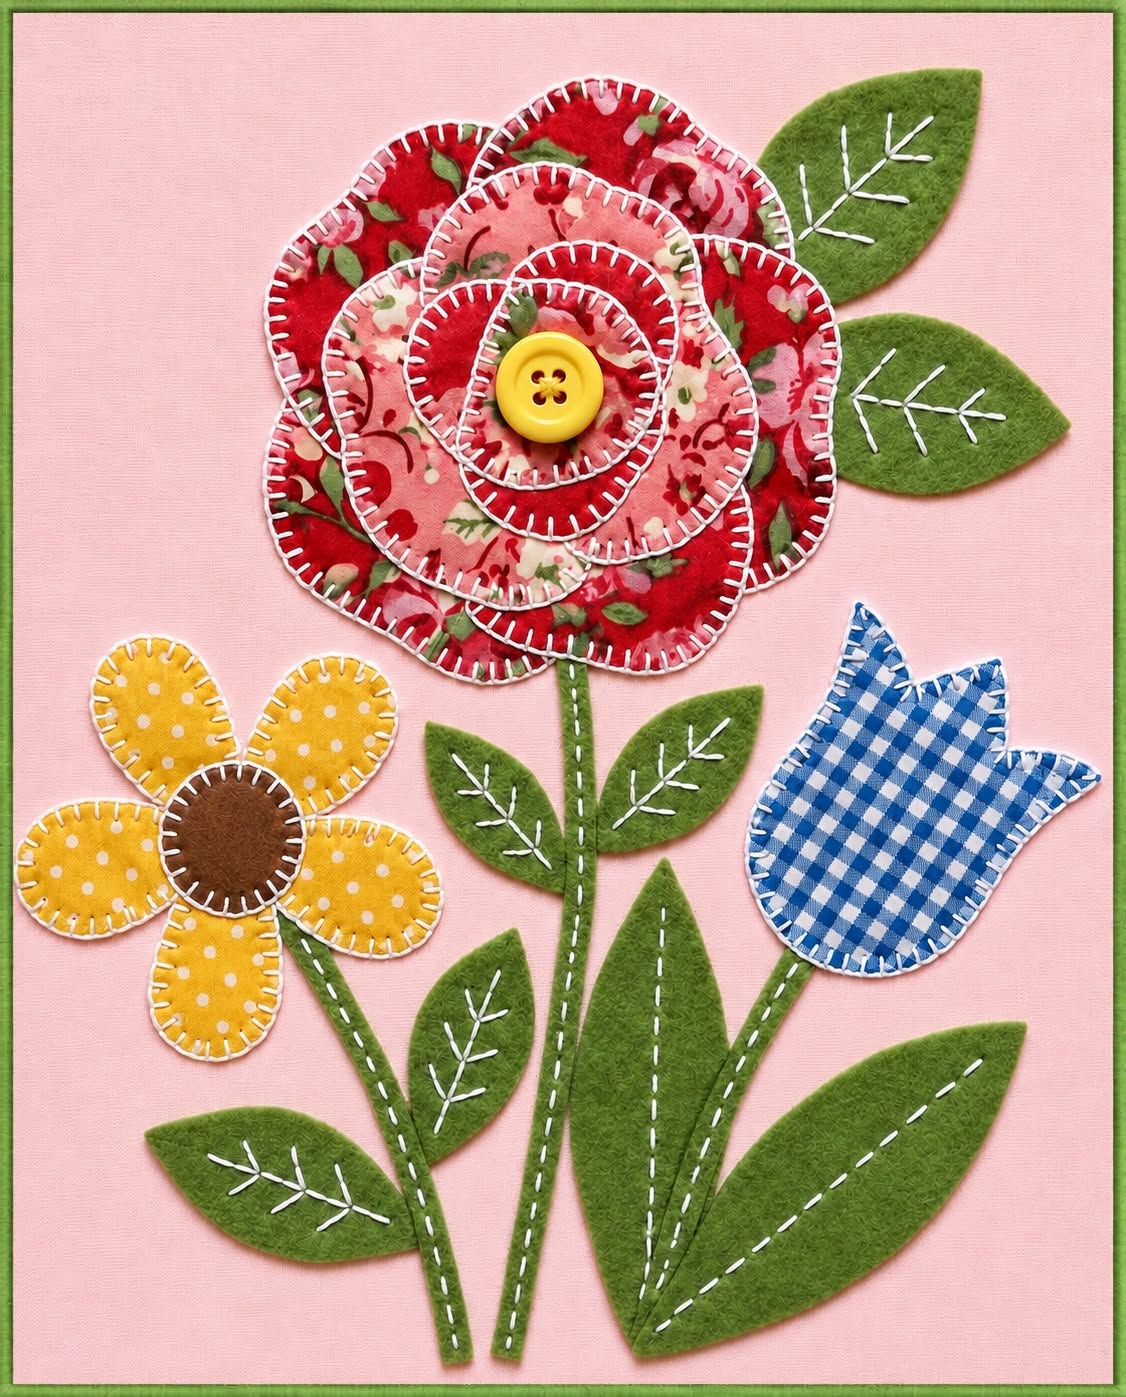
The Floral Application Tutorial Pattern is a cheerful sewing project that combines appliqué, hand stitching, layered fabric flowers, felt leaves, and simple decorative details into one charming textile composition. Inspired by the floral arrangement shown in the reference image, this project features a large layered pink and red flower, a smaller yellow flower, a blue tulip, green stems, and several leaves arranged over a neutral fabric background. The combination of colors, prints, buttons, and visible stitches gives the piece a handmade personality that works beautifully as wall art, a quilt block, a pillow front, a tote bag panel, or part of a larger patchwork project. One of the greatest advantages of this fabric appliqué pattern is that it can be created with small fabric scraps already available in your sewing collection. The shapes are simple enough for beginners while still allowing experienced sewists to experiment with texture and decorative stitching. Throughout this tutorial, you will learn how to prepare the pieces, build the layered flowers, position the stems and leaves, and finish the entire design neatly.
Creating a successful Floral Application Tutorial Pattern begins with understanding how appliqué works. Fabric appliqué is a sewing technique in which smaller pieces of fabric are cut into decorative shapes and attached to a larger background fabric. Instead of constructing the entire design from pieced quilt blocks, the maker creates a picture directly on the surface using flowers, leaves, stems, animals, geometric shapes, or other motifs. In this floral project, appliqué is especially effective because each flower can be assembled separately before being added to the background. Raw-edge appliqué can create a relaxed handmade appearance, while turned-edge appliqué produces a cleaner traditional finish. Blanket stitching, running stitches, or machine stitching can be used around the edges depending on the desired style. The visible stitches shown around the flowers in this project are not simply functional; they become part of the decorative design and help emphasize each colorful shape.
Before cutting the fabric for your Floral Application Tutorial Pattern, gather your materials and decide approximately how large you want the finished panel to be. A practical starting size is a background rectangle measuring approximately 35 cm wide by 42 cm high, although the dimensions can be increased or reduced according to the final use of the project. Choose a neutral cotton or linen-style fabric for the background so that the colorful appliqué pieces remain visually prominent. Prepare several red and pink cotton prints for the large flower, yellow printed cotton for the smaller flower, blue gingham or another blue print for the tulip, green felt or cotton for the leaves, and narrow strips of green fabric for the stems. You will also need embroidery thread, sewing thread, scissors, pins or temporary fabric adhesive, a hand-sewing needle, and one decorative button for the center of the large flower. Press all fabrics before beginning because smooth fabric produces more accurate templates and cleaner appliqué shapes.
Preparing the Fabric, Templates, and Floral Appliqué Pieces
Begin the Floral Application Tutorial Pattern by preparing your background fabric. Cut a rectangle approximately 35 x 42 cm and press it carefully. If the fabric is lightweight, you can add a piece of lightweight fusible interfacing to the back. This extra layer gives the panel more stability while you sew the appliqué pieces and decorative stitches.
DISCOVER MORE FREE PATTERNS HERE!
Next, create paper templates for the flowers and leaves. The large flower can be built from four or five irregular circular layers ranging from approximately 6 cm to 14 cm in diameter. Instead of making every circle perfectly round, gently shape the edges into petals. Slight variations will make the finished floral appliqué look more natural and handcrafted.
For the smaller yellow flower, draw one simple petal shape approximately 4.5 cm long and 3 cm wide. Trace it five times onto yellow fabric and cut the pieces carefully. Create a circular center approximately 4.5 to 5 cm wide using brown fabric or felt. This combination produces the friendly daisy-like flower seen in the design.
The blue tulip is even easier to prepare. Draw a rounded tulip silhouette approximately 8 cm high and 7 cm wide. Create three pointed sections along the upper edge so the flower resembles an open tulip. Trace the template onto blue gingham or another patterned cotton fabric and cut it out, leaving the edges clean and smooth.
For the leaves, create several elongated oval templates with pointed ends. Small leaves can measure approximately 7 x 3 cm, while the larger leaves near the bottom can measure 11 to 14 cm long. Using two or three sizes adds movement to the Floral Application Tutorial Pattern and prevents the arrangement from appearing overly symmetrical.
Finally, prepare the stems. Cut narrow green fabric strips approximately 0.8 to 1.2 cm wide. The longest stem may measure around 24 cm, while the shorter stems can measure between 15 and 20 cm. Press the edges inward slightly if you want a clean appliqué finish, or leave the edges raw for a rustic textile appearance.
Building the Layered Flowers and Decorative Details
The large flower is the visual center of the Floral Application Tutorial Pattern, so assemble it carefully before attaching it to the background. Place the largest red floral piece on your work surface, then position a slightly smaller pink or red layer over it. Continue stacking the pieces until you have created a dimensional flower with several visible rings of fabric.
Once you are satisfied with the arrangement, temporarily secure the flower layers with pins, fabric glue, or a small amount of fusible web. Sew around each layer using blanket stitch or decorative running stitch. A contrasting thread, such as cream, pink, or light yellow, can make the hand-sewn details more noticeable.
The stitching does not need to be mechanically perfect. In fact, slightly visible handmade stitches give this fabric flower appliqué much of its character. Try to keep the spacing reasonably consistent, but allow the natural texture of hand sewing to remain visible. This creates the warm, traditional look associated with folk-inspired quilting and appliqué.
Attach a decorative button to the center after all flower layers are secured. A yellow button creates a strong focal point against red and pink fabrics. Sew it firmly through several layers using strong thread. If the finished project will be used by small children, consider replacing the button with a securely sewn fabric circle to avoid detachable pieces.
To create the smaller yellow flower, arrange the five petals around the brown center. Slightly overlap the inner edges of the petals so there are no large spaces in the middle. Stitch around each yellow petal with blanket stitch, then position the brown circle on top and sew around its edge using matching or contrasting embroidery thread.
Finish the blue tulip by stitching around the entire silhouette. A white, cream, or pale blue blanket stitch works beautifully against blue gingham. Because this flower has a simpler silhouette than the layered rose, its patterned fabric becomes an important decorative feature and provides visual balance within the Floral Application Tutorial Pattern.
Arranging the Stems, Leaves, and Flowers on the Background
Before sewing anything permanently to the background, lay all pieces in position. Start with the stems because they sit underneath the flowers and leaves. Place the tall central stem slightly left of center for the large red flower, a shorter stem on the left for the yellow flower, and another stem on the right for the blue tulip.
Now place the flowers at the top of each stem. The large flower should occupy the upper central area and become the strongest focal point. Position the smaller yellow flower lower on the left and the blue tulip slightly higher on the right. This triangular arrangement gives the Floral Application Tutorial Pattern a balanced composition without making it appear rigid.
Add the leaves gradually. Place two leaves near the upper right side of the large flower, several smaller leaves along the stems, and larger leaves toward the bottom. Avoid placing every leaf at exactly the same height. Natural variation makes the floral arrangement appear more lively and visually interesting.
When you are happy with the composition, take a quick photograph before removing any pieces. The photograph can act as a placement guide while you sew. Then secure the stems first using small pins, washable fabric adhesive, or fusible web according to your preferred appliqué method.
Stitch the stems with a straight stitch close to their edges. If the strips are very narrow, one central line of stitching may be enough. Continue by attaching each leaf. Decorative hand stitching down the center of the leaves can imitate natural veins, while several smaller diagonal stitches create additional leaf details.
Finally, sew the flowers into place. Begin with the smaller flowers and finish with the large layered flower. Check regularly that the background remains smooth. If you notice puckering, reduce the tension of your stitches and avoid pulling the thread too firmly. A smooth foundation is essential for a professional-looking floral application pattern.
Finishing the Floral Application Tutorial Pattern and Creative Uses
After all appliqué pieces are attached, inspect the entire panel carefully. Trim loose threads and reinforce any areas that feel insecure. Pay particular attention to pointed leaf tips, narrow stems, and flower edges because these areas may lift slightly if they have not been stitched completely.
Press the finished Floral Application Tutorial Pattern gently from the wrong side. Place a clean pressing cloth between the project and the iron, especially if you used felt or synthetic materials. Avoid pressing directly over a plastic button because excessive heat could damage it.
At this stage, you can decide how the floral panel will be used. For a wall hanging, add lightweight batting and backing fabric, then quilt around the appliqué shapes. Echo quilting around the flowers and leaves can make the motifs stand out while adding subtle texture to the neutral background.
The same design can become an attractive cushion front. Simply enlarge or reduce the Floral Application Tutorial Pattern to fit your cushion size, complete the appliqué first, and then construct the pillow cover. A simple envelope back is an accessible option for beginners because it does not require a zipper.
Another possibility is using the design on a tote bag. In this case, apply the floral arrangement to the front panel before assembling the bag. Consider adding lightweight interfacing behind the appliqué area so the fabric remains stable during everyday use. The result is a personalized handmade accessory created from relatively small pieces of fabric.
You can also customize the pattern seasonally. Red and pink flowers create a romantic spring look, while orange, mustard, burgundy, and brown fabrics can create an autumn-inspired version. Blue and white prints can produce a fresh country style. Because the shapes remain the same, changing only the fabrics can completely transform the personality of this appliqué sewing project.
Frequently Asked Questions About the Floral Application Tutorial Pattern
What is the best fabric for a Floral Application Tutorial Pattern?
Quilting cotton is one of the easiest materials to use because it is stable, widely available, simple to cut, and comfortable to sew by hand or machine. Felt can also be used for leaves because it does not fray easily. Linen-blend fabric works especially well for the background because its subtle texture complements colorful appliqué pieces.
Can beginners make this floral appliqué project?
Yes. The Floral Application Tutorial Pattern is suitable for beginners because the shapes do not require complicated piecing. New sewists can begin with simple raw-edge appliqué and basic running stitches. Once they become more comfortable, they can experiment with blanket stitching, turned edges, embroidery, and additional quilting details.
Do I need a sewing machine to complete the project?
No. The entire project can be sewn by hand. Hand stitching actually complements the folk-art appearance of the flowers. A sewing machine can make the process faster, especially when attaching long stems or securing the finished panel to batting, but it is not essential.
What stitch is best for fabric appliqué?
Blanket stitch is a popular choice because it secures the fabric edge while creating a decorative outline. A small running stitch is another good option for a handmade appearance. Machine zigzag or satin stitch can also be used when a stronger, more defined edge is desired.
How do I prevent appliqué fabric from fraying?
Using fusible web can stabilize the fabric edges before stitching. You can also choose a dense blanket stitch or narrow zigzag stitch to cover raw edges. Another method is needle-turn appliqué, where a small seam allowance is folded underneath the shape while it is sewn.
Can I change the size of the flowers?
Absolutely. The flower templates can be enlarged or reduced according to your project. When changing the size, maintain similar proportions among the petals, centers, leaves, and stems so the finished composition remains balanced.
Can fabric scraps be used for this project?
Yes, and this is one of the best features of the Floral Application Tutorial Pattern. Small cotton scraps are ideal for the layered flower because each section can use a different print. Coordinating scraps from previous quilt projects can create a beautifully varied design while making practical use of leftover materials.
Should I wash fabric before making appliqué?
Prewashing is helpful when you are unsure whether the fabric may shrink or release excess dye. This is particularly important when combining intense red fabrics with a light background. After washing, press each fabric carefully before tracing and cutting the appliqué templates.
How can I make the flowers look more dimensional?
Layer several differently sized fabric pieces and use contrasting prints. You can also add decorative stitching, buttons, embroidery, or a small amount of lightweight batting beneath selected petals. These techniques introduce subtle depth without making the panel difficult to sew.
Can this design be included in a quilt?
Yes. Complete the floral appliqué on a quilt block first, then incorporate the block into the quilt top. You can repeat the design several times, alternate it with simpler blocks, or use one larger Floral Application Tutorial Pattern as the central feature of a wall quilt.
How should the finished appliqué be washed?
If all materials are washable, gently wash the finished piece in cool or lukewarm water using a mild detergent. Avoid aggressive agitation, particularly when decorative buttons or hand embroidery are present. Allow the piece to dry flat when possible and press carefully from the reverse side.
How can I create my own variation of this pattern?
Start with the same basic arrangement and change one element at a time. You might create six petals instead of five, replace the tulip with a heart-shaped flower, enlarge the leaves, or experiment with different prints. Maintaining the basic balance of one large focal flower and two smaller flowers helps preserve the pleasant composition.
Conclusion
The Floral Application Tutorial Pattern demonstrates how simple fabric shapes can become a detailed and expressive textile project. By preparing a neutral foundation, cutting layered flowers, creating felt or fabric leaves, adding narrow green stems, and securing everything with decorative stitching, you can recreate the charming floral composition shown in the inspiration image. The project also introduces important sewing skills such as fabric appliqué, blanket stitch, layering, template preparation, fabric placement, hand embroidery, and basic composition.
One of the most enjoyable aspects of this pattern is its flexibility. The same templates can be used with romantic floral prints, country fabrics, modern geometric cottons, pastel colors, or even leftover scraps from previous quilting projects. Changing the colors, number of petals, decorative stitches, or button centers allows every maker to develop a slightly different version while following the same basic Floral Application Tutorial Pattern.
EASILY FIND THE PDF FOR THIS PATTERN HERE!
Whether you turn the finished design into a quilt block, wall hanging, cushion, tote bag, or decorative fabric panel, the most important part is enjoying the creative process. Handmade appliqué does not need to look factory-perfect; small differences in stitches, prints, and shapes often give the finished work its unique personality. If you try this project, leave your sincere opinion about the tutorial and share your suggestions for colors, fabrics, stitches, or new floral variations you would love to create.