
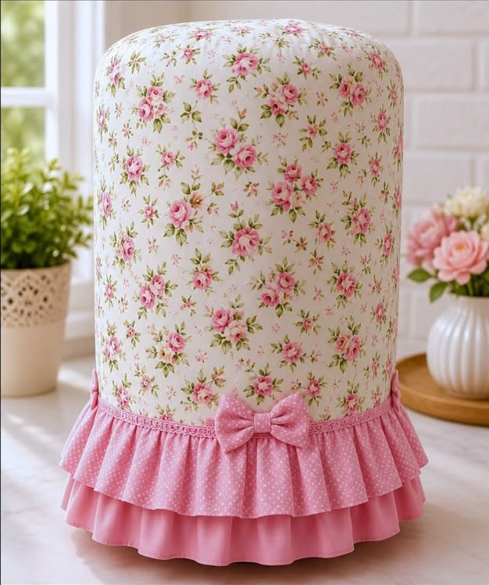
The Fabric Cover with Ruffles and a Bow Pattern is a charming sewing project that combines practical protection with the warm, decorative look of handmade home décor. Inspired by the photograph, this design features a softly shaped fabric cover made from delicate floral cotton, finished with layered pink ruffles and a centered fabric bow. The result works beautifully for covering a countertop appliance, storage container, small kitchen machine, or another similarly shaped household item. One of the strongest features of this project is that it can be adapted to different dimensions instead of depending on one fixed size. That makes the pattern especially useful for sewists who enjoy customized projects. With careful measuring, neat seams, and coordinated fabrics, you can recreate the romantic appearance shown in the reference image while still giving the piece your own personality.
Creating a Fabric Cover with Ruffles and a Bow Pattern is also an excellent opportunity to practice several basic sewing techniques in one manageable project. You will learn how to measure a three-dimensional object, calculate seam allowances, create a rounded top, prepare gathered fabric strips, sew layered ruffles, and make a structured decorative bow. Although the finished cover looks detailed, each section is constructed separately before everything is assembled together. This makes the project suitable for confident beginners as well as experienced sewing enthusiasts looking for a quick decorative project. Choosing lightweight cotton fabrics will make the sewing process easier because they press cleanly and create soft, controlled gathers. The floral print and pink fabrics in the photograph also demonstrate how combining patterns and solid or dotted fabrics can create an elegant coordinated finish.
Another advantage of this fabric cover sewing project is the freedom to personalize almost every detail. You can use vintage florals, gingham, polka dots, farmhouse prints, pastel fabrics, or modern geometric designs depending on the room where the cover will be displayed. The ruffles can be narrow and subtle or deeper and more dramatic, while the bow can be small, oversized, structured, or soft. Before cutting the fabric, it is important to measure the object carefully because the accuracy of these measurements determines how well the finished cover will fit. Always include enough ease so the cover can slide on and off comfortably without becoming excessively loose. Once those measurements are recorded, the construction process becomes much easier to organize and the final result looks more professional.
Materials and Measurements for the Fabric Cover with Ruffles and a Bow Pattern
For this Fabric Cover with Ruffles and a Bow Pattern, begin by gathering your main fabric, coordinating ruffle fabric, matching sewing thread, scissors or a rotary cutter, pins or sewing clips, measuring tape, fabric marker, iron, and sewing machine. Lightweight quilting cotton is one of the easiest materials to use because it is stable enough to hold its shape while remaining flexible. For a result similar to the photo, select an ivory or cream floral fabric containing small pink flowers and green leaves. Combine it with a pink fabric for the lower ruffles and bow. A subtle polka-dot pink cotton works particularly well for the upper ruffle and bow because it adds contrast without overpowering the floral print.
DISCOVER MORE FREE PATTERNS HERE!
The most important step is measuring the object you want to cover. Measure its height, including the top curve if necessary, and then measure around the widest part of the object. If the object is cylindrical or nearly cylindrical, the body panel can usually be created from one large rectangular piece of fabric. Add approximately 2 to 3 cm to the circumference measurement for seam allowance and ease. You should also add seam allowance to the height measurement. Avoid making the cover extremely tight because a little extra space will allow it to slide over the object easily.
Next, determine the shape and size of the top panel. If the top of your object is circular, measure its diameter and add approximately 2 cm for seam allowances. For an oval or rounded rectangular object, trace the top onto large paper and add a seam allowance around the outline. This paper template becomes your top pattern piece. Creating this template is especially helpful because the upper fabric panel needs to match the body circumference as closely as possible. Mark quarter points around both the top piece and the upper edge of the body panel so they can be matched during sewing.
The main body is generally made from one large rectangle of floral fabric. Its width should equal the circumference of the object plus ease and seam allowances. Its height should extend from the top seam to the point where you want the decorative ruffles to begin. In the photographed project, the floral section occupies most of the cover, while the ruffles decorate only the lower portion. This proportion keeps the floral print visible and prevents the project from looking overly busy. Before cutting, check all measurements twice to reduce fabric waste.
For the ruffles, cut long strips of coordinating fabric. A good starting point is to make each strip approximately 1.5 to 2 times the circumference of the finished cover. More fabric creates fuller gathers, while less fabric creates softer, flatter ruffles. For a design inspired by the reference photo, prepare one pink dotted strip approximately 8 to 10 cm deep and one solid or subtly printed pink strip approximately 9 to 12 cm deep. Remember to add extra fabric for hems and seam allowances. The lower ruffle can be slightly deeper than the upper one for an attractive layered effect.
Finally, cut the pieces needed for the bow. A simple fabric bow can be made from one rectangle for the main loops and a smaller rectangle for the center band. For a medium decorative bow, a rectangle around 16 to 20 cm wide and 8 to 10 cm high is a useful starting point, although the dimensions can be adjusted according to the size of your cover. The fabric bow should be noticeable without hiding too much of the ruffle. Using the same pink dotted fabric as the upper ruffle will visually connect both decorative elements.
How to Sew the Main Floral Fabric Cover
Begin construction by sewing the short edges of the large floral rectangle together with right sides facing. This creates the cylindrical body of your Fabric Cover with Ruffles and a Bow Pattern. Use approximately a 1 cm seam allowance unless you have calculated a different allowance in your measurements. Finish the raw seam edges with a zigzag stitch, overlock stitch, or serger to help prevent fraying. Press the seam carefully to one side or open, depending on your preferred finishing method. Good pressing is one of the simplest ways to make handmade sewing projects look cleaner.
Now prepare the top panel. Place the top fabric piece right side up and mark four evenly spaced points around its edge. Do the same with the upper edge of the cylindrical body. Turn the body wrong side out and place the top panel inside so the right sides of the fabrics are touching. Match the quarter marks and pin them together first. Then distribute the remaining fabric evenly between those points.
Sew slowly around the top seam, especially if the cover has a rounded shape. Curved seams are easier to control when you use plenty of pins or sewing clips and stop occasionally with the needle lowered to reposition the fabric. Avoid pulling either layer while sewing because stretching can create unwanted puckers. After stitching, inspect the seam from the right side. If you see any folds or uneven sections, correct them before finishing the seam allowance.
If your top panel is strongly curved, carefully clip the seam allowance without cutting through the stitches. Small clips allow the fabric to spread naturally when the cover is turned right side out. Finish the raw edge afterward using your preferred seam-finishing method. Turn the project right side out and place it over the object to test the fit. This fitting stage is important because small corrections are much easier before the ruffles have been attached.
At this point, examine the lower edge and decide exactly where the first ruffle should begin. The photograph shows the decorative section starting near the lower quarter of the cover. Mark this position lightly with a removable fabric marker or a row of long temporary stitches. Keeping the ruffle attachment line level all the way around the cover will create a polished appearance. Measure from the bottom edge at several different points rather than relying only on your eyes.
Before continuing, press the entire floral body gently. Avoid pressing too aggressively over curved areas because you want the top to remain smoothly rounded. If your fabric is very lightweight and you want extra structure, a light interfacing can be added to the main body before assembly, although it is not essential for most cotton projects. The goal is a soft structured cover that holds its form but still slides easily over the appliance or container. Once the body looks smooth and fits correctly, you can begin constructing the ruffles.
Creating and Attaching the Layered Fabric Ruffles
The layered ruffles are one of the defining characteristics of the Fabric Cover with Ruffles and a Bow Pattern. Start with the lower ruffle because it sits underneath the upper decorative layer. Join the short ends of the lower strip with right sides together to create one continuous ring. Finish the seam and press it flat. Hem the lower edge by turning the fabric under twice and stitching close to the fold.
To create gathers, sew two parallel rows of long machine stitches along the top edge of the ruffle without backstitching at the beginning or end. Leave long thread tails. Two gathering rows usually produce more even results than a single row. Gently pull the bobbin threads while sliding the fabric along the stitching. Continue until the ruffle circumference matches the circumference of the fabric cover.
Divide both the ruffle and cover into four equal sections and mark each quarter with pins. Matching these points helps distribute the fabric gathers evenly. Pin the lower ruffle in place with right sides together if attaching it at the bottom edge, or position it along your previously marked line if using an overlay construction. Adjust the gathers until they look balanced all the way around. Sew carefully, keeping the gathers perpendicular to the stitching line.
Prepare the second ruffle in the same way using the pink dotted fabric. Hem its lower edge neatly, sew the short ends together, and gather the upper edge until it fits around the cover. Position this second ruffle slightly above the lower layer so part of the solid pink ruffle remains visible underneath. This layered arrangement creates the romantic look shown in the photograph. Make sure the overlap is consistent around the entire cover.
For extra refinement, you can add a narrow strip of lace, ric-rac, piping, or decorative trim above the upper ruffle. In the reference image, a subtle decorative detail separates the floral body from the pink gathered fabric. If you prefer a simpler appearance, a narrow topstitched fabric strip can create a similar visual transition. Keep the trim lightweight so it does not make the cover stiff. The floral print should remain the main visual feature.
After attaching both ruffles, press only the seam area rather than flattening the gathers themselves. The ruffles should remain soft and dimensional. Check the lower edge while the cover is placed over the object to make sure the fabric does not interfere with ventilation openings, switches, cords, or moving parts. A decorative appliance cover should always be removed before operating an appliance, particularly if the machine generates heat. The finished cover is intended for decoration and dust protection while the appliance is not in use.
Making the Bow and Finishing the Fabric Cover
To make the decorative bow, fold the large bow rectangle in half with the right sides together and sew around the edges, leaving a small opening for turning. Trim the corners carefully and turn the fabric right side out. Use a blunt turning tool to shape the corners without piercing the fabric. Press the rectangle flat, turning the raw edges of the opening inward. Close the opening with hand stitches or a narrow line of machine stitching.
Bring the short ends of the bow rectangle toward the center and overlap them slightly. Secure the overlap using a few hand stitches. Pinch the center of the rectangle to create the characteristic bow shape. Several small folds usually create a fuller and more elegant result. Wrap strong thread around the center a few times to hold those folds securely.
Prepare the smaller center strip by folding its long raw edges toward the middle and pressing them. Fold the strip again so the raw edges are hidden. Wrap it around the pinched center of the bow and secure the ends together at the back. This method creates a clean fabric bow center without visible unfinished edges. Adjust the loops with your fingers until both sides look symmetrical.
Position the completed bow at the front center of the upper ruffle. Before sewing, place the cover on the object to check the visual alignment. The center-front position should be determined from the cover itself rather than simply measuring from the back seam. Attach the bow securely using small hand stitches through the back layers of the bow. Keep the stitches hidden so the front maintains a professional finish.
Inspect the entire project for loose threads, uneven gathers, or areas that need additional stitching. Trim thread ends carefully and give the floral portion a final light pressing. Shape the ruffles using your fingers rather than flattening them with the iron. If necessary, lightly steam the ruffles from a short distance to relax stubborn creases. Your Fabric Cover with Ruffles and a Bow Pattern should now have a smooth floral body, balanced gathered layers, and a centered decorative bow similar to the inspiration image.
To personalize future versions, experiment with seasonal prints, contrasting ruffles, lace accents, embroidered details, or patchwork panels. A Christmas version could use traditional seasonal cottons, while a spring version might feature pastel flowers and gingham. You could also create a farmhouse style using neutral linen-look fabric with small checked ruffles. The basic fabric cover pattern remains the same; only the materials and decorative details need to change. This makes the project an excellent reusable pattern for handmade home décor.
FAQ – Fabric Cover with Ruffles and a Bow Pattern
What is the best fabric for a Fabric Cover with Ruffles and a Bow Pattern?
Lightweight or medium-weight cotton is usually the easiest choice. Quilting cotton works particularly well because it is easy to cut, press, stitch, and gather. Avoid fabrics that are extremely thick if you plan to create multiple ruffle layers, because bulky fabric can make the seams difficult to manage. Prewashing cotton before cutting is also helpful when shrinkage is a concern.
How do I determine the correct size for my fabric cover?
Measure the height, circumference, and top dimensions of the item you want to cover. Add approximately 2 to 3 cm of ease around the body so the cover is not difficult to remove. Then add your normal seam allowance to every pattern piece. Because appliances and containers vary widely in size, measuring your own item is more reliable than depending on universal dimensions.
How much fabric do I need for this project?
The amount depends on the size of your object and the fullness of your ruffles. Small countertop covers may require less than one meter of main fabric, while larger projects can require more. Remember that gathered ruffles use significantly more fabric than their finished circumference. Purchasing a little extra fabric is useful for matching prints, correcting mistakes, or creating additional decorative details.
How can I make the ruffles look even?
Mark both the cover and the ruffle into four or eight equal sections before gathering. Match those marks first and then distribute the gathers between them. Sewing two rows of gathering stitches also provides better control. The most attractive ruffled fabric cover has evenly distributed gathers rather than heavily gathered areas beside nearly flat sections.
Can beginners make the Fabric Cover with Ruffles and a Bow Pattern?
Yes. The project includes several techniques, but each one can be completed separately. Beginners can take their time with measuring, gathering, curved sewing, and bow construction. Making a paper template for the top section and testing the fit before adding decorations will make the process easier. Practicing gathers on a scrap of fabric can also be useful before working on the final pieces.
Can this cover stay on an appliance while it is operating?
No. A handmade fabric cover should generally be treated as a decorative dust cover and removed completely before using an appliance. Fabric can obstruct ventilation, cover controls, or come into contact with warm surfaces. Always follow the safety instructions supplied with the appliance and allow it to cool fully before replacing the cover.
How can I make the cover look more professional?
Accurate measuring, careful cutting, consistent seam allowances, regular pressing, and balanced gathers make a major difference. Finish raw seams whenever possible and check that the ruffle lines remain level. Pay particular attention to the position of the bow because it naturally becomes the focal point. Coordinating your floral print, ruffle fabrics, and trims will also help create a cohesive handmade appearance.
Can I create this design without the bow?
Absolutely. The bow is decorative rather than structural. You can replace it with a fabric flower, button detail, lace medallion, small appliqué, or simply leave the ruffle plain. However, the bow is an important visual element of the classic Fabric Cover with Ruffles and a Bow Pattern, especially when recreating the romantic style of the reference project.
Can I add lining to the fabric cover?
Yes. A lining can provide extra body and create a cleaner interior finish. Cut the lining using the same basic measurements as the outer cover, assemble it separately, and join it according to your preferred construction method. Lightweight cotton lining is usually enough. Avoid overly heavy layers that could make the finished cover difficult to handle.
How can I adapt this pattern for different home décor styles?
Simply change the fabrics and decorative details. Floral cotton and pink ruffles create a romantic cottage style, while beige linen-look fabric and checked ruffles can create a farmhouse appearance. Bright geometric prints work well for modern kitchens, and seasonal fabrics can turn the same pattern into holiday décor. The construction method remains almost identical.
Conclusion
The Fabric Cover with Ruffles and a Bow Pattern combines useful sewing techniques with an elegant decorative finish. Throughout this tutorial, you learned how to measure the object being covered, prepare the main floral body, draft a top panel, calculate seam allowances, create evenly gathered fabric ruffles, construct a handmade bow, and assemble all of the elements into a coordinated finished cover. Careful measurements and patient fitting are the keys to achieving a smooth result that looks tailored instead of loose or uneven.
EASILY FIND THE FREE PDF FOR THIS PATTERN HERE!
This project is especially enjoyable because it can be customized repeatedly with different floral prints, colors, ruffle depths, trims, and bow styles. Once you understand the basic construction, you can adapt the same Fabric Cover with Ruffles and a Bow Pattern for many shapes and decorative themes around the home. If you make your own version, leave your sincere opinion about this project and share your suggestions for colors, fabrics, or decorative details you would love to see in another variation.