
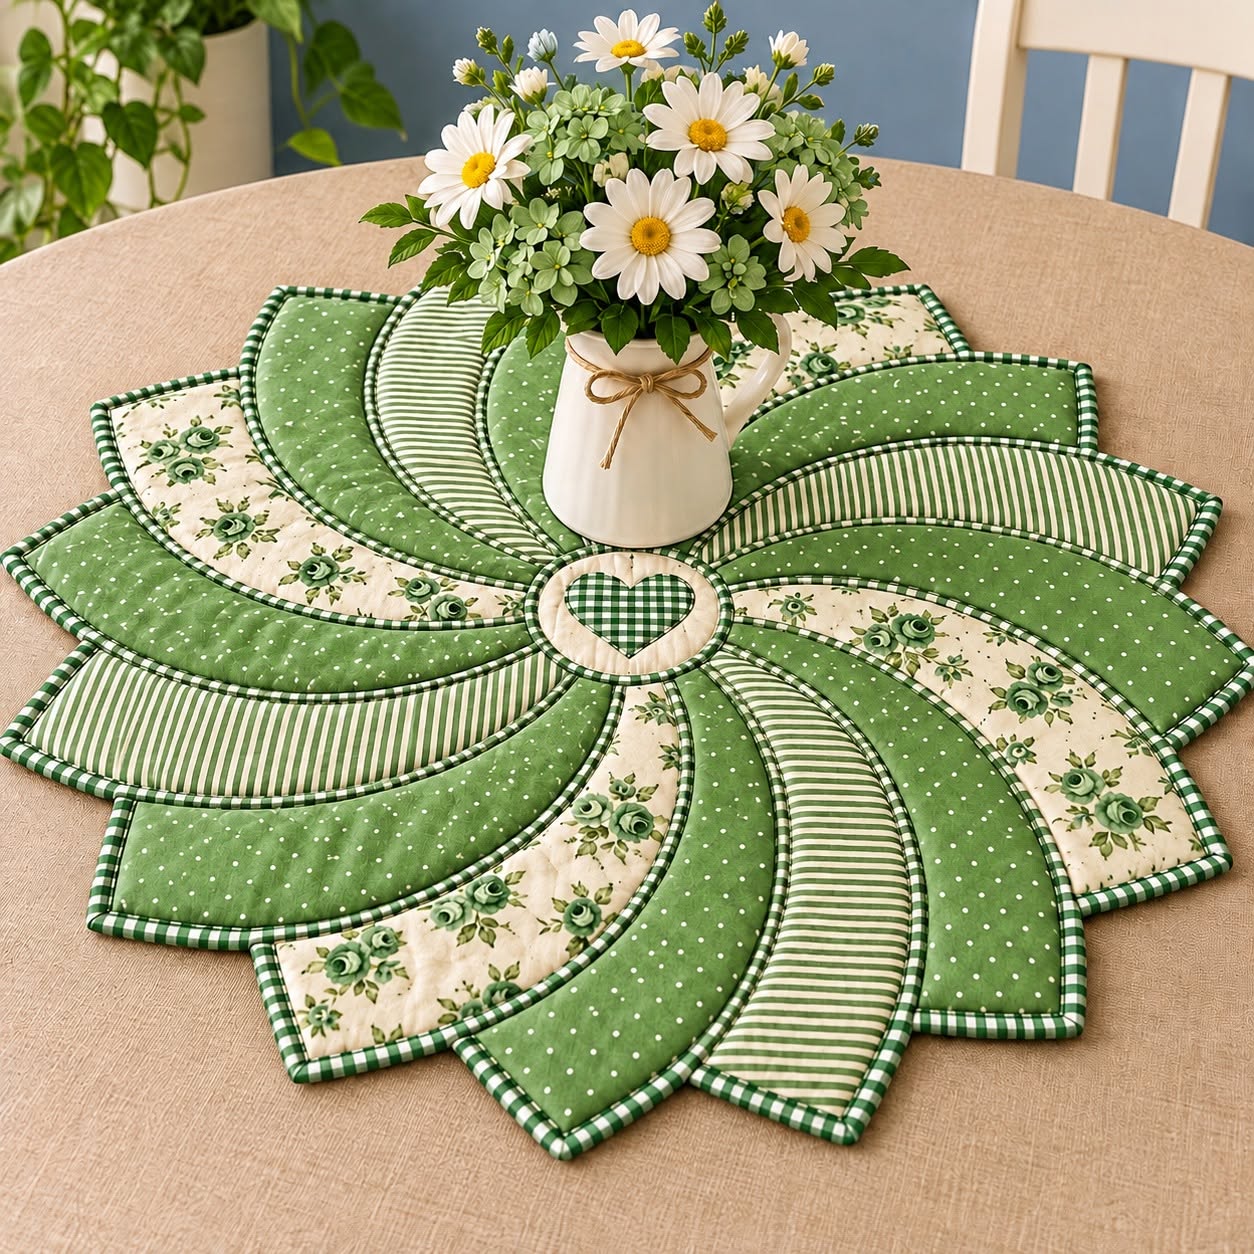
The Flower Petal Shaped Placemat Pattern is a charming sewing and quilting project that transforms coordinated fabrics into a decorative flower-inspired table centerpiece. The design shown in the reference image combines curved petal sections, contrasting blue prints, delicate floral fabric, striped cotton, tiny polka dots, and a finished center featuring a small heart appliqué. Instead of looking like a traditional rectangular placemat, this project spreads across the table like a large fabric blossom, making it especially attractive for spring décor, cottage-style kitchens, tea tables, handmade gifts, and seasonal displays. One of the most appealing qualities of the Flower Petal Shaped Placemat Pattern is that every petal can showcase a different fabric while still maintaining a coordinated color palette. The curved construction may appear complicated at first, but once the shapes are prepared carefully, the project becomes a manageable combination of cutting, layering, stitching, turning, pressing, and assembling.
This tutorial is designed to explain the entire Flower Petal Shaped Placemat Pattern process in a practical way so that both confident beginners and experienced quilters can adapt the project to their own sewing style. You do not need exactly the same blue and cream fabrics shown in the photograph. The pattern works beautifully with quilting cotton, floral fabric, gingham, stripes, solids, small geometric prints, or even selected fabric scraps from previous projects. What matters most is creating enough contrast for the curved petals to remain visually distinct. The pictured version uses blue as the dominant color, with white and cream fabrics providing balance and softer visual breaks. The central heart becomes a small focal point that connects the romantic floral theme with the handmade character of the piece. With accurate preparation and patient pressing, you can create a polished result without needing advanced quilting equipment.
Another advantage of the Flower Petal Shaped Placemat Pattern is its flexibility. You can make the finished flower large enough to sit beneath a vase or centerpiece, reduce the pattern for individual place settings, or enlarge the pieces for a decorative table topper. A finished diameter of approximately 80 to 95 cm works well for a substantial centerpiece similar to the one pictured, although the exact measurement will depend on your petal template and the amount of overlap between sections. The project is also an excellent opportunity to practice curved sewing, fabric binding, appliqué, topstitching, quilt layering, and color coordination in one attractive project. Because the design consists of repeated units, you can sew one petal first as a test before cutting the complete set. This simple step makes it easier to confirm your seam allowance, shape, and finished dimensions before committing all of your fabric.
Materials and Preparing the Flower Petal Shaped Placemat Pattern
To make the Flower Petal Shaped Placemat Pattern, begin by choosing four to six coordinating fabrics. For a look similar to the reference project, select medium blue cotton with tiny white dots, blue-and-white stripes, cream floral fabric with blue flowers, and blue gingham for the center heart. You will also need backing fabric, thin batting or fusible fleece, matching sewing thread, pins or fabric clips, scissors or a rotary cutter, a fabric marker, an iron, and your sewing machine. A walking foot can be useful for quilting thicker layers, but it is not essential.
DISCOVER MORE FREE PATTERNS HERE!
Create a petal template on sturdy paper or lightweight cardboard. A practical starting size is approximately 30 cm long and 13 to 16 cm wide at the broadest point. Draw a gently curved petal that is narrower toward one end and fuller toward the opposite end. Because the photographed design has flowing, overlapping petals rather than sharply pointed flower petals, keep the curves soft and generous. Add approximately 0.7 to 1 cm seam allowance around the template if your original drawing represents the finished size.
For a full flower, prepare approximately 14 to 18 petals, depending on how wide your petal template is and how much overlap you want. The visual character of the Flower Petal Shaped Placemat Pattern comes from alternating fabrics, so avoid placing too many identical petals directly beside one another. Before sewing, arrange paper templates in a circle to test the spacing. This allows you to adjust the petal width without wasting fabric.
Trace the petal template onto the wrong side of your fabrics. Each petal needs a top layer, backing layer, and a piece of batting. Cut the batting slightly smaller than the fabric if you want to reduce bulk at the seams. When using directional prints such as stripes, pay attention to the orientation of every piece. In the pictured design, alternating stripe directions help give the flower a sense of movement.
Prewash your cotton fabrics if you normally prewash quilting materials, then press everything thoroughly before cutting. Accurate cutting is particularly important for this fabric placemat pattern because small differences in petal size can become noticeable when all the pieces meet in a circle. Use the same template for every petal instead of redrawing the shape repeatedly. Labeling the backs of your fabric pieces can also help you remember your planned arrangement.
Finally, prepare a circular center template approximately 12 to 15 cm in diameter. The center should be large enough to cover the inner ends of all the assembled petals. You can also prepare a small heart appliqué template measuring roughly 7 to 9 cm across. The heart is optional, but it closely reflects the reference project and creates an attractive handmade focal point in the finished Flower Petal Shaped Placemat Pattern.
Sewing and Finishing the Individual Fabric Petals
Begin each petal by placing the top fabric and backing fabric with right sides together. Position the batting against the wrong side of one fabric layer. Pin or clip around the edges, leaving a small opening along one relatively straight section for turning. Sew slowly around the curve using your chosen seam allowance. Smooth, controlled stitching will produce a cleaner edge once the petal is turned.
Before turning the petal right side out, carefully trim excess seam allowance and clip along the curved areas. Do not cut through the stitching. These tiny clips allow the seam to spread naturally after turning and prevent the curved edge from puckering. If the tip or narrow end contains extra bulk, trim it cautiously. Curve quality is important because the repeated rounded edges are one of the defining features of the Flower Petal Shaped Placemat Pattern.
Turn the piece right side out through the opening. Use a blunt turning tool, knitting needle, or similar smooth object to gently shape the curved edges. Avoid pushing aggressively because that could damage the seam. Press the petal carefully with the iron until it lies flat. Fold the raw edges of the turning opening inward so that they align with the sewn seam.
Topstitch around the complete petal approximately 0.3 to 0.5 cm from the edge. This closes the opening while also strengthening and defining the shape. The example in the photograph uses visible contrasting edges that emphasize every curved section. You can achieve a similar effect with decorative topstitching, narrow binding, or a contrasting fabric edge. Blue gingham binding is especially effective if you want the finished project to resemble the reference style.
If you prefer the clearly outlined petal appearance shown in the photograph, add narrow bias binding around each petal instead of relying only on topstitching. Bias strips work well because they can bend around curves more easily than strips cut on the straight grain. Sew the binding to the front, wrap it over the raw edge, and secure it neatly on the back. Take your time around the deepest curves to avoid wrinkles.
Repeat this process until all the petals are complete. Lay the finished pieces on a flat surface and compare their dimensions before beginning final assembly. Minor differences can usually be hidden through overlap, but extremely uneven petals should be corrected before proceeding. At this stage, the Flower Petal Shaped Placemat Pattern starts to become visually exciting because you can experiment with different arrangements without permanently joining anything.
Arranging and Assembling the Flower-Shaped Placemat
Place all the completed petals on a large table or clean floor and arrange them in a circular formation. Allow each petal to overlap its neighbor slightly near the center. The outer edges should create a flower-like silhouette rather than a perfect circle. Rotate the different printed fabrics around the design until the colors feel balanced. Try to distribute floral, striped, dotted, and solid-looking sections evenly.
Once you are satisfied with the arrangement, photograph it with your phone before moving anything. This simple reference can save time if the petals become mixed during sewing. Mark the pieces with small removable numbers if necessary. Building the Flower Petal Shaped Placemat Pattern is much easier when you have a clear order for assembly instead of trying to remember where every print belongs.
Begin connecting neighboring petals at their overlapping inner sections. Depending on your preferred construction method, you may tack them together with several secure stitches or sew a short line where one petal overlaps another. Keep permanent stitching close enough to the center that it will later be covered by the circular centerpiece. The goal is to stabilize the flower without creating unnecessary stitching across the visible petal surfaces.
Continue attaching the petals around the entire circle. Stop occasionally and place the flower flat on the table to check that the project remains symmetrical. If the shape begins pulling strongly in one direction, adjust the next petal before sewing it permanently. Remember that a handmade flower does not need mathematical perfection, but balanced spacing gives the quilted placemat a more professional appearance.
When all petals are connected, place the circular center piece over the inner ends. The circle should hide the attachment stitches and create a clean transition between the individual petals. Prepare this circle with batting and backing in the same way as the petals, or use a finished appliqué circle. A cream center works beautifully against blue petals because it creates visual contrast while connecting with floral cream fabrics elsewhere in the project.
Add the heart appliqué to the middle before permanently attaching the center circle. For a design similar to the photograph, cut the heart from blue gingham or checked fabric. Fuse it temporarily with lightweight fusible web if desired, then secure the edges with a blanket stitch, zigzag stitch, or straight appliqué stitch. Sew the completed circular centerpiece over the middle of the flower, making sure every petal end remains securely hidden underneath.
Quilting Details, Decorative Finishing, Care, and Styling
After assembly, inspect the entire Flower Petal Shaped Placemat Pattern and decide whether additional quilting is needed. Because every petal already contains batting, extensive quilting may not be necessary. However, one or two curved lines of quilting inside each petal can provide extra stability and create additional texture. Follow the natural arc of the fabric rather than forcing straight lines into the flowing design.
Thread color can subtly change the appearance of the project. White thread creates fresh contrast against medium blue fabrics, while matching blue thread produces a quieter finish. Cream works well on floral sections, and decorative gold or beige thread can give the heart and center additional definition. When mixing thread colors, keep the overall design consistent so that the stitching supports rather than overwhelms the flower placemat pattern.
Press the finished piece using moderate heat appropriate for your fabrics and batting. Place a pressing cloth over appliqué or decorative stitching when necessary. Do not aggressively stretch the curved petals during pressing because this can distort their shapes. A final careful press helps the flower lie flatter on the table and improves the appearance of the overlapping sections.
The Flower Petal Shaped Placemat Pattern is especially attractive beneath a simple vase, ceramic pitcher, candle arrangement, fruit bowl, or seasonal centerpiece. If the center will support a vase containing water, consider placing a small waterproof coaster or protective mat underneath. This helps protect your handmade fabric project from moisture while allowing the decorative petals to remain fully visible.
For washing, follow the care recommendations for the specific fabrics and batting you used. In general, gentle washing with mild detergent and cool or lukewarm water is suitable for quality quilting cotton. Avoid harsh bleach because it can damage colors and fibers. Reshape the flower while damp and allow it to dry flat whenever possible. A light press afterward can restore the crisp appearance of the petals.
Once you understand the basic Flower Petal Shaped Placemat Pattern, you can create many variations. Try autumn prints in rust, gold, cream, and green; Christmas fabrics in red and evergreen; pastel colors for spring; or bright scraps for a playful patchwork version. You can also replace the central heart with a flower, star, monogram, pumpkin, butterfly, or another appliqué motif. The same basic construction method can therefore become a reusable sewing idea for many seasons.
FAQ – Frequently Asked Questions About the Flower Petal Shaped Placemat Pattern
Is the Flower Petal Shaped Placemat Pattern suitable for beginners?
Yes. A confident beginner can complete this project successfully, especially by making one test petal first. The main skills required are accurate cutting, sewing curved seams, turning fabric pieces, pressing, topstitching, and simple appliqué. Working slowly around the curves is more important than sewing quickly.
How many petals should I use?
Approximately 14 to 18 petals creates a full flower for many template sizes. Wider petals require fewer pieces, while narrow petals require more. Arrange paper templates first so you can determine the best quantity before cutting valuable fabric.
What is the best fabric for a flower-shaped placemat?
100% quilting cotton is one of the easiest choices because it is stable, easy to cut, easy to press, and available in coordinating prints. Gingham, stripes, small florals, polka dots, and solids can all be combined effectively.
Should I use batting inside the petals?
Yes, thin batting gives the petals structure and creates the soft padded appearance associated with quilting. Low-loft cotton or polyester batting works well. Fusible fleece is another option when you want slightly firmer petals.
Can I make the placemat without binding every petal?
Absolutely. Sewing the pieces right sides together, turning them, pressing them, and topstitching around the edge is a simpler alternative. Binding produces a more defined outline like the reference image, but it is not required for a successful Flower Petal Shaped Placemat Pattern.
How large should the completed project be?
For a decorative table centerpiece, a finished diameter of approximately 80 to 95 cm can create a dramatic flower similar in proportion to the pictured example. You can scale the pattern down for individual settings or enlarge it for a bigger table.
Can fabric scraps be used for this project?
Yes. This is an excellent scrap-friendly quilting project because each petal can use a different fabric. For a coordinated result, choose scraps that share at least one common color or visual theme.
How can I prevent curved edges from puckering?
Use an accurate seam allowance, sew curves slowly, trim bulky seam allowances, and make small clips along curved areas before turning. Pressing each piece carefully before topstitching also makes a noticeable difference.
Does the heart in the center have to be included?
No. The heart is decorative. You can replace it with another appliqué shape, an embroidered motif, a patchwork block, a fabric-covered button design, or simply leave the center circle plain.
Can the Flower Petal Shaped Placemat Pattern be machine washed?
It usually can if you use washable quilting cotton, batting, thread, and appliqué materials. Gentle washing and flat drying are preferable because they help maintain the curved petal shape and prevent excessive distortion.
What color combinations work well with this design?
Blue and cream create a fresh cottage look like the reference image, but many combinations are effective. Red and cream create a traditional look, green and beige feel natural, pastels suit spring décor, and multicolored scraps produce a cheerful patchwork effect.
How do I make the flower look balanced?
Lay out all the petals before sewing and distribute similar prints around the circle instead of clustering them in one area. Alternating light and dark fabrics is another effective way to create rhythm and definition throughout the Flower Petal Shaped Placemat Pattern.
Conclusion
The Flower Petal Shaped Placemat Pattern combines practical quilting techniques with an eye-catching floral shape that can completely change the look of a table. Throughout this tutorial, you learned how to choose coordinating quilting fabrics, create a reusable petal template, cut the fabric and batting, sew curved petals, turn and press them, add topstitching or binding, arrange the pieces into a balanced flower, secure the layers, and finish the center with a decorative heart appliqué.
The most important part of this project is not achieving absolute perfection in every curve. Careful preparation, consistent petal sizes, thoughtful fabric placement, and good pressing will have a much greater effect on the final appearance. Once you complete your first Flower Petal Shaped Placemat Pattern, the same method can be adapted to countless colors, sizes, seasons, and decorating styles.
EASILY FIND THE FREE PDF FOR THIS PATTERN HERE!
This is also a wonderful project for using coordinated fabric scraps while practicing curved sewing, quilting, appliqué, binding, patchwork, and decorative topstitching. Whether you use the finished piece beneath flowers, as a table centerpiece, or as handmade décor for a special occasion, its layered petal shape gives it a distinctive character that ordinary placemats rarely offer. If you make your own version, leave your sincere opinion about the project and share your suggestions. Which fabric colors would you choose for your Flower Petal Shaped Placemat Pattern, and what other appliqué design would you place in the center?