
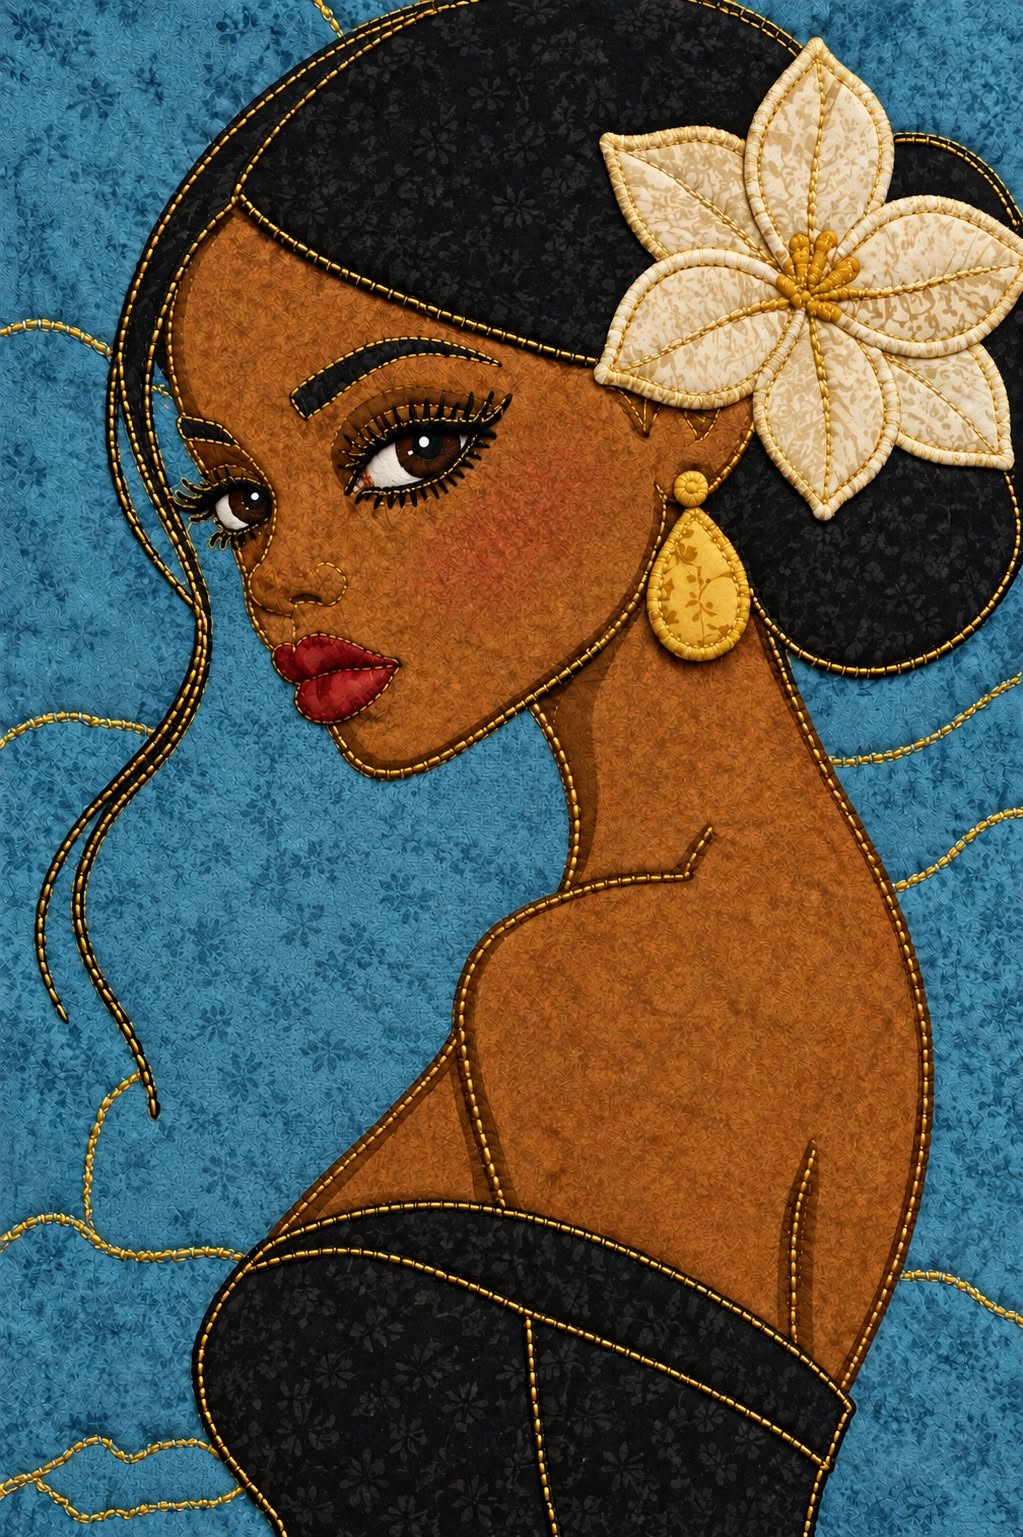
The Elegant Woman Fabric Panel Appliqué Tutorial Pattern is a beautiful textile-art project that combines expressive portrait design, fabric layering, decorative stitching, and careful color selection in one striking composition. Inspired by the fabric panel shown in the reference image, this project features an elegant female portrait created with warm brown fabrics, deep black hair, a dimensional cream flower, golden accessories, expressive eyes, and a softly textured blue-green background. The appeal of this type of fabric appliqué pattern comes from the way simple pieces of cotton can be transformed into facial features, hair, clothing, jewelry, and decorative details. Although the finished artwork looks elaborate, the construction becomes much easier when it is separated into manageable layers and assembled in the correct order.
Creating an Elegant Woman Fabric Panel Appliqué Tutorial Pattern is also an excellent opportunity to improve several useful sewing skills. You will practice fabric appliqué, accurate tracing, careful fabric placement, curved-edge stitching, decorative embroidery, layered appliqué, and fabric color coordination. The project does not require every detail to be perfectly realistic. In fact, much of its beauty comes from the handmade appearance of the stitches, subtle differences between fabric prints, and artistic interpretation of the face. The key is to preserve the recognizable silhouette while allowing the fabrics and stitching to add their own character. Cotton quilting fabrics are particularly suitable because they are easy to cut, press, stabilize, and stitch.
Another advantage of this appliqué tutorial pattern is how easily it can be customized. The skin fabric can range from caramel and bronze to deeper brown shades, while the hair can be made from black, charcoal, dark navy, or printed fabric. The large decorative flower can be cream, ivory, gold, white, or even a brighter color if you prefer a more contemporary result. Likewise, the background can be changed to coordinate with a room, quilt, wall hanging, cushion, or decorative fabric panel. Instead of treating the reference as something that must be copied exactly, think of the Elegant Woman Fabric Panel Appliqué Tutorial Pattern as a foundation for creating your own textile portrait while following reliable appliqué techniques.
Choosing Fabrics, Supplies, and Preparing the Portrait Pattern
Begin by choosing a strong but manageable foundation fabric for the background. In the reference design, a muted turquoise or blue-green fabric creates beautiful contrast against the warm complexion and black hair. Quilting cotton works very well, although a cotton-linen blend can add interesting texture. Cut the background slightly larger than your intended finished panel so you have room for trimming and squaring after stitching. Press it thoroughly before beginning because wrinkles can make the appliqué shapes more difficult to position accurately.
DISCOVER MORE FREE PATTERNS HERE!
For the portrait, select several coordinated quilting fabrics rather than relying on one solid color. A medium brown fabric can form the main face, neck, shoulder, and arm areas, while slightly darker shades can provide definition where pieces overlap. Black or charcoal cotton is ideal for the hair and clothing. Small pieces of cream, ivory, burgundy, gold, white, and dark brown fabric can be reserved for the flower, lips, earrings, eyes, and facial details. Using subtle tone-on-tone prints is particularly effective because they provide visual depth without distracting from the overall portrait.
You will also need a basic collection of appliqué sewing supplies. Helpful materials include lightweight fusible web, sharp fabric scissors, a fine-tip fabric pencil, tracing paper, an iron, coordinating threads, an appliqué or quilting needle, and stabilizer if your background fabric tends to distort. Fusible web makes a portrait project considerably easier because it keeps the numerous curved shapes securely positioned while you sew. If you prefer traditional techniques, the same design can be created using needle-turn appliqué, although this method requires more time.
Before cutting fabric, create a full-size paper template of the portrait. Separate the design into individual sections such as the main face, neck, shoulder, arm, hair, clothing, flower petals, lips, eye shapes, eyebrows, and jewelry. Label each piece carefully. It is helpful to number overlapping components so you remember which pieces must be positioned first. For example, the neck and shoulder should generally be installed before the face, while sections of hair may overlap both the face and background.
When working with fusible appliqué, remember that shapes traced onto the paper side of fusible web may need to be reversed depending on the product and tracing method being used. Trace each pattern component neatly and leave a small amount of space between pieces. Rough-cut the shapes before fusing them to the wrong side of the chosen fabrics. Follow the temperature instructions supplied with your fusible material because excessive heat can stiffen fabric or weaken the adhesive.
Once the fusible web has cooled, cut each shape precisely along the traced lines. Curved sections around the cheek, chin, neck, flower petals, and hairstyle deserve special attention. Small sharp scissors allow smoother curves than large dressmaking shears. Keep all the finished pieces grouped according to the area of the portrait where they belong. At this stage, you should have what resembles a fabric puzzle ready to become the main structure of your Elegant Woman Fabric Panel Appliqué Tutorial Pattern.
Building the Face, Neck, Hair, and Main Fabric Layers
Lay the prepared background on a large flat surface and locate the approximate center of your composition. Before removing any fusible backing, arrange the largest portrait pieces on top of the background. Begin with the neck, shoulder, torso, and main facial silhouette. Compare their spacing carefully with the reference image. The elegant appearance of the portrait depends greatly on the long neck, gently angled face, and graceful shoulder line, so take time to adjust these areas before pressing.
After you are satisfied with the placement, remove the fusible paper and lightly press the main shapes into position. Do not immediately apply excessive pressure or heat. A short initial press gives you greater control and reduces the chance of accidentally shifting a component. Continue building from the lowest layers toward the upper layers. The body pieces should appear naturally connected rather than looking like unrelated shapes, and overlapping edges can later be emphasized with thread.
Add the large black fabric hair appliqué next. The hairstyle is one of the strongest visual elements of this design because the dark fabric frames the face and creates a dramatic contrast with the background. Use more than one piece if necessary to reproduce the rounded upper hairstyle and lower hair section. A subtle black-on-black floral or tonal print is especially attractive because the hair remains visually dark while showing texture when viewed up close.
The face can now be refined with smaller appliqué pieces. Position the eye whites first, followed by the colored iris and dark pupil. Small white highlights can make the eyes appear much more expressive. Create the lips using deep red or burgundy fabric and divide the upper and lower lip subtly through stitching. Eyebrows can be made from extremely narrow fabric pieces, but embroidered or densely stitched eyebrows are often easier to control and can create a cleaner result.
One of the charming details in the reference composition is the slender dark strand of hair that travels down beside the face. Instead of cutting an extremely thin appliqué strip, this detail can be created using narrow bias fabric, decorative cord, couching, or several rows of dense dark stitching. Whichever technique you choose, allow the line to curve naturally. Slightly irregular curves often appear more organic than a mechanically perfect line.
When all major pieces are correctly positioned, press the entire design according to the instructions for your fusible web. Allow it to cool completely before moving it. Check every edge with your fingertips to ensure that it has bonded correctly. At this stage, the Elegant Woman Fabric Panel Appliqué Tutorial Pattern should already resemble the finished portrait, even though the decorative stitching, facial definition, flower, accessories, and quilting are still to come.
Stitching the Appliqué and Creating the Flower and Facial Details
The stitching stage is where a simple arrangement of fabrics begins to look like genuine textile portrait art. Select thread colors that either blend with the appliqué pieces or deliberately contrast with them. A narrow blanket stitch is particularly effective for this style because it secures the fabric while creating a handmade decorative outline. A small zigzag stitch or satin stitch can also be used. If sewing by hand, blanket stitch and whip stitch are both suitable options.
Begin stitching around the larger areas first. Secure the face, neck, shoulders, arms, hair, and clothing before moving to tiny facial components. Work slowly around curved edges and reduce your stitch length when necessary. On a sewing machine, stop with the needle down when turning around tight curves. This prevents the fabric from shifting and helps produce smoother outlines. Matching brown thread around the skin sections creates definition without making the stitching overly dominant.
The eyes deserve additional attention because they give the portrait much of its personality. Outline the eye shapes with dark thread, then add carefully spaced stitches around the eyelid to suggest eyelashes. Small embroidered details can define the nose, nostrils, cheek, jawline, and other facial features without requiring additional fabric pieces. Avoid adding too many lines at once. Begin with the most important details, examine the portrait from a distance, and add more only when they improve the expression.
Next, construct the large fabric appliqué flower decorating the hair. Cut several individual petals from cream or ivory patterned cotton. Each petal can be lightly padded with a thin layer of batting if you want additional dimension. Arrange the petals in a circular formation and overlap them slightly near the center. Secure the edges with blanket stitch, satin stitch, or another decorative appliqué technique. A warm golden fabric or dense golden embroidery can be used in the flower center.
Add decorative veins to the flower petals using coordinating gold or cream thread. These stitched lines help separate each petal and give an otherwise flat appliqué more visual structure. The combination of ivory fabric with small golden details is particularly effective because it echoes the jewelry. If you want a slightly three-dimensional finish, some petal edges can be left minimally raised, provided the project is intended as a wall panel rather than something that will receive heavy washing.
Complete the earrings with small pieces of golden-yellow fabric. A circular upper section combined with a teardrop-shaped lower section closely reproduces the look of the reference artwork. Outline the pieces with coordinating stitching, and consider adding a second line of decorative embroidery inside the teardrop. Small details such as earrings, flower stitching, eye highlights, and lips may occupy little space, but they give the Elegant Woman Fabric Panel Appliqué Tutorial Pattern its polished and sophisticated character.
Quilting, Finishing the Panel, and Personalizing Your Appliqué Project
Once the appliqué stitching is finished, prepare the panel for quilting. Create a quilt sandwich using the completed appliqué top, a thin layer of batting, and backing fabric. Smooth all three layers carefully and secure them with basting spray, safety pins, or temporary hand-basting stitches. Thin batting is usually preferable for detailed portrait appliqué quilting because it adds dimension without making the smaller facial areas excessively bulky.
Quilt the background first using gentle curved lines or free-motion stitching. The reference image uses flowing shapes that add movement without competing with the central portrait. You can follow a similar approach by quilting irregular waves, loops, or soft contour lines throughout the blue-green background. Keep the quilting relatively understated near the face so the viewer’s attention remains focused on the portrait. Contrasting thread can be used sparingly for a more artistic look.
Additional quilting can be added within larger appliqué pieces if desired. For example, subtle stitching inside the shoulder or hair can help prevent large sections from appearing flat. Follow the natural direction of the design rather than filling every space with dense quilting. Stitching that echoes the shape of the hairstyle or body contour can enhance dimension while preserving the clean graphic style of the fabric panel appliqué.
After quilting, inspect the entire panel for loose threads or areas that need reinforcement. Trim thread ends neatly and correct any appliqué edges that may have lifted during quilting. Square the panel using a ruler and rotary cutter, removing only the minimum amount necessary. At this point, you can finish the edges with traditional quilt binding, a narrow fabric border, or another decorative finishing technique that coordinates with the portrait.
Personalization is one of the most enjoyable aspects of the Elegant Woman Fabric Panel Appliqué Tutorial Pattern. Consider changing the background to burgundy, teal, mustard, navy, or soft neutral fabric. The flower could become red, blue, pink, or gold, and the earrings could coordinate with it. You can also use different skin tones, hairstyles, clothing fabrics, or facial details to develop an original textile character while keeping the same general construction technique.
Finally, decide how you would like to display the project. It works beautifully as a quilted wall hanging, decorative panel, framed textile artwork, cushion front, or centerpiece for a larger quilt. If displaying it as wall art, adding a hanging sleeve to the back keeps the front clean and allows the panel to hang evenly. Give the finished piece a light final press from the reverse side when appropriate, taking care not to flatten dimensional appliqué elements such as the flower.
FAQ – Frequently Asked Questions
What is fabric appliqué?
Fabric appliqué is a sewing technique in which smaller fabric shapes are attached to a larger background fabric to create decorative designs, pictures, letters, or patterns. The edges can be secured by machine stitching, hand stitching, fusible adhesive, or combinations of these methods. Portrait appliqué uses the same principle but usually requires more individual shapes and careful layering.
Is the Elegant Woman Fabric Panel Appliqué Tutorial Pattern suitable for beginners?
A motivated beginner can certainly make this project, although it is more detailed than a basic appliqué block. If you are new to the technique, practice blanket stitching on fabric scraps before sewing the portrait. Constructing the project in stages also makes it much less intimidating.
What is the best fabric for portrait appliqué?
Good-quality quilting cotton is one of the easiest choices because it cuts cleanly, presses well, and is available in a huge variety of colors and tonal prints. Cotton-linen blends can also work well, especially for backgrounds. Extremely stretchy or slippery fabrics are harder to control and are generally less convenient for beginners.
Do I need fusible web for this project?
No. Fusible web is helpful because it temporarily or permanently holds pieces in position before stitching, but traditional needle-turn appliqué can also be used. Fusible appliqué is generally faster and may be easier when dealing with numerous small facial and decorative components.
Which stitch works best around appliqué pieces?
Blanket stitch is an excellent option for the handcrafted style seen in this design. Narrow zigzag, satin stitch, straight-edge stitching, and hand appliqué stitches can also produce attractive results. Your choice depends on whether you want visible decorative outlines or nearly invisible edges.
How can I make the eyes look expressive?
Use several layers: a light fabric for the eye white, a brown or colored iris, a dark pupil, and a tiny light highlight. Dark thread around the eyelid and individually stitched eyelashes can greatly increase the sense of expression. Small changes in pupil position can dramatically alter the direction of the gaze.
How do I prevent the background from puckering?
Stabilize the background when stitching dense appliqué areas, avoid pulling the fabric while sewing, and make sure your machine tension is properly adjusted. Fusible web and lightweight embroidery stabilizer can both improve stability. Pressing the fabric carefully between stages may also help keep the panel smooth.
Can I use fabric scraps for this pattern?
Absolutely. In fact, fabric scraps are ideal for the eyes, lips, flower petals, earrings, and other small components. A coordinated scrap collection can also make the portrait more visually interesting because subtle variations in prints create texture.
Can the flower be made three-dimensional?
Yes. Individual petals can include thin batting or be constructed as lightly padded pieces before being attached. However, dimensional elements are best for wall hangings and decorative panels rather than items that will be washed or handled frequently.
Can I quilt over the appliqué?
Yes, but quilting should be added thoughtfully. Background quilting can make the portrait stand forward visually, while selective quilting inside large appliqué sections adds texture. Avoid extremely dense stitching across delicate facial features unless that effect is intentionally part of your design.
How can I customize the Elegant Woman Fabric Panel Appliqué Tutorial Pattern?
Change the skin tones, hair colors, background, flower, earrings, clothing, quilting design, or decorative stitching. You can also simplify or increase the number of facial details. The construction principles remain essentially the same even when the visual style changes significantly.
How should I care for a finished appliqué panel?
A decorative wall panel generally requires little maintenance beyond gentle dust removal. If the project is designed for washing, choose washable fabrics, thread, batting, and fusible products from the beginning. Gentle washing and minimal agitation will help protect detailed appliqué and decorative stitching.
Conclusion
The Elegant Woman Fabric Panel Appliqué Tutorial Pattern demonstrates how fabric, thread, color, and careful layering can transform a simple textile surface into expressive portrait art. The process begins with selecting coordinated quilting fabrics and preparing individual pattern components, followed by arranging and fusing the major facial, body, hair, and clothing shapes. Working gradually makes even an intricate portrait much easier to understand and construct.
Throughout the project, techniques such as fusible appliqué, blanket stitching, decorative embroidery, layered flower construction, facial detailing, and background quilting work together to create depth. The warm brown complexion, dramatic dark hairstyle, elegant cream flower, golden jewelry, expressive eyes, and blue-green background are especially effective because each element provides contrast while remaining part of a coordinated composition.
EASILY FIND THE FREE PDF FOR THIS PATTERN HERE!
The most important lesson is that a successful fabric appliqué portrait does not depend on absolute perfection. Careful fabric selection, clean cutting, thoughtful placement, secure stitching, and expressive handmade details matter much more. Once you understand the layering process, the same techniques can be adapted to many other portraits, wall quilts, decorative panels, cushions, and textile-art projects. I hope this Elegant Woman Fabric Panel Appliqué Tutorial Pattern inspires you to experiment with your own fabrics and personal style. After completing your version, leave your sincere opinion about the project and share your suggestions. It would be wonderful to know which colors, fabrics, stitches, or details you would change to make this elegant appliqué portrait uniquely your own.