
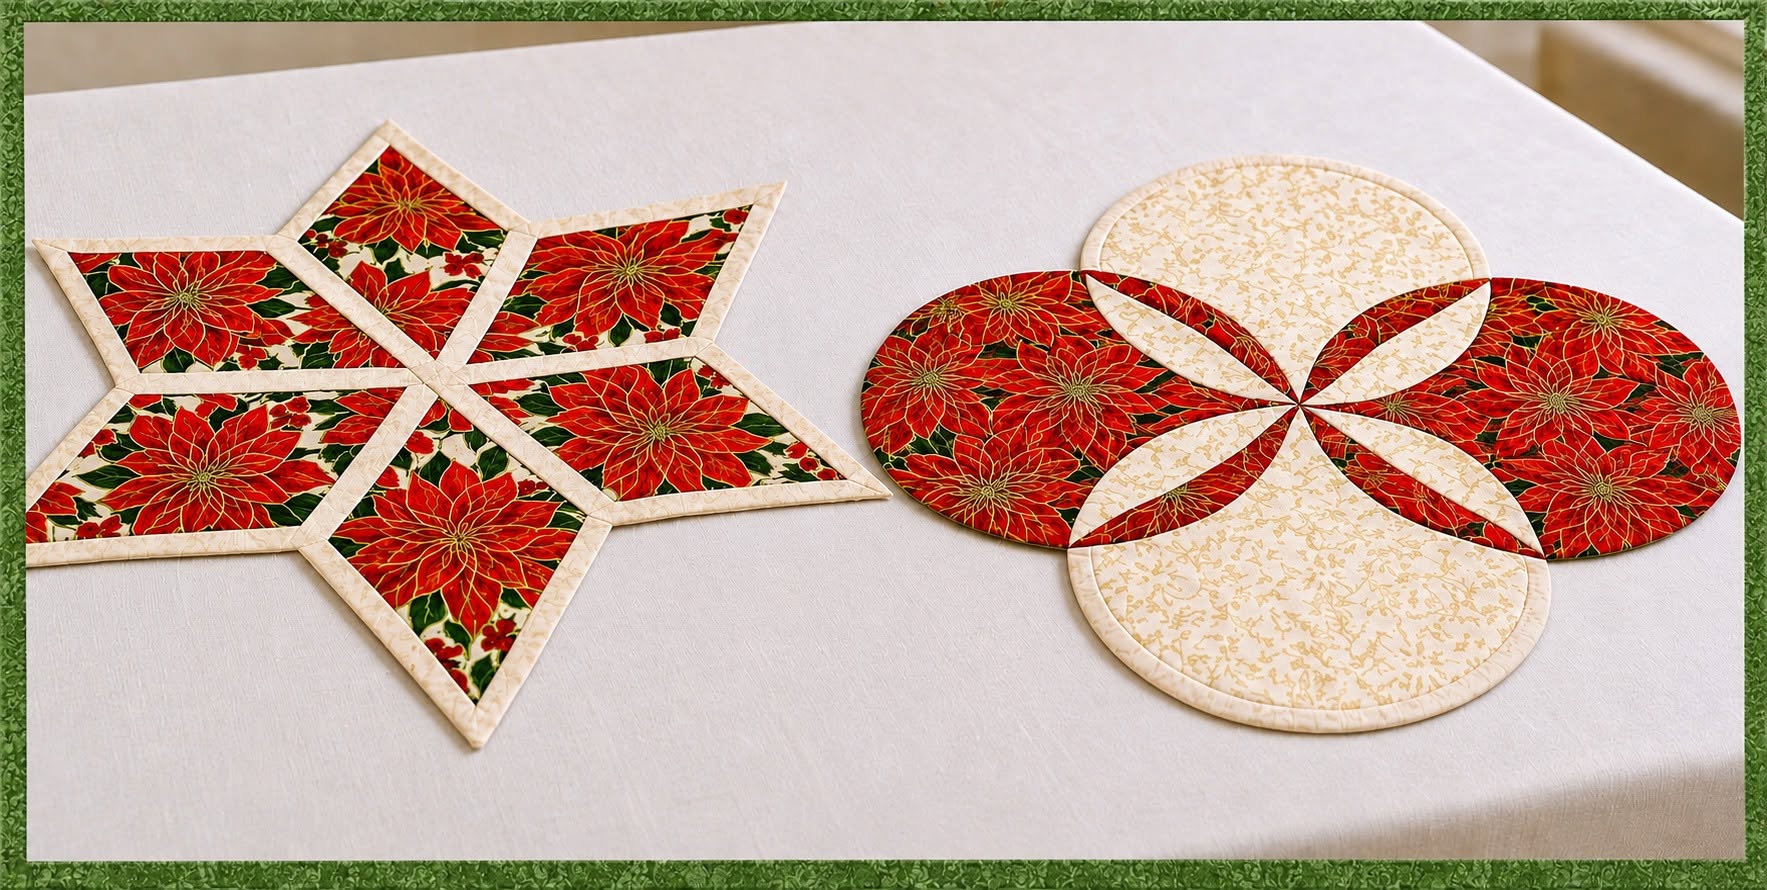
Christmas Star Ornament Pattern is a beautiful sewing project for anyone who loves handmade Christmas decorations, patchwork, quilting, and festive fabric crafts. Inspired by the star-shaped piece shown in the photo, this design combines pointed geometric sections, traditional Christmas prints, light-colored fabric accents, and neat topstitching to create an elegant holiday decoration. Although the finished star can be used as an ornament, its flat quilted construction also makes it suitable as a Christmas table decoration, mini mat, centerpiece accent, wall decoration, or handmade seasonal gift. The project is especially appealing because it can be adapted to different fabrics while keeping the recognizable six-point star shape.
One of the most attractive features of this Christmas Star Ornament Pattern is the contrast created between the rich red floral fabric and the light neutral fabric surrounding the individual sections. Traditional colors such as red, cream, green, gold, and white immediately create a Christmas feeling, but the pattern does not depend on one exact color combination. You can use fabric scraps left from previous quilting projects, coordinated fat quarters, or a carefully selected Christmas fabric collection. By combining accurate cutting with simple machine sewing, even someone who has only moderate quilting experience can create a polished-looking ornament without complicated equipment.
This project is also an excellent introduction to patchwork piecing, seam allowances, pressing, quilting, topstitching, and decorative fabric placement. These techniques are useful far beyond Christmas crafts and can later be applied to placemats, table runners, quilt blocks, fabric ornaments, coasters, and wall hangings. The secret to making the star look balanced is not difficult stitching but careful preparation: cut matching pieces accurately, keep the seam allowance consistent, press each seam before adding the next section, and arrange all six points before the final assembly. With a little patience, the Christmas Star Ornament Pattern becomes a satisfying project that looks detailed while remaining approachable for home sewing.
Materials, Fabric Selection, and Preparing the Christmas Star Pieces
Begin by choosing two or three coordinating fabrics. For a look similar to the photographed project, select a red Christmas floral fabric as the main print and a cream, ivory, or lightly patterned fabric for the contrasting sections. A small amount of dark green in the printed fabric adds extra holiday character. Cotton quilting fabric is particularly suitable because it is stable, easy to cut, simple to press, and available in countless seasonal patterns.
DISCOVER MORE FREE PATTERNS HERE!
For one medium-sized star, approximately 30 to 35 cm across, prepare about 30 cm × 30 cm of the main printed cotton and approximately the same amount of contrasting fabric. You will also need a piece of thin batting or fusible fleece and a backing fabric slightly larger than the completed star. Exact fabric consumption may vary according to the size of your templates and how efficiently the pieces are arranged before cutting.
The basic star can be constructed from six matching pointed units. Each unit resembles an elongated diamond, kite, or petal shape that becomes one point of the finished star. A practical starting size is approximately 14 to 16 cm from the inner point to the outer tip. However, the most important rule is that all six templates must be identical. Even a difference of a few millimeters can affect the symmetry of the completed Christmas Star Ornament Pattern.
To create the decorative interior visible in the inspiration photo, divide every star point into smaller fabric sections. A narrow contrasting strip can frame the main printed section, producing the elegant cream outline around the red Christmas fabric. This method resembles basic foundation-style patchwork because several small pieces are assembled before the complete star unit is joined to the others. Beginners may simplify the design by cutting each point from a single printed fabric and adding decorative topstitching instead.
Before cutting, press all your fabrics with a warm iron. Wrinkles can change the dimensions of small geometric pieces and make accurate matching more difficult. Place the template on the fabric, trace carefully, and mark the required seam allowance. A 0.7 cm seam allowance works well for small patchwork projects, although a traditional quarter-inch quilting seam of approximately 0.6 cm can also be used. The important thing is to choose one measurement and maintain it throughout the entire project.
Cut six identical main star units along with the smaller contrasting pieces needed for the decorative inserts. Arrange everything on your work surface before sewing. This simple dry arrangement is extremely useful because it allows you to check fabric direction, color distribution, and symmetry. When using directional Christmas prints such as poinsettias, trees, candy canes, or reindeer, rotate the pieces so the motifs face outward toward the points whenever possible.
Sewing and Assembling the Six-Point Christmas Star
Start by constructing one star point at a time. Join the central printed section to the contrasting strips with right sides together, sewing with the consistent seam allowance selected earlier. After every seam, press the fabric carefully. Pressing the seam allowances toward the darker fabric usually prevents them from showing through lighter cream sections and helps the patchwork lie flat.
Continue adding the smaller fabric pieces until one complete pointed unit has been created. Compare it with your paper template and trim only if necessary. Repeat the same method for the remaining five units. Consistency is more important than speed. Producing six accurately matched points will make the final assembly significantly easier and give your Christmas Star Ornament Pattern the clean geometric appearance seen in professional quilting projects.
Once all six points are completed, place them on a flat surface to form the star before stitching anything together. The inner tips should meet at the center, while the wide outer sections create the six prominent arms. Look closely at the printed motifs and rotate individual units if necessary. This is the ideal moment to correct the arrangement because changing the placement after sewing is much more difficult.
Instead of trying to join all six points at once, sew the star in pairs. Place two neighboring units right sides together and sew from the outer section toward the center, stopping exactly where the seam allowances intersect. Accurate stopping at the central point prevents bulk and distortion. Create three pairs using the same method, then press those seams gently without stretching the bias edges.
Next, join two pairs to create a larger section and finally attach the remaining pair. Work slowly near the center of the star. If all seam intersections are aligned carefully, the six units should meet in a small, tidy central junction. A perfectly sharp center is attractive, but a tiny variation is normal in handmade patchwork and will rarely be noticeable after the project is quilted.
Give the assembled star a final press from both sides. Avoid dragging the iron across the fabric because some edges may have been cut partially on the bias and can stretch. Instead, lower the iron, press briefly, lift it, and reposition it. This press-and-lift technique helps preserve the geometry of the star and creates a smooth foundation for the batting, backing, and finishing stages.
Adding Batting, Quilting, Topstitching, and Clean Edges
Place the backing fabric right side down on the table, position the batting on top, and place your completed star right side up. This forms the traditional quilt sandwich consisting of backing, batting, and patchwork top. Smooth each layer gently from the center toward the outer points. Thin batting is ideal for an ornament because excessively thick batting can make narrow star points difficult to turn and finish neatly.
Secure the layers with quilting pins, safety pins, temporary fabric adhesive, or hand-basting stitches. Because the project is relatively small, extensive basting is unnecessary, but the layers should not shift while sewing. Pay special attention to the points and center of the star, where several seams and fabric layers meet.
For a finish similar to the image, stitch close to the main patchwork seams using a matching or slightly contrasting thread. This technique is sometimes called stitching in the ditch when the needle follows the seam line between two pieces. It strengthens the construction while emphasizing the geometric structure of the design. Cream thread creates a subtle appearance, while gold thread can add a more decorative Christmas effect.
Decorative topstitching can also be sewn approximately 2 to 3 mm from the contrasting fabric edges. This creates definition around each red printed section and visually separates the individual pieces. Use a slightly longer stitch length than you used for construction seams. A length of approximately 2.5 to 3 mm often produces attractive visible stitches without making the fabric look overly perforated.
There are several ways to finish the outer edge. One beginner-friendly method is to sew the patchwork top and backing right sides together before inserting or securing the batting, leaving a small opening for turning. Clip excess fabric around corners without cutting through the stitches, turn the star right side out, carefully shape all six points, and close the opening with an invisible hand stitch.
Another option is narrow quilt binding, especially if you want a visible cream-colored outline similar to the inspiration image. Cut bias binding approximately 3.5 to 4 cm wide and attach it gradually around the perimeter. Bias-cut fabric bends more easily around angled sections than straight-grain strips. Fold the binding over the raw edge and finish it by machine or hand for a crisp decorative frame around the entire Christmas Star Ornament Pattern.
Finishing, Decorating, and Using Your Handmade Christmas Star
After completing the outer edge, examine every point individually. Use a blunt turning tool or knitting needle to gently push out corners if the star was turned right side out. Do not use scissors or another sharp object because it can puncture the fabric. A well-shaped outer point contributes greatly to the finished appearance of this geometric Christmas project.
If you want to hang the star on a Christmas tree, door, cabinet, or wall hook, add a small fabric or ribbon loop to one point. A loop measuring approximately 8 to 10 cm before folding is usually sufficient for a medium ornament. For a table decoration or trivet-style project, simply omit the loop so the star can lie completely flat.
You can also personalize the Christmas Star Ornament Pattern with simple embellishments. Small wooden buttons, fabric-covered buttons, hand embroidery, metallic thread, or tiny decorative stitches can be added after quilting. Keep decorations relatively lightweight because heavy embellishments may pull the fabric out of shape, especially if the star will be hung vertically.
For a coordinated holiday table, make several stars using the same fabrics but alternate the position of the colors. One could feature predominantly red fabric, another cream fabric, and another green fabric. Smaller versions can become Christmas coasters, while larger versions can be used as candle mats or centerpiece decorations. When using the project beneath candles or hot dishes, choose materials appropriate for that purpose and never leave burning candles unattended.
The circular fabric piece visible beside the star in the inspiration image also demonstrates how repeating fabrics across different shapes can create a coordinated Christmas collection. You could use leftover red and cream fabrics from your star to create round quilted mats, mug rugs, napkin rings, or simple ornaments. Repeating the same prints makes separate handmade projects look like part of one carefully planned seasonal set.
Finally, give the completed ornament a gentle press and trim any loose threads. Avoid pressing directly over plastic decorations or synthetic embellishments. Store fabric Christmas ornaments flat between sheets of clean tissue paper after the holidays rather than folding them. Proper storage protects the points, keeps the batting smooth, and allows your handmade star to return each Christmas season looking fresh and carefully finished.
FAQ – Frequently Asked Questions About the Christmas Star Ornament Pattern
Is the Christmas Star Ornament Pattern suitable for beginners?
Yes. A simplified version is very suitable for confident beginners. The main skills are accurate cutting, straight machine sewing, pressing, and matching several geometric sections. Beginners can start with solid star points instead of creating the smaller patchwork inserts. Once comfortable with the construction, the more detailed version can be attempted.
What is the best fabric for making a Christmas star ornament?
Medium-weight quilting cotton is generally the easiest choice. It presses well, holds its shape, and is available in many Christmas designs. Red poinsettias, holly, snowflakes, stars, green foliage, cream prints, and subtle metallic details all work beautifully for this type of project.
How large should the finished star be?
There is no mandatory size. A star measuring approximately 15 to 20 cm works well as a hanging ornament, while a 30 to 35 cm version is more appropriate for a table centerpiece or decorative mini mat. The pattern can be enlarged or reduced as long as every template piece is resized at the same percentage.
Do I need batting inside the ornament?
Batting is not essential, but it gives the star more structure and emphasizes the quilting stitches. Thin cotton batting, lightweight polyester batting, or fusible fleece are practical options. Very thick batting should usually be avoided because it can create bulky seams around the narrow points.
Can I sew this project entirely by hand?
Yes. Although a sewing machine makes the process faster, the complete Christmas Star Ornament Pattern can be hand sewn. Use small, consistent running stitches for the seams and stronger hand quilting stitches to secure the layers. Hand sewing can give the star a charming traditional appearance.
How do I keep the center of the star from becoming bulky?
Maintain a narrow, consistent seam allowance and avoid sewing unnecessarily beyond the center intersection. Press seams in alternating directions when appropriate so they do not all stack on the same side. Trimming tiny excess seam allowance at the center may also reduce bulk, but always leave enough fabric to keep the seams secure.
Why are my star points uneven?
Uneven points are usually caused by inconsistent templates, different seam allowances, stretched bias edges, or inaccurate seam matching. Use the same template for all six sections and press rather than dragging the iron. Pin important intersections before stitching and compare completed units before assembling the final star.
Can I use fabric scraps for this Christmas project?
Absolutely. This is an excellent scrap fabric project because each star point requires relatively small pieces. Coordinated scraps from previous Christmas quilts can create an especially interesting design. Try repeating at least one fabric or color throughout the star to maintain visual harmony.
Can the Christmas star be washed?
If it is made entirely from washable cotton fabrics, washable batting, and colorfast thread, gentle hand washing is usually possible. However, decorative metallic threads, buttons, ribbons, or specialty fabrics may require different care. For purely decorative ornaments, spot cleaning is often sufficient.
Can I make the design without the cream borders?
Yes. The cream sections create the attractive framed effect visible in the project, but they are optional. Each point can be constructed from one fabric, two contrasting fabrics, or several patchwork pieces. The six-point geometry is what defines the star, so the internal fabric arrangement can be personalized freely.
What other projects can be made from the same pattern?
By changing the size and thickness, the design can become a Christmas potholder, mug rug, table mat, mini quilt, wall hanging, tree ornament, door decoration, or handmade gift. Several stars can even be connected to create a festive fabric garland or incorporated into a larger Christmas quilt design.
How can I make the ornament look more professional?
Accurate cutting and careful pressing make the biggest difference. Take time to match the center seams, use a suitable needle and quality thread, trim loose threads, and keep visible topstitching evenly spaced. A final press after construction will also help the Christmas Star Ornament Pattern maintain a crisp, polished shape.
Conclusion
The Christmas Star Ornament Pattern combines classic Christmas colors, geometric patchwork, quilting, and simple decorative sewing in one versatile handmade project. Throughout this tutorial, you learned how to choose coordinating fabrics, prepare six matching star sections, maintain consistent seam allowances, assemble the points accurately, press the patchwork without stretching it, create a quilt sandwich, add topstitching, and finish the outer edges neatly.
The same techniques can be adapted to many other seasonal projects, from small tree ornaments and coasters to larger table decorations and mini quilts. Red floral fabric paired with cream creates a timeless Christmas appearance like the project shown in the inspiration photo, while different color combinations allow you to develop an ornament that matches your own holiday décor.
Most importantly, this pattern leaves room for creativity. Change the scale, experiment with fabric prints, add embroidery, create a hanging loop, or sew several coordinated stars as handmade gifts. Each variation can have its own personality while maintaining the distinctive six-point construction of the Christmas Star Ornament Pattern. If you make this project, leave your sincere opinion about the pattern and share your suggestions. Tell us which Christmas fabric combination you would choose, what you would change in the design, and which handmade holiday project you would like to learn next.