
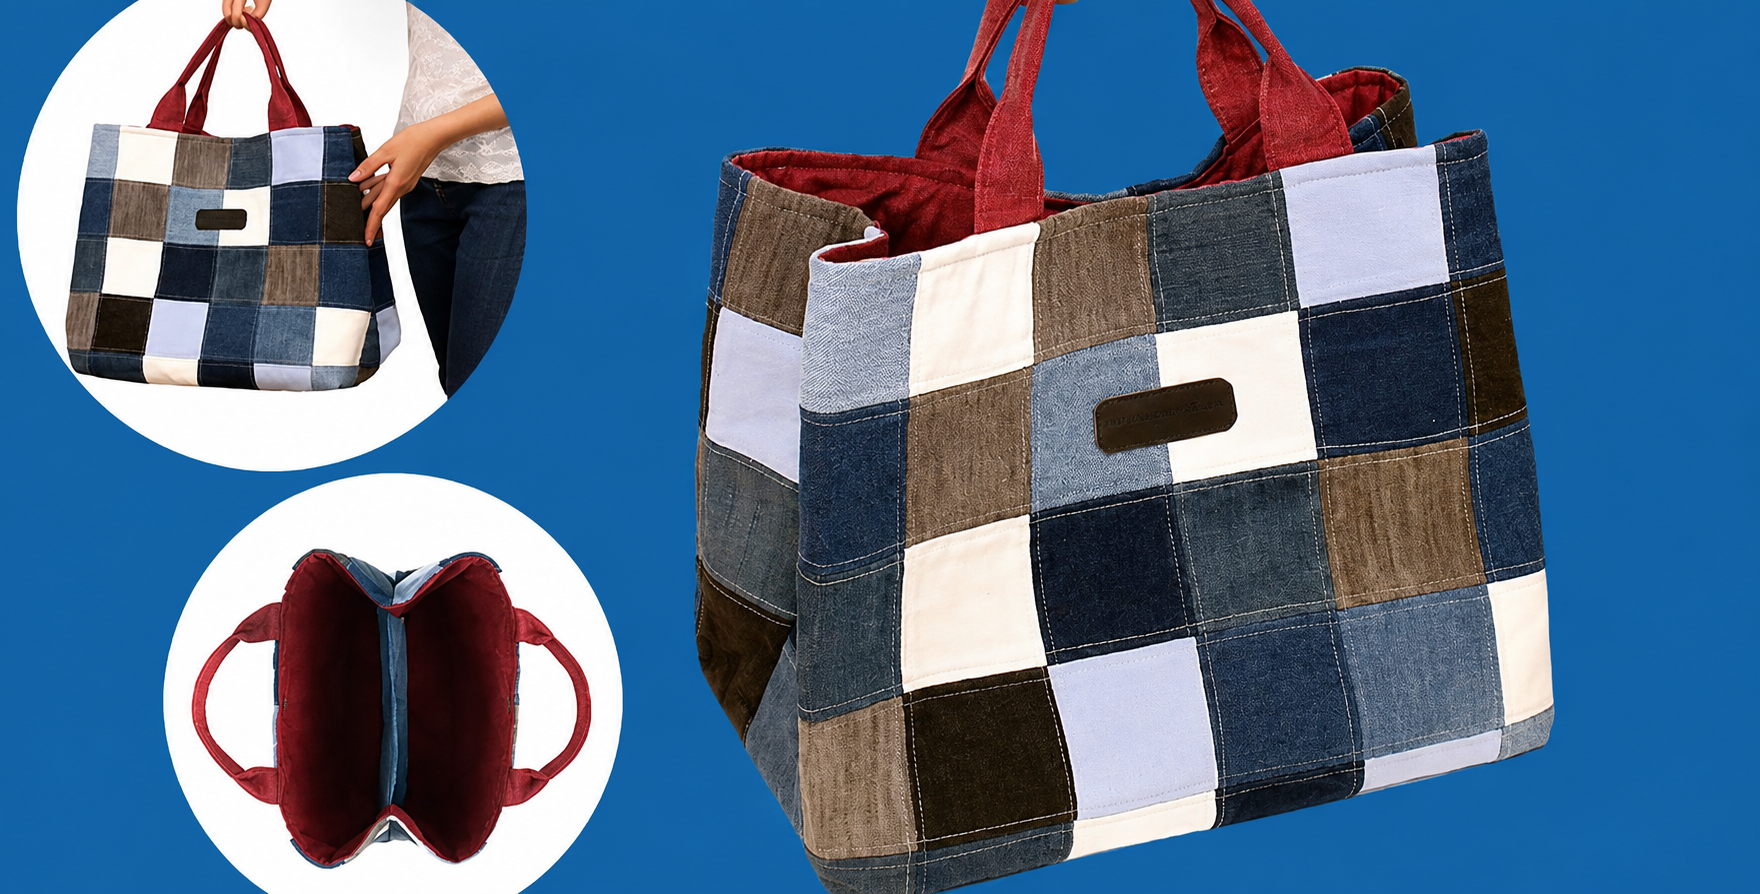
Bag made from old jeans Pattern is a creative sewing project that turns worn denim into a practical, attractive, and reusable patchwork tote. Instead of discarding old jeans that may still have strong fabric, you can cut the usable sections into squares and transform them into a structured bag with plenty of personality. The design shown in the reference image combines different shades of denim with neutral fabric pieces, visible stitching, contrasting red handles, and a roomy interior. This mixture creates a handmade appearance while still looking polished enough for everyday use. A Bag made from old jeans Pattern is especially appealing because no two finished bags need to look exactly the same. The variation in faded denim, seams, texture, and color gives each project a unique character.
Creating a denim patchwork bag is also an excellent way to practice several useful sewing techniques in one project. You will learn how to select and prepare recycled fabric, create accurate patchwork blocks, stabilize denim, assemble panels, make a lining, add handles, and finish the seams neatly. Because denim can vary considerably in weight, the preparation stage is important. Some jeans are light and flexible, while others are thick and rigid. Choosing pieces with reasonably similar thickness helps the finished bag hold its shape without becoming unnecessarily heavy. You can also mix denim with cotton, canvas, or linen-like fabrics to reproduce the varied checkerboard effect seen in the project.
Another advantage of the Bag made from old jeans Pattern is its flexibility. The measurements can easily be adjusted depending on whether you want a shopping tote, craft bag, everyday shoulder bag, or spacious organizer. The basic construction remains the same: create patchwork exterior panels, reinforce them, prepare the sides and base, sew a lining, attach sturdy handles, and assemble everything carefully. Beginners can keep the design simple, while experienced sewists can add pockets, dividers, closures, decorative stitching, or labels. The important goal is to build the project gradually and accurately so that the recycled materials become a durable bag rather than simply a collection of fabric scraps.
Preparing the Denim and Creating the Patchwork Panels
The first step in making a Bag made from old jeans Pattern is selecting the jeans you want to reuse. Look for denim that is still strong and free from badly weakened areas. Knees and inner-leg sections are often heavily worn, so the upper legs and back portions may provide better fabric. Wash and dry all jeans before cutting because previously worn denim may have stretched differently over time. Press the fabric with steam after removing the seams so that every piece lies as flat as possible.
DISCOVER MORE FREE PATTERNS HERE!
Next, cut away bulky seams, waistbands, zippers, and damaged sections. Open the jean legs along one seam so that you obtain larger flat pieces of fabric. The original image suggests a patchwork made from medium-sized squares, so squares of approximately 10 cm to 12 cm can work well for a similar look. Remember that your finished squares will become smaller after sewing because of the seam allowances. A consistent cutting size is much more important than the exact measurement you choose.
The term patchwork describes a sewing method in which smaller pieces of fabric are joined together to create a larger textile surface. For this bag, arrange your denim squares in alternating shades of dark blue, faded blue, gray, brown, cream, and other coordinating neutrals. Avoid placing too many identical colors beside one another. A balanced mixture will create the irregular but intentional checkerboard appearance that makes this denim bag pattern visually interesting.
Arrange the squares on a large table before sewing anything. For a medium-to-large tote, you might create a front panel approximately 45 cm wide and 35 cm high after trimming. The exact number of squares will depend on the dimensions you selected. Photographing the arrangement before sewing can be helpful because the pieces may become mixed while you work. Try to distribute light and dark fabrics evenly across the panel.
Sew the squares together in horizontal rows using approximately a 1 cm seam allowance. Press the seams after completing each row. Denim seams can become bulky when several intersections meet, so you may press adjacent rows in opposite directions. This technique allows the seam allowances to nest together when the rows are joined, helping the patchwork intersections align more accurately. Use a strong polyester thread and a denim or jeans needle suitable for your fabric thickness.
After sewing the rows together, press the complete patchwork panel carefully and trim the edges until they are straight. Make a second panel for the back of the bag using the same dimensions. The two panels do not need to use identical fabric placement. In fact, the unpredictable combination of recycled denim is part of the charm of the Bag made from old jeans Pattern. Once both panels are complete, you are ready to reinforce them and begin shaping the bag.
Reinforcing the Bag and Constructing the Outer Body
A recycled denim bag needs enough support to carry its contents without collapsing. Although denim is naturally stronger than many quilting fabrics, the patchwork seams can benefit from additional stabilization. Apply medium-weight fusible interfacing to the wrong side of both exterior panels. If the denim is already very thick, a lighter interfacing may be sufficient. The objective is to stabilize the patchwork without making the bag excessively stiff.
The word interfacing refers to a supporting material placed behind fabric to add body, structure, or stability. Fusible interfacing has an adhesive surface that bonds to the fabric when pressed with an iron. Always follow the heat requirements of your interfacing and test a small denim scrap first. Because recycled jeans may contain stretch fibers, pressing should be controlled to avoid distorting the patchwork panel.
You can also add decorative topstitching across the patchwork seams. The reference design features visible stitching that emphasizes the square construction. Sew approximately 2 or 3 mm away from each seam line using a slightly longer stitch length. Contrasting thread creates a handcrafted effect, while matching thread produces a cleaner appearance. Topstitching does more than decorate the bag; it can also help flatten and reinforce bulky seam allowances.
For the side panels, cut two rectangles that match the desired finished height of the bag. A width of approximately 12 cm to 15 cm creates a roomy tote similar to the design in the image. Cut a bottom panel using the same width and a length that matches the width of the front and back pieces. Reinforce these sections with interfacing as well. If you want a particularly firm base, an additional layer of heavy interfacing or bag stabilizer can be included.
Attach one side panel to each vertical edge of the front panel with right sides together. Sew slowly because multiple layers of denim may be thick near patchwork intersections. Then attach the back panel to the opposite edges of the side sections. Finally, sew the bottom panel into position. Clip or pin everything carefully before sewing, especially around corners. Strong sewing clips are often easier to use than pins when working with several denim layers.
After assembling the exterior, turn it right side out and inspect all seams. The bag should now resemble an open rectangular container. Check whether the corners are even and whether the front and back panels sit at approximately the same height. Correct small irregularities before adding the lining. A well-shaped exterior provides the foundation for the finished Bag made from old jeans Pattern, so taking extra time at this stage can significantly improve the final result.
Making the Lining, Handles, and Interior Compartments
The lining gives a handmade bag a clean interior and protects the raw seams of the outer construction. Choose a strong cotton, canvas, or cotton-blend fabric. In the reference project, a deep red lining complements the darker denim and matches the handles. Cut lining pieces using the same general dimensions as the front, back, sides, and base of the exterior, but confirm your finished exterior measurements before cutting.
Before assembling the lining, decide whether you want interior pockets. A simple rectangular pocket is useful for storing a phone, keys, sewing tools, or other small items. Cut a piece of lining fabric, fold the upper edge twice, and topstitch it. Fold the remaining edges toward the wrong side, position the pocket on the lining, and stitch around the sides and bottom. You can sew a vertical line through the pocket to create two separate compartments.
The bag shown in the image also suggests a structured interior with a central section. You can create a bag divider by cutting two rectangles of lining fabric and placing interfacing between them. Sew the layers together, turn them right side out, and topstitch the upper edge. Position the divider inside the lining and secure its bottom and side edges during assembly. This feature is optional, but it can help organize the contents of a large tote.
Construct the lining in the same general sequence as the exterior. Join the front and back pieces to the side panels, then attach the bottom. Leave an opening of approximately 12 cm to 15 cm along one bottom seam. This opening will later allow you to turn the entire bag right side out after the lining and exterior have been joined. Reinforce the beginning and end of the opening with backstitches.
For the handles, you can reuse sturdy sections of old jeans or use contrasting canvas fabric. The red handles in the reference design provide a strong visual contrast against the blue and neutral patchwork. For each handle, cut a long strip approximately 8 cm to 10 cm wide. Fold the strip lengthwise, press the raw edges toward the center, fold again, and topstitch along both long sides. Add interfacing inside the handles if the fabric feels too soft.
Position the handles symmetrically on the front and back of the bag. For a comfortable shoulder tote, leave enough length for the bag to sit beneath the arm without feeling tight. Secure each handle temporarily with several rows of stitching before assembling the lining. Because handles receive significant stress, sew a rectangular reinforcement with an X-shaped line through the center at each attachment point whenever the design allows. This additional stitching greatly improves the durability of a recycled denim bag.
Final Assembly, Finishing Details, and Care
Place the completed exterior bag inside the lining with right sides facing each other. The handles should be positioned between the exterior and lining layers and pointed downward inside the bag. Align the upper raw edges carefully, matching the side seams. Clip around the entire opening and sew with a consistent seam allowance. Sew slowly over the handle areas because those sections contain several layers.
Reach through the opening you previously left in the lining and gently pull the exterior bag through it. Continue until the entire bag is right side out. Push the corners into shape carefully without using anything sharp that might puncture the fabric. Once the exterior is fully visible, place the lining inside the bag and smooth it against the interior walls.
Close the turning opening with a narrow machine stitch or a hand-sewn ladder stitch. Then press the upper edge of the bag carefully. Denim may require more steam and pressure than lightweight cotton, but avoid excessive heat if your patchwork contains synthetic fabric. Topstitch around the entire upper edge approximately 3 mm from the seam. This finishing line helps prevent the lining from rolling outward and gives the bag a more professional appearance.
At this point, you can add optional decorative features. A small fabric or leather-style label can be sewn to the front panel, similar to the detail visible in the reference design. You could also add a magnetic snap, zipper panel, button-and-loop closure, or decorative patch. These additions are not necessary for the basic Bag made from old jeans Pattern, but they allow you to personalize the project according to how the bag will be used.
Inspect every structural seam before using the tote. Reinforce any area where several patchwork seams meet or where the handles attach to the body. Trim loose threads and gently press the finished bag into shape. If the base feels too flexible, you can make a removable bottom insert from plastic canvas or another lightweight rigid material covered with matching fabric. The insert should be slightly smaller than the interior base so it can be removed before washing.
To care for your finished upcycled denim bag, spot cleaning is usually the gentlest option, especially if you have combined denim with several other fabrics or used interfacing. If the materials are washable, hand washing or a delicate machine cycle may be suitable. Avoid extremely hot water because different recycled fabrics can react differently to washing. Allow the bag to air-dry whenever possible and reshape it while damp to preserve its structure.
FAQ About Bag made from old jeans Pattern
What is a Bag made from old jeans Pattern?
A Bag made from old jeans Pattern is a sewing guide or construction method used to turn recycled denim into a functional bag. The jeans are usually cut into squares, rectangles, or other shapes and then sewn together using patchwork techniques. The resulting panels are reinforced and assembled with sides, a base, handles, and a lining.
How many pairs of jeans do I need to make the bag?
The amount depends on the bag size and how much usable fabric remains in each pair of jeans. For a medium or large patchwork tote, two to four pairs may provide enough variety. Using several jeans is especially useful when you want a mixture of light, medium, and dark denim shades.
What size should the denim squares be?
Squares between approximately 10 cm and 12 cm are convenient for a medium patchwork tote. However, you can use smaller or larger blocks. The most important rule is to cut every square accurately and include a consistent seam allowance.
Do I need interfacing when sewing a denim bag?
Interfacing is strongly recommended when the denim is soft, stretchy, or made from many smaller patchwork pieces. It supports the seams and helps the bag maintain its shape. Very heavy denim may require only lightweight interfacing.
What sewing machine needle should I use for old jeans?
A denim or jeans needle is the most suitable choice because it is designed to penetrate heavier woven fabrics. A size around 90/14 or 100/16 may work depending on the thickness of the material and the number of layers being sewn.
Can a beginner make this denim patchwork tote?
Yes. A beginner can complete this project by working slowly and keeping the construction simple. Accurate cutting, pressing, and seam alignment are more important than advanced sewing techniques. Beginners may prefer to omit the interior divider and complicated closures for their first version.
Can I mix denim with other fabrics?
Yes. Cotton, canvas, linen blends, twill, and other stable woven fabrics can be incorporated into the patchwork. Mixing neutral fabric with recycled jeans is an effective way to create the varied appearance seen in this Bag made from old jeans Pattern.
How can I prevent thick denim seams from becoming bulky?
Trim excessive seam allowance where several seams intersect, press seams in alternating directions, and use a hump jumper or folded scrap of fabric to keep the presser foot level when crossing thick areas. Sewing slowly also reduces skipped stitches and needle breakage.
How do I make the handles strong enough?
Use durable fabric, add interfacing when necessary, and reinforce the attachment points with multiple rows of stitching. A box-shaped reinforcement with diagonal stitching can distribute stress across a larger area of fabric.
Can I add a zipper to the top of the bag?
Yes. A recessed zipper panel can be added between the lining and exterior, although this requires additional construction steps. Beginners may find a magnetic snap or fabric loop closure easier for a first project.
What can I do with the original pockets from the jeans?
Original jean pockets can become practical interior or exterior pockets. Removing them carefully and reusing them is another good way to preserve interesting details from the original garment.
How can I make the bottom of the bag firmer?
Use heavy interfacing in the bottom panel or add a removable base insert. A covered plastic canvas insert is particularly convenient because it provides support while remaining removable for cleaning.
Is every Bag made from old jeans Pattern supposed to look identical?
No. One of the biggest advantages of recycled denim patchwork is the natural variation between materials. Different fading patterns, shades, stitching, and fabric textures make every handmade bag slightly different.
Conclusion
The Bag made from old jeans Pattern is a practical way to transform unused denim into a strong and attractive everyday accessory. Throughout this project, you learned how to select suitable jeans, cut consistent patchwork squares, arrange different denim shades, assemble and reinforce the exterior panels, construct the sides and base, prepare a lining, add pockets or dividers, create sturdy handles, and finish the upper edge professionally.
The most important elements of a successful denim patchwork bag are accurate cutting, careful pressing, reinforced seams, and balanced fabric placement. Taking your time during these stages helps create a bag that not only looks handmade and distinctive but is also strong enough for regular use. The pattern can easily be customized with different colors, handle lengths, pocket arrangements, closures, or decorative details, giving you many possibilities for future versions.
Reusing old jeans also gives familiar fabric a completely new purpose. Rather than focusing on achieving identical patchwork squares or perfectly matching denim tones, embrace the variations in the material. Those differences are what give an upcycled denim tote its character. Once you understand the basic construction of this Bag made from old jeans Pattern, you can adapt the same method to create shopping bags, organizers, craft totes, shoulder bags, and other useful sewing projects. If you make your own version of this project, leave your sincere opinion about the pattern and share your suggestions. It would also be great to know which details you would change, which denim colors you prefer, and what type of recycled-jeans project you would like to create next.