
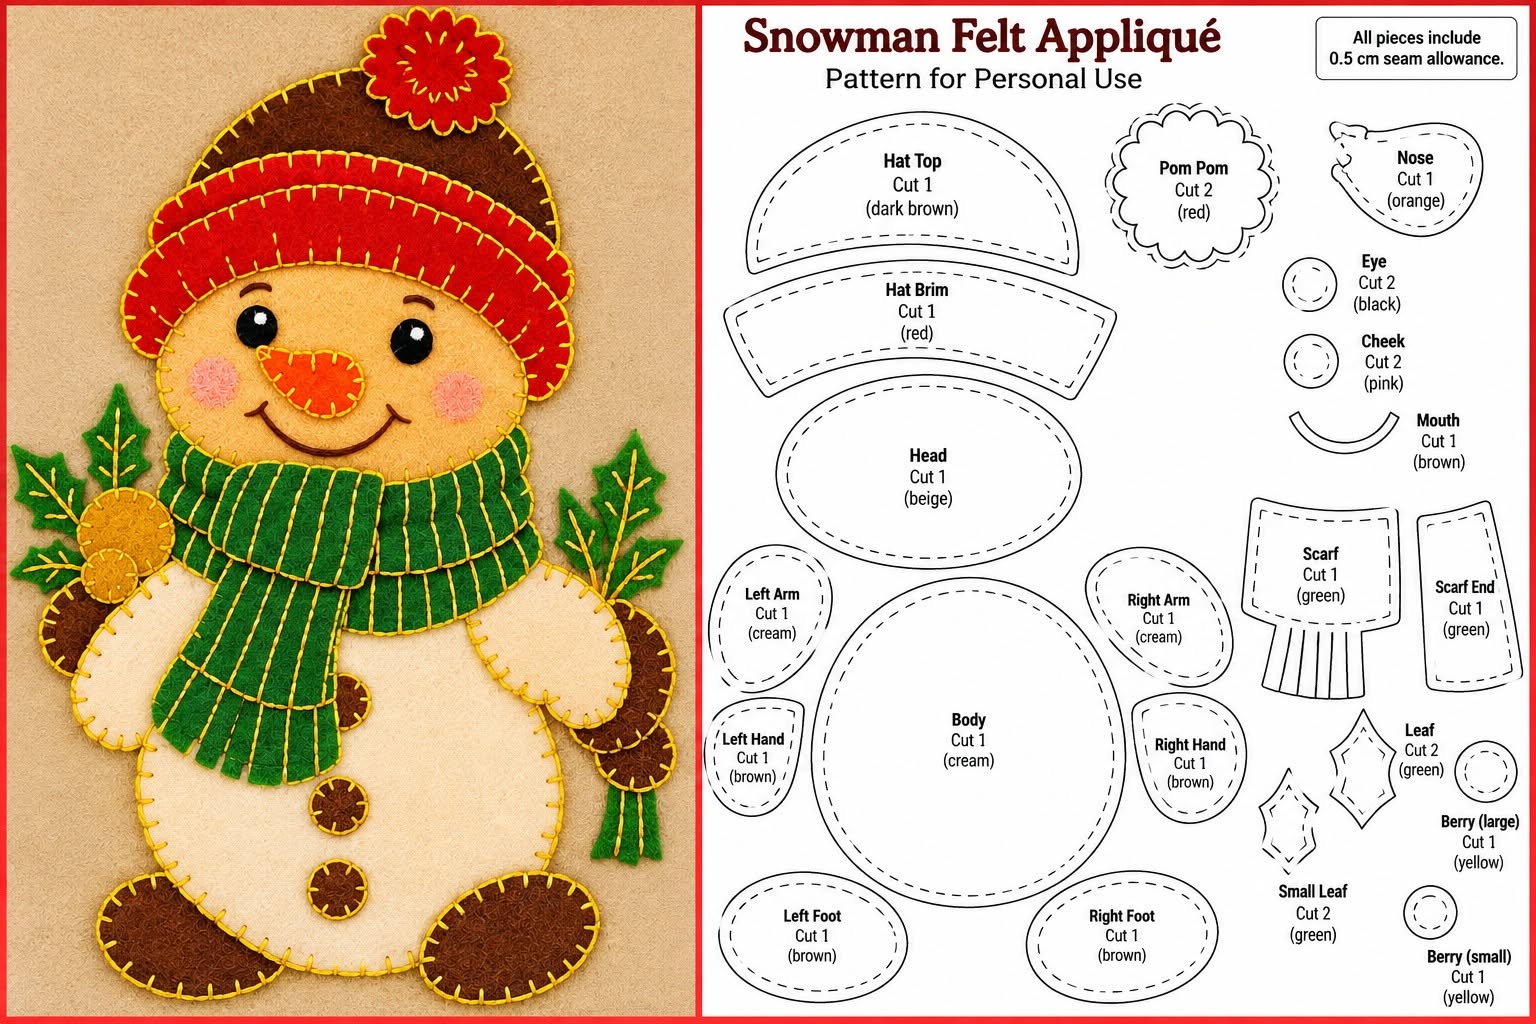
The Felt Snowman Applique Panel Pattern is a charming winter sewing project that combines simple appliqué shapes, cozy felt textures, decorative hand stitching, and cheerful seasonal details. Inspired by the photographed panel, the design features a friendly snowman wearing a deep red winter hat and a layered green scarf, surrounded by snowflakes and leafy branches. Small details such as the carrot nose, rosy cheeks, buttons, mittens, boots, and stitched facial features give the project a warm handmade personality. Because most of the shapes are constructed separately before being attached to the background, the panel is approachable for beginners while still giving experienced sewists opportunities to add creative embellishment. It can become a wall hanging, decorative pillow front, framed textile artwork, seasonal table decoration, or the central block of a larger winter quilt. Best of all, felt is forgiving to work with because its edges generally remain stable without complicated finishing.
Creating a successful Felt Snowman Applique Panel Pattern begins with observing the composition and breaking it into manageable pieces instead of trying to construct the entire snowman at once. The main body is essentially a large rounded snowman shape, while the head is an oval placed slightly above it. The hat consists of a brown crown, a wide red brim, and a red pom-pom, while the scarf is created with overlapping green sections that add depth around the neck. The arms are represented by cream-colored mittens combined with brown sections and decorative greenery, giving the figure a whimsical woodland appearance. Around the snowman, embroidered or appliquéd snowflakes help fill the negative space without competing with the central character. When these individual elements are organized carefully, a project that initially appears detailed becomes a comfortable sequence of tracing, cutting, positioning, stitching, and embellishing.
Another advantage of this felt snowman appliqué project is the freedom it gives you to personalize the final result. You can reproduce the colors shown in the inspiration image or adapt the palette to match your own holiday décor. Traditional red, green, cream, orange, and brown create a rustic Christmas look, while blue, silver, white, and gray could produce a cooler contemporary winter design. Decorative stitches may be completed by hand for a folk-art appearance or by machine when you prefer faster construction. Although exact finished dimensions can be adjusted to suit your intended use, keeping every template proportional is important so that the hat, head, scarf, mittens, and body continue to work together visually. Careful preparation at the beginning will make the later stages smoother and help the finished panel look balanced and professionally assembled.
Materials and Planning for the Felt Snowman Applique Panel Pattern
For this project, begin with a firm piece of cream, beige, or light tan felt or fabric for the background. A neutral background works particularly well because it allows the white snowman body, dark accessories, and bright winter colors to remain clearly visible. If you intend to turn the Felt Snowman Applique Panel Pattern into a wall hanging or quilted panel, consider adding lightweight interfacing or batting behind the background. This extra layer provides stability during stitching and gives the finished textile more structure. Press woven fabric before starting, but use caution with synthetic felt because excessive heat can damage or distort it.
DISCOVER MORE FREE PATTERNS HERE!
Choose several felt colors for the appliqué pieces, including white or ivory for the snowman, brown for the boots and selected accessories, green for the scarf and leaves, red for the hat, orange for the carrot nose, black for the eyes, and golden brown for the buttons. Small scraps are often sufficient for details such as cheeks, pupils, leaves, berries, and the pom-pom. Using felt with approximately the same thickness throughout the project helps the layers sit evenly. Wool-blend felt produces a beautiful traditional texture, although quality craft felt can also work successfully. The most important consideration is choosing material that cuts cleanly and does not stretch excessively.
You will also need sharp fabric scissors, paper scissors for templates, sewing needles, embroidery floss or strong sewing thread, pins or small appliqué clips, a removable fabric marking tool, and paper for creating the pattern pieces. Embroidery floss in contrasting colors makes the decorative blanket stitch easier to see. A brown or golden thread can create the rustic outline visible around many of the snowman pieces. Green thread can be used on the scarf and foliage, while red thread blends comfortably into the hat. Keeping several thread colors nearby allows every section to look intentional rather than using one color everywhere.
Before cutting felt, draw the complete snowman design on ordinary paper. Start with the overall silhouette and then trace individual components such as the body, head, hat crown, hat brim, pom-pom, scarf sections, boots, mittens, nose, eyes, buttons, leaves, and decorative branch pieces. Label each paper template so that similarly shaped pieces are not confused later. Mark important positioning points, including the center of the face and the location of the scarf. Templates make the construction repeatable and are especially useful if you eventually want to create more than one winter panel.
Arrange the paper templates on the background before transferring anything to felt. This dry-layout stage allows you to confirm the proportions and identify problems while changes are still easy. The snowman should remain the visual center, with enough open space around the head for the surrounding snowflakes. Place the scarf so that it partially overlaps the lower edge of the head and upper body. The hat should overlap the forehead rather than simply touching it. These overlapping sections create the layered handmade effect that makes felt appliqué especially attractive.
Finally, decide whether you want to sew every piece completely by hand or combine hand sewing with machine stitching. Hand stitching provides maximum control around small curves and produces the characteristic folk-art appearance associated with felt ornaments and appliqué panels. Machine stitching can make the larger body and background sections quicker to secure. A combination is often practical: machine stitch large structural pieces and hand stitch the visible decorative areas. Whichever method you choose, test your thread and stitch length on scrap felt first so you know how the materials will behave.
Cutting and Building the Snowman Appliqué Pieces
Begin construction with the largest elements of the Felt Snowman Applique Panel Pattern. Trace the main snowman body onto ivory or white felt using a removable marker, then cut slowly with sharp scissors. Rather than creating several perfectly round snowballs, follow the softer continuous silhouette visible in the inspiration project. A slightly irregular handmade outline gives the snowman warmth and character. Cut the separate oval head next and test its placement over the upper portion of the body. Minor asymmetry can make the character feel more natural, but the overall figure should remain visually balanced.
Create the hat from separate layers instead of cutting it as a single shape. Cut a rounded crown from dark brown felt, then create a wide curved brim from red felt. A second narrow red layer can be positioned over or near the brim to suggest the ribbed construction of a knitted winter hat. Finish the top with a scalloped or rounded red felt pom-pom. Decorative lines stitched across the red pieces can imitate knit ribs without requiring actual knitted fabric. Position the hat low enough on the head to look comfortable while leaving plenty of space for the snowman’s eyes.
The scarf is another important layered element. Cut a broad green section that wraps beneath the head, followed by a second overlapping strip to create thickness. Add a long hanging scarf tail that travels diagonally toward one side of the body. Small cuts along its bottom edge can create fringe, but avoid cutting so deeply that the strip becomes fragile. Decorative vertical stitches placed along the scarf help imitate woven or knitted texture. Using a slightly darker or lighter green thread can make these details noticeable without overwhelming the design.
For the face, cut two small black felt circles for the eyes and two tiny white circles or stitched highlights. Cut the carrot nose from orange felt as a short tapered shape and add several darker orange or brown stitches to suggest natural carrot texture. Rather than cutting the smile from felt, embroider it directly onto the face with brown or dark thread. Curved embroidered eyebrows can be added above the eyes. Soft peach or dusty pink circles positioned on each cheek give the snowman a friendly expression and introduce another subtle color.
Cut three small brown circles for the buttons and arrange them vertically down the body. The buttons do not need to be mathematically identical because small handmade differences suit the rustic aesthetic. Prepare the boots from medium or dark brown felt and position them partly underneath the bottom of the snowman. For the arms, create cream mittens and brown wrist sections. The mitten shapes can be outlined with a contrasting blanket stitch, which defines their edges and connects them visually with the stitching around the body.
The greenery beside the mittens adds another decorative dimension to this particular Felt Snowman Applique Panel Pattern. Cut several pointed leaves from green felt and arrange them like holly or winter foliage. Thin embroidered lines can become leaf veins and stems. Small circles in mustard, gold, brown, or red may be used as berries or decorative accents. Because these shapes are smaller, position them with tweezers or a needle tip before securing them. Keep both sides visually related without making them perfectly symmetrical, as gentle variation helps preserve the handcrafted appearance.
Assembling, Stitching, and Finishing the Winter Panel
Once every appliqué shape has been cut, place the complete snowman on the background without stitching anything permanently. Start with the body and head, followed by the hat, scarf, boots, arms, face, buttons, and foliage. Step back and examine the overall composition. This is your opportunity to adjust spacing before committing to stitches. Taking a quick reference photo of the arrangement can also help you remember the final positioning if pieces are accidentally moved during construction.
Secure the large white body first using small pins or another temporary appliqué method appropriate for your materials. Work gradually around the edge with an evenly spaced blanket stitch or whipstitch. Avoid pulling the thread too tightly because felt can buckle when excessive tension is applied. Continue with the head, keeping the stitches similar in size so both pieces appear coordinated. A contrasting golden-brown thread creates the strong outlined effect visible in traditional folk appliqué, while matching thread produces a quieter finish.
After the primary snowman shape is attached, sew the hat and scarf in their natural layering order. Attach pieces that sit underneath first, then add the overlapping sections. Use simple running stitches along the red hat to create the appearance of knitted ribs and repeat a similar technique on the green scarf. These decorative stitches are not merely ornamental; they provide texture and visually transform flat felt into something resembling winter clothing. Keep the lines slightly relaxed rather than perfectly mechanical to preserve the handmade character.
Next, attach the facial details, mittens, boots, buttons, and foliage. Use especially small stitches around the eyes and carrot nose because large stitches can distort tiny pieces. Once the eyes are attached, add white highlights to make the expression appear lively. Stitch the smile with a smooth curved line and add short eyebrow stitches above the eyes. The combination of simple shapes and expressive embroidery is one of the reasons a snowman appliqué pattern can feel so engaging even though the construction techniques remain accessible.
Create the surrounding snowflakes only after the snowman is complete. You may cut tiny white felt shapes or embroider them directly onto the background using white thread. Embroidery is particularly effective because it avoids adding excessive bulk. Vary the size and shape of the snowflakes and distribute them throughout the empty background areas. Leave breathing room around the hat and face so the composition does not become crowded. A few small star-like stitches can fill awkward gaps without competing with the larger snowflakes.
To finish the panel, inspect every appliqué edge for loose stitches and trim stray threads carefully. If the background remains flat, it can be placed inside a decorative textile frame or attached to a backing fabric. For a wall hanging, add batting and a backing layer before quilting or stitching around selected portions of the design. If you are making a pillow, incorporate the finished appliqué panel into the front before constructing the pillow cover. The completed Felt Snowman Applique Panel Pattern should retain its soft handcrafted texture while remaining sturdy enough for seasonal display.
Creative Variations, Care Tips, and Ways to Use the Finished Panel
One of the easiest ways to personalize this design is through color. The classic red and green palette naturally suits traditional Christmas décor, but the same Felt Snowman Applique Panel Pattern can look completely different with icy blue, navy, silver-gray, or pastel accessories. You could make the hat blue and the scarf burgundy, introduce patterned wool felt, or combine several shades of green in the foliage. Maintaining contrast between neighboring pieces is more important than following one specific color scheme.
The snowman’s accessories can also be customized. Add a small felt patch to the hat, embroider tiny stars onto the scarf, change the pom-pom shape, or decorate the mittens with miniature stitched snowflakes. Buttons could be created from felt circles, embroidery, or securely attached decorative sewing buttons when the finished project will remain out of reach of very young children. Personal touches make each handmade panel unique while preserving the recognizable structure of the original design.
You can also adapt the felt appliqué panel for different finished projects. For a wall hanging, keep a generous margin around the snowman and add a coordinated fabric border. For a cushion front, make the central figure slightly smaller so that important details are not lost in the seam allowance. For a larger quilt, the snowman can become one feature block surrounded by pieced winter fabrics. Smaller versions may be transformed into decorative banners, gift bag fronts, or seasonal fabric ornaments.
Proper care will extend the life of the finished appliqué. Felt projects generally benefit from gentle handling because vigorous machine washing may cause distortion, pilling, or changes to embroidered details. Dust can often be removed carefully with a soft lint roller or gentle brush. If cleaning becomes necessary, follow the care recommendations appropriate for the specific fiber content of your felt and background fabric. Store the panel completely dry and preferably flat to prevent deep folds from developing.
Beginners should remember that perfect stitches are not required to create an appealing result. In fact, subtle variation in handmade blanket stitching contributes to the folk-art character of the project. Concentrate instead on consistent spacing, secure knots, clean cutting, and thoughtful placement. Practice curved sections on felt scraps before sewing around the snowman’s head or mittens. With each section completed, your confidence with hand appliqué, embroidery, and layered felt construction will naturally improve.
Most importantly, treat the Felt Snowman Applique Panel Pattern as a flexible creative guide rather than a rigid formula. The recognizable snowman silhouette establishes the basic design, while fabric choices, thread colors, embroidery, foliage, snowflakes, and accessories provide room for your own ideas. This balance between structure and personalization makes the project enjoyable to repeat. A collection of snowmen made with different scarves and hats could even become a coordinated series of handmade winter decorations.
Frequently Asked Questions
What is a Felt Snowman Applique Panel Pattern?
A Felt Snowman Applique Panel Pattern is a textile project in which separately cut felt shapes are layered and stitched onto a background to form a decorative snowman scene. The pattern normally contains templates for major shapes such as the body, head, clothing, facial features, and accessories. Additional embroidery may be used to create facial lines, snowflakes, clothing texture, and other small details.
Is this felt snowman project suitable for beginners?
Yes. Beginners can complete this type of project because felt is relatively easy to cut and does not usually require traditional raw-edge finishing. The most useful skills are tracing templates, cutting carefully, arranging shapes, and making simple hand stitches. New sewists can practice the blanket stitch on scraps before working on the final pieces.
What stitch works best for felt appliqué?
The blanket stitch is an excellent choice because it secures the felt while producing an attractive decorative outline. A small whipstitch can provide a less noticeable attachment, while a running stitch is useful for adding clothing texture and other decorative lines. You do not need to use the same stitch throughout the entire panel.
Can the snowman appliqué be sewn with a sewing machine?
Yes. Larger pieces can be attached with a sewing machine using a straight stitch, narrow zigzag, or suitable appliqué stitch. Smaller elements may still be easier to control by hand. Many crafters combine machine and hand sewing so they can complete structural work efficiently while preserving handcrafted embroidery details.
Do I need to add seam allowance to the felt appliqué pieces?
Usually, exposed felt appliqué pieces do not require a traditional seam allowance because their edges are meant to remain visible and are stitched directly onto the background. However, seam allowance should be added around the outer background when the finished panel will become part of a pillow, quilt, bag, or another sewn item.
How can I resize the pattern without changing its proportions?
Resize every template by the same percentage. For example, if the body is enlarged while the head and accessories remain unchanged, the finished character will appear disproportionate. Scaling all pieces together maintains the relationship between the body, hat, scarf, face, arms, and decorative elements.
Can regular fabric be used instead of felt?
Yes, although woven fabric behaves differently because its raw edges can fray. When substituting cotton fabric, you may want to use fusible appliqué techniques or turn the edges under, depending on the desired finish. Felt remains especially convenient for this project because the shapes can be cut and stitched with minimal edge preparation.
How can I make the finished panel look more professional?
Clean cutting, balanced positioning, controlled thread tension, and consistent stitch spacing make the biggest difference. Arrange every element before sewing and check the entire composition from a short distance. Decorative stitching should enhance the shapes rather than overpower them, and loose thread ends should be secured and trimmed neatly.
Conclusion
The Felt Snowman Applique Panel Pattern is a welcoming seasonal project that introduces several valuable textile techniques in one cheerful design. By breaking the snowman into simple individual shapes, you can gradually construct the body, head, hat, scarf, face, mittens, boots, buttons, foliage, and snowy background without making the process unnecessarily complicated. Careful planning before stitching also makes it much easier to maintain the balanced proportions of the photographed inspiration.
Throughout the project, you can practice felt appliqué, blanket stitch, running stitch, layering, embroidery, template preparation, and decorative finishing. These techniques are useful far beyond this single winter design and can later be applied to quilts, cushions, ornaments, wall hangings, table decorations, and many other fabric projects.
The greatest appeal of handmade appliqué is that small variations become part of the finished piece’s personality. Your stitches do not have to look mechanically identical, and your snowman does not need to be an exact duplicate of another project. Thoughtful color choices and secure construction are far more important than absolute perfection.
Once you understand the basic construction sequence, experiment with different scarves, hat colors, snowflake arrangements, embroidery details, and background fabrics. These modifications allow you to create a recognizable Felt Snowman Applique Panel Pattern while still producing a piece that feels personal and original.
EASILY FIND THE FREE PDF FOR THIS PATTERN HERE!
Whether you display the finished snowman during the holidays, incorporate it into a winter quilt, or turn it into a decorative cushion, the project offers an enjoyable combination of sewing and creative design. Its simple shapes make it approachable, while the layered details provide enough interest to keep the construction rewarding from beginning to end. I hope this tutorial helps you confidently create your own Felt Snowman Applique Panel Pattern from the first paper templates to the final decorative stitches. After completing your project, leave your sincere opinion about the design and share any suggestions, color combinations, or creative changes you would make. Your ideas may inspire an entirely new version of this cozy handmade snowman.