
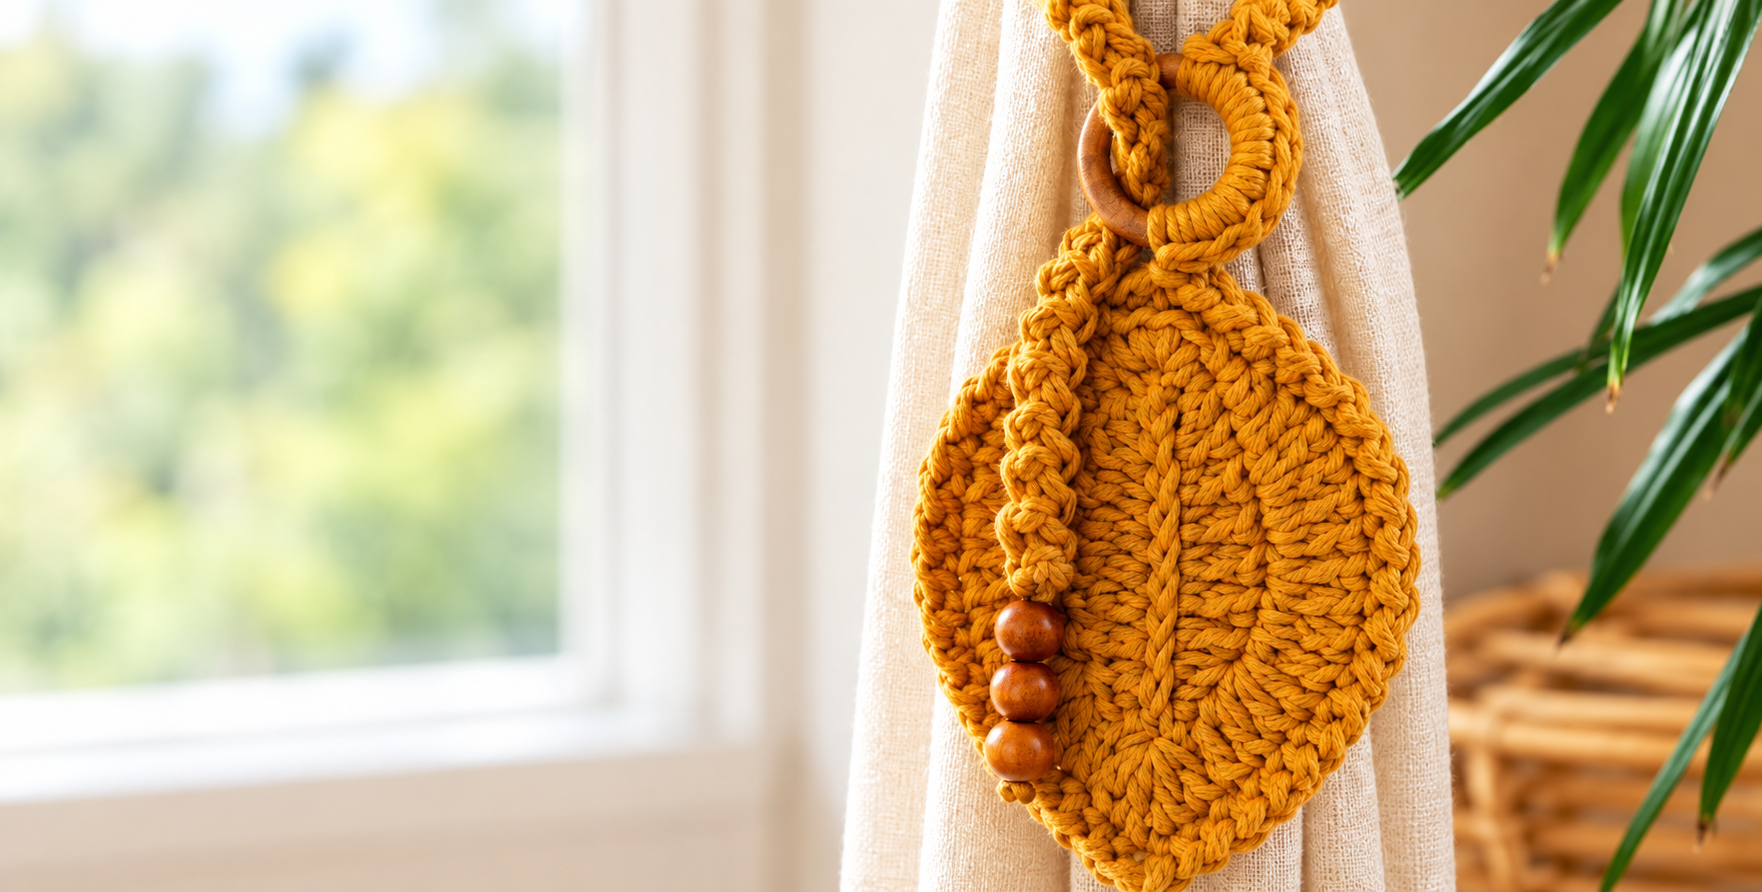
The Crochet Curtain Tieback Pattern is a charming way to combine practical home décor with the warmth of handmade crochet. A curtain tieback may be a relatively small project, but it can completely change the appearance of a window by gathering fabric neatly while adding texture, color, and personality to the room. The design featured here is inspired by a decorative circular crochet piece with a rich golden tone, an ornamental loop, and natural wooden details that create a warm, relaxed look. Because the project uses familiar crochet techniques and can be adjusted to different curtain sizes, it is suitable for crocheters who want to practice shaping while producing something useful. Throughout this tutorial, you will learn how to crochet the main decorative body, build the edging, create a strong hanging loop, and add optional decorative elements. The finished crochet curtain tieback can work beautifully with neutral curtains, rustic interiors, bohemian rooms, farmhouse décor, or colorful handmade spaces.
One of the best things about making your own Crochet Curtain Tieback Pattern is the freedom to customize every detail. Instead of depending on a fixed store-bought accessory, you can choose yarn that matches the colors already used in your room, adjust the diameter of the crochet piece, make the fastening loop shorter or longer, and even change the decorative beads. Cotton yarn is especially attractive for this project because it creates clearly defined stitches and usually has enough structure to hold the finished shape. However, cotton blends and other firm yarns can also work well. A mustard or golden shade gives the tieback a warm handmade appearance similar to the inspiration piece, while cream, sage green, terracotta, dusty rose, navy blue, or natural beige can create completely different decorative styles. The goal is not simply to crochet an accessory but to create a small textile detail that feels connected to the room around it.
This tutorial is written using standard U.S. crochet terminology and includes the instructions inside crochet brackets so that the construction is easy to follow. The main stitches used are chain (ch), slip stitch (sl st), single crochet (sc), half double crochet (hdc), and double crochet (dc). You will also encounter increases, which simply mean working more than one stitch into the same stitch or space to expand the shape evenly. Before beginning your Crochet Curtain Tieback Pattern, read through the entire pattern once, especially if you plan to customize the size. Crochet tension can vary significantly between makers, so consider the stitch counts as a reliable starting point rather than an unchangeable rule. The most important result is a flat, balanced decorative body and a fastening section strong enough to comfortably hold your curtain without stretching excessively.
Materials, Crochet Terms, and Preparation for the Curtain Tieback
For this Crochet Curtain Tieback Pattern, choose a medium-weight cotton or cotton-blend yarn with enough body to keep the decorative section from becoming floppy. Approximately 70 to 120 meters of yarn should be sufficient for one tieback, depending on its finished size and the thickness of the yarn. You will also need a crochet hook appropriate for your yarn, usually around 4 mm to 5 mm for medium-weight cotton, scissors, a yarn needle, stitch markers, and optional wooden beads or a wooden ring.
DISCOVER MORE FREE PATTERNS HERE!
The term Crochet Curtain Tieback Pattern refers to a set of crochet instructions used to create a decorative band, loop, or ornament that gathers a curtain toward the side of a window. Unlike a simple cord, this design includes a crocheted focal piece, giving the finished accessory the appearance of both functional hardware and handmade textile art. It can be created as a removable tieback, attached around a hook, or wrapped directly around lightweight curtains.
Begin by making a small gauge sample if you are uncertain about the yarn and hook combination. [Gauge test: ch 15, dc in 4th ch from hook, dc across, ch 3, turn, dc across for approximately 6 rows.] The sample does not need to match a strict professional gauge because the project is decorative, but the fabric should feel firm rather than loose. If large gaps appear between stitches, try a slightly smaller hook.
Before crocheting the decorative body, decide how large you want the center piece to be. A finished diameter of approximately 13 to 17 cm works well for many curtains. For a more delicate tieback, stop the circular construction earlier. For heavier curtains, make the circle slightly larger and use a sturdier yarn. Remember that increasing the size may also require additional stitches in later rounds so the piece remains flat.
It is also useful to understand the abbreviations before beginning. Ch means chain, sl st means slip stitch, sc means single crochet, hdc means half double crochet, and dc means double crochet. An instruction such as [2 dc in next st] tells you to work two double crochet stitches into one stitch. This is an increase, and increases are essential when creating circles because they provide the extra width needed for each new round.
Finally, prepare your optional decorative components before starting. Wooden beads complement the natural texture of crochet beautifully, but they are not required. If you use beads, make sure their holes are large enough for the yarn or for a separate strong cord that can be attached securely. Decorative components should be firmly fastened, especially if the finished tieback will be handled regularly. Keeping your materials ready will make the crochet curtain tieback tutorial smoother from beginning to end.
Step-by-Step Crochet Curtain Tieback Pattern
Start the center of the Crochet Curtain Tieback Pattern with a magic ring. [Round 1: Make magic ring, ch 3, work 11 dc into ring, pull ring closed, sl st into top of beginning ch-3 to join. Total: 12 dc.] If you prefer not to use a magic ring, [ch 4, sl st into first ch to form a ring], then crochet the first round into the center. Keep the stitches evenly spaced so the circle begins neatly.
Create the second round by increasing in every stitch. [Round 2: ch 3, dc in same st, 2 dc in each remaining st around, sl st to top of beginning ch-3. Total: 24 dc.] This round creates the foundation for the expanding circular motif. Try not to pull the slip stitch too tightly because you will need to work comfortably into the joined area during the next round.
Continue shaping the circle. [Round 3: ch 3, 2 dc in next st, *dc in next st, 2 dc in next st; repeat from * around, sl st to join. Total: 36 dc.] The sequence alternates one regular stitch with one increase. The circle should lie relatively flat. If it begins forming a bowl, your tension may be too tight; if it becomes noticeably wavy, the increases may be too frequent for your yarn and tension.
Add another expansion round to create the main body. [Round 4: ch 3, dc in next st, 2 dc in next st, *dc in next 2 sts, 2 dc in next st; repeat from * around, sl st to join. Total: approximately 48 dc.] This produces a sturdy circular foundation that can later receive decorative raised stitches or textured sections. Check the diameter before moving forward and add another increase round only when a larger piece is desired.
For additional texture similar to a handcrafted decorative medallion, create a raised surface using front-post-style placement or simple clusters. A beginner-friendly option is [Round 5: ch 1, sc in first st, *skip 1 st, 5 dc in next st, skip 1 st, sc in next st; repeat from * around, adjusting final repeat if necessary, sl st to first sc]. This produces small shell-like curves along the surface and begins giving the accessory a more ornamental appearance.
Finish the main circle with a firm border. [Edging Round: ch 1, sc evenly around, placing 1 sc in each regular stitch and 2 sc where extra spacing is needed; sl st to first sc.] For a more decorative border, you may work [sl st in next st, ch 3, sc in same st, sl st in next st; repeat around]. The exact edging can be simplified or embellished according to your preferred crochet home décor style.
Creating the Loop, Decorative Details, and Finishing
The upper loop is one of the most important parts of the Crochet Curtain Tieback Pattern because it provides the fastening point. Attach yarn securely to the upper edge of the medallion. [Loop foundation: ch 28 to 40, depending on required length, sl st into attachment point.] Test the loop around your curtain or wall hook before continuing. Add or remove chains until the length feels comfortable without being excessively loose.
Strengthen the loop by crocheting around the chain. [Loop reinforcement: ch 1, work 1 sc into each chain around, sl st into medallion.] For a thicker decorative cord, work another round of slip stitches or single crochet around the entire loop. This creates a more substantial structure and helps prevent stretching. A sturdy loop is particularly useful when working with medium or heavier curtain fabric.
To create a decorative wrapped section, crochet a narrow band. [Decorative band: ch 6, sc in 2nd ch from hook and across, ch 1, turn; sc across. Repeat rows until band measures approximately 8 to 12 cm.] Wrap this band around the base of the loop or around a wooden ring and sew both ends securely to the back of the crochet work. This element creates a layered handmade appearance.
Wooden beads can be added to one side of the circular motif for a natural bohemian finish. Create a short crochet cord using [ch 12 to 18, sl st back across chains] and attach it securely to the edge. Thread two or three beads onto the cord if the holes allow it, then create a large knot or stitch the end firmly. Beads should be considered optional decoration rather than structural fastening components.
Weave every yarn end securely using a yarn needle. Rather than cutting ends immediately after passing them through one or two stitches, weave each tail in several directions through the back of the crochet fabric. This helps prevent the ends from becoming visible after repeated handling. If your circle needs shaping, lightly dampen it, place it flat, adjust the edges with your hands, and allow it to dry completely.
To use your finished Crochet Curtain Tieback Pattern, gently gather the curtain at the desired height and wrap the fastening section around the fabric. Depending on your design, place the loop over a wall hook, wooden ring, decorative knob, or another suitable support. Avoid pulling the crochet excessively tight. The tieback should gather the curtain gracefully while allowing the stitches and decorative medallion to remain clearly visible.
Crochet Curtain Tieback Pattern FAQ
What is the best yarn for a Crochet Curtain Tieback Pattern? Cotton yarn is one of the most practical choices because it provides good stitch definition, moderate strength, and limited stretch. A cotton blend can also work well. For a structured tieback, avoid yarn that is extremely soft or elastic unless you plan to reinforce the fastening section. Medium-weight yarn offers a useful balance between decorative texture and manageable thickness.
How large should a crochet curtain tieback be? There is no universal measurement because curtain thickness varies. The decorative medallion in this Crochet Curtain Tieback Pattern can measure approximately 13 to 17 cm across, while the fastening loop can be adjusted to fit the curtain. Before finishing the loop permanently, wrap it around the actual curtain to confirm the appropriate length.
Can beginners make this crochet curtain tieback? Yes. Beginners who already know chain stitches, single crochet, and double crochet should be able to complete the project with patience. The circular increase rounds provide useful practice in shaping crochet motifs. If the decorative shell edging feels difficult, replace it with one or two simple rounds of single crochet.
Why is my crochet circle becoming wavy? A wavy crochet circle usually contains too many increases for the yarn, hook size, or personal tension. Try reducing the number of increases during the next round. Conversely, if the circle curls upward like a bowl, it may need additional increases. Crochet patterns often require small tension-based adjustments, particularly when different yarns are substituted.
Can I make the tieback without wooden beads or a wooden ring? Absolutely. The wooden components are optional and mainly contribute to the decorative style. You can create the entire crochet curtain holder using yarn by replacing the wooden ring with a reinforced crochet loop and omitting the beads. You can also add tassels, small crocheted leaves, flowers, or simple cords according to the room’s décor.
How can I make a pair of matching curtain tiebacks? Keep notes while making the first piece. Record your hook size, yarn type, number of rounds, stitch counts, loop length, and decorative details. Then follow exactly the same sequence for the second tieback. Counting stitches carefully is especially important because even a small difference in the number of increases can change the diameter of the circular motif.
Can this pattern be resized for thick curtains? Yes. For thicker curtains, increase the length of the fastening loop and consider using stronger yarn. You can also enlarge the decorative medallion by continuing the circular increase sequence. For example, after a round using [dc in next 2 sts, 2 dc in next st], the following expansion can use [dc in next 3 sts, 2 dc in next st] repeated around.
How do I keep the finished crochet tieback looking neat? Keep the stitch tension consistent, weave yarn ends carefully, and gently shape the finished work. If your yarn is washable, follow its care instructions rather than assuming every crochet fiber can be cleaned the same way. Regularly check decorative attachments, especially beads or rings, to ensure they remain securely fastened.
Can I use different colors for this pattern? Yes, and color customization is one of the easiest ways to make the project unique. Mustard gold creates a warm bohemian appearance, while ivory offers a soft neutral look. Sage green works beautifully in nature-inspired interiors, terracotta adds warmth, and darker shades can produce a dramatic contrast against light curtains.
What can I do if my tieback stretches over time? Cotton generally stretches less than many soft acrylic yarns, but any crochet piece can relax with repeated use. Reinforcing the loop with an extra round of single crochet or slip stitches can increase stability. You may also shorten the loop slightly if you expect the yarn to relax after regular use.
Conclusion
The Crochet Curtain Tieback Pattern is a practical and decorative project that turns basic crochet techniques into a beautiful handmade accent for the home. In this tutorial, you learned how to select suitable yarn, understand the essential crochet abbreviations, build a circular medallion using controlled increases, create decorative texture, add a secure edging, construct a reinforced fastening loop, and finish the project with optional wooden beads or a wooden ring. The instructions in brackets, including [ch], [sc], [dc], [sl st], and increase sequences, can also help you become more comfortable reading other crochet patterns.
More importantly, this project can easily be adapted to your personal style. You can change the yarn color, enlarge or reduce the medallion, simplify the border, lengthen the loop, or replace the wooden details with entirely crocheted decorations. Making a matching pair creates a coordinated look for two curtain panels, while using contrasting colors can turn the tiebacks into noticeable decorative features.
A handmade crochet curtain tieback proves that even a relatively small crochet project can make a meaningful difference in a room. It combines function, texture, and creativity without requiring complicated construction, making it a satisfying project for both improving crochet skills and refreshing home décor. If you try this Crochet Curtain Tieback Pattern, leave your sincere opinion about the project and share your suggestions. Your ideas about colors, yarn choices, decorative details, or pattern variations can inspire even more creative ways to personalize this handmade curtain accessory.