
The Crochet bag with a textured weave Pattern is a beautiful way to combine practical crochet skills with an eye-catching woven effect that looks much more complicated than it really is. This style of handmade bag uses crocheted strips or raised sections arranged so they appear to pass over and under one another, creating the visual impression of a traditional basket weave. The finished texture gives the project structure, dimension, and personality while still keeping the softness people expect from crochet. You can work the design with bright contrasting colors, elegant neutral shades, or a carefully planned palette that matches your personal style. Because the pattern relies on repeated stitches and clearly defined sections, it is also an enjoyable project for crocheters who already know the basic crochet stitches and want to try something different. Throughout this guide, you will learn how to plan, crochet, assemble, and finish a textured crochet bag from beginning to end.
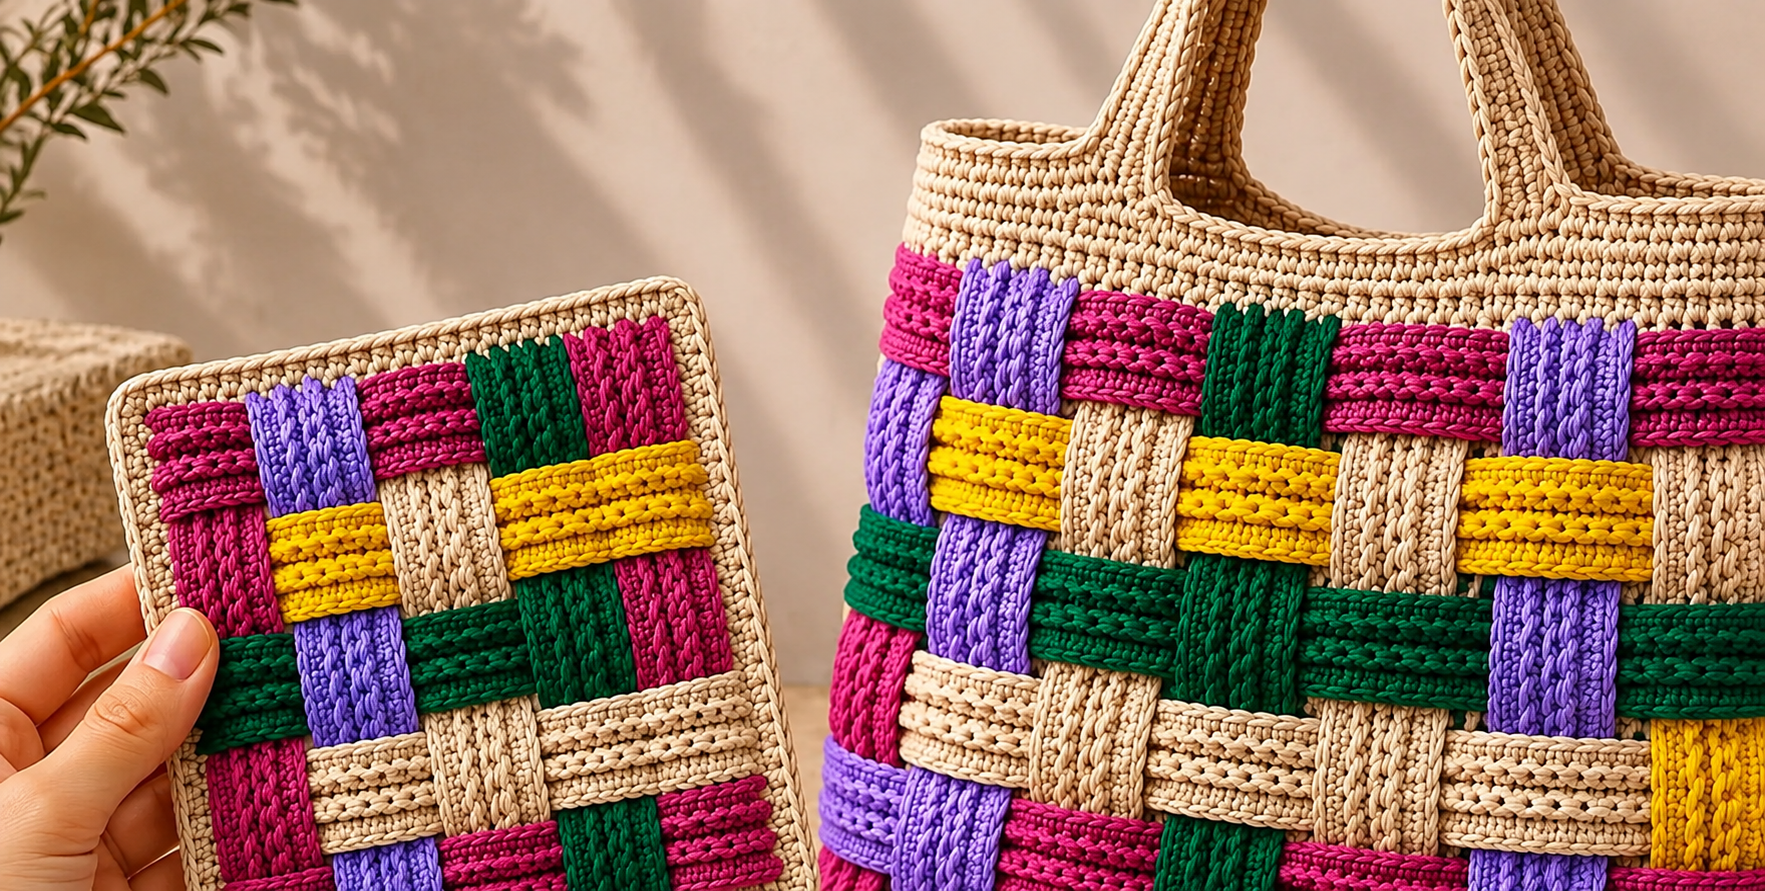
One of the most appealing characteristics of the Crochet bag with a textured weave Pattern is its flexibility. You can make a small handbag, a medium everyday tote, or a larger market-style bag simply by adjusting the width and height of the foundation panels. The woven sections can be created with individual crochet strips or with raised stitch groups designed to imitate interlaced fabric. For the colorful version described in this tutorial, the main body is divided into horizontal and vertical textured bands in shades such as green, purple, pink, yellow, and cream. A neutral top section and sturdy crocheted handles help balance the brighter colors while making the bag practical for regular use. The result is a handmade crochet tote bag with a distinctive appearance that can be customized without changing the essential construction method.
Before starting the Crochet bag with a textured weave Pattern, it helps to understand that neatness is more important than speed. Consistent tension will keep the crocheted bands similar in width and will make the final weaving process much easier. You should also count stitches frequently, especially when making separate strips, because even a difference of one or two stitches can change the dimensions of the finished panel. Beginners may want to prepare a small practice sample before beginning the actual bag so they can test yarn thickness, hook size, and tension. Experienced crocheters can easily adapt the project by adding lining, pockets, reinforced handles, decorative edging, or different color combinations. The instructions below use standard US crochet terminology and explain the most important abbreviations so that every stage of the project is easy to follow.
Materials, Crochet Stitch Key, and Preparation
For this Crochet bag with a textured weave Pattern, choose a durable yarn that produces defined stitches and holds its shape well. Cotton, cotton-blend yarn, sturdy recycled yarn, or smooth synthetic yarn can all work successfully. A medium to bulky weight gives the woven areas a substantial appearance, although you can use lighter yarn if you prefer a softer bag. For a colorful design, prepare approximately five colors, including a neutral shade for the upper edge and handles. The exact amount will depend on your yarn thickness and desired bag size, but approximately 700 to 1,000 meters of yarn in total is a useful starting range for a medium tote.
DISCOVER MORE FREE PATTERNS HERE!
Select a crochet hook that produces a firm fabric without making your stitches uncomfortable to work. For many medium-weight yarns, a hook around 4.0 mm to 5.5 mm is suitable, but the yarn label should be your first reference. You will also need scissors, a yarn needle, stitch markers, measuring tape, and optional fabric for lining. If your bag will carry heavier items, consider adding a firm lining or stabilizer inside. These finishing details can significantly improve the durability of a crochet tote bag while helping it maintain its rectangular shape.
The main crochet abbreviations used in the pattern are straightforward. ch = chain, which forms the foundation or turning chains; sc = single crochet, a compact stitch used for borders and firm sections; hdc = half double crochet, which creates slightly more height while remaining dense; dc = double crochet, a taller stitch useful for flexible bands; sl st = slip stitch, normally used for joining or moving across stitches; and st/sts = stitch/stitches. You may also see RS = right side, WS = wrong side, and rep = repeat when working repeated sections.
The basic single crochet (sc) is especially valuable in this project because it creates a firm surface. Insert the hook into the indicated stitch, yarn over, and pull up a loop so that two loops remain on the hook. Yarn over again and pull through both loops. When you crochet several rows of sc with even tension, the resulting strip becomes sturdy enough to function as one of the woven bands. The stitch is also excellent for reinforcing the upper edge and handles.
The half double crochet (hdc) can be used when you want slightly more flexibility. Yarn over, insert your hook into the next stitch, yarn over again, and pull up a loop. You should now have three loops on the hook. Yarn over once more and pull through all three loops. Repeated rows of hdc form a beautifully textured strip that is quicker to make than a dense sc strip while still providing enough substance for the woven crochet texture.
Before crocheting the full bag, make a sample approximately 10 x 10 cm. Measure how many stitches and rows you obtain within that area. Gauge is not as strict for a bag as it would be for a fitted garment, but it still affects the final dimensions and the amount of yarn required. More importantly, the gauge sample tells you whether the fabric is firm enough to support the woven structure. If the fabric feels loose or stretches too easily, try a slightly smaller hook before beginning the main crochet bag pattern.
Creating the Textured Woven Crochet Panels
Begin the front panel by deciding the finished width of your bag. A practical medium size is approximately 36 to 40 cm wide and 30 to 34 cm tall, excluding the handles. Crochet a firm rectangular base panel or foundation section in the neutral color using sc or hdc. Keep the sides straight by counting your stitches at the end of every row. This foundation will provide a stable surface for arranging the colored strips and is an important part of creating a polished Crochet bag with a textured weave Pattern.
To make the horizontal woven bands, chain enough stitches to reach the planned width of the textured area. Starting in the second chain from the hook, work sc across, ch 1, turn, and continue working sc rows until the strip reaches approximately 3 to 4 cm wide. Fasten off and leave a yarn tail long enough for sewing. Repeat this process in your chosen colors. For example, you might prepare bands in pink, yellow, green, purple, and cream to achieve the lively patchwork appearance associated with a colorful textured crochet bag.
Now create the vertical bands using the same technique. The length of each strip should correspond to the height of the woven portion of the bag. Make every vertical strip approximately the same width as the horizontal strips so the pattern remains visually balanced. If your horizontal sections are 4 cm wide, aim for vertical pieces that are also close to 4 cm wide. Blocking the strips lightly before assembly can help straighten their edges and make the weaving process more accurate.
Arrange the horizontal strips on a flat surface first. Place them parallel to one another with the desired spacing and color sequence. Begin introducing the vertical strips one at a time, passing the first strip over one horizontal band and under the next. For the following vertical strip, reverse the sequence so that it passes under the first horizontal strip and over the second. Continue alternating this arrangement across the entire panel. This simple over-under method is what creates the characteristic basket weave crochet effect.
Once you are satisfied with the placement, secure the woven sections carefully. Use stitch markers or safety pins to hold important intersections before sewing. With a yarn needle and matching yarn, attach the outer edges and selected crossing points so the strips cannot shift during use. Avoid sewing every intersection too tightly because a small amount of natural movement helps preserve the soft woven appearance. The objective is to create a secure panel without flattening the beautiful raised texture.
Repeat the entire process for the back panel. You may copy the exact same color arrangement or change the sequence for a more playful handmade appearance. Check that both panels have approximately the same height and width before beginning assembly. Minor differences can usually be corrected by working an extra border row around the smaller panel. When both sections are ready, you will have the central visual elements needed for the Crochet bag with a textured weave Pattern.
Assembling the Bag, Sides, Base, and Handles
Place the front and back panels with their right sides facing outward if you want the joining stitches to become a decorative feature. Align the bottom edges carefully and use stitch markers at both corners. Join the panels using single crochet through corresponding stitches or edges. Work slowly around the bottom and sides, keeping the seam consistent. A crocheted seam creates additional structure and complements the handcrafted character of the crochet woven bag.
For a flat tote, you can simply join the front and back panels directly. For a roomier bag, create a separate side-and-bottom strip approximately 7 to 10 cm wide. Crochet this long strip in sc until it reaches from one upper corner, around the bottom, and up to the opposite upper corner. Attach one long edge to the front panel and the other to the back. This construction creates depth and makes the finished crochet tote bag more practical for carrying everyday items.
After joining the main body, crochet around the entire upper edge. Attach the neutral yarn and work one round of sc, making sure the stitches are evenly distributed. Join with a sl st. Work several additional rounds until the upper band measures approximately 4 to 6 cm high. This section strengthens the opening and provides a secure location for attaching the handles. Using a neutral shade here can visually connect the colorful textured panel with the handles.
To create each handle, chain enough stitches for the desired length. A comfortable shoulder-style handle might measure approximately 45 to 55 cm, while shorter handles can be around 30 to 40 cm. Starting in the second chain from the hook, work sc across. Ch 1, turn, and continue in rows until the handle reaches approximately 3 to 5 cm wide. A wider handle distributes weight more comfortably and reduces stretching.
For additional handle strength, you can crochet a long strip, fold it lengthwise, and sew the edges together. Another option is to work several tightly tensioned rows of sc using a slightly smaller hook. Position the handle ends evenly on the front and back of the bag. Measure carefully from each side before sewing so both handles are centered. Attach each end with several rows of strong stitches, preferably forming a square or rectangular reinforcement area.
Once the handles are attached, inspect the entire Crochet bag with a textured weave Pattern. Check every woven intersection, side seam, bottom seam, and handle connection. Weave in all yarn ends securely with a yarn needle, passing the tails through several stitches before trimming them. If the bag looks uneven, gentle blocking can help improve its shape. At this stage, your textured crochet tote is structurally complete and ready for optional lining and decorative finishing.
Finishing, Customization, Care, and Crochet Tips
Adding a fabric lining is optional, but it can make the Crochet bag with a textured weave Pattern more practical. A lining prevents small belongings from passing through openings and also reduces stretching. Cut two fabric rectangles slightly larger than the internal dimensions of the bag, allowing approximately 1 to 1.5 cm seam allowance. Sew the sides and bottom, fold the upper raw edge inward, and hand-stitch the lining carefully to the inside upper crochet band.
You can personalize the bag further by adding pockets. A simple fabric slip pocket can be sewn to the lining before inserting it into the bag. Alternatively, crochet a small rectangular pocket using sc and sew it directly to the inside. A pocket is particularly useful for keys, a phone, or other small objects. Practical details like these can turn a decorative textured crochet bag pattern into an everyday accessory.
Color planning makes a dramatic difference in the final appearance. For a bold design, combine saturated colors such as deep green, magenta, purple, and golden yellow with a soft cream background. For a more subtle style, try beige, taupe, ivory, dusty rose, and muted blue. Another possibility is to create a monochromatic design using several shades of one color. The textured weave remains visible even when the palette is restrained because the raised bands naturally create shadows and dimension.
If your woven strips curl while you crochet them, do not immediately assume something is wrong. Dense strips can naturally curl slightly because of tension. Gentle blocking usually corrects the problem. Lay each strip flat, shape it to the correct measurement, and allow it to dry completely before weaving. Keeping your tension consistent is one of the most effective ways to achieve professional results in the Crochet bag with a textured weave Pattern.
Cleaning should always be based on the care instructions for the yarn you selected. In general, a handmade crochet bag benefits from gentle washing. Avoid aggressively twisting or wringing the fabric because this can distort the woven bands. Reshape the bag while damp and allow it to dry flat or supported in its natural shape. If the bag contains a fabric lining, make sure both materials are compatible with your chosen cleaning method.
The pattern is also easy to adapt into smaller projects. The same over-under construction can be used for a crochet clutch, cosmetic pouch, tablet sleeve, cushion cover, or decorative storage basket. A small woven sample can even become a useful coaster or decorative panel. Once you understand how the strips interact, experimenting becomes much easier. That versatility is one reason the Crochet bag with a textured weave Pattern is such an enjoyable technique to learn.
Frequently Asked Questions About the Crochet Bag with a Textured Weave Pattern
Is the Crochet bag with a textured weave Pattern suitable for beginners?
It is best for an adventurous beginner who already understands basic stitches such as chain, single crochet, half double crochet, and slip stitch. The stitches themselves are simple. The main challenge is keeping the strips even and arranging the woven pattern correctly. Making a small practice sample first can make the full project much easier.
What yarn is best for a textured crochet bag?
A firm cotton or cotton-blend yarn is an excellent choice because it offers good stitch definition and limited stretch. Smooth synthetic yarn can also work well. Extremely soft or stretchy yarn may cause the woven bands to lose their shape, so choose a yarn that creates a stable fabric.
How can I make the crochet bag stronger?
Use tight stitches, reinforce the seams, attach the handles securely, and consider adding a fabric lining. You can also crochet the handles with a smaller hook or make them double thickness. Reinforcing the upper edge with multiple rounds of single crochet helps prevent excessive stretching.
Can I make the bag larger or smaller?
Yes. The construction is easy to resize. Increase or decrease the length and number of horizontal and vertical strips while maintaining the same proportions. Measure your planned finished panel before assembly and remember that a larger bag may require stronger handles and additional structural support.
Why do my crochet strips have different widths?
Differences are usually caused by changing tension, accidental stitch increases or decreases, or inconsistent turning chains. Count the stitches in every row and occasionally measure the strip with a ruler or measuring tape. Consistent tension is especially important for achieving an even basket weave crochet pattern.
Do I have to use several colors?
No. A single-color bag can look extremely elegant because the woven texture itself creates visual interest. You could also use two contrasting colors or several shades from the same color family. The construction remains exactly the same regardless of the color combination.
Can I crochet the weave directly instead of making separate strips?
Yes, experienced crocheters can imitate basket weave using front-post and back-post stitches. However, the separate-strip method creates a more pronounced three-dimensional woven appearance and makes color changes particularly striking. It is also easier to understand visually when learning the technique for the first time.
How do I prevent the bag from stretching?
Choose a firm yarn, use a relatively tight gauge, reinforce the upper edge, and add a lining. Avoid making handles too narrow because thin crochet handles can stretch when carrying weight. A structured side-and-bottom panel can also help maintain the overall shape.
How long does it take to make this crochet bag?
The total time depends on your speed, yarn weight, bag dimensions, and the complexity of your chosen color arrangement. A small bag may take a few focused sessions, while a larger lined tote may require several days. Working methodically usually produces a better result than rushing the weaving and assembly stages.
Can leftover yarn be used for this pattern?
Yes. The woven design is especially suitable for using coordinated yarn leftovers because individual strips do not always require large amounts of yarn. Make sure the different yarns have reasonably similar thicknesses so the bands remain balanced and the finished panel stays even.
Conclusion
The Crochet bag with a textured weave Pattern combines basic crochet techniques with an impressive woven construction that can transform simple strips into a richly textured handmade accessory. You learned how to choose suitable yarn, understand essential crochet stitch abbreviations, prepare the foundation, create horizontal and vertical bands, arrange the over-under weave, assemble the front and back panels, strengthen the sides and base, crochet durable handles, and add optional finishing details such as a lining and pockets.
The most important elements are consistent tension, accurate measurements, secure assembly, and thoughtful color placement. Once those fundamentals are understood, the same textured weave crochet technique can be adapted to bags of different sizes, colors, and styles as well as many other handmade projects. Try your own version of this pattern and make it personal through your yarn choices and finishing details. After completing your bag, leave your sincere opinion and share any suggestions, color ideas, or adjustments you would make to the Crochet bag with a textured weave Pattern.