
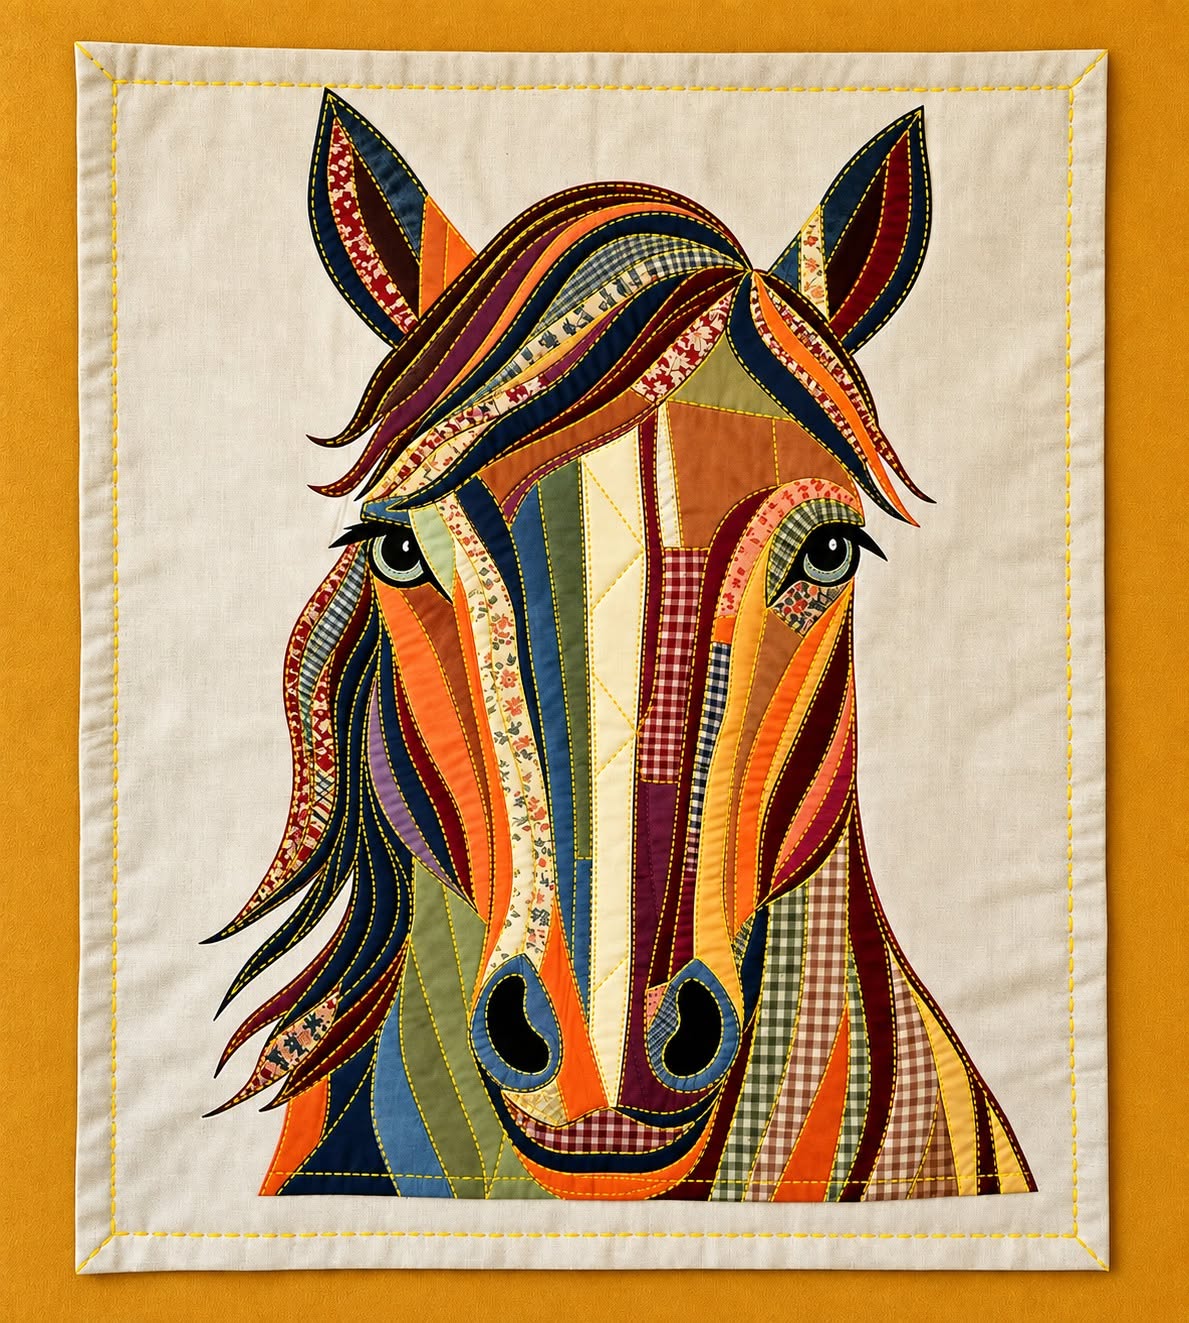
The Patchwork Horse Panel with Fabric Appliqué Pattern is a striking textile art project that combines the expressive beauty of a horse portrait with the warmth and personality of patchwork. Instead of relying on a single fabric or traditional painted details, the horse is created from carefully selected fabric sections in contrasting colors, prints, and textures. Deep burgundy, navy blue, burnt orange, muted green, cream, plaid, and floral fabrics can work together to create the layered appearance seen in the reference project. The result is an artistic wall panel that feels modern while still celebrating traditional quilting and appliqué techniques. Because every piece of fabric contributes to the final expression, even small scraps can become important design elements. This makes the project particularly appealing for quilters who enjoy turning leftover materials into decorative artwork.
Creating a Patchwork Horse Panel with Fabric Appliqué Pattern may look complicated at first, but the project becomes much easier when it is divided into manageable sections. The horse can be built gradually by working from the largest facial areas toward the smaller details, including the mane, ears, eyes, muzzle, and decorative strips. The beauty of this style is that perfect fabric matching is not necessary because variation is actually part of the design. Solid fabrics can sit beside florals, gingham, stripes, and textured cottons without making the project feel inconsistent. Careful placement, accurate cutting, and neat stitching are more important than using expensive materials. With patience and a clear construction order, an intermediate beginner can gradually develop a highly detailed fabric portrait.
Another important feature of the Patchwork Horse Panel with Fabric Appliqué Pattern is its ability to combine several sewing skills in one creative project. You can practice fabric appliqué, patchwork sewing, decorative topstitching, layered construction, fabric selection, and quilt-panel finishing while creating a single finished piece. The reference design uses elongated curved shapes to suggest the natural structure of a horse’s face and flowing mane. These curves create movement and keep the portrait from appearing flat. A neutral background helps the colorful horse remain the visual focus, while a simple stitched border gives the artwork a clean finish. In the following steps, you will learn how to plan, cut, assemble, stitch, and finish a similar decorative horse panel from beginning to end.
Planning the Patchwork Horse Panel and Preparing the Materials
Start by deciding the finished dimensions of your Patchwork Horse Panel with Fabric Appliqué Pattern. A medium wall panel of approximately 50 x 60 cm is comfortable for working with detailed appliqué pieces without making the project unnecessarily large. Cut the background fabric slightly larger than your desired finished size so that you have room for trimming and squaring after all the stitching is complete. A cream, ivory, natural linen-look cotton, or pale beige fabric is an excellent choice because it allows colorful patchwork pieces to stand out clearly. Press the background thoroughly before beginning so that wrinkles do not affect the placement of your appliqué.
DISCOVER MORE FREE PATTERNS HERE!
For the horse itself, gather a varied collection of cotton fabric scraps. Look for colors such as burgundy, dark red, navy blue, denim blue, orange, rust, sage green, olive, cream, brown, and small amounts of black and white. You can also incorporate miniature floral prints, gingham, plaid, narrow stripes, and vintage-inspired prints. The strongest visual effect comes from alternating darker and lighter values rather than using fabrics that are all similar in tone. When placing neighboring pieces, try to create enough contrast for each section to remain visible after stitching.
You will also need basic sewing and quilting supplies, including sharp fabric scissors, small detail scissors, pins or fabric clips, an iron, an ironing surface, a sewing machine, matching or contrasting thread, a quilting ruler, and a removable fabric marker. Fusible appliqué web can be especially useful for this design because many of the horse pieces are narrow and curved. Fusible material temporarily stabilizes the pieces and reduces shifting while you stitch around the edges. If you prefer traditional appliqué, you can use lightweight fabric glue or pins instead.
Before cutting fabric, create a horse appliqué template based on the major shapes visible in the design. Divide the horse into separate areas such as the ears, forehead, central facial strips, cheeks, jaw, muzzle, neck, eyes, nostrils, and mane. Do not attempt to make the entire horse from one complicated template. Smaller sections are easier to trace, position, and adjust. Numbering the templates can also help you remember which pieces overlap others during construction.
The long curved fabric strips are one of the most recognizable features of the Patchwork Horse Panel with Fabric Appliqué Pattern. These pieces form both the mane and many areas of the face. When creating your templates, vary their widths slightly so that the project develops a handcrafted appearance instead of looking mechanically symmetrical. Some strips can measure approximately 2 to 3 cm wide, while larger facial sections may be 4 to 6 cm wide. Gentle curves are easier to sew than extremely sharp bends, especially for anyone new to appliqué.
Finally, arrange your fabrics beside the printed or drawn templates before cutting everything at once. This simple planning step can prevent color imbalance. Place dark fabrics beside lighter ones and distribute highly patterned fabrics throughout the design rather than concentrating them in one area. The fabric appliqué pattern should feel colorful but visually balanced. Photographing your planned fabric arrangement can also help you remember the original placement once you begin cutting and moving the individual pieces.
Cutting, Layering, and Building the Horse Appliqué
Begin constructing the horse by tracing each template onto the paper side of your fusible web. Follow the manufacturer’s general handling instructions for the fusible material you already use, while remembering that each template may need to be traced in reverse depending on the method. Rough-cut around the shapes, leaving a small margin around each traced piece. Fuse each shape onto the wrong side of its selected fabric and then cut directly along the final outline. Using small sharp scissors is especially helpful for narrow curves, pointed ears, and delicate mane pieces.
Position the largest shapes first. The broad sections of the neck, cheeks, and central face provide the visual foundation for the Patchwork Horse Panel with Fabric Appliqué Pattern. Place these sections approximately in the center of the background, leaving enough open fabric around the horse for the final border. Avoid permanently fusing everything immediately. First arrange the pieces loosely and check the overall proportions. The ears should extend upward naturally, while the lower neck should provide a stable visual base for the portrait.
Next, add the long vertical strips that run down the horse’s face. These pieces are essential for recreating the elongated appearance of the reference image. Alternate solid cotton fabrics, checks, florals, muted prints, and contrasting colors. Slightly overlap some pieces to avoid unwanted gaps. The center of the face can include a strong vertical strip that leads visually toward the muzzle, while the neighboring shapes should curve gently toward the eyes and cheeks. Keep checking the design from a distance because proportion problems are often easier to notice when you are not viewing the panel close up.
Construct the ears using layered pieces rather than a single flat fabric shape. A dark outer ear creates definition, while burgundy, red, floral, or orange inner sections add dimension. Position the ears behind the top facial and mane pieces so the layering appears natural. You can use narrow dark fabric strips along the edges to emphasize their shape. This technique is repeated throughout the fabric horse appliqué, where darker outlines help separate one colorful section from another.
The eyes deserve special attention because they give the horse its expression. Create each eye with several small fabric shapes: a dark outer outline, a white or pale section, a black pupil, and perhaps a tiny highlight. Add curved dark eyelashes or eyelid shapes above the eyes if desired. Because these pieces are small, position them carefully before fusing. Try to keep the eyes aligned, but do not worry about absolute symmetry. Slight differences can make the patchwork horse portrait feel more artistic and alive.
Finish the lower face by adding curved cheek pieces, the muzzle, nostrils, and the lower mouth line. Use dark fabrics for the nostrils and surround them with blue, gray, burgundy, or another contrasting color to give the muzzle definition. A curved plaid or gingham strip can work beautifully for the mouth area because it creates an unexpected decorative detail. When the entire horse has been arranged successfully, follow the recommended method for your fusible product and secure all appliqué pieces to the background before moving to machine stitching.
Stitching the Appliqué and Creating the Flowing Patchwork Mane
Once the appliqué has been secured, begin stitching around the fabric shapes using a narrow straight stitch, blanket stitch, or small zigzag stitch. Straight stitching close to the raw edge can create the artistic appearance shown in many contemporary fabric portraits. If you enjoy a more traditional finish, a blanket stitch provides a clearly defined appliqué outline. Choose one primary method for most of the project so that the finished panel feels cohesive. Slowly guide the fabric around curves rather than pulling it from the side.
Work from the interior sections toward the outer edges whenever possible. Stitching the central facial strips first helps stabilize the largest portion of your Patchwork Horse Panel with Fabric Appliqué Pattern. After these pieces are secured, continue toward the cheeks, eyes, muzzle, and ears. Stop with the needle down whenever you need to turn around a curve. This gives you greater control and helps maintain an even distance between the stitching line and the fabric edge.
The flowing mane can now be added using several long, tapered appliqué shapes. Create pieces of different lengths in burgundy, navy, blue, orange, floral prints, muted purple, brown, and cream. Some mane sections should curve across the forehead, while others should flow down the side of the horse’s neck. Layer the pieces so that each section appears to sit naturally over the previous one. This overlapping construction gives the patchwork mane depth and produces the flowing movement that makes the design visually interesting.
Decorative stitching can make the mane even more expressive. Add one or two parallel lines of stitching inside selected fabric strips, following their curves. These lines imitate the movement of individual strands of hair without requiring extremely narrow appliqué pieces. You can use matching thread for a subtle effect or choose slightly contrasting thread when you want the stitching to become part of the design. Avoid excessive decorative stitching on every section, since leaving some pieces simple provides visual balance.
After all the appliqué is stitched, inspect the front and back of the project. Trim loose threads and check for any fabric edges that were accidentally missed. Small unsecured sections can be stitched again before quilting begins. Press the panel carefully from the back using an appropriate iron temperature for your fabrics and fusible materials. At this stage, the horse fabric wall art should already have most of its final personality and structure.
If you would like the finished panel to have more dimension, add a thin layer of batting behind the background fabric and place a backing fabric underneath. Quilt around the outside silhouette of the horse or add subtle stitching across the background. Simple quilting works best because the appliqué itself contains many visual details. Straight lines approximately 2 to 4 cm apart or a restrained free-motion texture can stabilize the layers without distracting from the fabric appliqué horse.
Finishing, Displaying, FAQ, and Caring for the Completed Panel
Square the quilted panel carefully using a quilting ruler before finishing the edges. The reference style works beautifully with a simple neutral fabric border or narrow binding. For a similar appearance, cut strips from cream or natural cotton and attach them around the four sides. Keep the border relatively narrow so the colorful Patchwork Horse Panel with Fabric Appliqué Pattern remains the center of attention. Press the corners neatly to create a crisp rectangular frame.
If the project will be displayed as textile wall art, consider adding a hanging sleeve to the back before completing the final hand stitching on the binding. A simple fabric sleeve allows a wooden dowel or lightweight hanging rod to support the panel evenly. Avoid attaching the artwork from only one small point because that can eventually distort the fabric. Keeping the panel flat and properly supported will help maintain its shape and protect the detailed appliqué work.
One common question is: What is a Patchwork Horse Panel with Fabric Appliqué Pattern? It is a decorative textile project in which a horse image is assembled from numerous fabric shapes instead of being painted or printed as one complete illustration. Patchwork describes the creative use of multiple fabrics, while fabric appliqué refers to placing smaller fabric shapes on a larger background and securing them with stitching. Combining these techniques allows makers to create highly detailed and colorful portraits.
Another frequently asked question is: Can beginners make this horse appliqué panel? A confident beginner can attempt the project, especially when the horse design is divided into separate manageable templates. However, someone completely new to sewing may benefit from practicing curved appliqué on scrap fabric first. The eyes, nostrils, pointed ears, and narrow mane sections require greater precision than the larger facial pieces. Working slowly is more important than working quickly.
Many makers also ask: What fabrics are best for a patchwork horse? Medium-weight quilting cotton is usually the easiest option because it cuts cleanly, presses well, and remains stable during stitching. Small-print florals, checks, plaids, stripes, and solid fabrics are excellent for creating variety. Very stretchy or slippery fabrics can be more difficult to control. If you want to incorporate unusual textiles, consider stabilizing them before cutting the appliqué pieces.
A frequent technical question is: Should the raw edges be turned under? They do not necessarily need to be turned under for a contemporary raw-edge appliqué project. Fusible web combined with close machine stitching can keep the shapes secure while maintaining the artistic style of the panel. If you prefer traditional turned-edge appliqué, you can add a small seam allowance around each template and fold the edges underneath. This technique takes longer but produces a smoother finish.
Another useful question is: How should a finished fabric horse panel be cleaned? Decorative wall panels generally require very little washing. Regular gentle dust removal is usually sufficient. If cleaning becomes necessary, follow the care requirements of the specific fabrics, batting, thread, and fusible material used in your project. Avoid aggressive scrubbing or high heat, particularly when the panel contains numerous small appliqué shapes. Proper display away from prolonged direct sunlight can also help preserve the fabric colors.
Finally, many quilters wonder: Can the Patchwork Horse Panel with Fabric Appliqué Pattern be personalized? Absolutely. Personalization is one of the greatest advantages of this project. You can create the mane in bright rainbow colors, use denim scraps for a rustic horse, choose country-style plaids, work with pastel fabrics, or create a more realistic palette of browns, blacks, creams, and chestnut tones. You can also adjust the eye expression, modify the mane, change the background, or enlarge the pattern to create a larger wall hanging.
Conclusion
The Patchwork Horse Panel with Fabric Appliqué Pattern shows how scraps of fabric can be transformed into expressive textile artwork through thoughtful color selection, layering, appliqué, and decorative stitching. The process begins with a carefully prepared background and a horse template divided into manageable shapes. From there, different fabrics are selected for the face, ears, eyes, muzzle, neck, and flowing mane. Building the portrait gradually makes a complicated-looking design much easier to understand and sew.
The most important lesson is to focus on contrast and movement. Dark fabrics create outlines and definition, lighter fabrics provide highlights, and colorful prints add personality. The long curved pieces across the face and mane are especially important because they guide the eye through the composition. Combining patchwork fabrics, raw-edge appliqué, and controlled machine stitching creates depth without requiring advanced painting or embroidery skills.
Take your time when positioning the smaller pieces, particularly around the eyes and muzzle, because these areas determine much of the horse’s expression. Do not be afraid to move fabrics around before permanently attaching them. Sometimes replacing only one color can improve the balance of the entire fabric appliqué pattern. Keeping a photograph of your planned arrangement nearby can also make assembly easier.
Once the appliqué is complete, quilting and finishing transform the fabric portrait into a durable decorative panel. A neutral border allows the colorful horse to remain the focal point, while a hanging sleeve makes the finished project easy to display. Whether you choose vintage floral scraps, modern solids, plaids, denim-inspired fabrics, or a completely different palette, your finished panel can have a unique personality.
EASILY FIND THE PDF FOR THIS PATTERN HERE!
This project is also an excellent opportunity to use treasured scraps left from previous quilting projects. Even very small pieces can become part of an ear, eye, mane section, cheek, or facial stripe. Instead of requiring perfectly coordinated fabric, the Patchwork Horse Panel with Fabric Appliqué Pattern celebrates diversity in pattern and color, making every completed horse slightly different from the next. If you create your own Patchwork Horse Panel with Fabric Appliqué Pattern, share your sincere opinion about the project and the techniques you enjoyed most. Suggestions are always valuable too, especially ideas for different color combinations, fabrics, stitching styles, or future appliqué designs. Your creative choices can turn the basic construction method explained here into a completely original piece of textile art.