
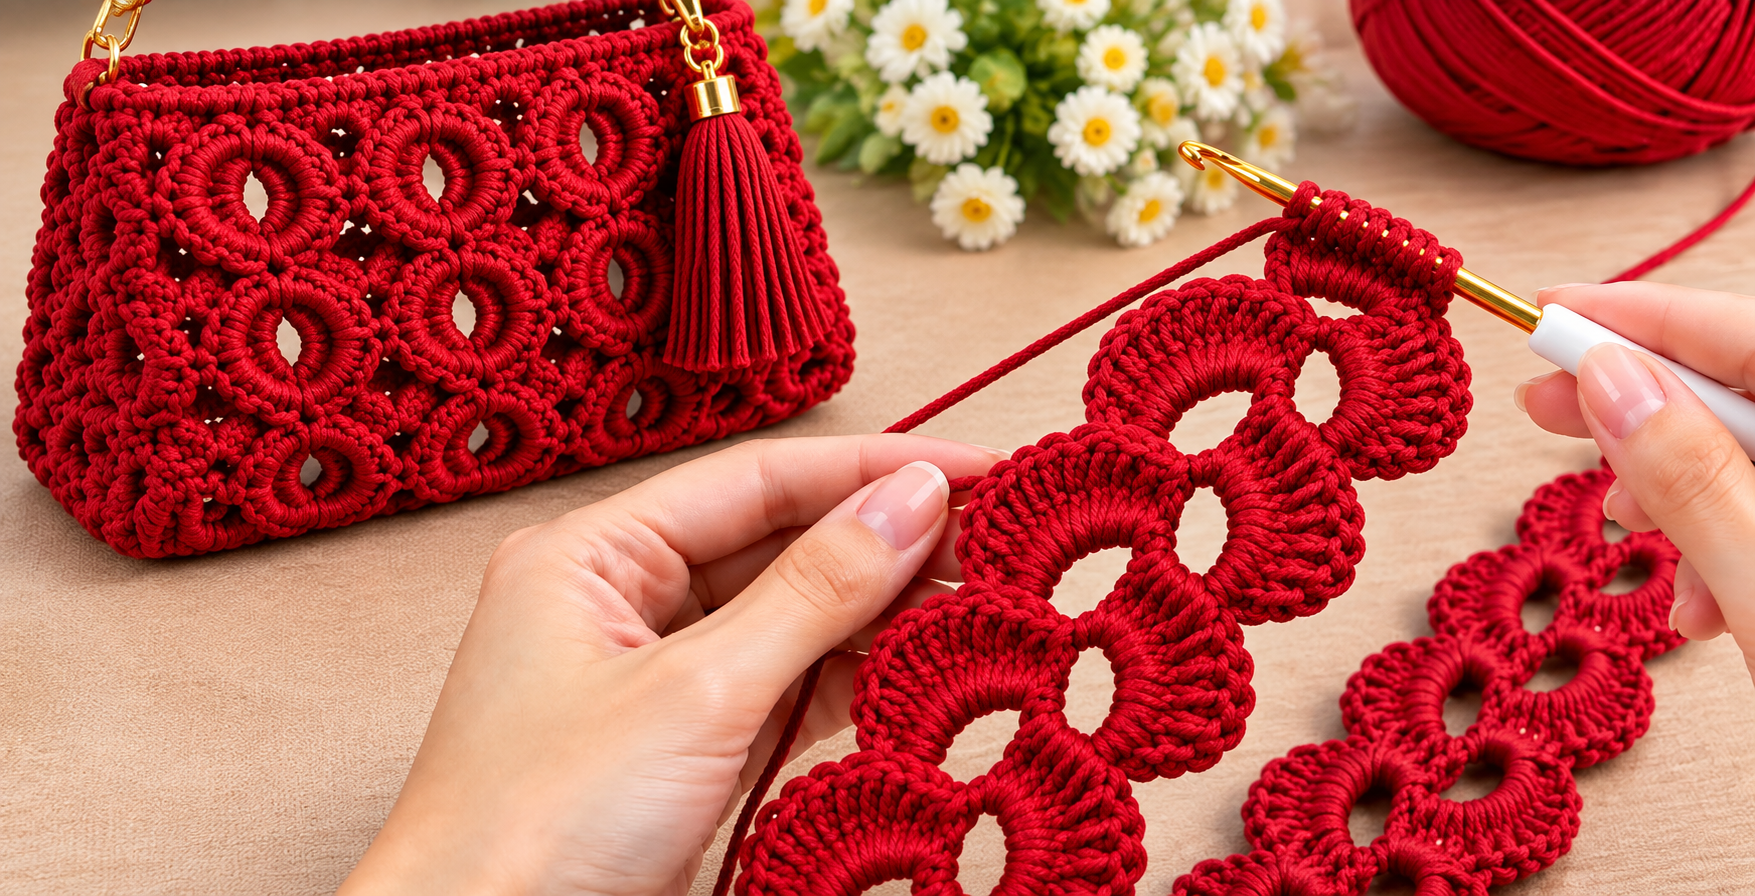
The Bag strap, crochet headband Pattern is a creative crochet project that turns a beautiful repeating motif into a versatile handmade accessory. The design is based on connected oval or ring-inspired shapes that create an elegant openwork structure while still offering enough body for practical use. Depending on the yarn, width, and finishing method you choose, the same basic construction can become a decorative crochet bag strap, a stylish crochet headband, or even a trim for other handmade projects. The repeating structure makes the pattern visually interesting without requiring an overwhelming number of techniques, which makes it approachable for crocheters who already understand basic stitches and want to practice more decorative work. The project is also highly customizable because the length, width, yarn color, and number of motifs can all be adjusted. Throughout this guide, you will learn how to build the pattern carefully from the first foundation stitches through the final finishing details.
One of the most attractive characteristics of this crochet strap pattern is its combination of texture and negative space. Rather than creating a completely solid strip, the design uses curved sections and open centers to produce a lace-like appearance. When the motifs are joined closely together, they form a flexible band that can follow the shape of a shoulder or comfortably sit around the head. For a bag strap, a strong cotton or cotton-blend yarn can provide durability and stitch definition. For a headband, a softer fiber with a little flexibility may feel more comfortable against the skin. The crochet hook should correspond to the yarn thickness, but using a slightly smaller hook can help produce firm, neat stitches when the finished piece needs extra structure. The important goal is consistency: even tension will make each motif look similar and help the entire band remain balanced.
Before beginning the Bag strap, crochet headband Pattern, it is helpful to understand that handmade tension and yarn thickness can change the finished measurements considerably. Instead of depending on one universal stitch count, this tutorial focuses on a repeatable construction method that you can test with your chosen materials. You will need yarn, a suitable crochet hook, scissors, a yarn needle, stitch markers, and optional hardware if the finished piece will become a bag strap. Beginners should make one sample motif before committing to the complete length. This small test allows you to evaluate the size, firmness, and appearance of the stitches. Once the sample looks balanced, you can repeat the same crochet sequence confidently and build a professional-looking accessory one motif at a time.
Materials, Crochet Stitches, and Preparing the Foundation
For a strong crochet bag strap, medium-weight mercerized cotton is an excellent starting point because it creates defined stitches and tends to hold its shape well. A cotton blend can also work if you prefer slightly more softness. For a crochet headband, consider a smooth cotton, bamboo blend, or soft acrylic that will feel comfortable against the forehead and behind the ears. Avoid extremely fuzzy yarn when learning the pattern because the decorative loops and individual stitches are easier to see with a smooth fiber. Approximately 50 to 150 grams of yarn may be sufficient depending on the dimensions, yarn weight, and density of your finished band.
DISCOVER MORE FREE PATTERNS HERE!
Choose a hook that creates compact stitches without making the fabric excessively stiff. If the yarn label suggests several hook sizes, beginning near the middle or lower end of that range is practical for this project. Your crochet terminology should include chain (ch), slip stitch (sl st), single crochet (sc), half double crochet (hdc), and double crochet (dc). Depending on the variation you create, taller stitches may also be used to shape the curved portions. Understanding these basic crochet stitches makes the decorative construction much easier.
The chain stitch creates the foundation from which the first oval opening can be formed. Make a slip knot and crochet a short chain long enough to create the central opening you want. For a small decorative motif, approximately 8 to 12 chains can be a useful starting range, although the exact number should be adjusted for your yarn. Bring the first and last chains together carefully without twisting the chain. Join with a slip stitch to create a small foundation ring. This ring becomes the center around which the textured crochet stitches will be worked.
Instead of inserting the hook into every individual chain, you can work the first decorative round around the chain ring itself. This technique helps the stitches slide into position and makes it easier to cover the foundation evenly. Chain for the height required by your selected stitch, then work a generous number of single crochet, half double crochet, or double crochet stitches around the ring. Push the completed stitches gently together as you work. The goal is to hide most of the foundation chain and create a thick, smooth oval edge.
To achieve the elongated look associated with the Bag strap, crochet headband Pattern, shape the motif rather than forcing it into a perfect circle. Hold the ring gently and distribute more stitches toward the curved ends while keeping the sides balanced. The central opening should remain visible. If the stitches ripple dramatically, there may be too many stitches around the foundation. If the motif pulls inward or refuses to lie flat, additional stitches may be needed. Correcting the first motif is much easier than discovering a tension problem after completing the entire strap.
Finish the first motif with a neat slip stitch and inspect its shape before continuing. Measure the width and length if you want every repeat to remain consistent. You can also write down your final chain count and the number of stitches used around the ring. This becomes your personal gauge reference for the project. Because crochet varies naturally from person to person, documenting your successful sample is one of the most reliable ways to reproduce identical motifs throughout the complete crochet headband pattern or bag strap.
Crocheting and Joining the Repeating Motifs Step by Step
Begin the second motif without cutting the working yarn whenever possible. After completing the first oval, create another foundation chain extending from its edge. The chain should contain the same number of stitches used for the first motif. Bring the chain back toward its starting position to form another loop, taking care not to twist it. Join securely with a slip stitch. You should now have a new open foundation attached directly to the previous motif, allowing the pattern to grow continuously.
Work around this second foundation using the same stitch combination and tension as before. Consistency is particularly important here because differences become more noticeable when several motifs sit next to each other. Crochet around the ring until the foundation is covered and the second oval resembles the first. As you approach the connection point, keep the stitches close but avoid overcrowding them. A clean joining area will allow the motifs to remain distinct while still looking like part of one continuous crochet strap.
For the interlocking appearance, position each new motif according to the direction of the previous one. Some versions can alternate slightly from side to side, while others can be arranged in a straight sequence. Before completing a joining stitch, place the work on a flat surface and check the orientation. If necessary, pass the working loop through an opening or join directly into a selected stitch of the previous motif. The objective is a secure connection that preserves the visible open spaces responsible for the pattern’s decorative character.
Continue using this sequence: form the foundation loop, cover it with crochet stitches, shape the oval, connect it to the previous motif, and check the alignment. This repeating rhythm is the heart of the Bag strap, crochet headband Pattern. After three or four motifs, the construction usually becomes much easier to understand. Stop periodically and lay the strip flat. The motifs should follow a consistent line without excessive twisting. Minor variations are natural in handmade crochet, but major differences should be corrected before additional repeats are added.
For a bag strap, continue until the strip reaches the length required for your bag and preferred carrying style. A short handle may need only a compact series of motifs, while a shoulder or crossbody strap will require considerably more. Remember that some yarns stretch after use, especially when supporting the weight of a bag. Test the strip by gently pulling it before deciding on the final length. If extra strength is necessary, you can add a narrow crocheted reinforcement along the back or incorporate a sturdy fabric backing while preserving the decorative motifs on the visible side.
When adapting the construction into a crochet headband, wrap the unfinished strip gently around the intended head circumference before fastening the ends. The band should feel secure without creating uncomfortable pressure. Crochet fabric often stretches, so making the headband slightly smaller than the exact circumference can improve the fit, depending on the fiber. Join the first and last motifs using slip stitches or carefully sewn stitches. For a removable or adjustable version, small ties can be crocheted at each end instead of permanently joining the band into a circle.
Finishing the Bag Strap or Crochet Headband Professionally
Once the desired length has been reached, finish the working yarn securely. Leave a tail long enough for weaving rather than cutting immediately next to the final stitch. Thread the tail through a yarn needle and weave it through several nearby stitches, changing direction at least once to reduce the chance of the yarn working loose. Trim only after the tail feels secure. Repeat this process for any additional yarn ends. Careful finishing is especially important on a strap because repeated movement can expose weakly secured ends.
If you are making the crochet bag strap version, decide how the strap will attach to the bag. Metal rings, swivel hooks, D-rings, or permanently crocheted attachments are common possibilities. When using hardware, create reinforced end sections that can wrap around the rings. Work several rows of compact single crochet stitches, pass the section through the hardware, fold it back, and sew it firmly to itself. The decorative portion should not carry all the stress at one small point, so reinforcing the attachment area can significantly improve durability.
Another useful option is adding a narrow reinforcement strip behind the decorative crochet. This can be particularly helpful for a bag that will regularly carry heavier objects. Crochet a simple strip of single crochet matching the finished strap length and sew it discreetly to the back. Keep the stitches small and place them where they will not interfere with the openwork design. The front will retain the attractive ring motif while the backing helps limit stretching. This technique combines decorative crochet with practical construction.
For the crochet headband, comfort should guide the finishing choices. Run your fingers along the inside surface and check for knots, stiff joins, or yarn ends that might irritate the skin. A seamless join is ideal for a closed headband. If you prefer an adjustable accessory, finish both ends neatly and add crocheted ties. Another variation is to attach a small elastic section at the back, which can make sizing more forgiving. Make sure any added elastic is securely enclosed or stitched so that the finished accessory remains neat.
Blocking can greatly improve the final appearance of the Bag strap, crochet headband Pattern. Check the care instructions for your yarn first. For fibers suitable for wet blocking, lightly dampen the finished piece, shape each motif with your fingers, and place the band flat to dry. Avoid stretching it beyond the intended dimensions. Blocking helps settle the stitches, open the central spaces, and encourage the repeated motifs to lie evenly. It is especially useful when some rings look slightly different after crocheting.
Finally, examine the entire project in good light. Look for loose yarn ends, uneven connections, missed stitches, or sections that twist unexpectedly. Handmade crochet does not need to look mechanically identical to be beautiful, but careful finishing can dramatically improve the overall presentation. The completed Bag strap, crochet headband Pattern should feel flexible, secure, and visually balanced. Once you understand the motif construction, experiment with contrasting colors, narrower rings, larger openings, or different yarn textures while preserving the same fundamental technique.
FAQ About the Bag Strap, Crochet Headband Pattern
What crochet skill level is recommended for this pattern? The Bag strap, crochet headband Pattern is best suited to confident beginners and intermediate crocheters. You should be comfortable making chains, slip stitches, single crochet, half double crochet, and double crochet. The individual techniques are not especially complicated; the main challenge is maintaining consistent tension and creating similarly sized motifs. Practicing one or two sample rings before beginning the final accessory can make the process considerably easier.
What is the best yarn for a crochet bag strap? A smooth cotton yarn or sturdy cotton blend is a practical choice because it provides clear stitch definition and reasonable durability. A tightly spun yarn is usually preferable to a very soft, stretchy yarn when the strap will support weight. If the project is intended primarily as a decorative strap for a lightweight purse, you can experiment with softer fibers. For heavier bags, consider reinforcing the back of the crochet strip and strengthening the attachment points.
Can the same pattern really be used as a crochet headband? Yes. The repeating motif construction can be adapted effectively into a crochet headband because it forms a flexible decorative strip. The main differences are sizing and material selection. A headband should use a comfortable yarn and should fit securely without being overly tight. Instead of attaching metal hardware, join the ends seamlessly, add ties, or incorporate a small elastic section. Always test the fit before permanently finishing the ends.
How do I stop the crochet motifs from curling or twisting? First check your tension and stitch count. Too many stitches packed around a foundation loop can create ruffling, while too few can cause the motif to pull or curl. Make sure each foundation chain is not twisted before joining it into a ring. It also helps to place the work flat after every few repeats and correct the orientation immediately. Gentle blocking after completion can improve small inconsistencies, although blocking cannot completely correct an incorrect stitch count.
How can I make the bag strap stronger and reduce stretching? Use firm yarn, maintain compact tension, reinforce the attachment points, and consider adding a backing. A narrow single crochet reinforcement strip sewn behind the decorative motifs can provide additional support without hiding the front design. Fabric tape can also be used as an internal backing if appropriate for your construction. Most importantly, remember that highly decorative openwork crochet is generally better suited to lightweight or moderately loaded bags than to carrying very heavy items.
How can I customize the Bag strap, crochet headband Pattern? Color is the easiest place to start. A single bold shade creates a sophisticated continuous design, while alternating colors can emphasize every individual motif. You can also change the size of the foundation loops, experiment with different yarn weights, adjust the width, or use contrasting edging. For a bag, coordinating the yarn with the bag body and hardware creates a polished result. For a headband, softer colors or bright seasonal shades can completely transform the same basic crochet pattern.
Conclusion
The Bag strap, crochet headband Pattern demonstrates how one repeating crochet idea can become two very different handmade accessories. By beginning with a simple chain foundation, forming an oval opening, covering the foundation with consistent stitches, and connecting each new motif carefully, you can gradually build an attractive openwork band. The most important skills are consistent crochet tension, accurate repetition, careful joining, and secure finishing.
You also learned how material choices affect the final project. A sturdy cotton crochet yarn works particularly well when durability and stitch definition are important, while a softer yarn can make the same construction more comfortable as a headband. Testing a sample motif before making the complete piece gives you an opportunity to adjust the hook size, stitch count, and tension without wasting time or yarn.
For the bag version, reinforced ends and secure hardware attachments help turn the decorative crochet into a practical bag strap. For the headband version, comfortable joins, careful sizing, and optional ties or elastic allow the motif strip to become an attractive wearable accessory. Blocking and neatly weaving in the yarn ends provide the final touches that help the project look clean and professionally finished.
Most importantly, treat this pattern as a flexible starting point rather than a rigid formula. Once you are comfortable creating the repeating rings, you can experiment with different colors, yarn weights, motif dimensions, and finishing styles. That versatility is what makes the Bag strap, crochet headband Pattern such an enjoyable crochet project for anyone who likes combining decorative details with useful handmade accessories. If you make your own version, leave your sincere opinion about the pattern and share any suggestions you have for improving or customizing it. Your ideas about colors, yarn combinations, motif sizes, and finishing techniques can inspire even more creative variations of this beautiful crochet bag strap and headband pattern.