
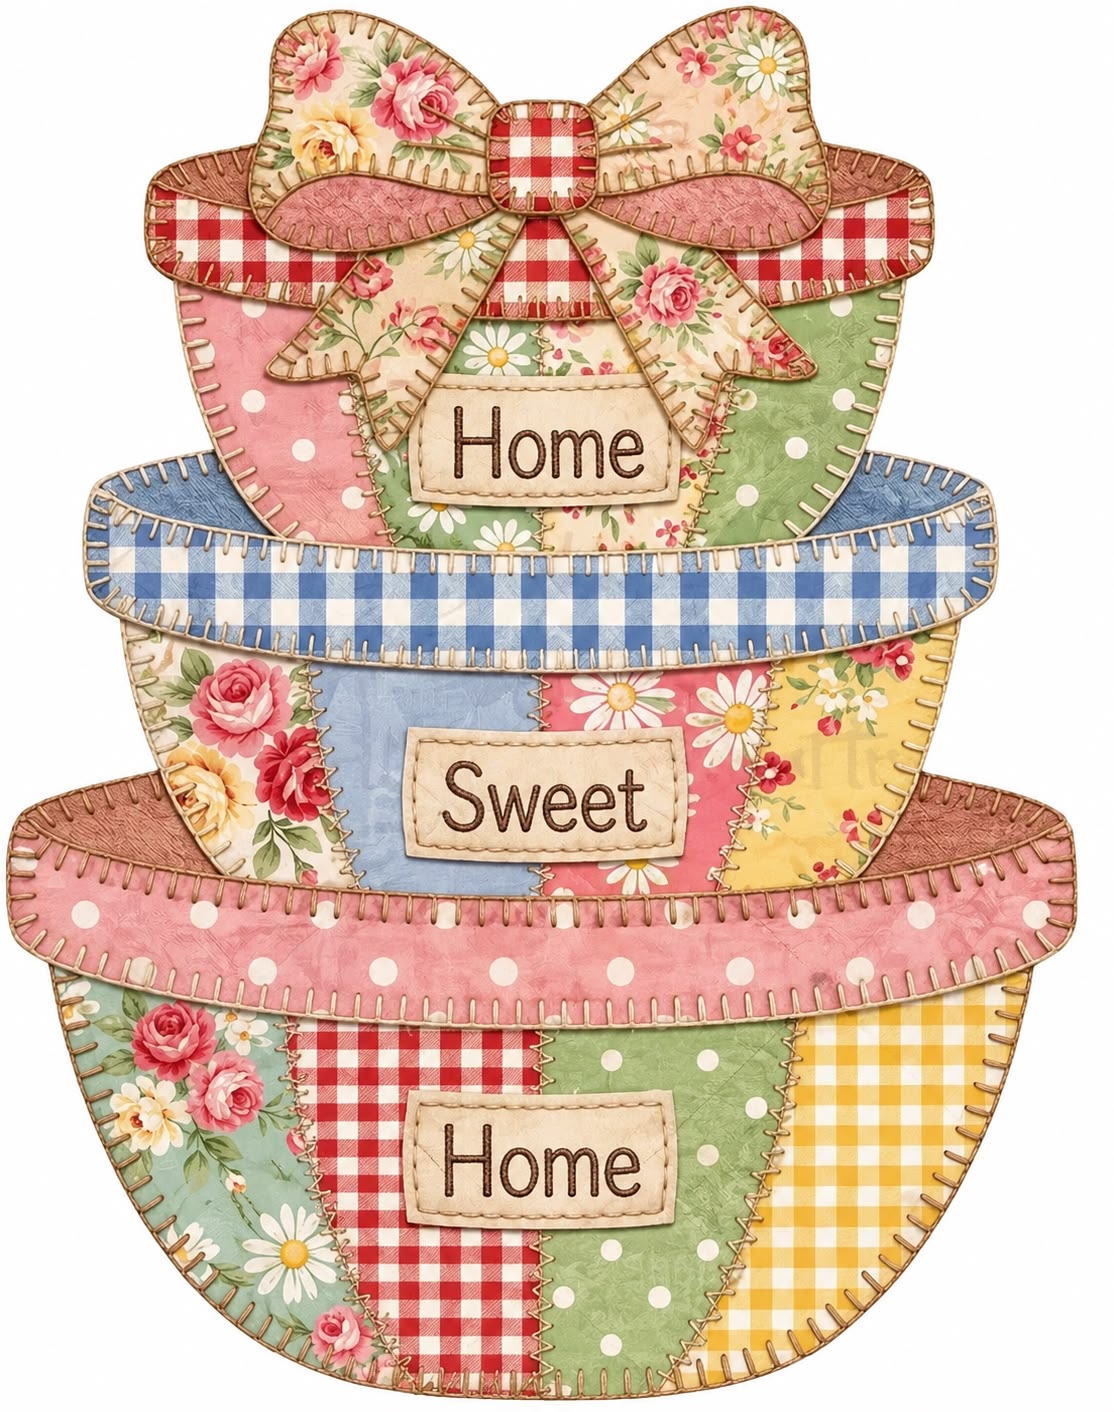
The “Home Sweet Home” Layered Fabric Bowls Pattern is a charming sewing and fabric-appliqué project that combines the cozy feeling of handmade décor with the playful beauty of patchwork. Inspired by the image, the design features three decorative fabric bowls or baskets stacked vertically, each one created with a different combination of floral prints, gingham, polka dots, and soft country-style colors. The upper section is finished with an oversized fabric bow, while small appliqué labels reading “Home,” “Sweet,” and “Home” give the entire piece its welcoming personality. Although the finished design looks detailed, it can be broken down into manageable pieces that are suitable for anyone comfortable with basic sewing, appliqué, and decorative stitching. The secret is to work slowly, prepare every template before sewing, and assemble the project from the bottom layer upward.
One of the most attractive features of this layered fabric bowls pattern is the opportunity to mix many different fabrics without making the finished project feel disconnected. Floral cotton, gingham, polka dots, and subtle textured prints can all work together when a consistent color palette is maintained. In the pictured design, shades of pink, green, yellow, blue, cream, and red create a cheerful cottage-inspired appearance. Decorative blanket stitching around the edges visually connects the individual pieces and gives the project its distinctive handcrafted finish. You can recreate this look with hand stitching for a traditional result or use a sewing machine with an appropriate decorative stitch. Either method can produce a beautiful piece when the edges are carefully prepared and the layers remain smooth.
The “Home Sweet Home” Layered Fabric Bowls Pattern can be adapted as a wall hanging, decorative fabric panel, appliqué for a larger quilt, or seasonal home accent. For the project described here, a finished height of approximately 45 to 50 cm works well, although every template can be enlarged or reduced proportionally. Quilting cotton is an excellent choice because it is easy to cut, press, layer, and stitch. Lightweight fusible interfacing or fusible web can also make assembly easier, especially around curved bowl shapes and the large bow. The instructions below explain how to plan the templates, prepare the patchwork sections, build the three dimensional-looking bowls, add the labels, and finish the decorative stitching while keeping the project neat and balanced.
Preparing the Fabric, Templates, and Three Layered Bowl Shapes
Begin by gathering the basic supplies for the “Home Sweet Home” Layered Fabric Bowls Pattern. You will need assorted quilting cotton fabrics, coordinating thread, lightweight fusible web, a small amount of batting or stabilizer, fabric scissors or a rotary cutter, a cutting mat, ruler, iron, sewing machine, hand-sewing needle, and embroidery or decorative thread. Choose at least six to eight coordinating fabrics so there is enough variety for the patchwork sections. Floral prints can serve as the visual focus, while gingham, dots, and subtle solids provide balance. Cream or beige fabric is particularly useful for the three word labels because it keeps the lettering easy to read.
DISCOVER MORE FREE PATTERNS HERE!
Before cutting your favorite fabric, create paper templates for the three bowls. The bottom bowl should be the largest, the middle bowl slightly narrower, and the upper bowl the smallest. For a finished project around 48 cm tall, you might make the lower bowl approximately 31 cm wide and 17 cm high, the middle bowl approximately 27 cm wide and 14 cm high, and the upper bowl approximately 23 cm wide and 13 cm high. These dimensions are flexible rather than mandatory. Draw gentle outward curves along the sides and a rounded bottom on each bowl so the silhouette resembles the inspiration image. Add approximately 0.7 cm seam allowance wherever you plan to turn an edge under.
Each bowl can be divided vertically into three fabric sections to create the characteristic patchwork appearance. For the largest bowl, try floral fabric on the left, red gingham or checks in the center, and yellow gingham on the right. The middle bowl might combine floral, pale blue, pink floral, and yellow sections. For the upper bowl, pink, green, and floral fabrics create a lovely contrast. These combinations do not need to match the reference exactly. What matters most is distributing strong prints throughout the design rather than placing every bold fabric in the same area.
Cut the individual patchwork panels slightly larger than necessary and sew them together using a 0.7 cm seam allowance. Press each seam carefully to one side or press it open if that gives you a flatter result. Once the patchwork unit is complete, position the paper bowl template over it and cut the final bowl shape. If you want a slightly padded look, cut a matching piece of thin batting or fusible fleece approximately 0.5 cm smaller around the outer edges. This subtle padding gives the finished appliqué more body without making the edges unnecessarily bulky.
The wide rims are an important part of the design because they make the flat appliqué pieces look like actual stacked containers. Create each rim as a long, gently curved band following the width of its corresponding bowl. A finished rim approximately 4 to 5 cm high works well for a project of this size. The bottom rim can use pink polka-dot fabric, the middle rim blue gingham, and the top rim red gingham. Add contrasting brown or dusty-rose end pieces if you want to reproduce the dimensional appearance shown in the inspiration. Light interfacing behind these bands helps them maintain a clean shape.
Once the bowls and rims have been prepared, temporarily arrange all three on your work surface. Place the largest bowl at the bottom, the medium bowl above it, and the smallest at the top. Allow each upper bowl to overlap the one beneath it by approximately 2 to 3 cm. Do not permanently sew everything together yet. This test arrangement allows you to check the overall proportions and make small corrections. The stacked composition should look balanced, with the bowl rims remaining visible and the central labels positioned along the vertical center of the project.
Assembling the Patchwork, Bow, Labels, and Decorative Stitching
Start permanent assembly with the largest bowl. If you are making a wall hanging, position it on a backing fabric large enough to accommodate the entire finished design. If you prefer a freestanding appliqué panel, use a stabilizer behind the individual pieces instead. Fuse or pin the lower bowl into position and smooth it carefully from the center toward the edges. Add its pink rim across the upper portion, making sure the rim overlaps the bowl body. Stitch around the pieces using a blanket stitch, which is one of the defining decorative techniques in this fabric bowl pattern.
Position the middle bowl so its lower section disappears slightly behind the rim of the bottom bowl. This overlapping construction is what creates the convincing layered effect. Attach the body first and then add the blue gingham rim across its upper edge. Continue with the smallest bowl, placing it behind the middle rim and keeping the center lines aligned. When all three bowls are viewed together, they should appear to be sitting naturally inside one another rather than simply floating as separate appliqué pieces.
Now create the oversized bow that decorates the top. Cut two large rounded bow-loop shapes, two tapered ribbon tails, and one small rounded-square center piece. A bow approximately 22 to 25 cm wide will usually balance well with the suggested bowl dimensions. Floral fabrics are ideal for the loops, while a contrasting dusty pink insert can add depth along the lower portions. Use red gingham for the center knot to visually connect the bow to the checked fabrics elsewhere in the project. Add lightweight fusible interfacing if your cotton feels too soft.
Arrange the bow behind the rim of the upper bowl so that the two loops extend outward and upward. Position the ribbon tails diagonally toward the center of the top bowl. The center knot should cover the meeting point of the loops and tails. Fuse or baste everything in place before completing the decorative stitching. Sew slowly around curved sections, especially near the narrow ribbon tails. A contrasting blanket stitch in beige, tan, or brown gives the edges the rustic handmade appearance visible throughout the design.
For the three labels, cut rounded rectangles from cream, beige, or natural cotton. The labels should decrease slightly in size as the bowls become smaller. Stabilize each rectangle and turn the edges neatly under, or place a second slightly larger piece behind it to create a framed effect. Add “Home” to the upper label, “Sweet” to the middle label, and “Home” to the lower label. The words can be embroidered by hand, machine embroidered, or carefully stitched using a suitable lettering function if your sewing machine has one. Keep the lettering centered and dark enough to contrast clearly with the neutral fabric.
Complete the project by inspecting every appliqué edge and reinforcing any loose areas. Add decorative stitches along the vertical patchwork seams if you want them to become part of the design rather than disappear into the background. The repeated stitching is particularly important because it visually unifies fabrics that have very different prints. Press the finished project from the reverse side using an appropriate temperature for your materials. Avoid flattening padded areas too aggressively. The final result should preserve the cheerful, softly dimensional character that makes the “Home Sweet Home” Layered Fabric Bowls Pattern so distinctive.
FAQ About the “Home Sweet Home” Layered Fabric Bowls Pattern
What is the best fabric for making this layered fabric bowls project? Quilting cotton is one of the easiest choices because it combines stability with flexibility. It also comes in an enormous variety of floral, gingham, polka-dot, and textured prints, making it especially suitable for this style of patchwork. Try to choose fabrics with a similar weight even when their patterns are very different. Extremely thin fabric can distort during appliqué, while heavy upholstery fabric may create bulky overlaps. Prewashing is optional depending on the intended use, but fabrics should be prepared consistently so they behave similarly during construction.
Do I need a sewing machine to make the pattern? No. The entire project can be completed with hand stitching, although it will naturally take longer. In fact, hand-worked blanket stitching can enhance the traditional folk-art appearance of the finished piece. A sewing machine is useful for joining the patchwork panels and speeding up edge finishing, but it is not essential. If sewing by hand, use small, consistent stitches and avoid pulling the thread too tightly because excessive tension can make the fabric curl around the appliqué edges.
What is blanket stitch, and why is it useful for this project? Blanket stitch is a decorative edge stitch frequently used around appliqué shapes. It creates a line along the edge with regularly spaced stitches extending inward over the appliqué. On this project, the stitch serves two purposes: it secures the fabric pieces and creates a strong decorative outline. Because the “Home Sweet Home” Layered Fabric Bowls Pattern contains many overlapping shapes, using the same stitch style around the bowls, rims, bow, and labels helps visually connect all of the components.
Can beginners make this layered fabric design? A confident beginner can complete it by treating the project as a series of small steps rather than trying to assemble everything at once. The easiest approach is to make paper templates first, cut and sew each bowl separately, and arrange the full composition before attaching anything permanently. Beginners may also find fusible appliqué easier than traditional needle-turn appliqué. The most challenging areas are likely to be the curved edges, narrow bow tails, and maintaining even decorative stitches, so practice the chosen stitch on scrap fabric before working on the final pieces.
Can the colors and prints be changed? Absolutely. Color customization is one of the greatest advantages of a patchwork appliqué pattern. For a farmhouse look, consider cream, sage green, dusty blue, and muted red. A spring version could use pale pink, yellow, mint, and floral prints. Christmas fabrics could transform the same shapes into seasonal décor, while neutral linen-inspired colors could create a more understated interpretation. Whatever palette you choose, repeat at least two or three colors throughout the composition. Repetition prevents a large assortment of prints from appearing visually random.
How can I turn the finished appliqué into a wall hanging? Begin with a backing panel several centimeters larger than the complete stacked-bowl design. A piece around 40 cm wide by 55 cm high provides useful working space for the suggested dimensions, although you should measure your completed appliqué before cutting the final backing. After attaching the entire design, layer the backing with batting and a rear fabric. Quilt around the main shapes or add simple background quilting. Finish the outer edge with binding and add a hanging sleeve to the back. This turns the decorative appliqué into a finished textile piece suitable for display.
Conclusion
Finishing Your “Home Sweet Home” Layered Fabric Bowls Pattern
Creating the “Home Sweet Home” Layered Fabric Bowls Pattern is largely about building complexity one simple layer at a time. What initially looks like an intricate composition can be divided into three rounded bowl bodies, three contrasting rims, several patchwork panels, one decorative bow, and three small labels. Preparing these components separately makes the project much easier to control and gives you time to adjust the colors and proportions before the permanent assembly begins.
The first major skill covered in this tutorial is fabric selection and patchwork construction. Floral prints create focal points, while gingham, dots, and quieter textures help establish contrast. Sewing smaller pieces into larger patchwork units before cutting the final shapes is an efficient way to keep the bowl silhouettes clean. Careful pressing at every stage also helps the seams remain flat beneath appliqué and decorative stitching.
The second essential technique is layered appliqué. By overlapping the bowl bodies and their wide rims, a flat collection of fabric pieces develops a convincing sense of depth. The same principle applies to the bow: the loops sit behind the center knot, the tails extend underneath, and the bowl rim overlaps selected areas. Planning which component sits above or below another before sewing prevents unnecessary unpicking later.
Decorative blanket stitching provides the final visual connection between all those layers. Whether completed by hand or machine, consistent edge stitching defines the shapes, reinforces the appliqué, and contributes to the cozy handmade personality of the design. Coordinating thread can create a subtle finish, while darker contrasting thread makes every curve and patchwork section more noticeable. Test both options on scraps before committing to the final project.
The “Home Sweet Home” message is what transforms the design from a colorful stack of fabric bowls into a welcoming piece of handmade home décor. The individual Home, Sweet, Home appliqué labels create a clear focal path from top to bottom, while the oversized floral bow adds personality at the top. Once you understand the basic construction, you can personalize the lettering, fabrics, dimensions, and embellishments while preserving the recognizable layered composition.
DISCOVER MORE FREE PATTERNS HERE!
Most importantly, enjoy the process rather than worrying about making every handmade stitch perfectly identical. Small variations can become part of the character of a fabric appliqué project. If you make your own “Home Sweet Home” Layered Fabric Bowls Pattern, leave your sincere opinion about the design and share your suggestions for future fabric and patchwork projects. Your ideas about color combinations, appliqué techniques, and creative variations can inspire even more ways to transform simple pieces of fabric into something special for the home.