
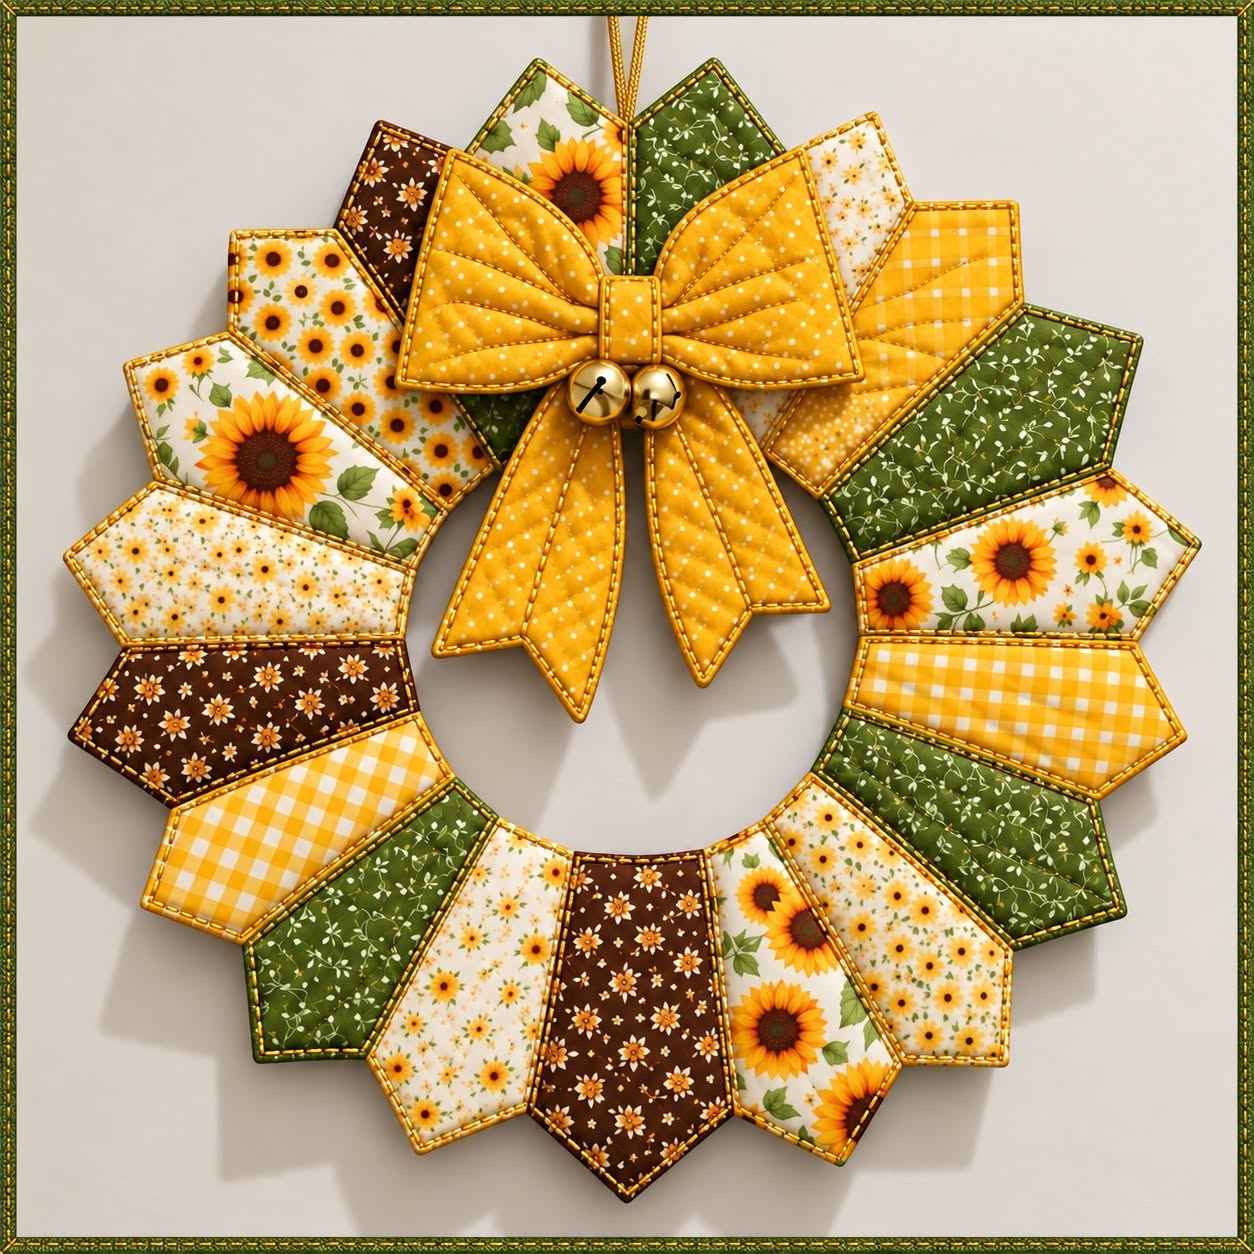
The Patchwork Fabric Wreath with Sunflowers Pattern is a cheerful sewing project that combines the warmth of handmade patchwork with the rustic beauty of sunflower-inspired fabrics. The design shown in the reference image uses a harmonious mixture of yellow, green, cream, brown, floral, gingham, and tiny botanical prints arranged around a circular wreath. Each fabric section has a softly padded appearance, giving the finished decoration extra dimension without making it look heavy. A large quilted yellow bow at the top becomes the focal point, while two small decorative bells add a charming finishing touch. Because the individual sections repeat around the circle, this project is also an excellent opportunity to practice accurate cutting, consistent seam allowances, pressing, and basic quilting techniques. The finished wreath can be displayed on a wall, interior door, sewing-room cabinet, or seasonal decorative corner.
One of the most appealing features of the Patchwork Fabric Wreath with Sunflowers Pattern is the way simple fabric pieces create a sophisticated decorative object. You do not need extremely complicated quilt blocks to achieve the look, because the visual impact comes mainly from the careful placement of complementary prints. Sunflower fabrics introduce the main theme, while yellow gingham, small daisies, green leaves, and brown floral prints provide contrast and prevent the design from becoming repetitive. The circular arrangement naturally guides the eye around the project, making every fabric section part of the overall composition. Slight padding and visible quilting stitches help emphasize the handmade texture that is so characteristic of traditional fabric crafts. With patient preparation, even someone developing their sewing skills can adapt this project into a beautiful fabric wreath pattern for home decoration.
Another advantage of this design is its flexibility. Although the photograph uses sunflower-inspired colors, the same construction method can be adapted for spring flowers, autumn foliage, Christmas prints, farmhouse fabrics, or even scraps left from previous quilting projects. The key is to maintain a balanced combination of light, medium, and darker fabrics so the different pieces remain clearly visible when assembled. For the sunflower version, golden yellow acts as the dominant color, green introduces a natural accent, white or cream provides breathing space, and brown adds depth. The patchwork wreath therefore becomes more than a seasonal ornament; it is also a useful lesson in fabric coordination and color balance. Choosing the materials thoughtfully before cutting will make the sewing process much easier and give the final wreath a polished, intentional appearance. The following instructions explain how to recreate the general style of the photographed project from beginning to end.
Materials and Preparation for the Patchwork Fabric Wreath
Begin by gathering the main materials required for your Patchwork Fabric Wreath with Sunflowers Pattern. You will need several coordinating cotton fabrics, lightweight batting or fusible fleece, backing fabric, sewing thread, scissors or a rotary cutter, a cutting mat, ruler, pins or clips, an iron, and a sewing machine. Select approximately six to eight different prints so the circle has enough variation without appearing chaotic. Sunflower prints should be included in several sections because they visually establish the theme. Add yellow gingham, tiny yellow flowers, green foliage prints, cream florals, and one darker brown fabric for contrast. A solid or subtly printed golden yellow fabric works particularly well for the decorative bow.
DISCOVER MORE FREE PATTERNS HERE!
For a medium wreath, plan for an outer finished diameter of approximately 40 to 45 cm. The individual patchwork units can be roughly 10 to 13 cm long, depending on the fullness and scale you want. Each piece should have a narrower inner end and a slightly wider outer end, creating a tapered shape that fits naturally around a circle. Before cutting your good fabric, make one paper template and arrange several copies around a drawn circle. This simple test helps you determine how many sections will be required for your preferred wreath size. Adding approximately 1 cm of seam allowance around the template provides enough room for comfortable machine sewing.
The term seam allowance refers to the small amount of fabric between the stitching line and the raw edge of the material. Maintaining a consistent seam allowance is important because uneven stitching can change the final dimensions of each unit. For this project, consistency matters more than using a very specific measurement. If every section is prepared with the same allowance, the wreath will look balanced once all the pieces are positioned around the center opening. Mark the template carefully and cut the fabric pieces accurately. When using directional sunflower prints, pay attention to the orientation of the flowers so they do not appear upside down after assembly.
Next, cut matching pieces of batting or fusible fleece for each patchwork section. The batting provides the softly quilted effect visible in the inspiration image and gives the pieces enough body to maintain their shape. If you use fusible fleece, follow its normal pressing requirements and avoid stretching the fabric while applying it. Lightweight materials are usually better than thick upholstery padding because excessive bulk can make the inner circle difficult to assemble. You may trim the batting slightly smaller than the fabric shape to reduce thickness inside the seam allowances. Prepare all the units before sewing so the construction process remains organized.
Create a color arrangement on your worktable before permanently joining anything. Alternate busy sunflower prints with calmer gingham, green, cream, or brown designs. Avoid placing two nearly identical fabrics directly beside each other unless you intentionally want a repeated section. In the reference style, darker brown and green patches serve as visual anchors between brighter yellow and white pieces. This approach helps create a balanced sunflower patchwork decoration rather than a circle dominated by one color. Take a quick photo of the arrangement if necessary so you can remember the sequence while sewing.
Finally, prepare the yellow fabric for the bow but keep it separate until the wreath body is finished. Cut enough fabric for two generous bow loops, two hanging tails, and a small center band. Adding batting to the bow pieces will help reproduce the plush quilted appearance of the original design. Small decorative bells can be attached at the center later, although they are optional. If the wreath will hang from a ribbon, prepare a narrow fabric or ribbon loop as well. Having every component ready at the beginning makes the later assembly much smoother.
Sewing and Quilting the Individual Fabric Sections
Start constructing the main units by placing each printed fabric piece with its corresponding backing piece, right sides together. Position the batting against the wrong side of one fabric layer if you are not using fusible material. Stitch around the outer edges while leaving a small opening for turning. Clip or carefully trim excess fabric at corners and along areas where bulk may accumulate. Turn the section right side out through the opening, gently shaping each edge with a blunt turning tool. Press the piece carefully so the seam lies flat and the tapered form remains symmetrical.
After turning, close the opening with a narrow machine stitch or hand stitching. Each section should now resemble a small padded fabric panel. Repeat the same process for every piece, checking that they remain reasonably consistent in size. Small variations are normal in handmade projects, but large differences can disrupt the circular arrangement. Pressing after every stage greatly improves the result because it prevents puckering and makes the final quilting easier. Avoid using an extremely hot iron directly over synthetic batting.
The next step is quilting, which means sewing through the fabric and batting layers to hold them together while adding texture. The photograph shows a delicate quilted appearance rather than dense stitching, so simple lines are sufficient. You can sew parallel lines, diagonal lines, gentle curves, or understated decorative stitches. Keep the spacing consistent from one section to another so the whole wreath shares the same visual language. Quilting thread that blends with the fabric produces a subtle finish, while contrasting thread creates a more decorative effect.
Quilt each unit individually before assembling the full circle. Working with small pieces is easier than trying to quilt the complete wreath after everything has been joined. Begin near the center of each piece and work outward whenever possible, which reduces the chance of creating wrinkles. If you choose diagonal quilting, mark guidelines with a removable fabric marker before stitching. For floral prints, you can also quilt around selected sunflower shapes to emphasize the design. The objective is to give the fabric gentle definition without overpowering its printed pattern.
Once all the quilted pieces are finished, trim loose threads and place them back into the planned circular arrangement. Inspect the transition between colors from several angles. Move a few sections if one side appears much darker or brighter than the other. This small design step makes a surprisingly large difference in a patchwork fabric wreath, particularly when many prints are involved. The best arrangement usually contains a natural rhythm rather than a perfectly predictable repetition.
At this stage, you can also decide whether you want visible topstitching around the edges. Topstitching is a line of stitching sewn close to the finished edge of a fabric piece, mainly for reinforcement and decoration. A narrow topstitched border can make every unit appear more defined and professional. Use a slightly longer stitch length and guide the fabric slowly around the corners. If the pieces already feel structured enough, however, you may leave the edges plain and allow the quilting itself to provide the decorative detail.
Assembling the Circular Wreath and Creating the Bow
Arrange the finished sections around a flat circular guide before connecting them. The narrow ends should point toward the center, while the wider ends create the outside edge of the wreath. Slight overlapping between neighboring pieces helps produce the layered look visible in the image. Adjust the spacing until the central opening appears round and the outside silhouette feels balanced. Do not attach the pieces permanently until you are satisfied with the complete arrangement. Measuring from the center to several outer points can help confirm that the wreath is reasonably symmetrical.
There are several practical ways to secure the sections together. For a decorative fabric wreath, overlapping adjacent units and sewing them together at hidden contact points is an accessible method. Begin with pairs, stitching carefully where one piece overlaps the next, and gradually continue around the circle. Reinforce the inner portion because that area experiences the greatest tension once the wreath is hanging. Depending on your materials, small hand stitches may be useful in locations that are difficult to reach by machine. Keep checking the circular shape throughout assembly.
A separate stabilizing ring can be added behind the patchwork if you want a firmer wreath. This ring can be made from sturdy fabric-covered interfacing or another lightweight craft-safe support suitable for decorative sewing. It should remain hidden behind the patchwork pieces and should not extend beyond the outer edges. Attach the finished sections securely to the support using stitching at multiple points. The wreath should feel stable when lifted but should still retain the soft textile appearance that distinguishes it from rigid decorations.
Now make the large yellow quilted bow. Sew two padded loop pieces, turn them right side out, press them, and add several lines of quilting. Fold or gather each loop toward the center and secure it with strong stitches. Prepare two long tails in the same way, shaping the lower ends into gentle points or angled tips. Position the tails behind the loops so they extend downward over the top-center portion of the wreath. The bow should be large enough to create a focal point without covering too many sunflower fabric sections.
Wrap a small matching strip around the middle of the bow to conceal the gathering stitches. In the reference design, two small bells create an attractive accent beneath the center of the bow. If you include bells, sew them firmly in place with strong thread rather than relying only on adhesive. Decorative buttons, fabric-covered buttons, or a small handmade flower can also be used as alternatives. Make sure any small embellishments are secure, particularly if the finished wreath will be handled frequently. Position the bow at the top of the wreath and sew it firmly to several underlying fabric units.
Finish this stage by adding a hanging loop behind the top section. A fabric loop made from one of the coordinating green, yellow, or brown prints blends nicely with the project, while a ribbon can provide a simpler alternative. Stitch the loop to reinforced areas rather than attaching it to only one lightweight fabric layer. Hold the wreath upright to check how it hangs before completing the final stitches. If one side drops lower, adjust the loop position slightly until the wreath appears centered. This final balance check prevents a beautifully sewn wreath from hanging at an unintended angle.
Finishing Details, Styling Ideas, and Long-Term Care
After the entire Patchwork Fabric Wreath with Sunflowers Pattern is assembled, inspect every seam and attachment point. Trim any remaining threads and gently reshape the padded sections with your fingers. The petals or tapered patchwork pieces should appear full but not distorted. If the bow has become flattened during construction, lightly arrange the loops and tails to restore their volume. A final gentle press may be useful on some areas, but avoid compressing the batting too heavily. The dimensional quality is an important part of the finished appearance.
The sunflower color palette works especially well for late summer and early autumn, but it is versatile enough for year-round farmhouse-inspired decoration. Yellow introduces warmth and optimism, while green provides a fresh natural contrast. Brown gives the composition depth, and white or cream prevents the stronger colors from becoming overwhelming. This is why the sunflower fabric pattern feels coordinated even though many different prints are used. Understanding this simple color relationship also makes it easier to create personalized versions using fabrics already available in your sewing collection.
If you prefer a cleaner contemporary appearance, limit the design to four or five fabrics and repeat them consistently around the circle. For a traditional scrap-quilt style, use many different prints while maintaining the same general yellow, green, cream, and brown palette. Small-scale prints are particularly effective because their motifs remain visible on the relatively narrow patchwork sections. Large sunflower prints can still work, but plan the cutting carefully so important flower motifs are not accidentally removed. This technique is sometimes called fussy cutting, where a specific printed element is intentionally positioned inside a fabric piece.
The same pattern concept can also be resized. A smaller wreath can decorate a cabinet door or craft-room wall, while a larger version can become a statement piece. When resizing, adjust all components proportionally, including the width of the sections, the inner opening, and the size of the bow. Increasing only one dimension may make the wreath look unbalanced. Creating a paper mockup before cutting fabric is one of the safest ways to experiment with a new size. It costs almost nothing and can prevent unnecessary fabric waste.
Because this is primarily a fabric decoration, gentle care will help preserve its shape. Remove surface dust with a soft brush, lint roller used carefully, or light hand dusting. Avoid soaking a heavily padded wreath unless you know that every fabric, batting, stabilizer, and embellishment is washable. If storage is necessary, place the wreath flat or in a roomy container so the bow and padded units are not crushed. Keeping it away from excessive moisture and prolonged direct sunlight can also help preserve the fabric prints. Thoughtful storage allows a handmade patchwork sunflower wreath to be enjoyed for many seasons.
Most importantly, allow the handmade qualities of the project to remain visible. Patchwork does not need to look factory-produced to be attractive. Slight differences in quilting lines or fabric placement contribute to the personality of a handmade wreath. The goal is careful craftsmanship, secure construction, and a balanced overall design rather than absolute mechanical perfection. By combining accurate preparation with creative fabric choices, the Patchwork Fabric Wreath with Sunflowers Pattern can become a distinctive decorative project that reflects your personal sewing style.
FAQ – Frequently Asked Questions
What type of fabric is best for a Patchwork Fabric Wreath with Sunflowers Pattern?
Quilting cotton is one of the easiest options because it cuts accurately, presses well, and is available in many coordinated prints. Sunflower fabric, yellow gingham, small floral cotton, green botanical prints, and brown accent fabrics work particularly well together. Fabrics of similar weight are usually easier to sew because the finished sections maintain a consistent thickness.
How many different fabrics should I use for the wreath?
Approximately six to eight coordinating prints create plenty of visual variety for a medium wreath. You can use fewer fabrics for a modern appearance or more scraps for a traditional patchwork look. The most important consideration is maintaining color balance around the circle rather than using a specific number of prints.
Do I need batting for this patchwork wreath?
Batting is strongly recommended if you want the softly padded effect shown in the reference design. Lightweight batting or fusible fleece adds structure and allows the quilting stitches to become more visible. A wreath made without batting can still work, but it will generally appear flatter.
What size should the finished wreath be?
A diameter of approximately 40 to 45 cm works well for a medium decorative wreath, but the pattern can be scaled up or down. Make a paper template first and arrange multiple copies in a circle before cutting your fabric. This helps you confirm both the outer diameter and the size of the center opening.
Can beginners make this sunflower patchwork project?
Yes. The project uses fundamental sewing skills such as accurate cutting, stitching, turning, pressing, basic quilting, and simple assembly. Beginners may find it helpful to complete one sample patchwork section before cutting the entire set. This allows adjustments to the template or seam allowance before more fabric is used.
How do I keep the wreath perfectly round?
Work over a paper circle or measured guide while arranging the units. Measure from the center to several points around the outside edge and adjust the overlap as necessary. A lightweight stabilizing ring attached behind the fabric sections can also help the wreath maintain its shape.
Can I make the bow without batting?
Yes, but adding lightweight batting gives the bow greater volume and makes the quilted stitches more noticeable. Without batting, consider using interfacing so the loops and tails do not collapse. The amount of structure should match the weight of your chosen fabric.
Can I use fabric scraps for the Patchwork Fabric Wreath with Sunflowers Pattern?
Absolutely. This design is particularly suitable for fabric scraps because each individual section requires only a relatively small piece. Keeping your scraps within a coordinated palette of yellow, green, cream, white, and brown will help the finished wreath look intentional rather than randomly assembled.
How should the fabrics be arranged around the wreath?
Alternate stronger prints with quieter fabrics and distribute the darkest pieces around the circle rather than clustering them together. Place sunflower motifs in several different areas so the main theme appears throughout the design. Step away from the arrangement occasionally to judge the overall balance before sewing.
What can I use instead of decorative bells?
Fabric-covered buttons, wooden-style decorative buttons, a small fabric flower, a sunflower appliqué, or an additional folded fabric accent can replace the bells. The embellishment should complement the wreath without competing with the large bow.
How can I customize this pattern for another season?
Keep the same basic construction and simply change the fabrics and embellishments. Spring versions could feature pastel florals, autumn versions could use leaves and warm earth tones, and winter versions could feature seasonal botanical prints. The tapered patchwork-unit construction makes the design highly adaptable.
Is this wreath intended for indoor or outdoor use?
Standard quilting cotton, batting, and decorative stitching are best suited to indoor or well-protected locations. Regular fabric can fade or become damaged when exposed to rain, strong moisture, or prolonged sunlight. For longevity, display the wreath indoors or in a sheltered decorative area.
Conclusion
The Patchwork Fabric Wreath with Sunflowers Pattern brings together several enjoyable sewing techniques in one decorative project. Throughout this tutorial, we explored how to select coordinated sunflower fabrics, prepare tapered patchwork templates, add batting, sew and turn the individual units, create quilting texture, arrange colors around a circular shape, assemble the wreath, and finish it with a padded yellow bow and decorative details. These steps can be adapted to different wreath sizes and fabric themes, making the project useful well beyond a single season.
The most important elements are careful cutting, consistent seam allowances, balanced fabric placement, secure assembly, and patient finishing. Combining golden yellow, natural green, cream, floral white, and contrasting brown creates the welcoming sunflower character seen in the inspiration piece. The quilting adds depth, while the oversized bow turns the top of the wreath into a strong focal point.
EASILY FIND THE FREE PDF FOR THIS PATTERN HERE!
Whether you create the design for your own home, as a handmade gift, or simply as a relaxing patchwork project, the finished wreath offers many opportunities for personalization. Change the prints, adjust the dimensions, experiment with quilting patterns, or replace the bells with your own decorative detail. Handmade projects become more meaningful when they include individual creative choices. If you make your own Patchwork Fabric Wreath with Sunflowers Pattern, leave your sincere opinion about the project and share your suggestions. Which colors, fabrics, quilting details, or embellishments would you use to give this sunflower wreath your own unique style?