
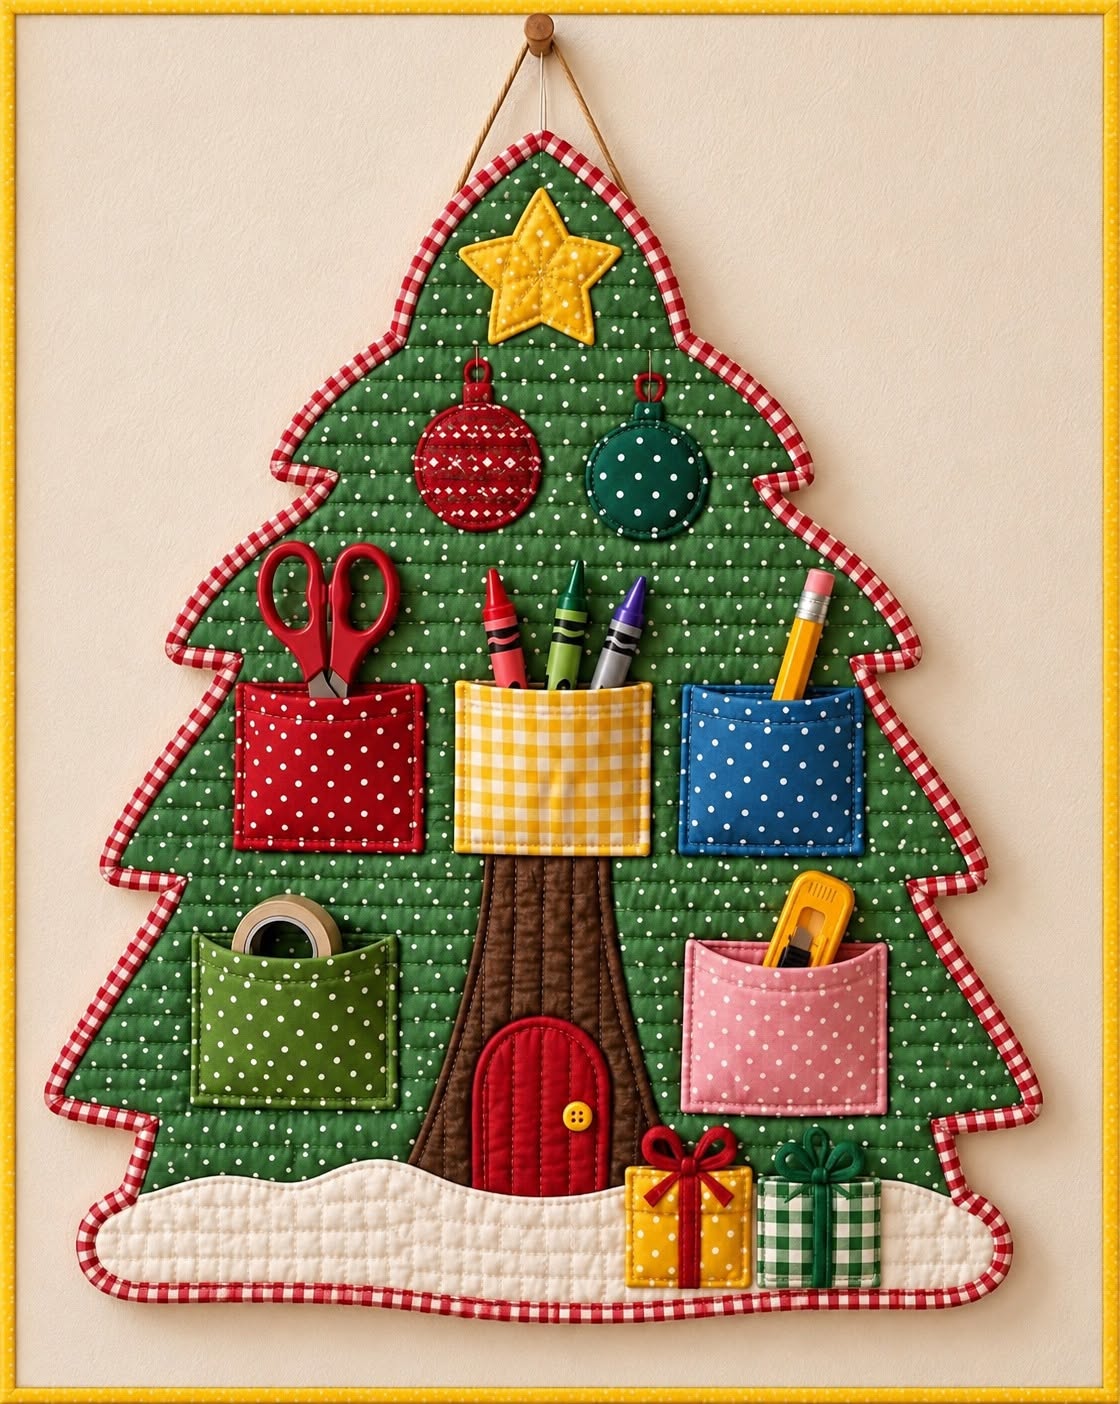
The Christmas Tree Shaped Wall Organizer Pattern is a charming sewing project that combines holiday decoration with practical storage in one handmade piece. Inspired by the Christmas tree organizer shown in the image, this project uses quilted green fabric, colorful pockets, appliqué details, and a festive checked binding to create a wall hanging that is both decorative and useful. Instead of making a traditional flat Christmas ornament, you can create a dimensional textile organizer capable of holding scissors, pencils, crayons, measuring tools, sewing accessories, or other lightweight craft supplies. The recognizable tree silhouette immediately gives the project a seasonal personality, while the pockets add a functional element that makes the organizer useful throughout the holiday crafting season.
One of the most attractive features of the Christmas Tree Shaped Wall Organizer Pattern is the opportunity to combine different fabrics without requiring complicated sewing techniques. Green fabric forms the main tree, brown fabric creates the trunk, white or cream fabric represents snow, and small pieces of red, yellow, blue, pink, and coordinating prints become practical storage pockets. Details such as the golden star, miniature ornaments, tiny gift appliqués, and red gingham binding give the organizer a warm handmade appearance. Because most pieces can be created from relatively small fabric cuts, this is also an excellent project for using fabric scraps, leftover quilting cotton, batting pieces, and coordinating remnants from previous holiday sewing projects.
The finished organizer can be adapted to many environments. It could become a Christmas craft organizer in a sewing room, a colorful pencil holder in a creative workspace, or a decorative wall pocket system for lightweight holiday supplies. The construction is also easy to personalize because the exact dimensions of the tree and pockets can be changed depending on the available wall space. The key to achieving a balanced result is planning the tree shape first, positioning all decorative elements before attaching the pockets, and quilting the main body before finishing the outer edges. By following these steps carefully, the Christmas Tree Shaped Wall Organizer Pattern can become a polished project that looks detailed while remaining approachable for confident beginners and experienced sewists alike.
Materials and Planning for the Christmas Tree Organizer
Start by selecting fabrics that create a clear Christmas color palette. For the main body, choose medium-weight green quilting cotton with a subtle print such as dots, small stars, or tiny seasonal motifs. You will also need fabric for the backing, lightweight or medium batting, brown fabric for the tree trunk, cream fabric for the snow section, and several contrasting cotton prints for the pockets. Red gingham or another small checked fabric works especially well for the outer binding because it creates a strong visual outline around the green tree.
DISCOVER MORE FREE PATTERNS HERE!
Prepare additional scraps for the decorative appliqués. A yellow or golden fabric can be used for the star, while red and dark green scraps can create the hanging Christmas ornaments. Small yellow, green, and red pieces are ideal for the gift boxes positioned near the bottom of the organizer. If you enjoy adding extra texture, use contrasting quilting thread, embroidery thread, decorative machine stitching, or hand stitching around selected appliqué pieces. These small details can make even simple cotton fabrics look more dimensional.
Before cutting the fabric, decide how large you want the finished organizer to be. A practical starting size is approximately 65 to 75 cm tall and 50 to 60 cm wide at the broadest part of the tree. Draw half of a Christmas tree silhouette on folded pattern paper so both sides will remain symmetrical. Include several stepped branches, a narrow top point, and a wider curved bottom section. When the paper is unfolded, you will have a complete template for the main body of the Christmas Tree Shaped Wall Organizer Pattern.
Use the paper template to cut one green front piece and one backing piece. Cut batting slightly larger than the tree shape so you have room to quilt and trim everything accurately afterward. The batting is important because it provides structure and creates the softly padded appearance visible in a quilted wall organizer. For additional firmness, particularly if you plan to place sewing tools in the pockets, you can add a layer of lightweight fusible interfacing to the wrong side of the green front fabric.
Plan the pocket arrangement before sewing anything permanently. The organizer in the reference design uses several pockets distributed over the center and lower parts of the tree. A balanced arrangement could include three pockets across the upper-middle section and two pockets below them. Varying the fabric colors helps distinguish each storage area. For example, red, yellow, and blue pockets can form the first row, while green and pink pockets create a second row. This arrangement makes the wall organizer pattern more functional while maintaining a cheerful patchwork look.
Finally, gather your basic sewing supplies. You will need a sewing machine, fabric scissors or rotary cutter, cutting mat, ruler, pins or sewing clips, iron, ironing surface, fabric marker, and coordinating thread. A walking foot is helpful when quilting multiple layers but is not absolutely required. Prepare everything before beginning the construction because careful organization at this stage will make the remaining steps much smoother and help keep every part of the project aligned.
Cutting, Quilting, and Creating the Decorative Tree Base
Begin construction by placing the backing fabric wrong side up, followed by the batting and the green tree fabric right side up. Smooth the layers carefully to remove wrinkles, then secure them with quilting pins, safety pins, or temporary basting spray. Quilt across the green surface using straight horizontal lines approximately 2 to 3 cm apart. You may also create a grid, diagonal quilting pattern, or free-motion texture if you prefer. The goal is to stabilize the layers and create the softly padded surface characteristic of a quilted Christmas wall hanging.
Once the quilting is complete, place the original paper tree template over the quilted sandwich and carefully trim the layers to the final shape. Take your time around the stepped branches because these corners will later need to be covered neatly with binding. If necessary, mark the final outline with an erasable fabric marker before cutting. Accurate trimming makes a significant difference when you begin applying the outer binding to the Christmas Tree Shaped Wall Organizer Pattern.
Next, make the brown tree trunk. Cut a long tapered shape from brown fabric and add lightweight batting or interfacing underneath it. Quilt several vertical lines to imitate the texture of tree bark. Position the trunk in the lower center of the green tree and stitch around its edges. The upper portion will eventually disappear slightly behind the central pockets, while the lower portion should remain visible. Adding subtle quilting to the trunk helps visually separate it from the green background.
Create the small red door positioned toward the bottom of the trunk. Cut an arched shape from red fabric and stabilize it with interfacing. Fold or finish the raw edge, then topstitch the piece onto the trunk. Decorative vertical quilting lines can be added to suggest wooden door panels. A tiny button or embroidered circle can represent the doorknob. This whimsical detail turns the organizer into something more imaginative than a simple storage piece and gives the lower tree area a storybook appearance.
For the snowy base, cut an irregular strip of cream or white fabric with a softly curved upper edge. Add batting beneath it if you want extra dimension, then quilt the surface using wavy lines or gentle horizontal stitching. Position the snow across the lower edge of the tree so that it partially overlaps the trunk. Stitch around the upper curved edge while leaving the outside perimeter unfinished because that edge will later be enclosed within the binding.
Now prepare the star for the top of the tree. Cut a star from golden yellow fabric and a slightly smaller piece of fusible web or interfacing. Fuse or stabilize the star, position it near the upper center, and sew around the edges with a narrow straight stitch, zigzag stitch, or blanket stitch. Add an inner row of stitching to emphasize the star shape. This bright focal point immediately identifies the design as a Christmas tree sewing project and creates a strong visual anchor above the storage pockets.
Sewing the Pockets, Appliqués, Binding, and Hanging Loop
Each storage pocket should be reinforced so that it remains open and stable when holding lightweight objects. Cut the pocket rectangles slightly larger than the desired finished size. A useful pocket might measure approximately 14 cm wide by 12 cm tall before seam allowances are folded. Apply lightweight interfacing to the wrong side, fold the top edge twice, press it carefully, and topstitch. Fold and press the remaining raw edges toward the back so the pocket is ready for placement.
Arrange the pockets across the quilted tree before sewing. Place three across the middle area and two below them, keeping enough space between each pocket so the design does not feel crowded. Make sure the pockets remain within the green tree silhouette and do not overlap the future binding area. Pin them securely, then stitch around both sides and the bottom edge while leaving the upper edge open. Backstitch at the upper corners because these points receive the most stress during use.
To make the Christmas Tree Shaped Wall Organizer Pattern visually interesting, use several coordinating fabrics rather than making every pocket identical. Red fabric with white dots can echo traditional Christmas colors, yellow checks can brighten the center, blue fabric adds contrast, and green or pink prints create variety in the lower pockets. While the palette can be changed completely, repeating small patterns such as dots and checks gives the finished organizer a cohesive patchwork style.
Add the Christmas ornaments after confirming that they will not interfere with pocket openings. Cut two circular ornament shapes and add small fabric loops or appliqué caps at their tops. One ornament can be red with a decorative print, while the second can be dark green with white dots. Position them beneath the star and stitch around their edges. You can add a small line of embroidery or narrow fabric between the ornament and its hanging point to imitate a cord.
Near the snowy base, create two miniature wrapped gifts from small fabric rectangles. Add contrasting strips to represent ribbon and finish each package with a tiny fabric or ribbon bow. Stitch them securely to the organizer so no loose pieces can be pulled away easily. These gift appliqués are primarily decorative, but they help balance the visual weight of the pockets above and add another recognizable Christmas element to the holiday wall organizer.
Finish the entire tree by applying bias binding around the outside edge. Red-and-white gingham works beautifully because it frames the green fabric and coordinates with the red pockets and ornaments. Because the tree shape includes multiple inside and outside corners, use bias-cut binding rather than straight-grain strips whenever possible. Bias binding bends more easily around curves and angular areas. After the binding is complete, make a sturdy fabric or cord hanging loop at the top and attach it securely to the back of the organizer.
Christmas Tree Shaped Wall Organizer Pattern FAQ
What is a Christmas Tree Shaped Wall Organizer Pattern? A Christmas Tree Shaped Wall Organizer Pattern is a sewing template and construction concept used to create a wall hanging shaped like a Christmas tree with functional fabric pockets. Unlike an ordinary decorative quilt, this project combines quilting, appliqué, binding, and storage. The pockets can hold lightweight craft supplies, pencils, measuring tools, scissors, ribbons, or other small objects. The tree silhouette and seasonal embellishments transform practical storage into festive home décor.
What fabric is best for this wall organizer? Quilting cotton is one of the easiest fabrics to use because it is stable, available in many prints, and simple to sew. Medium-weight cotton works particularly well for the main tree and pockets. Batting adds structure, while interfacing helps reinforce pockets and decorative pieces. Very stretchy or delicate fabrics are generally more difficult to control, particularly around the binding and pocket edges, so woven cotton is a practical choice for most versions of this project.
Can beginners make this Christmas organizer? Yes. A beginner who is comfortable with basic straight stitching can complete a simplified version. The most challenging part is usually binding the irregular tree-shaped edge because there are several curves and corners. Beginners can practice slowly, use plenty of clips, and work on one section at a time. The pockets themselves are simple rectangles, and most decorative elements can be attached with straightforward appliqué techniques. The project also provides useful practice in machine quilting, pocket construction, and bias binding.
How can I make the organizer stronger? Use quality batting and consider adding lightweight fusible interfacing behind the main tree fabric. The pockets can also be reinforced individually with interfacing. When attaching each pocket, backstitch several times at the top corners because those points experience the greatest strain. If you expect the organizer to carry slightly heavier tools, use a firm backing fabric and create a reinforced hanging loop. However, this design is best suited to lightweight craft accessories rather than heavy objects.
Can the pocket sizes be changed? Absolutely. One advantage of a handmade Christmas wall organizer pattern is that the storage layout can be customized. Larger pockets can accommodate yarn tools, notebooks, or crafting accessories, while smaller pockets are useful for pens, clips, markers, or measuring tools. Always arrange paper versions of the pockets on the tree template before cutting the fabric. This simple planning technique allows you to check spacing and proportions without wasting material.
How should a finished fabric wall organizer be cared for? Gentle care will help maintain its shape. If the fabrics are washable, spot cleaning is often the easiest option because the organizer contains batting, appliqués, pockets, binding, and decorative elements. If full washing is necessary, use a gentle method appropriate for the fabrics and allow the organizer to dry flat whenever possible. Press carefully with an iron afterward if needed, avoiding excessive heat on synthetic embellishments or decorative materials.
Conclusion
The Christmas Tree Shaped Wall Organizer Pattern brings together several enjoyable sewing techniques in a single festive project. Starting with a quilted green tree base, you can build the design layer by layer using a textured trunk, snowy lower section, colorful reinforced pockets, a golden star, hanging ornaments, miniature gifts, and a contrasting gingham binding. Careful planning is the most important part of the process because positioning the appliqués and pockets before permanent stitching helps produce a balanced and professional-looking result.
This project is also highly adaptable. You can change the size, pocket arrangement, fabric prints, quilting pattern, appliqué colors, and decorative details to create a completely personal version. Whether it becomes a sewing room organizer, a craft supply holder, or simply a handmade Christmas decoration, the combination of practical storage and traditional textile techniques gives the design lasting appeal. The Christmas Tree Shaped Wall Organizer Pattern is especially useful for anyone who enjoys Christmas sewing projects, fabric appliqué, quilting, patchwork, and creative organization.
EASILY FIND THE FREE PDF FOR THIS PATTERN HERE!
Most importantly, there is no need for every handmade organizer to look exactly the same. Small differences in fabrics, stitching, decorations, and pocket placement are part of what makes handcrafted projects special. Use the instructions as a foundation, then adapt the details to match your own sewing style and the materials you already have available. After making your own Christmas Tree Shaped Wall Organizer Pattern, leave your sincere opinion about the project. I would also love to hear your suggestions for different pocket arrangements, fabric combinations, appliqué ideas, or other creative details that could make this festive organizer even more beautiful and practical.