
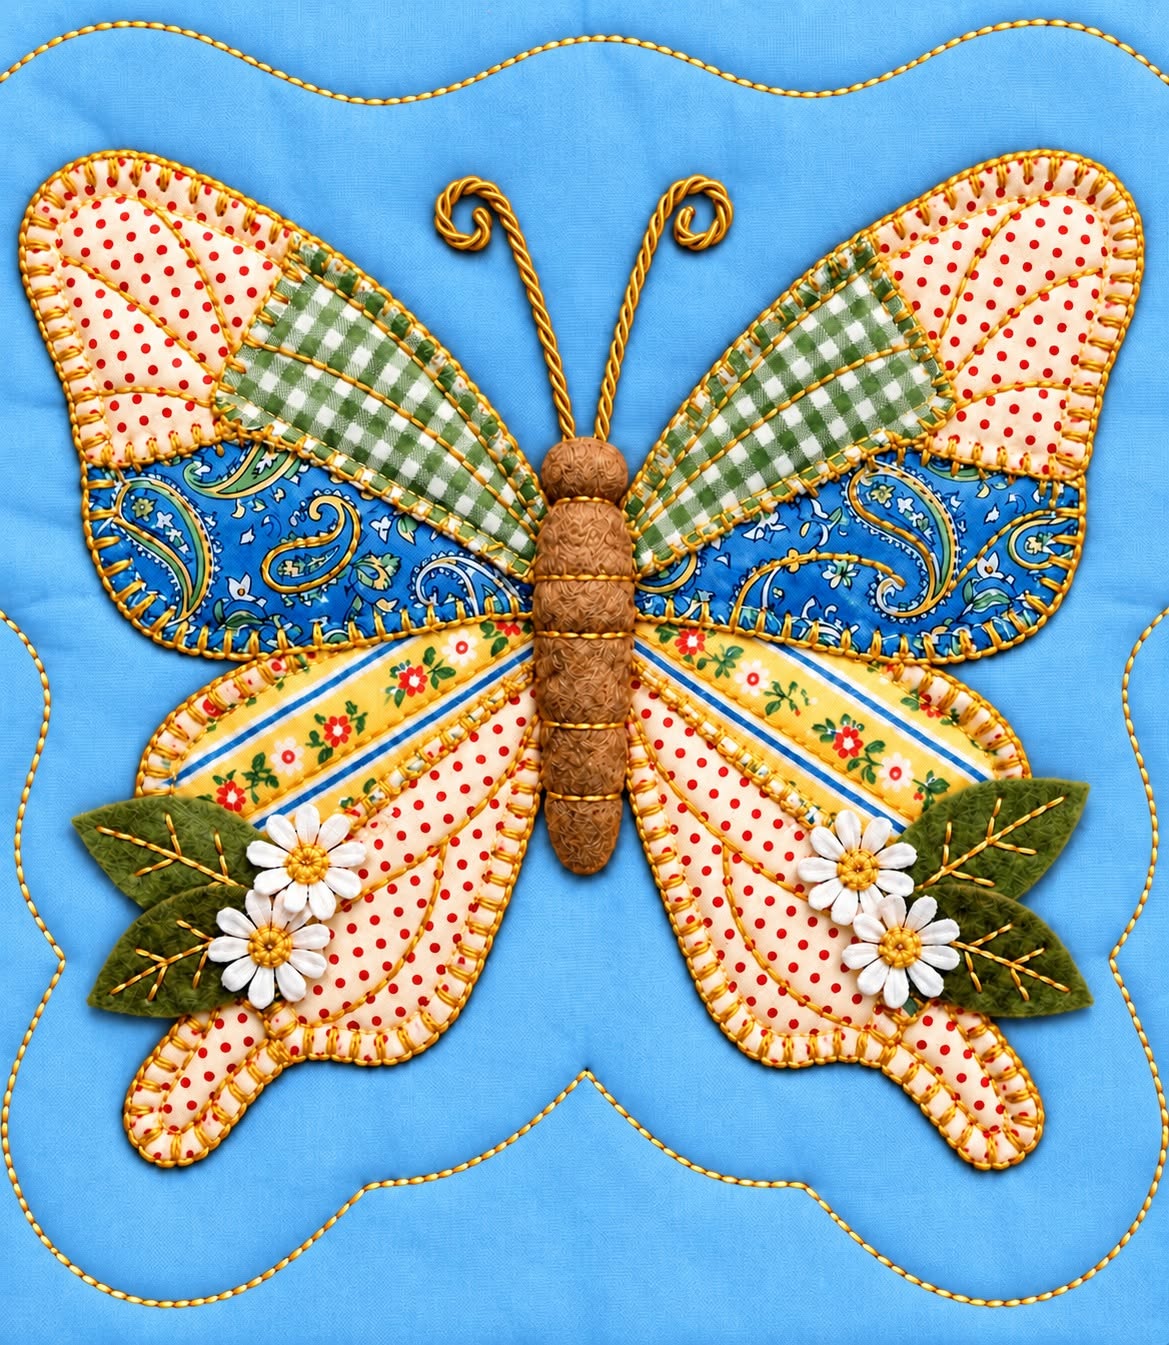
The Patchwork Butterfly Pattern is a charming sewing project that combines traditional patchwork, appliqué, decorative stitching, fabric texture, and dimensional embellishment in a single design. Inspired by the butterfly shown in the reference image, this project features symmetrical wings made from several coordinating fabrics, a soft dimensional body, delicate antennae, small fabric flowers, and felt leaves. The butterfly is placed on a light quilted background, which allows every print and texture to stand out beautifully. Although the finished piece looks detailed, the construction can be divided into manageable stages, making it suitable for confident beginners as well as experienced quilters who enjoy experimenting with scraps. One of the biggest advantages of this design is that no two butterflies need to look identical. By changing the fabrics, colors, flowers, or background quilting, you can create a completely personal version while keeping the recognizable structure of the original Patchwork Butterfly Pattern.
Another reason this Patchwork Butterfly Pattern is appealing is its excellent use of small fabric remnants. The wings can be assembled from polka dots, gingham, paisley prints, floral stripes, vintage-inspired cotton, or almost any lightweight quilting fabric that coordinates with the overall palette. In the photographed project, soft cream and red polka dots are paired with green checks, blue paisley, and warm yellow floral stripes, producing a cheerful country-inspired appearance. These different prints create visual movement without making the butterfly difficult to recognize because the arrangement remains balanced on both sides. The intentionally textured edges around several fabric sections also add handmade character. Instead of hiding every fabric edge beneath a traditional turned appliqué seam, the design celebrates texture, giving the butterfly a soft and slightly rustic appearance that works especially well on pillows, wall hangings, mini quilts, tote bags, table décor, or decorative quilt blocks.
Before starting your Patchwork Butterfly Pattern, it is helpful to think about the project as several separate components that eventually become one composition. First comes the background, followed by the upper wings, lower wings, body, antennae, leaves, and decorative flowers. Working in this order prevents bulky embellishments from interfering with the main sewing. Accuracy is important when creating the mirrored wings, but handmade variations should not be considered mistakes. Slight differences in fabric placement or decorative stitches can make the finished butterfly more interesting. The goal is to maintain an overall symmetrical silhouette while allowing the textures and prints to express the handmade nature of patchwork. Taking time to prepare templates, test the placement, and press each fabric section before stitching will make the final assembly much easier and help the completed butterfly lie neatly against the quilted background.
Materials, Fabric Selection, and Preparing the Butterfly Templates
Begin by selecting the fabrics for your Patchwork Butterfly Pattern. For a design similar to the reference project, choose four or five coordinating cotton prints. You might combine cream polka dots, green gingham, blue paisley, yellow floral fabric, and another small-scale print. Approximately 10 x 10 in (25 x 25 cm) of each fabric is usually more than enough for one decorative butterfly block, although the exact amount depends on the size you choose to make. Fabric scraps are especially useful because each wing section requires only a relatively small piece.
DISCOVER MORE FREE PATTERNS HERE!
For the background, choose a pale cotton or quilting fabric measuring approximately 16 x 16 in (41 x 41 cm) for a medium decorative block. The reference design uses a soft white background with subtle quilting, which keeps attention on the colorful butterfly. You may use an already quilted panel or create a quilt sandwich using background fabric, thin batting, and backing fabric. Light neutral shades such as white, ivory, cream, or pale beige work particularly well because they provide contrast without competing with the patterned wings.
You will also need material for the body. Felt, wool felt, fleece, chenille, or another soft fabric can produce the raised appearance seen in the project. A warm brown works beautifully because it contrasts with the colorful wings while suggesting the natural body of a butterfly. Small scraps of green felt can be used for the leaves. For the antennae, twisted cord, embroidery thread, narrow decorative braid, or yarn can be used. The antennae should be flexible enough to curve but substantial enough to remain visible against the background.
Additional supplies include coordinating sewing thread, embroidery thread if desired, fabric scissors, paper scissors, pins or fabric clips, a hand-sewing needle, sewing machine, iron, removable fabric marker, and paper for making templates. Small artificial fabric daisies may be used as decorative accents, but handmade fabric or embroidered flowers are equally appropriate. If the project is intended for frequent washing, securely stitched fabric embellishments are usually preferable to decorations attached only with adhesive.
To prepare the butterfly templates, draw one complete butterfly shape on paper first. Then divide each wing into sections according to the fabric changes you want. The upper wing can be separated into three broad areas, while the lower wing can be divided into two or three elongated sections. Creating only one side of the butterfly and flipping the templates for the opposite side is an easy way to maintain symmetry. Mark every template with its position, such as upper-left A, upper-left B, or lower-left C, before cutting.
Add approximately 1/4 in (6 mm) around pieces when you want extra fabric for trimming or controlled fraying. However, if you are creating a raw-edge appliqué, you can cut directly on the finished outline or leave only a very small allowance around each section. The original-inspired appearance benefits from slightly textured edges, so absolute precision is not necessary. What matters most is that corresponding right and left pieces have similar dimensions and that all sections together create the graceful outline associated with the Patchwork Butterfly Pattern.
Building and Stitching the Patchwork Butterfly Wings
Start with the upper wings because they establish the overall width of the butterfly. Arrange the largest outer pieces first, keeping them several inches apart so there is enough room for the body in the center. In a design inspired by the reference image, the upper outer section can use a cream fabric with small red dots. Position the mirrored pieces so they angle gently upward and outward. Step away from the work occasionally and look at the entire composition rather than concentrating on only one wing.
Place a contrasting fabric immediately toward the center of each upper wing. Green gingham is especially effective because its geometric pattern contrasts nicely with small polka dots. The lower portion of the upper wings can then be formed with a darker print, such as blue paisley. The contrast between cream, green, and blue helps define each patchwork section while allowing the pieces to visually merge into one wing. Repeat the same sequence on the opposite side to preserve the recognizable symmetry of the Patchwork Butterfly Pattern.
The lower wings should extend downward from the center of the butterfly at a softer angle. A striped floral fabric can form the upper portion of each lower wing, followed by a polka-dot fabric for the longer inner section. Narrow teardrop-shaped tips can finish the lower silhouette. Before stitching anything permanently, arrange all fabric sections on the background and check the balance. The distance from the center body to the outer edge of the left wing should be approximately equal to the same distance on the right.
Once you are happy with the arrangement, secure each section with pins, a temporary fabric adhesive suitable for sewing, or a lightweight fusible web if you prefer extra stability. Stitch close to the raw edges using a short straight stitch, small zigzag stitch, blanket stitch, or decorative machine stitch. For the slightly rustic look of the reference design, a visible edge with gentle fraying works particularly well. Quilting cotton naturally produces soft fibers along the edge after careful handling, creating extra texture around the wings.
To intentionally create this textured appearance, leave a narrow raw margin beyond the stitching line. After sewing, gently manipulate the edge with your fingers or carefully tease a few threads loose. Avoid pulling excessively because the fabric should remain securely attached. The goal is a soft decorative fringe rather than uncontrolled unraveling. A second line of stitching can be added approximately 1/8 in (3 mm) inside the first when additional durability is needed.
Continue working around every wing section until the upper and lower wings are completely secured. Press carefully from the back or use a pressing cloth if the appliqué includes dimensional materials. Do not flatten areas that you want to remain textured. At this stage, the butterfly should already have its complete patchwork silhouette, although the empty center will still be visible. This is a good moment to correct minor alignment issues because the body will later cover the central meeting points between the wing pieces.
Creating the Dimensional Body, Antennae, Leaves, and Flowers
The body is one of the most distinctive features of this Patchwork Butterfly Pattern because it creates a strong vertical focal point between the colorful wings. Cut a narrow elongated body shape from brown felt, fleece, wool, or textured fabric. For a butterfly block around 16 in (41 cm) square, a body approximately 5 to 6 in (13 to 15 cm) long can work well. Adjust the proportions according to your wing size rather than treating these measurements as strict requirements.
Create the head separately as a small round or oval shape. A slightly larger rounded section beneath the head can suggest the thorax, while the long tapered piece forms the abdomen. If you want more dimension, place a small amount of polyester stuffing underneath before stitching the body to the background. Use small hidden hand stitches around the edges so the center appears softly raised. Avoid overstuffing because a very bulky body can distort the surrounding patchwork wings.
The antennae should be added before the head is fully secured. Cut two equal lengths of twisted decorative cord or embroidery thread. Position them behind the upper portion of the body and curve each one outward. The reference-inspired style includes curled ends, which can be recreated by carefully coiling the final section of each antenna. Hand stitch the cords at several points so they maintain their shape without appearing rigid.
Next, prepare four green leaves, with two positioned near each lower wing. Wool felt is particularly convenient because it does not fray and can be shaped easily. Cut simple oval leaves with pointed ends, then embroider a central vein and two or three angled side veins. These small stitched details give otherwise flat felt pieces more character. Place the leaves so they seem to emerge from behind the lower wing rather than floating separately on the background.
Small white flowers provide a beautiful finishing contrast against the green leaves and multicolored patchwork. You can make simple daisies from fabric petals, use embroidered flowers, or create tiny dimensional flowers from folded fabric. Sew a yellow center into each flower before attaching it. Place two or three flowers near each lower wing, varying their angles slightly so the arrangement looks relaxed rather than overly mechanical.
Secure every embellishment with strong hand stitches, particularly if the finished project will become a cushion or another object that may be handled frequently. Decorative elements should not depend solely on craft glue for permanent attachment. Once the flowers, leaves, body, and antennae have been installed, examine the complete design. The embellishments should support the butterfly rather than overwhelm it. If an area feels crowded, removing one small decoration can sometimes improve the balance more effectively than adding another.
Quilting, Finishing the Background, and Creative Ways to Use the Pattern
A quilted background adds depth to the Patchwork Butterfly Pattern and helps transform the appliqué into a finished textile composition. If you did not quilt the background before applying the butterfly, you can add quilting around it now. Create a sandwich with backing fabric, batting, and the appliquéd top. Baste the layers together carefully, making sure the butterfly remains centered and smooth.
Simple quilting is usually best because the patchwork butterfly already contains many visual details. Large flowing curves, gentle waves, echo quilting, or widely spaced free-motion lines can provide texture without distracting from the appliqué. The reference design shows subtle curved quilting on the pale background, creating movement that complements the natural shape of the wings. Keep quilting stitches away from dimensional flowers and thick portions of the butterfly body.
For a decorative wall panel, trim the finished block square after quilting and add binding around the outside edge. A coordinating cream, green, blue, yellow, or red binding can connect the border visually with the butterfly fabrics. If you want a calmer appearance, use the same light fabric as the background. Carefully press the binding before stitching it down so the corners remain neat and the block hangs evenly.
The same Patchwork Butterfly Pattern can also become the centerpiece of a pillow cover. In that case, complete the butterfly appliqué and quilting before constructing the pillow. Leave enough background fabric around the butterfly so the design does not disappear into the seam allowances. For a larger cushion, the butterfly can remain centered. For a more contemporary look, position it slightly off-center while maintaining enough visual space around the wings.
Another possibility is to use the pattern on tote bags, sewing machine covers, table runners, fabric organizers, or larger quilts. When using the butterfly on an item that will receive frequent wear, choose tightly woven cotton fabrics and reinforce raw-edge stitching. You may also replace dimensional flowers with embroidered flowers to make the surface flatter. For a nursery wall hanging or decorative quilt, softer embellishments and additional dimensional details can create an especially cozy handmade appearance.
Most importantly, allow your own fabric collection to influence the final result. A Patchwork Butterfly Pattern does not need to follow one specific color palette. Spring versions could feature pastels and floral prints, while autumn butterflies might combine rust, mustard, olive, burgundy, and cream. Scrappy versions can use many different fabrics, and modern interpretations might rely on solids or geometric prints. The basic construction remains the same: balanced patchwork wings, a defined central body, decorative antennae, and thoughtful finishing details that bring all the elements together.
FAQ – Frequently Asked Questions About the Patchwork Butterfly Pattern
Is the Patchwork Butterfly Pattern suitable for beginners? Yes. A beginner with basic knowledge of straight stitching and simple appliqué can complete this project successfully. The most important beginner-friendly approach is to prepare paper templates before cutting the fabric and arrange every piece on the background before sewing. Raw-edge appliqué is especially approachable because it eliminates the need to turn tiny seam allowances underneath curved pieces.
What is the best fabric for patchwork butterfly wings? Quilting cotton is one of the best choices because it is stable, easy to cut, widely available in many prints, and simple to stitch. Small-scale patterns are particularly effective because they remain visible even when the fabric is cut into small sections. Cotton scraps from previous quilting projects can also be combined successfully.
Do I need a sewing machine to make this project? No. The entire butterfly can be assembled by hand if desired. Hand-sewn blanket stitches can produce an attractive decorative outline around the wings. However, a sewing machine makes the process quicker, especially when attaching multiple raw-edge sections and quilting the background.
How do I stop raw appliqué edges from fraying too much? Stitch close enough to the outer edge to stabilize the fabric while still leaving a small margin for controlled texture. A second line of stitching can provide additional security. If you prefer no fraying at all, use fusible appliqué and a satin, zigzag, or blanket stitch around the perimeter.
Should both butterfly wings be exactly identical? They should have approximately the same silhouette and proportions, but the project does not require mathematical perfection. Slight differences are natural in handmade appliqué. Creating one set of paper templates and flipping them for the opposite side is the easiest way to achieve balanced wings.
Can I use different fabrics from those shown in the example? Absolutely. Fabric selection is one of the most creative parts of the Patchwork Butterfly Pattern. Polka dots, checks, stripes, florals, paisley, solids, batiks, and vintage-inspired cottons can all work. For visual harmony, repeat at least one color throughout several wing sections.
Can fusible web be used for the butterfly appliqué? Yes. Lightweight fusible web can keep small wing sections from moving while they are stitched. Follow the manufacturer’s instructions for the fusible product you have chosen, and test it on scrap fabric before applying it to the final project.
What can I use instead of felt for the butterfly body? Wool fabric, fleece, velvet, chenille, textured cotton, or even layered quilting fabric can be used. A dimensional material creates an especially attractive contrast against the flatter cotton wings. If necessary, thin batting can be placed beneath ordinary fabric to create additional volume.
How large should I make the butterfly? There is no mandatory size. A medium butterfly can fit comfortably on a background measuring approximately 16 x 16 in (41 x 41 cm), but the templates can be enlarged or reduced. When resizing the pattern, resize all wing and body pieces by the same percentage so the proportions remain consistent.
Can this pattern be included in a larger quilt? Yes. The completed butterfly can become an individual quilt block and be combined with flowers, leaves, other butterflies, traditional patchwork blocks, or solid fabric sections. When planning a larger quilt, keep dimensional decorations relatively low-profile if the quilt will be used on a bed.
How can I make the design easier to wash? Use washable cotton fabrics, secure every appliqué piece with stitching, and avoid loosely attached embellishments. Embroidered flowers may be more practical than raised flowers for projects that require regular laundering. Gentle washing can also help preserve intentionally textured raw edges.
Why is color balance important in a Patchwork Butterfly Pattern? Because several prints appear close together, good color balance keeps the design visually organized. Repeating colors on both sides creates unity, while contrasting prints define individual wing sections. Symmetry allows you to combine multiple patterns without making the butterfly appear chaotic.
Conclusion
The Patchwork Butterfly Pattern combines many enjoyable sewing techniques in one accessible and highly customizable project. Beginning with a simple quilted background, you can build symmetrical wings from colorful fabric scraps, secure them with decorative raw-edge appliqué, create a dimensional central body, shape delicate antennae, and finish the lower wings with embroidered felt leaves and small flowers. Each stage contributes a different texture, turning basic pieces of fabric into a detailed butterfly that feels warm, handcrafted, and full of personality.
One of the most valuable lessons from this project is that successful patchwork does not depend on using exactly the same fabrics as another maker. Understanding proportion, symmetry, contrast, secure stitching, and thoughtful fabric placement allows you to recreate the structure while developing your own interpretation. Whether you choose cheerful country prints, romantic florals, modern solids, vintage scraps, or seasonal colors, the same Patchwork Butterfly Pattern can produce remarkably different results.
EASILY FIND THE FREE PDF FOR THIS PATTERN HERE!
Once completed, the butterfly can decorate a quilt block, pillow, wall hanging, tote bag, table runner, or many other handmade fabric projects. The combination of patchwork, raw-edge appliqué, quilting, dimensional embellishment, and decorative hand stitching also makes this an excellent project for practicing several sewing skills without requiring a very large amount of fabric. If you make your own version of this Patchwork Butterfly Pattern, leave your sincere opinion about the project and share your suggestions. Which fabric combination would you choose for the wings, and what detail would you add to make your butterfly completely unique? Your ideas can inspire new variations and creative possibilities for this beautiful patchwork design.