
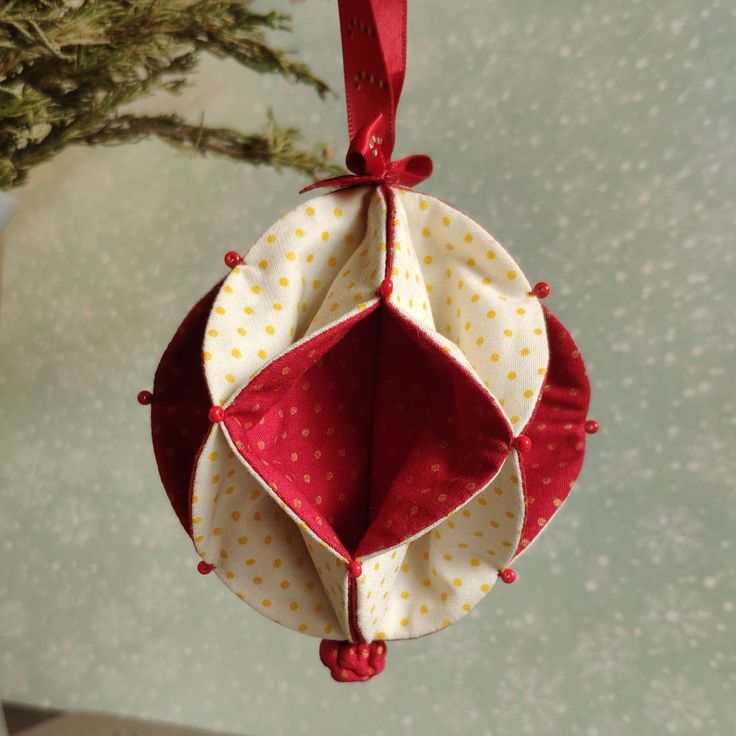
The Fabric Christmas Ornament Pattern is a charming sewing project that turns simple pieces of cotton fabric into a dimensional Christmas decoration with a beautiful handmade appearance. The ornament shown in the photo combines contrasting red and cream fabrics, small dotted prints, folded fabric sections, decorative beads or pins, and a red hanging ribbon. Its rounded shape gives it the appearance of a soft Christmas bauble, while the folded sections create depth and an almost geometric flower-like effect. This project is especially attractive for anyone who enjoys Christmas sewing projects, fabric crafts, patchwork, and handmade holiday decorations. It can be made with fabric scraps, which also makes it an excellent way to use leftover materials from quilting projects. Once you understand how the circles are prepared, folded, and joined together, the construction becomes surprisingly approachable.
Another reason the Fabric Christmas Ornament Pattern works so well as a seasonal project is the opportunity to customize every detail. Traditional Christmas colors such as red, cream, gold, forest green, and burgundy create a classic appearance, but modern combinations can look equally beautiful. You could use pastel fabrics for a softer ornament, blue and silver prints for a winter theme, or several coordinating scraps for a colorful patchwork version. The most important design principle is contrast because the folded construction reveals both the outer and inner fabrics at the same time. Using two fabrics that are clearly different makes the three-dimensional sections easier to see. Small prints, dots, tiny stars, and subtle metallic patterns are particularly suitable because the pieces are relatively small and detailed.
This tutorial explains a practical method for recreating the appearance of the ornament in the photograph while keeping the construction understandable for home sewists. Because an exact commercial template cannot be determined from a finished photograph alone, the measurements below are suggested dimensions that produce a similar result rather than claiming to reproduce an unknown original pattern exactly. The project can be sewn mainly by hand, although a sewing machine can speed up the preparation of the individual sections. Basic sewing experience is useful, but advanced quilting skills are not required. Careful cutting, consistent seam allowances, accurate marking, and firm hand stitches will make the greatest difference. By following the process gradually, you can create a polished handmade fabric Christmas ornament that is suitable for decorating a Christmas tree, adding to a holiday wreath, or giving as a handmade gift.
Materials and Preparation for the Fabric Christmas Ornament Pattern
Start by gathering two coordinating cotton fabrics. For a look similar to the photograph, choose a deep red fabric for the darker sections and a cream or white fabric with tiny gold or yellow dots for the contrasting sections. Quilting cotton is an excellent choice for this Fabric Christmas Ornament Pattern because it is lightweight enough to fold neatly but stable enough to maintain its shape. Avoid fabrics that are extremely thick because several layers will eventually meet at the same points.
DISCOVER MORE FREE PATTERNS HERE!
You will also need matching sewing thread, a hand-sewing needle, fabric scissors, removable fabric marker, ruler, ribbon, and optional decorative beads. A small amount of lightweight fusible interfacing can be useful when working with very soft cotton, although it is not always necessary. If you want the ornament to feel slightly firmer, choose a thin interfacing rather than heavy batting. Bulky materials can make the final assembly difficult.
For a finished ornament approximately 10 to 12 cm across, prepare several circles measuring roughly 9 to 10 cm in diameter. The exact number depends on the folding and joining arrangement you choose, but six to eight prepared circular units can create a full dimensional ornament similar to the example. Creating one test piece before cutting all your fabric is helpful because you can adjust the circle size if you want a smaller or larger decoration.
Create a reusable circle template from cardboard or template plastic. Place it on the wrong side of the fabrics and trace carefully around the edge. Accuracy is important because every section needs to fit together consistently. Cut an equal number of circles from each contrasting fabric if each unit will have one color on either side. This method creates reversible fabric circles that show different colors when they are folded.
Place one red circle and one cream circle with their right sides facing each other. Stitch around the outside using approximately a 0.6 cm seam allowance, leaving a small opening of about 3 cm for turning. If you are sewing by machine, reduce the stitch length slightly around the curved edge for better control. Before turning, clip or notch the seam allowance carefully without cutting through the stitching.
Turn each circle right side out through the opening. Smooth the seam gently with your fingers or a blunt turning tool, then press the circle with an iron. Turn the raw edges of the opening toward the inside and close them with a small ladder stitch. Repeat the process until all the fabric circles are completed. These clean, double-sided circles form the foundation of the entire Fabric Christmas Ornament Pattern.
How to Fold and Shape the Dimensional Fabric Sections
Once the circles are prepared, identify the center of each one. Folding the circle gently into quarters is an easy way to locate the center without drawing heavy markings on the fabric. Make a tiny removable mark where the folds cross. Consistent center points help keep the finished ornament symmetrical, especially when several folded sections meet together.
Choose which fabric you want to appear most prominently on the outside. In the ornament shown, the cream fabric creates bright curved sections while the red fabric appears strongly inside the folded openings. Position your circle accordingly before making the folds. Testing one circle first allows you to confirm which color will appear where before completing all the remaining pieces.
Fold opposite edges of the circle toward the center, creating smooth curved flaps. Depending on how tightly you fold them, the resulting piece will resemble a soft square or four-petal shape inside the original circle. Do not press the folds completely flat if you want the finished ornament to retain the rounded dimensional appearance visible in the photograph. The gentle volume created by the folds is part of the design.
Secure the folded points temporarily with pins, small clips, or a few hand stitches. If decorative beads are being used, they can eventually be placed at some of these joining points. The red accents in the photograph emphasize the geometry of the ornament and add a traditional Christmas touch. Beads are decorative rather than essential, so the design can also be finished entirely with stitching.
Repeat the same folding method on every circle. Place the completed sections next to one another as you work and compare their size and shape. This simple check prevents one unit from being significantly tighter or looser than the others. Consistency is especially important for a 3D fabric Christmas ornament because small differences become more noticeable once the sections are assembled into a sphere.
If your fabric does not hold the fold easily, use gentle steam from the iron while avoiding extremely sharp creases. The goal is to encourage the fabric to maintain the shape without removing all of its softness. When finished, each unit should have defined folded edges, an attractive contrast between the two fabrics, and enough flexibility to curve naturally during assembly.
Step-by-Step Assembly of the Christmas Ornament
Begin the assembly by positioning two prepared units side by side. Align their edges carefully and join them at selected points with strong hand stitches. Rather than sewing the entire curved edge together, attach the pieces where the design naturally meets. This point-to-point construction helps preserve the open, dimensional spaces that make the Fabric Christmas Ornament Pattern visually interesting.
Add another section next to the first two and continue stitching the corresponding points together. Work slowly and check the front and back of the project frequently. At this stage, the ornament will begin to curve naturally. That curvature is desirable because the flat folded units must gradually form a rounded Christmas bauble.
Continue adding the remaining sections around the ornament. Alternate the direction of the folds when necessary so that the red and cream sections create a balanced pattern. Before making permanent stitches, hold several units together with clips and study the overall arrangement. This simple dry-fitting process can prevent having to remove stitches later.
As the sphere begins to close, reinforce the central connection points. Several layers of fabric may meet in these areas, so use a sturdy hand-sewing needle and strong polyester or quilting thread. Take multiple small stitches rather than one large stitch. Small stitches provide better control and are easier to conceal within the seams and folds.
Decorative beads can now be added where the sections intersect. Choose small beads that complement the fabrics rather than overpowering them. Red beads work beautifully with cream and red fabric, while gold beads could add extra sparkle to a more elegant version. Stitch every bead securely, especially when the ornament will be stored and reused for several holiday seasons.
Before completely closing the upper section, prepare the hanging loop. Cut approximately 18 to 22 cm of ribbon, depending on how long you want the hanger to be. Fold the ribbon in half and insert the raw ends securely into the top joining point. Stitch through the ribbon several times. A small bow can then be tied around the base of the loop, recreating the decorative red ribbon detail seen in the photograph.
Finishing, Decorating, and Customizing Your Fabric Christmas Ornament Pattern
After assembly, gently reshape the ornament with your hands. Adjust the folded sections so they are evenly spaced and the central openings appear symmetrical. Because this is a textile decoration, a small amount of variation adds handmade character. However, significant unevenness can usually be corrected by repositioning a few stitches before the final knots are secured.
Check every joining point carefully. Reinforce any areas that feel loose, especially the hanging loop. The top of the ornament carries its entire weight when displayed, so secure stitching is important. Hide thread knots between fabric layers whenever possible. This gives the Fabric Christmas Ornament Pattern a professional finish from every viewing angle.
You can personalize the ornament with embroidery, metallic thread, tiny bells, wooden beads, buttons, or decorative stitching. Keep embellishments lightweight so they do not distort the fabric shape. If children or pets may handle the decoration, consider avoiding small detachable beads and use embroidered details instead. This provides a simpler finish while preserving the handmade style.
Fabric selection can completely transform the same Christmas ornament sewing pattern. Red and green create a traditional holiday decoration, while white and gold offer a sophisticated look. Blue and silver fabrics work beautifully for winter décor. Scrappy fabrics can create a cheerful patchwork ornament, and coordinated farmhouse prints provide a rustic appearance.
These ornaments can also become thoughtful handmade gifts. Create several using different fabric combinations and place them in small gift boxes, or personalize each ornament with an embroidered initial or year. They can be used as tree decorations, gift toppers, wreath accents, table decorations, or seasonal keepsakes. A collection made from leftover fabrics from family sewing projects can even become a meaningful memory set.
For storage, avoid crushing the finished ornament underneath heavier decorations. Place it in a small box or wrap it loosely in tissue paper before storing it with other Christmas items. Proper storage helps the folded sections retain their dimensional shape. When cared for well, a handmade Fabric Christmas Ornament Pattern project can return to the Christmas tree year after year.
Frequently Asked Questions About the Fabric Christmas Ornament Pattern
What is a Fabric Christmas Ornament Pattern? A Fabric Christmas Ornament Pattern is a sewing design used to create decorative Christmas ornaments from fabric rather than glass, plastic, or metal. Many designs use patchwork, appliqué, folding, quilting, or dimensional sewing techniques. The version explained here uses double-sided fabric circles that are folded and connected to create a rounded three-dimensional decoration.
What is the best fabric for making this ornament? Quilting cotton is generally one of the easiest materials to use. It cuts accurately, presses well, and is available in countless Christmas prints. Medium-light cotton also folds more cleanly than upholstery fabric, fleece, or other bulky textiles. Small-scale prints usually work particularly well because the decorative sections of the ornament are relatively compact.
Can beginners make this Fabric Christmas Ornament Pattern? Yes. A patient beginner who can sew a basic seam and simple hand stitches can complete the project. The most important skills are accurate cutting, careful turning, consistent folding, and secure hand stitching. Making one practice unit before assembling the full ornament is an excellent way to become familiar with the technique.
Do I need a sewing machine? No. The entire ornament can be sewn by hand if preferred. A sewing machine simply makes the initial construction of the double-sided circles faster. The final assembly is often easier to control with hand stitching because the pieces must be joined at specific dimensional points.
How large should the fabric circles be? Circles around 9 to 10 cm in diameter are a practical starting point for an ornament approximately 10 to 12 cm across, depending on the folding method and number of sections used. These measurements are adjustable. Smaller circles create miniature decorations, while larger circles can produce statement ornaments.
Can I make the ornament without beads? Absolutely. Beads are optional decorative accents. You can replace them with small stitches, embroidery knots, tiny buttons, or simply leave the joining points unembellished. Removing beads may also be preferable when the decoration will be used around small children or curious pets.
Should batting be placed inside the fabric pieces? Usually it is not necessary. The layered cotton and folded construction already provide structure. If the fabric feels too soft, lightweight interfacing can be added. Thick batting may make the folds bulky and can make accurate assembly more difficult.
How can I make the ornament look more professional? Use an accurate circle template, maintain the same seam allowance on every unit, press carefully, keep the folds consistent, and hide your thread knots. Also check the ornament from several angles during assembly. Symmetry and clean finishing usually have a greater visual impact than adding many embellishments.
Can fabric scraps be used for this project? Yes, and this is one of the best advantages of the pattern. Small leftovers from quilting and sewing projects can be combined into unique ornaments. Try choosing scraps that share one common color so the final design still feels coordinated.
Can I wash a finished fabric Christmas ornament? Gentle spot cleaning is preferable for dimensional ornaments, especially when beads, ribbons, or interfacing are present. Full washing can distort the folds or change the shape. Keeping the ornament protected during storage will reduce the need for cleaning.
Conclusion
The Fabric Christmas Ornament Pattern is a creative way to combine simple sewing techniques with dimensional fabric folding. Starting with contrasting cotton circles, you can create reversible pieces, fold them into decorative shapes, connect them carefully, add beads or stitching, and finish everything with a secure ribbon loop. The red and cream combination inspired by the photographed project gives the ornament a warm traditional Christmas appearance, but the same construction can be adapted to countless fabrics and decorating styles.
EASILY FIND THE FREE PDF FOR THIS PATTERN HERE!
More importantly, this project shows how a relatively small amount of fabric can become something special when color, folding, and hand stitching are combined thoughtfully. Whether you make one ornament as a weekend sewing project or create an entire collection for your Christmas tree, the Fabric Christmas Ornament Pattern offers plenty of room for personal creativity. If you make your own version, leave your honest opinion about the project and share your suggestions. Your ideas about fabric combinations, colors, embellishments, or different ways to customize the ornament can inspire even more beautiful handmade Christmas creations.