
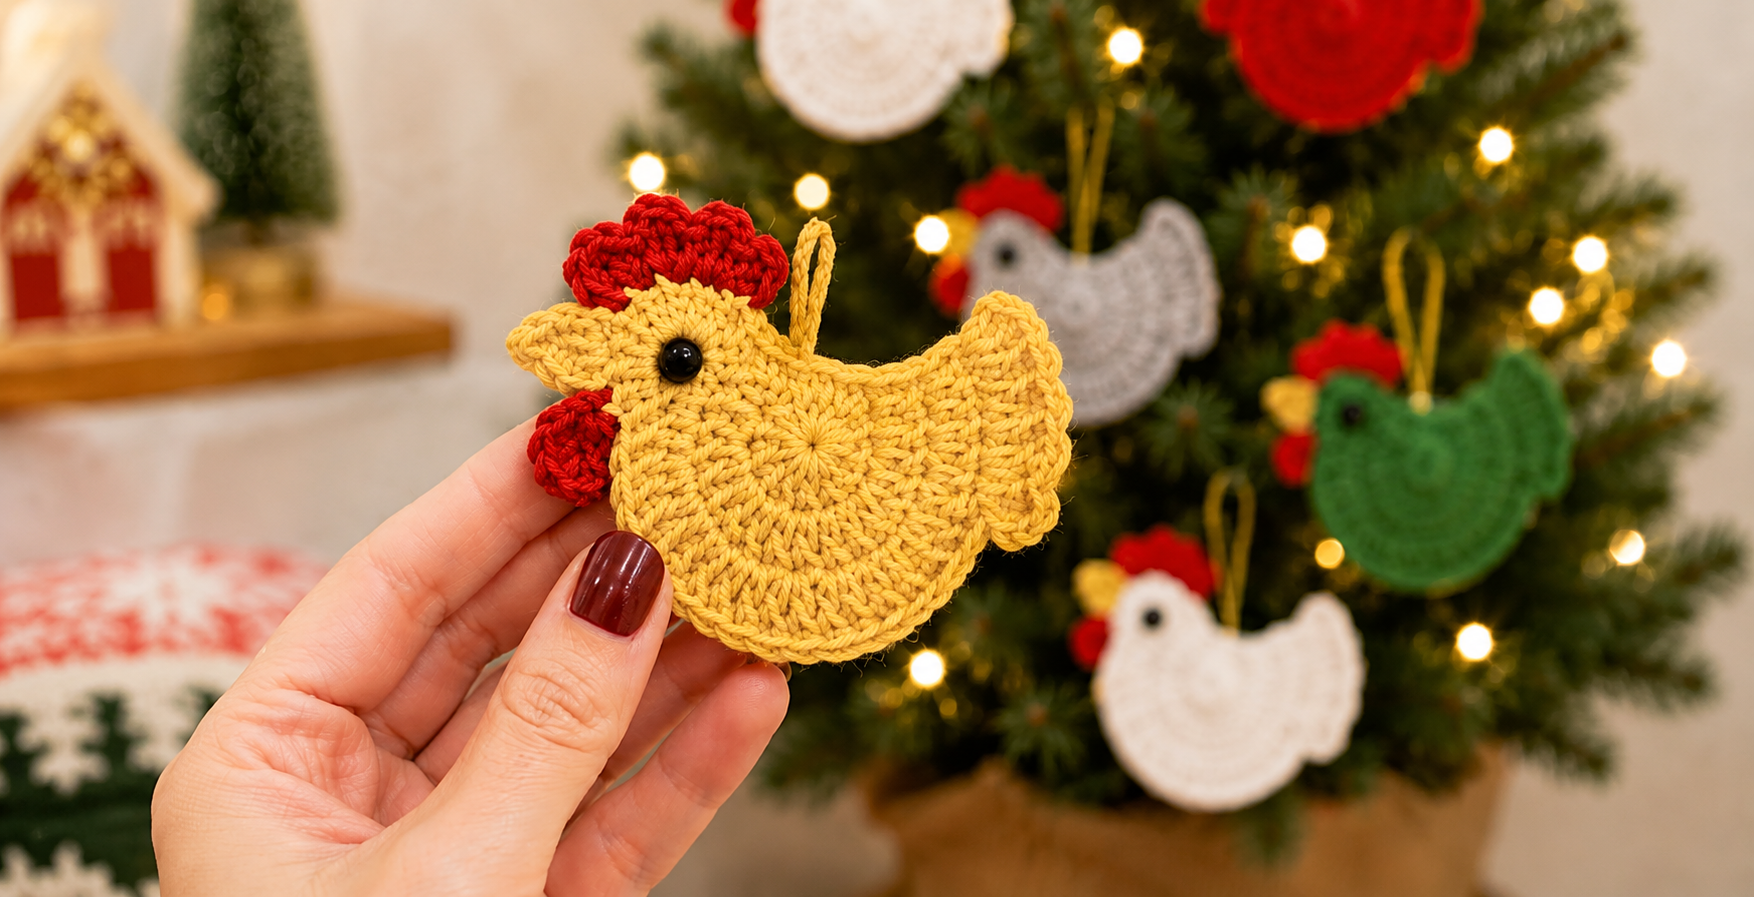
The Crochet Christmas Ornaments Pattern is a charming way to bring handmade warmth to holiday decorating while practicing useful crochet techniques in a project that can be completed with relatively small amounts of yarn. Inspired by the cheerful crocheted chicken ornament shown in the image, this pattern combines a rounded body, a shaped tail, a small beak, a red comb and wattle, and a simple hanging loop. The result is a lightweight Christmas decoration that can be placed on a tree, attached to a holiday garland, used as a gift topper, or included in a handmade seasonal collection. Because the project is compact, it is also a practical opportunity to work on consistent tension, shaping, increases, decreases, color changes, and neat finishing. Throughout this guide, the Crochet Christmas Ornaments Pattern is explained with standard crochet abbreviations so that you can understand how the stitches work together rather than simply copying a sequence without knowing its purpose.
Before beginning this Crochet Christmas Ornaments Pattern, gather a small amount of medium or light worsted cotton yarn in mustard yellow or golden yellow for the chicken, red yarn for the comb and wattle, and a tiny amount of black material for the eye. A crochet hook around 3.0 to 3.5 mm works well for a firm ornament, although the exact size can be adjusted according to your yarn and tension. You will also need scissors, a yarn needle, a removable stitch marker, and either a small black safety eye or an embroidered eye. When an ornament may be accessible to very young children or pets, an embroidered eye is the safer decorative choice because it eliminates a detachable plastic component. The finished piece does not need to match an exact gauge, but dense stitches are preferable because they help the ornament keep a defined silhouette and make the decorative details easier to position.
It is helpful to understand the crochet “keys,” or stitch abbreviations, before working the pattern. In this tutorial, ch means chain, sl st means slip stitch, sc means single crochet, hdc means half double crochet, dc means double crochet, inc means increase by working two stitches into the same stitch, and dec means decrease by combining two stitches. The notation st/sts refers to stitch or stitches, FO means fasten off, and a sequence placed inside parentheses is usually repeated as indicated. These crochet keys are important because they make a written Crochet Christmas Ornaments Pattern shorter, clearer, and easier to follow. Once you understand the abbreviations, you can concentrate on the shaping itself and see how increases create the chicken’s rounded body while taller stitches and strategically placed decreases create the neck, back, and tail.
Materials, Crochet Keys, and Preparing the Ornament
Choose yarn with a smooth texture so the individual stitches of your Crochet Christmas Ornaments Pattern remain visible. Cotton yarn is especially attractive for ornaments because it creates crisp stitch definition and holds its shape nicely. Acrylic can also be used and may produce a slightly softer result. For a traditional holiday appearance, combine golden yellow with rich red accents, although cream, green, white, rust, or even pastel shades can create entirely different personalities.
DISCOVER MORE FREE PATTERNS HERE!
The main crochet keys are worth practicing before starting. A ch is created by pulling yarn through the loop already on your hook. A sl st is made by inserting the hook into a stitch, pulling up a loop, and immediately pulling that loop through the loop already on the hook. Because a slip stitch adds almost no height, it is ideal for joining rounds and moving discreetly across a section of crochet.
The sc, or single crochet, is one of the most important stitches in this ornament. Insert the hook into the designated stitch, yarn over, pull up a loop, yarn over again, and pull through both loops. Single crochet creates a compact fabric that works beautifully around the chicken’s head, beak, comb attachment points, and finishing edges.
The hdc, or half double crochet, adds a little more height. Yarn over first, insert the hook into the stitch, yarn over and pull up a loop, then yarn over once more and pull through all three loops. Half double crochet is especially useful when you need to create a gentle transition between shorter single crochet stitches and taller double crochet stitches.
For a dc, or double crochet, yarn over, insert the hook into the stitch, yarn over and pull up a loop. Yarn over and pull through two loops, then yarn over and pull through the remaining two. Double crochet produces height quickly and is useful for building the rounded lower body and decorative tail sections of this Crochet Christmas Ornaments Pattern.
An increase means working two stitches into one stitch, which expands the fabric. A decrease does the opposite by combining stitches and narrowing the shape. These two techniques are the foundation of crochet shaping. Keep your tension comfortable rather than extremely tight, because you will need enough flexibility to insert the hook smoothly while still producing a firm ornament.
Step-by-Step Crochet Pattern for the Chicken Body
Begin the body with a magic ring, or make ch 4 and join with a sl st to create a small ring if you prefer. For Round 1, work 12 dc into the center of the ring and join with a slip stitch. Pull the starting ring closed firmly. This small circular center becomes the foundation of the chicken’s body and gives the ornament the radiating stitch appearance visible in many round crochet motifs.
For Round 2, ch 2, then work 2 dc in each st around. Join with a sl st. You should now have approximately 24 stitches. This round dramatically expands the circle and establishes the broad middle portion of the bird. Do not worry if the circle curves very slightly; gentle blocking at the end will help flatten the finished ornament.
For Round 3, begin with ch 2, then repeat 1 dc in the next st, 2 dc in the following st around the circle. Join with a slip stitch. This controlled increase creates a larger disk without excessive ruffling. Depending on yarn thickness and your preferred ornament size, you may stop after this round or add another partial round to enlarge the lower body.
Instead of completing every following round as a perfect circle, begin shaping the upper part of the chicken. Work a combination such as sc, hdc, dc, dc, hdc, sc across the upper-left portion to create a gradual neck and head transition. Continue around the lower body with taller stitches where more depth is needed. The idea behind this Crochet Christmas Ornaments Pattern is to transform the original circle into a recognizable bird silhouette.
To create the tail, work several stitches into a small group near the rear of the body. One useful sequence is sc, hdc, 2 dc, hdc, sc worked across a few consecutive stitches. For a more pronounced feathered tail, place 3 dc into one stitch, slip stitch into the next, and repeat once or twice. These small crochet shells resemble individual tail feathers without requiring separate pieces.
Finish the main body by working sl sts along any area that needs a flatter contour, then FO, leaving a tail long enough for weaving. Use the yarn needle to weave the yarn securely through the back of several stitches. At this point, place the body flat and look at its silhouette. The lower section should appear rounded, the front should have room for a head and beak, and the rear should show a raised decorative tail.
Creating the Comb, Beak, Wattle, Eye, and Hanging Loop
The red comb gives this Crochet Christmas Ornaments Pattern much of its character. Join red yarn to the top of the chicken’s head. In the first stitch, work ch 2, 2 dc, ch 2, sl st into the same general area. Repeat this small shell two or three times across the top. Each shell creates one rounded section of the comb. Keep the motifs compact so they remain proportional to the body.
For the red wattle under the beak, attach red yarn near the front lower section of the head. Work ch 3, then make 2 hdc or 2 dc into the same attachment point and finish with a slip stitch. A second small lobe can be added beside the first. The exact stitch count is less important than creating a balanced shape that complements the comb.
The beak can be crocheted directly into the edge of the head using yellow, gold, or orange yarn. Attach the yarn near the front of the face, ch 3, then work sl st into the second ch from hook and sc into the next ch. Slip stitch back into the body. This produces a tiny pointed beak. For a slightly larger beak, use four chains and work progressively taller stitches.
Add the eye only after deciding exactly where the facial features look balanced. A small black bead or safety eye can give the ornament a polished appearance, while several short black embroidery stitches can create an equally attractive eye. If embroidering, bring the needle through from the back, make two or three compact stitches, and secure the yarn carefully on the reverse side.
For the hanging loop, attach the body-colored yarn near the upper back or directly behind the comb. Make approximately ch 18 to ch 24, depending on how long you want the hanger, then join the final chain back to the starting point with a sl st. Fasten off and weave in the ends. The loop should be large enough to slide easily over a Christmas-tree branch.
Before finishing, inspect all attachments. Gently pull the comb, wattle, beak, and hanging loop to confirm that every yarn end has been secured. Handmade ornaments are handled repeatedly when decorating and storing the tree, so careful finishing makes a significant difference. A sturdy Crochet Christmas Ornaments Pattern should look attractive from the front while remaining neat and secure on the back.
Finishing, Blocking, Variations, and Decorating Ideas
Blocking helps the final chicken ornament appear clean and professional. Lightly dampen the crochet piece, reshape the body with your fingers, and place it flat on a towel or blocking surface. Adjust the tail, beak, comb, and lower curve so the silhouette is clearly defined. Allow the ornament to dry completely before hanging or storing it.
If the edges curl, avoid immediately changing your entire stitch count. Crochet circles may curl because of tension, hook size, yarn structure, or insufficient increases. Gentle blocking often solves minor curling. If the fabric forms a bowl before finishing, add slightly more increases. If it becomes heavily ruffled, reduce the number of increases in the next attempt.
You can adapt the Crochet Christmas Ornaments Pattern into many color combinations. A white chicken with a red comb creates a snowy farmhouse look, while green and red versions coordinate with traditional Christmas décor. Cream, beige, gold, and burgundy create a rustic style, and soft pink, mint, or pale blue can be used for a playful modern holiday palette.
The same basic body can also become several different ornaments. Change the comb and beak to transform the circular base into another bird, or add tiny embroidered details such as wings, stars, snowflakes, or French knots. A decorative edging made with slip stitches in a contrasting yarn can highlight the silhouette while using very little additional material.
For gift presentation, a finished ornament can be tied to a wrapped package, placed inside a handmade Christmas card, or combined with several coordinating ornaments as a small seasonal set. Since each piece uses modest amounts of yarn, this project is also an effective way to use leftover yarn from larger crochet projects while creating something practical and decorative.
When storing the ornament after Christmas, keep it clean and completely dry. Place it flat or loosely inside a breathable storage container instead of compressing it beneath heavy decorations. If the ornament loses its shape during storage, lightly reshape and block it again before the next holiday season. With careful finishing and storage, a handmade Crochet Christmas Ornaments Pattern can become part of your seasonal decorating tradition for years.
Frequently Asked Questions About the Crochet Christmas Ornaments Pattern
What skill level is suitable for this pattern?
This project is best suited to confident beginners or intermediate crocheters. A beginner who understands ch, sl st, sc, hdc, dc, increases, and basic joining should be able to complete it. The most challenging part is not the individual stitches but understanding how different stitch heights create the chicken silhouette.
What yarn is best for crochet Christmas ornaments?
Cotton yarn is an excellent option because its stitches remain well defined and the finished fabric tends to hold its shape. Acrylic yarn also works well and is widely available. For a compact ornament, avoid extremely bulky yarn unless you intentionally want a much larger finished piece.
What crochet hook should I use?
A hook between approximately 3.0 mm and 3.5 mm is a useful starting range for light worsted or similar yarn. The best hook depends on your yarn and personal tension. If the stitches look loose, try a slightly smaller hook. If the fabric feels extremely stiff and difficult to work, increase the hook size slightly.
How large will the finished chicken ornament be?
Finished dimensions depend on yarn weight, hook size, tension, and how many expansion rounds you crochet. With common medium-weight craft yarn and a small hook, you can expect a compact ornament that fits comfortably in the palm of your hand. Because gauge is not critical for decorative ornaments, you can easily scale the design.
Can I make the ornament larger?
Yes. Continue increasing the circular body before beginning the shaping sections. Another simple method is to use thicker yarn and a larger crochet hook. Remember that the comb, beak, wattle, eye, and hanging loop should also be enlarged proportionally.
Can I make the ornament smaller?
Yes. Use thinner yarn and a smaller hook or stop the circular body after fewer rounds. When making mini ornaments, simplify the comb and tail because too many decorative stitches may overwhelm the smaller body.
Why is my crochet ornament curling?
Mild curling can be caused by tight tension and often improves with blocking. Strong curling may indicate that the circle needs more increases. On the other hand, if the body ripples dramatically, there may be too many increases. Adjust gradually rather than changing many stitches at once.
Do I need stuffing for this Crochet Christmas Ornaments Pattern?
No. This particular version is designed as a flat crochet ornament and does not require stuffing. Its flat construction keeps it lightweight, which is especially convenient for Christmas-tree branches and garlands.
Can the eye be embroidered instead of using a bead?
Absolutely. A small embroidered black eye works beautifully and keeps the project entirely yarn-based. Embroidery is also preferable when creating decorations that could be handled by very young children, since there is no detachable bead or plastic eye.
How can I make both sides look neat?
Weave yarn ends through stitches of the same color and avoid carrying contrasting yarn across visible sections. When attaching decorative pieces, make small securing stitches and hide knots beneath dense crochet stitches whenever possible. Careful finishing makes a handmade ornament look polished from multiple angles.
Can I sell ornaments made from this type of design?
Handmade crochet ornaments can be attractive items for craft collections, gifts, or seasonal displays. If you are working from a specific third-party commercial pattern, always respect that designer’s stated terms. When making your own interpretation or original pattern, accurate descriptions and clear photographs help people understand what they are receiving.
How long does one ornament take to crochet?
Time varies greatly with experience. Once the stitch sequence becomes familiar, a small flat ornament can be completed much faster than a large stuffed crochet project. Making several at the same time can also improve efficiency because you repeat the same body and decorative components in batches.
Can beginners use stitch markers with this pattern?
Yes, and doing so is recommended. Place a marker at the beginning of a round or at important shaping points. This makes it easier to count increases and identify where the head, tail, or decorative sections should begin.
What does “2 dc in the same stitch” mean?
It means you work two complete double crochet stitches into one base stitch. This is an increase. It adds width to the fabric and is one of the main techniques used to expand the circular chicken body.
What is the difference between sc, hdc, and dc in the shaping?
These stitches have different heights. Single crochet is short, half double crochet is medium height, and double crochet is taller. Combining them allows the edge to rise or fall gradually, which is especially useful when shaping the chicken’s back, head, neck, and tail.
Conclusion
The Crochet Christmas Ornaments Pattern demonstrates how a simple circular crochet foundation can develop into a distinctive holiday decoration through thoughtful shaping and small decorative details. Starting with a central ring and rounds of double crochet increases, you create the rounded body before using sc, hdc, dc, slip stitches, increases, and shaped clusters to establish the head and tail.
You also learned how the main crochet keys work, including ch, sl st, sc, hdc, dc, inc, dec, st, sts, and FO. Understanding these abbreviations is valuable beyond this individual project because the same terminology appears in countless written crochet patterns. Knowing what each stitch does also makes it easier to modify a design instead of depending completely on exact instructions.
The finishing stages transform the basic crochet body into a cheerful chicken ornament. A red crocheted comb and wattle, small pointed beak, carefully positioned eye, decorative tail, and secure hanging loop give the piece its personality. Blocking then helps define the final shape and improves the overall appearance of the stitches.
One of the greatest advantages of this Crochet Christmas Ornaments Pattern is its flexibility. You can experiment with yarn colors, change the ornament size, simplify or enlarge the tail, create coordinated sets, or adapt the basic construction into other seasonal birds. Each variation provides another opportunity to practice crochet while producing a decoration with a handmade character that factory-made ornaments cannot duplicate.
Whether you make one chicken for your own Christmas tree or prepare an entire collection as handmade gifts, the project combines creativity with useful crochet practice. If you try this Crochet Christmas Ornaments Pattern, leave your sincere opinion about the project and share your suggestions for colors, details, or other Christmas ornaments you would like to create next. Your ideas can inspire even more creative variations for the holiday season.